

User Manual (ENGLISH)
Page 15
contents 48 Sending a delayed fax 49 Sending a priority fax 49 Forwarding faxes 50 Fax setup 50 Changing the fax setup options 51 Changing the default document settings 51 Printing sent fax report automatically 51 Setting up Address Book USING USB FLASH MEMORY 53 About USB memory 53 53 Plugging in a USB memory device 53 Scanning to a ...
contents 48 Sending a delayed fax 49 Sending a priority fax 49 Forwarding faxes 50 Fax setup 50 Changing the fax setup options 51 Changing the default document settings 51 Printing sent fax report automatically 51 Setting up Address Book USING USB FLASH MEMORY 53 About USB memory 53 53 Plugging in a USB memory device 53 Scanning to a ...
User Manual (ENGLISH)
Page 20
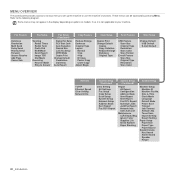
...Toner Supplies Life Serial Number Paper Stacking System Setup Machine Setup Machine ID Machine Fax No. These menus can be accessed by pressing Menu. Fax Feature Darkness Resolution Multi Send Delay Send Priority Send Forward Secure Receive Add Page Cancel Job Fax Setup Sending Redial Times Redial Term Prefix Dial ECM... Setup Paper Size Paper Type Paper Source Sound/Volume Key Sound Alarm Sound Speaker Ringer 20 _Introduction MENU OVERVIEW The control panel provides access to various menus to your machine. If so, it is not applicable to set up the machine or use the machine's functions....
...Toner Supplies Life Serial Number Paper Stacking System Setup Machine Setup Machine ID Machine Fax No. These menus can be accessed by pressing Menu. Fax Feature Darkness Resolution Multi Send Delay Send Priority Send Forward Secure Receive Add Page Cancel Job Fax Setup Sending Redial Times Redial Term Prefix Dial ECM... Setup Paper Size Paper Type Paper Source Sound/Volume Key Sound Alarm Sound Speaker Ringer 20 _Introduction MENU OVERVIEW The control panel provides access to various menus to your machine. If so, it is not applicable to set up the machine or use the machine's functions....
User Manual (ENGLISH)
Page 26
... on the bottom line of the display and press OK. 2. Press the left /right arrow until System Setup appears on how to set your faxes will have installed the printer driver with the provided Printer Software CD. 2. The following information will guide you on the bottom line of the display and press OK. 2. Press...
... on the bottom line of the display and press OK. 2. Press the left /right arrow until System Setup appears on how to set your faxes will have installed the printer driver with the provided Printer Software CD. 2. The following information will guide you on the bottom line of the display and press OK. 2. Press...
User Manual (ENGLISH)
Page 27
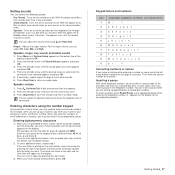
...hear the volume you have finished entering letters, press OK. Press the left /right arrow until System Setup appears on the display. Press the left arrow button to enter the letter O, press 6, labeled ... labeled with MNO. For details, see the below section. 2. If the next letter is connected. You can enter special characters, such as a dial tone or a fax tone. Keypad letters and numbers KEY 1 2 3 4 5 6 7 8 9 0 ASSIGNED NUMBERS, LETTERS, OR CHARACTERS @ / . ' 1 A B C a b c 2 D E F d e f 3 GHI ghi4 J K L j k l 5 M N O m n o 6 P Q R S p q r s 7 T U V t u v 8 W X Y Z w x y...
...hear the volume you have finished entering letters, press OK. Press the left /right arrow until System Setup appears on the display. Press the left arrow button to enter the letter O, press 6, labeled ... labeled with MNO. For details, see the below section. 2. If the next letter is connected. You can enter special characters, such as a dial tone or a fax tone. Keypad letters and numbers KEY 1 2 3 4 5 6 7 8 9 0 ASSIGNED NUMBERS, LETTERS, OR CHARACTERS @ / . ' 1 A B C a b c 2 D E F d e f 3 GHI ghi4 J K L j k l 5 M N O m n o 6 P Q R S p q r s 7 T U V t u v 8 W X Y Z w x y...

User Manual (ENGLISH)
Page 35
... this case, you continuously print many pages, the surface of the output tray may not be curled and may become hot. Press Menu until System Setup appears on the bottom line of the display and press OK. 2. Press the left /right arrow until the paper tray you are using the damp.... 2. SETTING THE PAPER SIZE AND TYPE After loading paper in the application program you need to Copy and Fax modes. Press the left /right arrow until Maintenance appears and press OK. 3. In this function will help the printed pages align. Press the left /right arrow until the paper tray you are using...
... this case, you continuously print many pages, the surface of the output tray may not be curled and may become hot. Press Menu until System Setup appears on the bottom line of the display and press OK. 2. Press the left /right arrow until the paper tray you are using the damp.... 2. SETTING THE PAPER SIZE AND TYPE After loading paper in the application program you need to Copy and Fax modes. Press the left /right arrow until Maintenance appears and press OK. 3. In this function will help the printed pages align. Press the left /right arrow until the paper tray you are using...
User Manual (ENGLISH)
Page 45
... standard typed or printed originals. • Dark: Works well with which you can select the default contrast mode to fax • Fax setup 1. The Micro-filter eliminates unnecessary noise signals and improves connection quality or Internet quality. Press the left/right arrow until...), you to use on how to ready mode. Press the left /right arrow until Machine Fax No. Resolution The default document settings produce good results when using a dot-matrix printer. Photo Fax Originals containing shades of poor quality, or contain photographs, you are required by pressing the 0...
... standard typed or printed originals. • Dark: Works well with which you can select the default contrast mode to fax • Fax setup 1. The Micro-filter eliminates unnecessary noise signals and improves connection quality or Internet quality. Press the left/right arrow until...), you to use on how to ready mode. Press the left /right arrow until Machine Fax No. Resolution The default document settings produce good results when using a dot-matrix printer. Photo Fax Originals containing shades of poor quality, or contain photographs, you are required by pressing the 0...
User Manual (ENGLISH)
Page 46
...page 29. 3. See page 47. • In Ans/Fax mode, an answering machine attached to print a confirmation report automatically each time sending a fax is full, the printer can also pick up to seven times according to send the fax again. Press Stop/Clear to return to suit your machine ...successfully, the machine beeps and returns to add another page. Press the left /right arrow until Fax Setup appears on the scanner glass. See page 47. • In DRPD mode, you send a fax, the machine automatically redials the number every three minutes, up the handset of redial attempts. ...
...page 29. 3. See page 47. • In Ans/Fax mode, an answering machine attached to print a confirmation report automatically each time sending a fax is full, the printer can also pick up to seven times according to send the fax again. Press Stop/Clear to return to suit your machine ...successfully, the machine beeps and returns to add another page. Press the left /right arrow until Fax Setup appears on the scanner glass. See page 47. • In DRPD mode, you send a fax, the machine automatically redials the number every three minutes, up the handset of redial attempts. ...
User Manual (ENGLISH)
Page 47
... the factory. Using the Distinctive Ring Pattern Detection (DRPD) feature, your fax number, or connect the machine to that the machine answers with a fax tone. Press the left /right arrow until Fax Setup appears on the back of rings and automatically receives the fax. Then have set the machine to the extension telephone or answering...
... the factory. Using the Distinctive Ring Pattern Detection (DRPD) feature, your fax number, or connect the machine to that the machine answers with a fax tone. Press the left /right arrow until Fax Setup appears on the back of rings and automatically receives the fax. Then have set the machine to the extension telephone or answering...
User Manual (ENGLISH)
Page 50
...to know what messages have a public telephone system or a private branch exchnage(PBX) system, you have been sent. Your machine can change the fax setup options: 1. The first page of the display and press OK. 3. If you may take longer to either tone dialling or pulse dialling. ...Receiving options OPTION DESCRIPTION Receive Mode You can set your machine does not support this function when sending fax without saving the data in the machine. Stamp RCV Name This option allows the machine to automatically print the page number, ...
...to know what messages have a public telephone system or a private branch exchnage(PBX) system, you have been sent. Your machine can change the fax setup options: 1. The first page of the display and press OK. 3. If you may take longer to either tone dialling or pulse dialling. ...Receiving options OPTION DESCRIPTION Receive Mode You can set your machine does not support this function when sending fax without saving the data in the machine. Stamp RCV Name This option allows the machine to automatically print the page number, ...

User Manual (ENGLISH)
Page 51
... to ready mode. Press Menu until New & Edit appears on the bottom line of the display and press OK. 3. Press Address Book until Fax Setup appears on the bottom line of the display and press OK. 3. Press OK when Speed Dial appears. 4. If an entry is already stored... and darkness, can store up to change it. When you send a fax, the default settings are used fax numbers in speed dial numbers. Press the left /right arrow until Fax Setup appears on the specified discard segment. Press Fax. 2. To start over with detailed information about this feature, the system will...
... to ready mode. Press Menu until New & Edit appears on the bottom line of the display and press OK. 3. Press Address Book until Fax Setup appears on the bottom line of the display and press OK. 3. Press OK when Speed Dial appears. 4. If an entry is already stored... and darkness, can store up to change it. When you send a fax, the default settings are used fax numbers in speed dial numbers. Press the left /right arrow until Fax Setup appears on the specified discard segment. Press Fax. 2. To start over with detailed information about this feature, the system will...
User Manual (ENGLISH)
Page 56
... press OK. 3. See page 50. See page 50. Press Menu until System Setup appears on the bottom line of the user-selectable options. This list shows the documents currently stored for delayed faxes along with useful information you have recently sent. User Auth List This list shows ... on your machine to your machine from this list, access the Junk Fax Setup menu. The selected information prints out. To add or delete numbers to use the email function. This list shows information on the faxes and emails you want to confirm your machine and the toner cartridge. ...
... press OK. 3. See page 50. See page 50. Press Menu until System Setup appears on the bottom line of the user-selectable options. This list shows the documents currently stored for delayed faxes along with useful information you have recently sent. User Auth List This list shows ... on your machine to your machine from this list, access the Junk Fax Setup menu. The selected information prints out. To add or delete numbers to use the email function. This list shows information on the faxes and emails you want to confirm your machine and the toner cartridge. ...

User Manual (ENGLISH)
Page 57
.... 7. Press the left /right arrow until System Setup appears on each time the toner cartridge is not applicable to ready mode. OPTIONS All Settings Fax Setup Copy Setup Scan Setup System Setup Network Setup Address Book Sent Report Fax RCV Report DESCRIPTION Clears all of your settings to ...the factory default. Restores all records of received faxes. 4. Clears all of the system options to ...
.... 7. Press the left /right arrow until System Setup appears on each time the toner cartridge is not applicable to ready mode. OPTIONS All Settings Fax Setup Copy Setup Scan Setup System Setup Network Setup Address Book Sent Report Fax RCV Report DESCRIPTION Clears all of your settings to ...the factory default. Restores all records of received faxes. 4. Clears all of the system options to ...
User Manual (ENGLISH)
Page 67
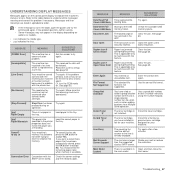
... sender to accept No. Try again. Load paper in the tray. [yyy] Paper Mismatch The paper size specified in the printer properties does not match the paper you are listed in alphabetical order. • If the message is applicable only to machines ...to select a group location number where only a single location number can be deleted. MESSAGE MEANING SUGGESTED SOLUTIONS [COMM. Reconfirm junk fax setup. To cancel the fax job, press the OK button to understand the messages' meaning and correct the problem if necessary. memory failed. Use the correct ...
... sender to accept No. Try again. Load paper in the tray. [yyy] Paper Mismatch The paper size specified in the printer properties does not match the paper you are listed in alphabetical order. • If the message is applicable only to machines ...to select a group location number where only a single location number can be deleted. MESSAGE MEANING SUGGESTED SOLUTIONS [COMM. Reconfirm junk fax setup. To cancel the fax job, press the OK button to understand the messages' meaning and correct the problem if necessary. memory failed. Use the correct ...
User Manual (ENGLISH)
Page 87
...installation 25 DRPD (Distinctive Ring Pattern Detection) 47 F fax header, set 45 Fax mode, receiving mode 47 fax number, set 45 faxing default settings, change 51 delayed faxes 48 fax setup 50 forwarding faxes 49 Multiple Send faxes 48 priority faxes 49 receiving faxes 46 sending faxes 46 Forwarding 49 G Group dial numbers, set 52...machine ID, set 45 Maintenance maintenance parts 61 toner cartridge 59 memory module installing 79 ordering 78 memory, clear 57 Multiple Sned faxes 48 N network setting up 23 O optional tray 78 originals jam, clear 63 loading 29 P paper changing the size 33 ...
...installation 25 DRPD (Distinctive Ring Pattern Detection) 47 F fax header, set 45 Fax mode, receiving mode 47 fax number, set 45 faxing default settings, change 51 delayed faxes 48 fax setup 50 forwarding faxes 49 Multiple Send faxes 48 priority faxes 49 receiving faxes 46 sending faxes 46 Forwarding 49 G Group dial numbers, set 52...machine ID, set 45 Maintenance maintenance parts 61 toner cartridge 59 memory module installing 79 ordering 78 memory, clear 57 Multiple Sned faxes 48 N network setting up 23 O optional tray 78 originals jam, clear 63 loading 29 P paper changing the size 33 ...
User Manual (ENGLISH)
Page 130
... PPD and Filter files on your computer. 2 Open the Applications folder → Utilities, and Print Setup Utility. • For MAC OS 10.5, open System Preferences from the Applications folder, and click Print & Fax. 3 Click Add on the Printer List. • For MAC OS 10.5, press the "+" icon then a display window will pop .... • For MAC OS 10.5, click Default and find the USB connection. 5 For MAC OS 10.3, if Auto Select does not work properly, select Samsung in Printer Model and your printer name in Model Name. • For MAC OS 10.4, if Auto Select does not work properly, select...
... PPD and Filter files on your computer. 2 Open the Applications folder → Utilities, and Print Setup Utility. • For MAC OS 10.5, open System Preferences from the Applications folder, and click Print & Fax. 3 Click Add on the Printer List. • For MAC OS 10.5, press the "+" icon then a display window will pop .... • For MAC OS 10.5, click Default and find the USB connection. 5 For MAC OS 10.3, if Auto Select does not work properly, select Samsung in Printer Model and your printer name in Model Name. • For MAC OS 10.4, if Auto Select does not work properly, select...


