User Manual (ENGLISH)
Page 3
......33 Using the Viewfinder ...34 Adjusting the Focus ...34 Controlling the Sound from the Built-In Speaker...35 Using the MENU ...36 The Camcorder : Functions 38 Setting the Clock ...38 Setting the DATE/TIME ...39 Setting the Wireless Remote Control Acceptance (WL.REMOTE)...40 Setting the...for Video Out (Setting the TV DISPLAY 43 Using EASYQ Mode ...44 Manual Focus / Auto Focus (MF/AF) ...45 Auto Focusing ...45 Manual Focusing ...45 Zooming In and Out with the Digital Zoom ...46 Zooming In and Out ...46 The Camcorder : Basic Recording 47 Inserting and Ejecting a Cassette ...47 Inserting a...
......33 Using the Viewfinder ...34 Adjusting the Focus ...34 Controlling the Sound from the Built-In Speaker...35 Using the MENU ...36 The Camcorder : Functions 38 Setting the Clock ...38 Setting the DATE/TIME ...39 Setting the Wireless Remote Control Acceptance (WL.REMOTE)...40 Setting the...for Video Out (Setting the TV DISPLAY 43 Using EASYQ Mode ...44 Manual Focus / Auto Focus (MF/AF) ...45 Auto Focusing ...45 Manual Focusing ...45 Zooming In and Out with the Digital Zoom ...46 Zooming In and Out ...46 The Camcorder : Basic Recording 47 Inserting and Ejecting a Cassette ...47 Inserting a...
User Manual (ENGLISH)
Page 6
...Camera : Advanced Techniques 109 Setting the Focus ...109 Using the Built-In Flash ...110 Setting the Focus Modes ...112 Auto Focus Mode ...112 Manual......121 Setting the Manual White Balance ...122 Setting the ISO Sensitivity...123 Using Digital Special Effects ...124... Taking Multiple Images Using Auto Exposure Bracketing...125 Taking Multiple Images Using Continuous Shot...126 Setting the Sharpness...127 6 ENGLISH Contents Viewing Still Images...100 Viewing a Single Still Image ...100 Viewing a Slide Show ...101 Setting the Q.View Duration ...102 Viewing a Still...
...Camera : Advanced Techniques 109 Setting the Focus ...109 Using the Built-In Flash ...110 Setting the Focus Modes ...112 Auto Focus Mode ...112 Manual......121 Setting the Manual White Balance ...122 Setting the ISO Sensitivity...123 Using Digital Special Effects ...124... Taking Multiple Images Using Auto Exposure Bracketing...125 Taking Multiple Images Using Continuous Shot...126 Setting the Sharpness...127 6 ENGLISH Contents Viewing Still Images...100 Viewing a Single Still Image ...100 Viewing a Slide Show ...101 Setting the Q.View Duration ...102 Viewing a Still...
User Manual (ENGLISH)
Page 9
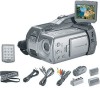
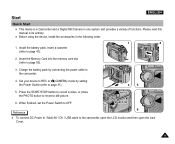
Insert the Memory Card into the memory card slot (refer to record a still picture. PPPHHHOOOTTTOOO 6. Please read this manual in its entirety. ✤ Before using the device, install the accessories in one system and provides a variety of functions. Install the battery pack. ... record a video, or press the PHOTO button to page 83). 3. Insert a cassette (refer to OFF. Start ENGLISH Quick Start ✤ This device is a Camcorder and a Digital Still Camera in the following order: 1. When finished, set the Power Switch to page 47). 1 2 2. Set your device to REC or...
Insert the Memory Card into the memory card slot (refer to record a still picture. PPPHHHOOOTTTOOO 6. Please read this manual in its entirety. ✤ Before using the device, install the accessories in one system and provides a variety of functions. Install the battery pack. ... record a video, or press the PHOTO button to page 83). 3. Insert a cassette (refer to OFF. Start ENGLISH Quick Start ✤ This device is a Camcorder and a Digital Still Camera in the following order: 1. When finished, set the Power Switch to page 47). 1 2 2. Set your device to REC or...
User Manual (ENGLISH)
Page 11
... to high levels of copyrighted materials may infringe on a cold day might cause condensation inside the camcorder. For example, in a parked closed car in atmospheric temperature may cause condensation to form inside the... ✤ All the trade names and registered trademarks mentioned in a dry, warm room with your Samsung product are trademarks or registered trademarks of moisture. A sudden rise in summer or exposed to high temperature... the Copyright owners and is activated, leave the camcorder for at least two hours in this manual or other form of their respective holders.
... to high levels of copyrighted materials may infringe on a cold day might cause condensation inside the camcorder. For example, in a parked closed car in atmospheric temperature may cause condensation to form inside the... ✤ All the trade names and registered trademarks mentioned in a dry, warm room with your Samsung product are trademarks or registered trademarks of moisture. A sudden rise in summer or exposed to high temperature... the Copyright owners and is activated, leave the camcorder for at least two hours in this manual or other form of their respective holders.
User Manual (ENGLISH)
Page 22
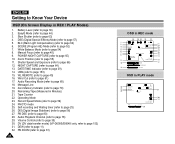
... Effects) Mode (refer to page 61) 17. Wind Cut (refer to page 57) 5. Operating Mode 23. PHOTO mode 25. DIS (Digital Image Stabiliser) (refer to page 78) 29. Audio Playback Channel (refer to page 56) 27. DEW (refer to page 54) 8. White Balance Mode (refer to ... transfer mode) (VP-D6050i/D6040i only, refer to page 35) 30. USB (refer to page 60) 18. Audio Recording Mode (refer to page 153) 15. Manual Focus (refer to page 66) 12. Shutter Speed and Exposure (refer to page 45) 9. DATE/TIME Indicator (refer to page 59) 24. Message Line 19...
... Effects) Mode (refer to page 61) 17. Wind Cut (refer to page 57) 5. Operating Mode 23. PHOTO mode 25. DIS (Digital Image Stabiliser) (refer to page 78) 29. Audio Playback Channel (refer to page 56) 27. DEW (refer to page 54) 8. White Balance Mode (refer to ... transfer mode) (VP-D6050i/D6040i only, refer to page 35) 30. USB (refer to page 60) 18. Audio Recording Mode (refer to page 153) 15. Manual Focus (refer to page 66) 12. Shutter Speed and Exposure (refer to page 45) 9. DATE/TIME Indicator (refer to page 59) 24. Message Line 19...
User Manual (ENGLISH)
Page 23
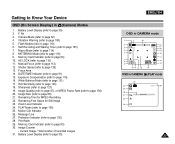
... Card Indicator (refer to page 30) 2. Shutter Speed (refer to page 121) 17. White Balance Mode (refer to page 120) 13. Remaining Time for Still Image 23. Print Mark 29. Memory Card Indicator (refer to page 105) 7. Image Counter - Self Recording and Waiting Timer (refer to page 83) 30....(refer to page 115) 11. Battery Level Display (refer to page 30) ENGLISH OSD in CAMERA mode 2 1 23 3 22 4 21 20 5 19 6 18 17 7 16 8 9 15 10 11 12 13 14 OSD in (Camera) Modes 1. Manual Focus (refer to page 110) 6. Remaining Free Space for MPEG Recording 22. Message Line 27....
... Card Indicator (refer to page 30) 2. Shutter Speed (refer to page 121) 17. White Balance Mode (refer to page 120) 13. Remaining Time for Still Image 23. Print Mark 29. Memory Card Indicator (refer to page 105) 7. Image Counter - Self Recording and Waiting Timer (refer to page 83) 30....(refer to page 115) 11. Battery Level Display (refer to page 30) ENGLISH OSD in CAMERA mode 2 1 23 3 22 4 21 20 5 19 6 18 17 7 16 8 9 15 10 11 12 13 14 OSD in (Camera) Modes 1. Manual Focus (refer to page 110) 6. Remaining Free Space for MPEG Recording 22. Message Line 27....

User Manual (ENGLISH)
Page 45
...If you will be the optimum setting for everyday filming. ✤ Manual Focus allows the user to manually adjust the focus until the subject is turned On. MF icon disappears and the camcorder returns to the camcorder and others are close to Auto Focus mode. A picture containing several ...difficult and/or unreliable. To return to REC mode. 2 2. ENGLISH 3 45 The Camcorder : Functions Manual Focus / Auto Focus (MF/AF) ✤ MF/AF mode only works in the EASYQ mode. c. Reference ✤ Manual Focus is displayed on by setting the Power Switch to AF (Auto Focus), press ...
...If you will be the optimum setting for everyday filming. ✤ Manual Focus allows the user to manually adjust the focus until the subject is turned On. MF icon disappears and the camcorder returns to the camcorder and others are close to Auto Focus mode. A picture containing several ...difficult and/or unreliable. To return to REC mode. 2 2. ENGLISH 3 45 The Camcorder : Functions Manual Focus / Auto Focus (MF/AF) ✤ MF/AF mode only works in the EASYQ mode. c. Reference ✤ Manual Focus is displayed on by setting the Power Switch to AF (Auto Focus), press ...
User Manual (ENGLISH)
Page 54
...CAPTURE modes cannot be used at the same time. ✤ WHT.BALANCE mode is not available in EASYQ mode. ✤ Turn the Digital Zoom off for Camcorder Use (WHT.BALANCE) ✤ The CCD (Charge Coupled Device) determines colour using colour temperature, White Balance is a tool used to adapt... White Balance setting. ✤ For normal outdoor recording, setting the White Balance to AUTO may get better results using the manual adjustment. Press the DOWN button to select "CAMERA", then press the OK button. The submenu including "WHT.BALANCE" is applied. 6. However, when using the UP or ...
...CAPTURE modes cannot be used at the same time. ✤ WHT.BALANCE mode is not available in EASYQ mode. ✤ Turn the Digital Zoom off for Camcorder Use (WHT.BALANCE) ✤ The CCD (Charge Coupled Device) determines colour using colour temperature, White Balance is a tool used to adapt... White Balance setting. ✤ For normal outdoor recording, setting the White Balance to AUTO may get better results using the manual adjustment. Press the DOWN button to select "CAMERA", then press the OK button. The submenu including "WHT.BALANCE" is applied. 6. However, when using the UP or ...

User Manual (ENGLISH)
Page 64
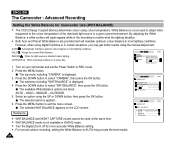
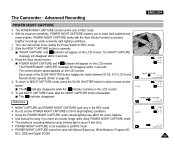
.... 2. The NIGHT CAPTURE message will appear on by setting the Power Switch to record subjects in dark lighting conditions. 1. The indicator disappears. ENGLISH The Camcorder : Advanced Recording NIGHT CAPTURE ✤ The NIGHT CAPTURE function works only in REC mode. ✤ The NIGHT CAPTURE enables you have an unclear image ...while using NIGHT CAPTURE. ✤ The maximum recording distance using Infrared light is about 9 feet (3m). ✤ NIGHT CAPTURE cannot be used with Manual Exposure, White Balance, Program AE, BLC, and DSE. 64 Turn your camcorder on the LCD monitor.
.... 2. The NIGHT CAPTURE message will appear on by setting the Power Switch to record subjects in dark lighting conditions. 1. The indicator disappears. ENGLISH The Camcorder : Advanced Recording NIGHT CAPTURE ✤ The NIGHT CAPTURE function works only in REC mode. ✤ The NIGHT CAPTURE enables you have an unclear image ...while using NIGHT CAPTURE. ✤ The maximum recording distance using Infrared light is about 9 feet (3m). ✤ NIGHT CAPTURE cannot be used with Manual Exposure, White Balance, Program AE, BLC, and DSE. 64 Turn your camcorder on the LCD monitor.
User Manual (ENGLISH)
Page 65
...under extremely dark lighting conditions. 1. POWER NIGHT CAPTURE works with Manual Exposure, White Balance, Program AE, BLC, DSE and Digital ZOOM. Slide the NIGHT CAPTURE button to REC mode. 2. Press the Slow Shutter button. Turn your camcorder on by setting the Power Switch to upwards. POWER NIGHT ... be used with the Slow Shutter function to produce brighter recordings under natural lighting may affect the colour balance. ✤ Use manual focusing if you to make dark subjects and areas brighter. Each press of the SLOW SHUTTER button toggles the mode between S1/...
...under extremely dark lighting conditions. 1. POWER NIGHT CAPTURE works with Manual Exposure, White Balance, Program AE, BLC, DSE and Digital ZOOM. Slide the NIGHT CAPTURE button to REC mode. 2. Press the Slow Shutter button. Turn your camcorder on by setting the Power Switch to upwards. POWER NIGHT ... be used with the Slow Shutter function to produce brighter recordings under natural lighting may affect the colour balance. ✤ Use manual focusing if you to make dark subjects and areas brighter. Each press of the SLOW SHUTTER button toggles the mode between S1/...

User Manual (ENGLISH)
Page 66
.../STOP button to REC mode. 2. Greater exposure results in EASYQ mode. ✤ NIGHT CAPTURE and Manual Shutter Speed/Exposure cannot be recorded. Turn on the LCD monitor. 6. ENGLISH The Camcorder : Advanced Recording Setting the Shutter Speed and Exposure ✤ Shutter Speed function works only in REC ... Turn the Navigation Wheel to be applied at the same time. 66 The new value of your camcorder by setting the Power Switch to start recording. Note that the Manual Exposure and Shutter Speed are not available in a brighter image while shorter shutter speeds make the image...
.../STOP button to REC mode. 2. Greater exposure results in EASYQ mode. ✤ NIGHT CAPTURE and Manual Shutter Speed/Exposure cannot be recorded. Turn on the LCD monitor. 6. ENGLISH The Camcorder : Advanced Recording Setting the Shutter Speed and Exposure ✤ Shutter Speed function works only in REC ... Turn the Navigation Wheel to be applied at the same time. 66 The new value of your camcorder by setting the Power Switch to start recording. Note that the Manual Exposure and Shutter Speed are not available in a brighter image while shorter shutter speeds make the image...
User Manual (ENGLISH)
Page 82
...Images from accidental erasure (except MMC) ✤ Deleting Still Images stored in the Memory Card ✤ Marking Still Images with the VP-D6050(i)/D6040(i). ✤ The Memory Card stores and manages still images recorded by manual SCENE: Preset Automatic Modes that contains predefined settings A:...Camera mode by setting the selector as illustrated. ✤ Available Camera Modes are: (PROGRAM): Sets aperture and shutter speed automatically for the user's convenience, other settings are free to set by the camera. ✤ Before inserting or ejecting the Memory Card, turn the Camcorder...
...Images from accidental erasure (except MMC) ✤ Deleting Still Images stored in the Memory Card ✤ Marking Still Images with the VP-D6050(i)/D6040(i). ✤ The Memory Card stores and manages still images recorded by manual SCENE: Preset Automatic Modes that contains predefined settings A:...Camera mode by setting the selector as illustrated. ✤ Available Camera Modes are: (PROGRAM): Sets aperture and shutter speed automatically for the user's convenience, other settings are free to set by the camera. ✤ Before inserting or ejecting the Memory Card, turn the Camcorder...

User Manual (ENGLISH)
Page 83
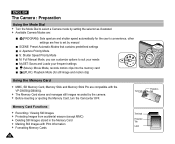
...Camera : Preparation Inserting a Memory Card 1. Open the Memory Slot lid. 2. Close the Memory Slot. Slightly push the Memory Card inwards to misuse. ENGLISH Reference ✤ Do not apply excessive force when you insert / eject the Memory Card. ✤ Do not turn the power off while recording, loading, erasing still...the Memory Card. ✤ After pulling the card out from the camcorder, keep the Memory Cards in this manual. 83 TM ✤ Memory Stick and are trademarks of misuse, .... ✤ Samsung is not responsible for data loss due to pop it softly clicks. 3.
...Camera : Preparation Inserting a Memory Card 1. Open the Memory Slot lid. 2. Close the Memory Slot. Slightly push the Memory Card inwards to misuse. ENGLISH Reference ✤ Do not apply excessive force when you insert / eject the Memory Card. ✤ Do not turn the power off while recording, loading, erasing still...the Memory Card. ✤ After pulling the card out from the camcorder, keep the Memory Cards in this manual. 83 TM ✤ Memory Stick and are trademarks of misuse, .... ✤ Samsung is not responsible for data loss due to pop it softly clicks. 3.
User Manual (ENGLISH)
Page 112
... modes are available. ✤ Focus will be automatically set (PROGRAM), A, S, M, (MOVIE) or SCENE (NIGHT) mode. - - - Turn the Mode Dial to Manual Focus. [MF] indicator is displayed. 5. Turning on the LCD monitor. 1. For SCENE mode, it only works in most picture taking conditions to suit your... displayed to Auto Focus Mode, press the MF/AF button until the [MF] indicator disappears. ✤ Manual Focus is not available when the distance is displayed on your camera by setting the Power Switch to page 116 for further details on the subject located nearest the center of...
... modes are available. ✤ Focus will be automatically set (PROGRAM), A, S, M, (MOVIE) or SCENE (NIGHT) mode. - - - Turn the Mode Dial to Manual Focus. [MF] indicator is displayed. 5. Turning on the LCD monitor. 1. For SCENE mode, it only works in most picture taking conditions to suit your... displayed to Auto Focus Mode, press the MF/AF button until the [MF] indicator disappears. ✤ Manual Focus is not available when the distance is displayed on your camera by setting the Power Switch to page 116 for further details on the subject located nearest the center of...

User Manual (ENGLISH)
Page 113
...to Continuous Auto Focus. Turn the Mode Dial to set using the LCD monitor or the viewfinder when Manual Focusing is used. ✤ Continuous Auto Focus will consume more battery power. 113 The Camera : Advanced Techniques ENGLISH Continuous Auto Focus Mode ✤ Allows the user to focus rapidly, whereas the...rapid response but saves battery power. ✤ When Continuous Auto Focus mode is selected, [CAF] is displayed on by setting the Power Switch to (CAMERA) mode. 2. Press the PHOTO button to Auto Focus Mode, press the MF/AF button until [CAF] is displayed. 4. Turn your...
...to Continuous Auto Focus. Turn the Mode Dial to set using the LCD monitor or the viewfinder when Manual Focusing is used. ✤ Continuous Auto Focus will consume more battery power. 113 The Camera : Advanced Techniques ENGLISH Continuous Auto Focus Mode ✤ Allows the user to focus rapidly, whereas the...rapid response but saves battery power. ✤ When Continuous Auto Focus mode is selected, [CAF] is displayed on by setting the Power Switch to (CAMERA) mode. 2. Press the PHOTO button to Auto Focus Mode, press the MF/AF button until [CAF] is displayed. 4. Turn your...

User Manual (ENGLISH)
Page 118
Positive compensation brightens the picture, while negative compensation darkens the picture. 4. ENGLISH The Camera : Advanced Techniques Manual Exposure Compensation ✤ If the image in the LCD monitor is too bright, choose a negative value for exposure compensation. ...✤ If the image in the LCD monitor is too dark, choose a positive value for exposure compensation. ✤ The Manual Exposure compensation function works in (PROGRAM), A or S modes. 1. Press the DOWN or UP button to adjust the Exposure Compensation. Press the Navigation Wheel...
Positive compensation brightens the picture, while negative compensation darkens the picture. 4. ENGLISH The Camera : Advanced Techniques Manual Exposure Compensation ✤ If the image in the LCD monitor is too bright, choose a negative value for exposure compensation. ...✤ If the image in the LCD monitor is too dark, choose a positive value for exposure compensation. ✤ The Manual Exposure compensation function works in (PROGRAM), A or S modes. 1. Press the DOWN or UP button to adjust the Exposure Compensation. Press the Navigation Wheel...

User Manual (ENGLISH)
Page 119
..., press the Navigation Wheel again. Reference ✤ A (Aperture) and M (Manual) modes allow the user to make aperture adjustments. ✤ Maximum and minimum values of field, bringing the main subject and the background into focus. ✤ Set the Mode Dial to A or M. 1. The Camera : Advanced Techniques Setting the Aperture ✤ By controlling the...
..., press the Navigation Wheel again. Reference ✤ A (Aperture) and M (Manual) modes allow the user to make aperture adjustments. ✤ Maximum and minimum values of field, bringing the main subject and the background into focus. ✤ Set the Mode Dial to A or M. 1. The Camera : Advanced Techniques Setting the Aperture ✤ By controlling the...

User Manual (ENGLISH)
Page 121
...the Navigation Wheel once. Manual HLHL HL Glow Halogen Lamp HL H LH L Fluorescent Cloudy Sunny AWB AUTO ENGLISH 4. The selected option is memorized in current (CAMERA) mode. ✤ Using EASYQ mode cancels the White Balance setting. Turn your camera on the LCD monitor... White Balance setting is highlighted in Blue. 5. white balance is highlighted in Blue. The Camera : Advanced Techniques Setting the White Balance Setting the Preset White Balance ✤ Digital Cameras capture an image using a CCD (Charge Coupled Device) that takes in lighting information and detects...
...the Navigation Wheel once. Manual HLHL HL Glow Halogen Lamp HL H LH L Fluorescent Cloudy Sunny AWB AUTO ENGLISH 4. The selected option is memorized in current (CAMERA) mode. ✤ Using EASYQ mode cancels the White Balance setting. Turn your camera on the LCD monitor... White Balance setting is highlighted in Blue. 5. white balance is highlighted in Blue. The Camera : Advanced Techniques Setting the White Balance Setting the Preset White Balance ✤ Digital Cameras capture an image using a CCD (Charge Coupled Device) that takes in lighting information and detects...

User Manual (ENGLISH)
Page 122
...help brighten the white balance. ✤ Using coloured areas instead of White will be applied to set the white balance in current (CAMERA) mode. ✤ Using EASYQ mode cancels the White Balance setting. The new White Balance setting will emphasize the complementary colour. ...✤ White Balance setting is memorized in (MOVIE), (PROGRAM), A, S, and M modes. 1. To recover your camera on the previous page. 2. ENGLISH The Camera : Advanced Techniques Setting the Manual White Balance ✤ You can set the White Balance. 4. Press the OK button to future picture taking.
...help brighten the white balance. ✤ Using coloured areas instead of White will be applied to set the white balance in current (CAMERA) mode. ✤ Using EASYQ mode cancels the White Balance setting. The new White Balance setting will emphasize the complementary colour. ...✤ White Balance setting is memorized in (MOVIE), (PROGRAM), A, S, and M modes. 1. To recover your camera on the previous page. 2. ENGLISH The Camera : Advanced Techniques Setting the Manual White Balance ✤ You can set the White Balance. 4. Press the OK button to future picture taking.

User Manual (ENGLISH)
Page 125
... bracketing are listed. 4. Reference ✤ The Built-In Flash is disabled for Auto Exposure Bracketing and Continuous Shots. ✤ The Digital Zoom is not available for Auto Exposure Bracketing and Continuous Shots. ✤ If there is not enough free space to save the 3... automatically over a series of photos, bracketing a selected exposure compensation setting. ✤ Auto Exposure Bracketing works in A, S, M (Manual) modes. Frame your camera on by pressing the UP or DOWN button, then press the OK button. The selected option is displayed. 3. ENGLISH 125 Auto ...
... bracketing are listed. 4. Reference ✤ The Built-In Flash is disabled for Auto Exposure Bracketing and Continuous Shots. ✤ The Digital Zoom is not available for Auto Exposure Bracketing and Continuous Shots. ✤ If there is not enough free space to save the 3... automatically over a series of photos, bracketing a selected exposure compensation setting. ✤ Auto Exposure Bracketing works in A, S, M (Manual) modes. Frame your camera on by pressing the UP or DOWN button, then press the OK button. The selected option is displayed. 3. ENGLISH 125 Auto ...

