
User Manual (user Manual) (ver.5.0) (English)
Page 3
... 810 of the polarized plug. 12. ENGLISH 13. Notices and Safety Instructions 9. A CAMCORDER is grounded to provide some protection against them, paying particular attention to cords or plugs, convenient receptacles, and the point where they are not sure of the type of the CAMCORDER and to protect it from battery power, or other ) or a 3-wire grounding type plug, a plug having one blade wider...
... 810 of the polarized plug. 12. ENGLISH 13. Notices and Safety Instructions 9. A CAMCORDER is grounded to provide some protection against them, paying particular attention to cords or plugs, convenient receptacles, and the point where they are not sure of the type of the CAMCORDER and to protect it from battery power, or other ) or a 3-wire grounding type plug, a plug having one blade wider...
User Manual (user Manual) (ver.5.0) (English)
Page 4
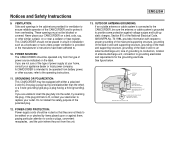
... the CAMCORDER. When the power-supply cord or plug is left unattended and unused for service. 20. Improper adjustment of this CAMCORDER through openings as the original part. Unauthorized substitutions may result in fire, electric shock or other controls may expose you to determine that are required, be taken to qualified service personnel under the following the operating instructions, adjust only those controls that the CAMCORDER...
... the CAMCORDER. When the power-supply cord or plug is left unattended and unused for service. 20. Improper adjustment of this CAMCORDER through openings as the original part. Unauthorized substitutions may result in fire, electric shock or other controls may expose you to determine that are required, be taken to qualified service personnel under the following the operating instructions, adjust only those controls that the CAMCORDER...
User Manual (user Manual) (ver.5.0) (English)
Page 6
... Connecting a Power Source ...23 To use the AC Power adapter and DC Cable ...23 To select the CAMCORDER mode ...23 Using the Lithium Ion Battery Pack ...24 Charging the Lithium Ion Battery Pack ...24 Table of continuous recording time based on model and battery type ...25 Battery level display ...26 Inserting and Ejecting a Cassette ...27 BASIC Recording 28 Making your First Recording ...28 Record Search (REC SEARCH) ...29 Hints for Stable Image Recording ...30 Recording with the LCD monitor ...30 Recording...
... Connecting a Power Source ...23 To use the AC Power adapter and DC Cable ...23 To select the CAMCORDER mode ...23 Using the Lithium Ion Battery Pack ...24 Charging the Lithium Ion Battery Pack ...24 Table of continuous recording time based on model and battery type ...25 Battery level display ...26 Inserting and Ejecting a Cassette ...27 BASIC Recording 28 Making your First Recording ...28 Record Search (REC SEARCH) ...29 Hints for Stable Image Recording ...30 Recording with the LCD monitor ...30 Recording...
User Manual (user Manual) (ver.5.0) (English)
Page 7
... functions in each mode ...36 CLOCK SET ...37 WL. BALANCE (WHITE BALANCE) ...44 Zooming In and Out with DIGITAL ZOOM ...45 Zooming In and Out ...45 Digital Zoom ...46 DIS (Digital Image Stabilizer) ...47 DSE (Digital Special Effects) SELECT ...48 Selecting an effect ...49 REC MODE ...50 AUDIO MODE ...51 WIND CUT ...52 DATE/TIME ...53 TV DISPLAY ...54 Using Quick Menu ...55 Setting the Quick menu ...56 SHUTTER SPEED & EXPOSURE ...57 SLOW SHUTTER(Low Shutter Speed) ...58 EASY Mode (for Beginners) ...59 MF/AF (Manual Focus/Auto Focus...
... functions in each mode ...36 CLOCK SET ...37 WL. BALANCE (WHITE BALANCE) ...44 Zooming In and Out with DIGITAL ZOOM ...45 Zooming In and Out ...45 Digital Zoom ...46 DIS (Digital Image Stabilizer) ...47 DSE (Digital Special Effects) SELECT ...48 Selecting an effect ...49 REC MODE ...50 AUDIO MODE ...51 WIND CUT ...52 DATE/TIME ...53 TV DISPLAY ...54 Using Quick Menu ...55 Setting the Quick menu ...56 SHUTTER SPEED & EXPOSURE ...57 SLOW SHUTTER(Low Shutter Speed) ...58 EASY Mode (for Beginners) ...59 MF/AF (Manual Focus/Auto Focus...
User Manual (user Manual) (ver.5.0) (English)
Page 8
... only) 76 IEEE 1394 Data Transfer 77 Transferring IEEE1394 (i.LINK)-DV standard data connections ...77 Connecting to a DV device ...77 Connecting to a PC ...77 System requirements ...78 Recording with a DV connection cable ...78 USB interface 79 Transferring a Digital Image through a USB Connection ...79 System Requirements ...79 Installing DVC Media 5.0 Program...80 Connecting to a PC ...81 Digital Still Camera mode 82 MEMORY STICK ...82 Memory Stick Functions ...82 Inserting and ejecting the Memory Stick ...83 Structure of folders and files on the Memory Stick ...84 4
... only) 76 IEEE 1394 Data Transfer 77 Transferring IEEE1394 (i.LINK)-DV standard data connections ...77 Connecting to a DV device ...77 Connecting to a PC ...77 System requirements ...78 Recording with a DV connection cable ...78 USB interface 79 Transferring a Digital Image through a USB Connection ...79 System Requirements ...79 Installing DVC Media 5.0 Program...80 Connecting to a PC ...81 Digital Still Camera mode 82 MEMORY STICK ...82 Memory Stick Functions ...82 Inserting and ejecting the Memory Stick ...83 Structure of folders and files on the Memory Stick ...84 4
User Manual (user Manual) (ver.5.0) (English)
Page 9
... To view the Multi Display ...89 Copying still images from a cassette to Memory Stick ...90 Marking images for printing ...91 Protection from accidental erasure...92 Deleting Still images ...93 Formatting the Memory Stick ...94 Attention ...94 MPEG RECORDING ...95 Selecting the moving picture sizes ...97 MPEG Playback ...98 Maintenance 99 After finishing a recording ...99 Cleaning and Maintaining the Camcorder...100 Cleaning the Video Heads ...100 Using Your Camcorder Abroad ...101 Power sources ...101 Color system ...101 Troubleshooting 102 Troubleshooting...
... To view the Multi Display ...89 Copying still images from a cassette to Memory Stick ...90 Marking images for printing ...91 Protection from accidental erasure...92 Deleting Still images ...93 Formatting the Memory Stick ...94 Attention ...94 MPEG RECORDING ...95 Selecting the moving picture sizes ...97 MPEG Playback ...98 Maintenance 99 After finishing a recording ...99 Cleaning and Maintaining the Camcorder...100 Cleaning the Video Heads ...100 Using Your Camcorder Abroad ...101 Power sources ...101 Color system ...101 Troubleshooting 102 Troubleshooting...
User Manual (user Manual) (ver.5.0) (English)
Page 12
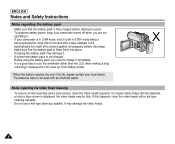
... the battery pack is displayed, the video heads may be dealt with as chemical waste. To ensure normal recording and a clear picture, clean the video heads regularly. If a square block-shape distorts playback, or only a blue screen is fully charged before starting to use a wet-type cleaning cassette. Make sure that the battery pack is not charged. It is left in STBY mode without being operated for more battery power. * When the battery...
... the battery pack is displayed, the video heads may be dealt with as chemical waste. To ensure normal recording and a clear picture, clean the video heads regularly. If a square block-shape distorts playback, or only a blue screen is fully charged before starting to use a wet-type cleaning cassette. Make sure that the battery pack is not charged. It is left in STBY mode without being operated for more battery power. * When the battery...
User Manual (user Manual) (ver.5.0) (English)
Page 15
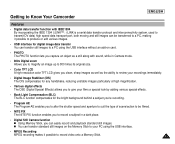
Getting to Know Your Camcorder ENGLISH Features • Digital data transfer function with sound, while in Camera mode. • 800x Digital zoom Allows you to magnify an image up to 800 times its original size. • Color TFT LCD A high-resolution color TFT LCD gives you clean, sharp images as well as the ability to review your recordings immediately. • Digital Image Stabilizer (DIS) The DIS compensates for any handshake, reducing unstable images particularly at high...
Getting to Know Your Camcorder ENGLISH Features • Digital data transfer function with sound, while in Camera mode. • 800x Digital zoom Allows you to magnify an image up to 800 times its original size. • Color TFT LCD A high-resolution color TFT LCD gives you clean, sharp images as well as the ability to review your recordings immediately. • Digital Image Stabilizer (DIS) The DIS compensates for any handshake, reducing unstable images particularly at high...
User Manual (user Manual) (ver.5.0) (English)
Page 16
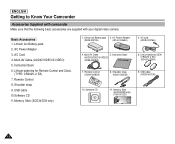
... 4. Memory Stick (SCD34/D39 only) (1109-001221) 3. ENGLISH Getting to Know Your Camcorder Accessories Supplied with camcorder Make sure that the following basic accessories are supplied with your digital video camera. Remote Control 8. Software CD 11. USB cable (AD39-00073A) 12 AC Power Adapter 3. Remote Control (AD59-00085A) 8. Shoulder strap (AD63-00202B) 10. Multi-AV Cable (AUDIO/VIDEO/S-VIDEO) 5. Lithium batteries for Remote Control and Clock. (TYPE: CR2025, 2 EA) 7. Lithium Ion Battery pack 2. Instruction Book (AUDIO/VIDEO/S-VIDEO) (AD39-00099A) 7. AC cord...
... 4. Memory Stick (SCD34/D39 only) (1109-001221) 3. ENGLISH Getting to Know Your Camcorder Accessories Supplied with camcorder Make sure that the following basic accessories are supplied with your digital video camera. Remote Control 8. Software CD 11. USB cable (AD39-00073A) 12 AC Power Adapter 3. Remote Control (AD59-00085A) 8. Shoulder strap (AD63-00202B) 10. Multi-AV Cable (AUDIO/VIDEO/S-VIDEO) 5. Lithium batteries for Remote Control and Clock. (TYPE: CR2025, 2 EA) 7. Lithium Ion Battery pack 2. Instruction Book (AUDIO/VIDEO/S-VIDEO) (AD39-00099A) 7. AC cord...
User Manual (user Manual) (ver.5.0) (English)
Page 22
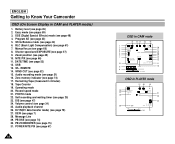
.... DATE/TIME (see page 42) 5. PHOTO mode 22. Volume control (see page 7) 28. DEW (see page 34) 25. PB ZOOM/ENTER (see page 57) 9. DV 26 1 2 : 0 0 A M J A N . 1 0 , 2 0 0 3 [ 1 1 ] 24 11 Shutter speed and EXPOSURE (see page 75) 31. Audio recording mode (see page 26) 2. Operating mode 20. Battery level (see page 51) 16. BLC (Back Light Compensation) (see page 73) 17. WL. Zero memory indicator (see page 61) 7. Record speed mode 21. Manual focus (see...
.... DATE/TIME (see page 42) 5. PHOTO mode 22. Volume control (see page 7) 28. DEW (see page 34) 25. PB ZOOM/ENTER (see page 57) 9. DV 26 1 2 : 0 0 A M J A N . 1 0 , 2 0 0 3 [ 1 1 ] 24 11 Shutter speed and EXPOSURE (see page 75) 31. Audio recording mode (see page 26) 2. Operating mode 20. Battery level (see page 51) 16. BLC (Back Light Compensation) (see page 73) 17. WL. Zero memory indicator (see page 61) 7. Record speed mode 21. Manual focus (see...
User Manual (user Manual) (ver.5.0) (English)
Page 27
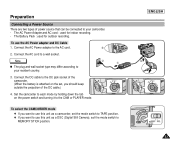
... the camcorder. (When the battery is attached on the power switch and turning it to the AC cord. 2. Preparation Connecting a Power Source There are two types of the DC cable.) 4. To use this unit as a camcorder, set the mode switch to use the AC Power adapter and DC Cable 1. Set the camcorder to each mode by holding down the tab on the set, you want to use this unit as a DSC (Digital Still Camera), set the mode switch to TAPE...
... the camcorder. (When the battery is attached on the power switch and turning it to the AC cord. 2. Preparation Connecting a Power Source There are two types of the DC cable.) 4. To use this unit as a camcorder, set the mode switch to use the AC Power adapter and DC Cable 1. Set the camcorder to each mode by holding down the tab on the set, you want to use this unit as a DSC (Digital Still Camera), set the mode switch to TAPE...
User Manual (user Manual) (ver.5.0) (English)
Page 28
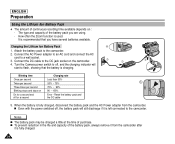
... and off for a second Error - The type and capacity of the battery pack, always remove it is charging. Charging the Lithium Ion Battery Pack 1. s Even with the power switched off, the battery pack will start to the camcorder. 2. Connect the DC cable to a wall socket. 3. Notes s The battery pack may be charged a little at the time of purchase. Attach the battery pack to flash, showing that you are using. -
... and off for a second Error - The type and capacity of the battery pack, always remove it is charging. Charging the Lithium Ion Battery Pack 1. s Even with the power switched off, the battery pack will start to the camcorder. 2. Connect the DC cable to a wall socket. 3. Notes s The battery pack may be charged a little at the time of purchase. Attach the battery pack to flash, showing that you are using. -
User Manual (user Manual) (ver.5.0) (English)
Page 37
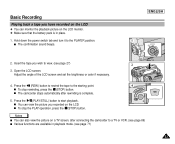
Adjust the angle of the LCD screen and set the brightness or color if necessary. 4. Press the (REW) button to rewind the tape to the starting point. 4 s To stop the PLAY operation, press the (STOP) button. Open the LCD screen. Press the (PLAY/STILL) button to the PLAYER position. ENGLISH 1 2. Hold down the power switch tab and turn it to start playback. s To stop rewinding, press the (STOP) button. Notes s You can also view the picture on a TV...
Adjust the angle of the LCD screen and set the brightness or color if necessary. 4. Press the (REW) button to rewind the tape to the starting point. 4 s To stop the PLAY operation, press the (STOP) button. Open the LCD screen. Press the (PLAY/STILL) button to the PLAYER position. ENGLISH 1 2. Hold down the power switch tab and turn it to start playback. s To stop rewinding, press the (STOP) button. Notes s You can also view the picture on a TV...
User Manual (user Manual) (ver.5.0) (English)
Page 39
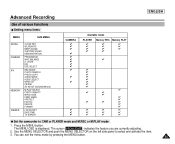
DELETE FORMAT LCD ADJUST DATE/TIME TV DISPLAY CAMERA ✔ ✔ ✔ ✔ ✔ Available mode PLAYER Memory REC. ZOOM DIS DSE SELECT REC MODE PHOTO SEARCH PHOTO COPY AUDIO MODE AUDIO SELECT WIND CUT PB DSE AV IN/OUT (SCD34/D39 only) M.PLAY SELECT PHOTO QUALITY MPEG4 SIZE PRINT MARK PROTECT FILE NO. Press the MENU button. Use the MENU SELECTOR and push the MENU SELECTOR on the left side panel to CAM or PLAYER mode and M.REC or M.PLAY mode 1. BALANCE D. Advanced Recording ENGLISH Use of various...
DELETE FORMAT LCD ADJUST DATE/TIME TV DISPLAY CAMERA ✔ ✔ ✔ ✔ ✔ Available mode PLAYER Memory REC. ZOOM DIS DSE SELECT REC MODE PHOTO SEARCH PHOTO COPY AUDIO MODE AUDIO SELECT WIND CUT PB DSE AV IN/OUT (SCD34/D39 only) M.PLAY SELECT PHOTO QUALITY MPEG4 SIZE PRINT MARK PROTECT FILE NO. Press the MENU button. Use the MENU SELECTOR and push the MENU SELECTOR on the left side panel to CAM or PLAYER mode and M.REC or M.PLAY mode 1. BALANCE D. Advanced Recording ENGLISH Use of various...
User Manual (user Manual) (ver.5.0) (English)
Page 41
... SET WL.REMOTE BEEP SOUND SHUTTER SOUND DEMONSTRATION SET TIME! Before recording, please set the day, hour and minute following the same procedure for setting the year and month. 10.Push the MENU SELECTOR after setting the minutes. Push the MENU SELECTOR to the sub menu. 11.To exit, push the MENU button. CAM MODE INITIAL SET CLOCK SET 1 2 : 0 0 A M J A N . 10 , 2 0 0 3 37 Advanced Recording q CLOCK SET ✤ CLOCK setup works in CAM, PLAYER, M.REC and M.PLAY modes. ✤ The DATE/TIME...
... SET WL.REMOTE BEEP SOUND SHUTTER SOUND DEMONSTRATION SET TIME! Before recording, please set the day, hour and minute following the same procedure for setting the year and month. 10.Push the MENU SELECTOR after setting the minutes. Push the MENU SELECTOR to the sub menu. 11.To exit, push the MENU button. CAM MODE INITIAL SET CLOCK SET 1 2 : 0 0 A M J A N . 10 , 2 0 0 3 37 Advanced Recording q CLOCK SET ✤ CLOCK setup works in CAM, PLAYER, M.REC and M.PLAY modes. ✤ The DATE/TIME...
User Manual (user Manual) (ver.5.0) (English)
Page 48
...Close ups s OUTDOOR ( ) : This controls the WHITE BALANCE according to CAM mode. 2. INITIAL CAMERA A/V MEMORY VIEWER PROGRAM AE WHT. Set the camcorder to the outdoor CAM MODE ambience. - s Reset the white balance if lighting conditions change. Using the MENU SELECTOR, select the WHITE BALANCE mode. ENGLISH Advanced Recording q WHT. BALANCE (WHITE BALANCE) ✤ The WHITE BALANCE function works in any recording condition. ✤ You may provide better results. 44 CAM MODE CAMERA SET WHT. s HOLD ( ) :This fixes the current WHITE BALANCE value. In daylight, especially...
...Close ups s OUTDOOR ( ) : This controls the WHITE BALANCE according to CAM mode. 2. INITIAL CAMERA A/V MEMORY VIEWER PROGRAM AE WHT. Set the camcorder to the outdoor CAM MODE ambience. - s Reset the white balance if lighting conditions change. Using the MENU SELECTOR, select the WHITE BALANCE mode. ENGLISH Advanced Recording q WHT. BALANCE (WHITE BALANCE) ✤ The WHITE BALANCE function works in any recording condition. ✤ You may provide better results. 44 CAM MODE CAMERA SET WHT. s HOLD ( ) :This fixes the current WHITE BALANCE value. In daylight, especially...
User Manual (user Manual) (ver.5.0) (English)
Page 84
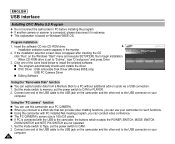
... can easily transfer data from a Memory Stick to begin installation. - Connect one end of the USB cable to the USB jack on cards via a USB connection. 1. s When you connect to the USB connector on your computer. Insert the software CD into CD-ROM drive. 3. - s DVC Driver : USB removable Disk Driver (Windows 98SE only) USB PC Camera Driver s Editing Software Using the "Removable Disk" function s You can conduct video conference. Using the "PC camera" function s You can use this camcorder as a PC CAMERA. Set the mode switch to Tape, set to CAM. 2. When CD-ROM drive is...
... can easily transfer data from a Memory Stick to begin installation. - Connect one end of the USB cable to the USB jack on cards via a USB connection. 1. s When you connect to the USB connector on your computer. Insert the software CD into CD-ROM drive. 3. - s DVC Driver : USB removable Disk Driver (Windows 98SE only) USB PC Camera Driver s Editing Software Using the "Removable Disk" function s You can conduct video conference. Using the "PC camera" function s You can use this camcorder as a PC CAMERA. Set the mode switch to Tape, set to CAM. 2. When CD-ROM drive is...
User Manual (user Manual) (ver.5.0) (English)
Page 108
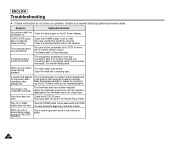
... battery pack. use the BLC function while you see a blue screen during the RECORD SEARCH. This is normal operation and it . When you see a broken block image during playback. Check the record protection tab on . Play, FF or REW Check the POWER switch. The image in the Manual Focus mode. When you are recording brighter. ENGLISH Troubleshooting ✤ If these instructions do not solve your problem, contact your nearest Samsung authorized service center. START/STOP button Check the POWER switch...
... battery pack. use the BLC function while you see a blue screen during the RECORD SEARCH. This is normal operation and it . When you see a broken block image during playback. Check the record protection tab on . Play, FF or REW Check the POWER switch. The image in the Manual Focus mode. When you are recording brighter. ENGLISH Troubleshooting ✤ If these instructions do not solve your problem, contact your nearest Samsung authorized service center. START/STOP button Check the POWER switch...
User Manual (user Manual) (ver.5.0) (English)
Page 109
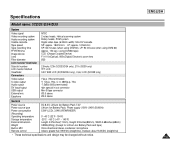
... Video recording system Audio recording system Usable cassette Tape speed Tape recording time FF/REW time Image device Lens Filter diameter LCD monitor/Viewfinder Size/dot number LCD monitor Method Viewfinder Connectors Video output S-video output Audio output DV input/output USB output External mic Earphone NTSC 2 rotary heads, Helical scanning system Rotary heads, PCM system Digital video tape (6.35mm width): Mini DV cassette SP: approx. 18.81mm/s LP: approx. 12.56mm/s SP: 60 minutes (when using DVM 60), LP: 90 minutes (when using DVM 60) Approx. 150 sec. (using DVM60 tape) CCD (Charge...
... Video recording system Audio recording system Usable cassette Tape speed Tape recording time FF/REW time Image device Lens Filter diameter LCD monitor/Viewfinder Size/dot number LCD monitor Method Viewfinder Connectors Video output S-video output Audio output DV input/output USB output External mic Earphone NTSC 2 rotary heads, Helical scanning system Rotary heads, PCM system Digital video tape (6.35mm width): Mini DV cassette SP: approx. 18.81mm/s LP: approx. 12.56mm/s SP: 60 minutes (when using DVM 60), LP: 90 minutes (when using DVM 60) Approx. 150 sec. (using DVM60 tape) CCD (Charge...
User Manual (user Manual) (ver.5.0) (English)
Page 110
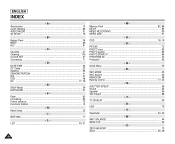
... ...61 - D DATE/TIME 53 DC Cable 23 Deleting ...93 DEMONSTRATION 41 DIS ...47 DSE ...48 DV ...77, 78 - F - Fade ...62 Formatting 94 Frame advance 72 Functions buttons 14 - H Hand Strap 22 - I - SHUTTER SPEED 56 Sound ...34 Speaker ...34 Still images 88 - U USB ...79 - LLCD ...30, 31 - R REC MODE 50 REC Search 29 REMOCON 38 Remote control 17, 20 - TV DISPLAY 54 - V - W WHT. Z - ZERO MEMORY 73 Zoom ...45, 46 106 Q Quick Menu 55...
... ...61 - D DATE/TIME 53 DC Cable 23 Deleting ...93 DEMONSTRATION 41 DIS ...47 DSE ...48 DV ...77, 78 - F - Fade ...62 Formatting 94 Frame advance 72 Functions buttons 14 - H Hand Strap 22 - I - SHUTTER SPEED 56 Sound ...34 Speaker ...34 Still images 88 - U USB ...79 - LLCD ...30, 31 - R REC MODE 50 REC Search 29 REMOCON 38 Remote control 17, 20 - TV DISPLAY 54 - V - W WHT. Z - ZERO MEMORY 73 Zoom ...45, 46 106 Q Quick Menu 55...


