
User Manual (user Manual) (ver.5.0) (English)
Page 6
... M.REC and M.PLAY modes) ...19 Turning the OSD on/off (On Screen Display) ...19 Preparation 20 How to use the Remote Control ...20 Battery Installation for the Remote Control ...20 Self Record using the Remote Control ...20 Lithium Battery Installation ...21 Adjusting the Hand Strap ...22 Hand strap ...22 Shoulder strap...22... Making your First Recording ...28 Record Search (REC SEARCH) ...29 Hints for Stable Image Recording ...30 Recording with the LCD monitor ...30 Recording with the Viewfinder ...30 Adjusting the LCD ...31 Using the VIEWFINDER ...32 Adjusting the Focus ...32 2
... M.REC and M.PLAY modes) ...19 Turning the OSD on/off (On Screen Display) ...19 Preparation 20 How to use the Remote Control ...20 Battery Installation for the Remote Control ...20 Self Record using the Remote Control ...20 Lithium Battery Installation ...21 Adjusting the Hand Strap ...22 Hand strap ...22 Shoulder strap...22... Making your First Recording ...28 Record Search (REC SEARCH) ...29 Hints for Stable Image Recording ...30 Recording with the LCD monitor ...30 Recording with the Viewfinder ...30 Adjusting the LCD ...31 Using the VIEWFINDER ...32 Adjusting the Focus ...32 2
User Manual (user Manual) (ver.5.0) (English)
Page 12
... power. * When the battery reaches the end of its life, please contact your camcorder turned off when you need to record. - Before using the battery pack, you are not operating it is displayed, the video heads may be dealt with a tape installed, it will automatically turn ...itself off to use a wet-type cleaning cassette. Notes regarding the battery pack - Do not use the viewfinder rather than the LCD when making long recordings, because the LCD uses up more than 5 minutes with as chemical waste. It is not charged...
... power. * When the battery reaches the end of its life, please contact your camcorder turned off when you need to record. - Before using the battery pack, you are not operating it is displayed, the video heads may be dealt with a tape installed, it will automatically turn ...itself off to use a wet-type cleaning cassette. Notes regarding the battery pack - Do not use the viewfinder rather than the LCD when making long recordings, because the LCD uses up more than 5 minutes with as chemical waste. It is not charged...

User Manual (user Manual) (ver.5.0) (English)
Page 13
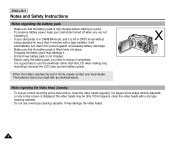
... not film with the camera lens pointing directly at the sun. Notes and Safety Instructions Note regarding electronic viewfinder 1. The LCD display has been manufactured using the LCD 1. If this occurs, we recommend using the viewfinder. 3. Do not position the camcorder such that the hand strap is pointing towards the sun. However, there may...
... not film with the camera lens pointing directly at the sun. Notes and Safety Instructions Note regarding electronic viewfinder 1. The LCD display has been manufactured using the LCD 1. If this occurs, we recommend using the viewfinder. 3. Do not position the camcorder such that the hand strap is pointing towards the sun. However, there may...
User Manual (user Manual) (ver.5.0) (English)
Page 24
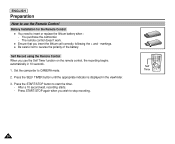
... SELF ZERO DATE/ TIMER MEMORY TIME PHOTO SEARCH A.DUB SLOW X2 Self F.ADV Timer 20 You purchase the camcorder. - Self Record using the Remote Control When you insert the lithium cell correctly, following the + and - The remote control doesn't work. ✤ Ensure that you... replace the lithium battery when : - Press the START/STOP button to stop recording. ENGLISH Preparation How to use the Self Timer function on the remote control, the recording begins automatically in the viewfinder. 3. Press the SELF TIMER button until the appropriate indicator is displayed in 10 seconds. 1.
... SELF ZERO DATE/ TIMER MEMORY TIME PHOTO SEARCH A.DUB SLOW X2 Self F.ADV Timer 20 You purchase the camcorder. - Self Record using the Remote Control When you insert the lithium cell correctly, following the + and - The remote control doesn't work. ✤ Ensure that you... replace the lithium battery when : - Press the START/STOP button to stop recording. ENGLISH Preparation How to use the Self Timer function on the remote control, the recording begins automatically in the viewfinder. 3. Press the SELF TIMER button until the appropriate indicator is displayed in 10 seconds. 1.
User Manual (user Manual) (ver.5.0) (English)
Page 29
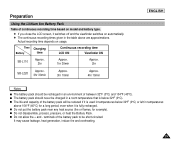
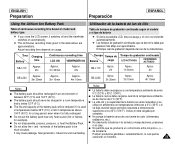
... temperatures above are approximations. Preparation Using the Lithium Ion Battery Pack Table of continuous recording time based on model and battery type. ✤ If you close the LCD screen, it switches off and the viewfinder switches on usage. s The life and capacity of the ...automatically. ✤ The continuous recording times given in a room temperature that is fully recharged. Time Charging Battery time Continuous recording time LCD ON Viewfinder ON SB-L110 Approx. 2hr Approx. 1hr 30min Approx. 2hr Approx. terminals of between 32°F (0°C) and 104°F (40...
... temperatures above are approximations. Preparation Using the Lithium Ion Battery Pack Table of continuous recording time based on model and battery type. ✤ If you close the LCD screen, it switches off and the viewfinder switches on usage. s The life and capacity of the ...automatically. ✤ The continuous recording times given in a room temperature that is fully recharged. Time Charging Battery time Continuous recording time LCD ON Viewfinder ON SB-L110 Approx. 2hr Approx. 1hr 30min Approx. 2hr Approx. terminals of between 32°F (0°C) and 104°F (40...
User Manual (user Manual) (ver.5.0) (English)
Page 34
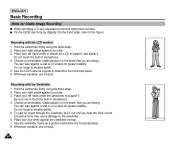
...out until you are taking . Whenever possible, use a tripod. 30 To view an object through the viewfinder, pull it . Hold the camcorder firmly using the hand strap. 2. Place your right elbow against your side. 3. Hold the camcorder firmly using the hand strap. 2. Place your right elbow ... the LCD to determine the horizontal plane. 8. s Fix the LENS cap firmly by clipping it . Use the viewfinder frame as a guide to the figure) Recording with the Viewfinder 1. Place your left hand under the camcorder to hold the camcorder correctly. Place your eye firmly against...
...out until you are taking . Whenever possible, use a tripod. 30 To view an object through the viewfinder, pull it . Hold the camcorder firmly using the hand strap. 2. Place your right elbow against your side. 3. Hold the camcorder firmly using the hand strap. 2. Place your right elbow ... the LCD to determine the horizontal plane. 8. s Fix the LENS cap firmly by clipping it . Use the viewfinder frame as a guide to the figure) Recording with the Viewfinder 1. Place your left hand under the camcorder to hold the camcorder correctly. Place your eye firmly against...
User Manual (user Manual) (ver.5.0) (English)
Page 36
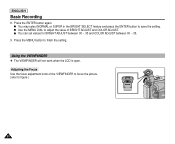
Using the VIEWFINDER ✤ The VIEWFINDER will not work when the LCD is open. s You can set values for BRIGHT ADJUST between 00 ~ 35 and COLOR ADJUST between 00 ~ 35. 9. s Use the MENU DIAL to adjust the value of the VIEWFINDER to focus the picture. (refer to figure ) 32 Adjusting the Focus Use the focus adjustment knob of BRIGHT ADJUST and COLOR ADJUST. ENGLISH Basic Recording 8. s You may select NORMAL or SUPER in the BRIGHT SELECT feature and press the ENTER button to finish the setting. Press the MENU button to save the setting. Press the ENTER button again.
Using the VIEWFINDER ✤ The VIEWFINDER will not work when the LCD is open. s You can set values for BRIGHT ADJUST between 00 ~ 35 and COLOR ADJUST between 00 ~ 35. 9. s Use the MENU DIAL to adjust the value of the VIEWFINDER to focus the picture. (refer to figure ) 32 Adjusting the Focus Use the focus adjustment knob of BRIGHT ADJUST and COLOR ADJUST. ENGLISH Basic Recording 8. s You may select NORMAL or SUPER in the BRIGHT SELECT feature and press the ENTER button to finish the setting. Press the MENU button to save the setting. Press the ENTER button again.
User Manual (user Manual) (ver.5.0) (English)
Page 56
... TV DISPLAY function works in CAMERA, PLAYER, M.REC and M.PLAY modes. ✤ You can select the output path of the OSD displayed on the LCD/Viewfinder/TV. 1. Set the camcorder to highlight VIEWER and press the ENTER button. 4. To exit, press the MENU button. s The menu list will appear. 3. CAM ...MODE INITIAL CAMERA A/V MEMORY VIEWER LCD ADJUST DATE / TIME TV DISPLAY CAM MODE VIEWER SET LCD ADJUST DATE / TIME TV DISPLAY 52 s Use the DISPLAY button located at the left side of the camcorder to turn ON/OFF all of the OSD (On Screen Display). Turn the MENU...
... TV DISPLAY function works in CAMERA, PLAYER, M.REC and M.PLAY modes. ✤ You can select the output path of the OSD displayed on the LCD/Viewfinder/TV. 1. Set the camcorder to highlight VIEWER and press the ENTER button. 4. To exit, press the MENU button. s The menu list will appear. 3. CAM ...MODE INITIAL CAMERA A/V MEMORY VIEWER LCD ADJUST DATE / TIME TV DISPLAY CAM MODE VIEWER SET LCD ADJUST DATE / TIME TV DISPLAY 52 s Use the DISPLAY button located at the left side of the camcorder to turn ON/OFF all of the OSD (On Screen Display). Turn the MENU...
User Manual (user Manual) (ver.5.0) (English)
Page 71
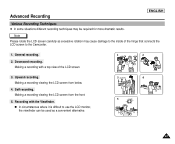
... techniques may cause damage to the inside of the LCD screen. 1 2 3. Making a recording with the Viewfinder. Recording with a top view of the hinge that connects the LCD screen to use the LCD monitor, the viewfinder can be used as excessive rotation may be required for more dramatic results. Downward recording. Self recording. Making a recording...
... techniques may cause damage to the inside of the LCD screen. 1 2 3. Making a recording with the Viewfinder. Recording with a top view of the hinge that connects the LCD screen to use the LCD monitor, the viewfinder can be used as excessive rotation may be required for more dramatic results. Downward recording. Self recording. Making a recording...
User Manual (user Manual) (ver.5.0) (English)
Page 102
... can view your recording in the world. 98 However, to view it to use your camcorder in any country or area with your camcorder and view pictures on the LCD from anywhere in the viewfinder. q NTSC-compatible Countries/Regions Bahamas, Canada, Central America, Japan, Mexico, ...Philippines, Korea, Taiwan, United States of the local wall outlet. s Use a commercially available AC plug Adapter, if necessary, depending on a ...
... can view your recording in the world. 98 However, to view it to use your camcorder in any country or area with your camcorder and view pictures on the LCD from anywhere in the viewfinder. q NTSC-compatible Countries/Regions Bahamas, Canada, Central America, Japan, Mexico, ...Philippines, Korea, Taiwan, United States of the local wall outlet. s Use a commercially available AC plug Adapter, if necessary, depending on a ...
User Manual (user Manual) (ver.5.0) (English)
Page 105
...reached the beginning or end of the cassette. The video heads may be recharged, Use another battery pack. The Viewfinder lens has not been adjusted. The battery pack has not been charged fully. use the BLC function while you see a broken block image during playback. You have ...normally. Auto focus does not Check the M.FOCUS menu. Troubleshooting ✤ If these instructions do not solve your problem, contact your nearest Samsung authorized service center. The battery pack is not a failure or defect. Check the battery pack or the AC Power Adapter. The image ...
...reached the beginning or end of the cassette. The video heads may be recharged, Use another battery pack. The Viewfinder lens has not been adjusted. The battery pack has not been charged fully. use the BLC function while you see a broken block image during playback. You have ...normally. Auto focus does not Check the M.FOCUS menu. Troubleshooting ✤ If these instructions do not solve your problem, contact your nearest Samsung authorized service center. The battery pack is not a failure or defect. Check the battery pack or the AC Power Adapter. The image ...
User Manual (user Manual) (ver.5.0) (English)
Page 106
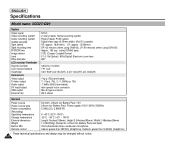
ENGLISH Specifications Model name: SCD27/D29 System Video signal Video recording system Audio recording system Usable cassette Tape speed Tape recording time FF/REW time Image device Lens Filter diameter LCD monitor/Viewfinder Size/dot number LCD monitor Method Viewfinder Connectors Video output S-video output Audio ... width): Mini DV cassette SP: approx. 18.81mm/s LP: approx. 12.56mm/s SP: 60 minutes (when using DVM 60), LP: 90 minutes (when using DVM 60) Approx. 180 sec. (using DVM60 tape) CCD (Charge Coupled Device) F1.4 10x(Optical), 800x(Digital) Electronic zoom lens Ø37 3.5inchs...
ENGLISH Specifications Model name: SCD27/D29 System Video signal Video recording system Audio recording system Usable cassette Tape speed Tape recording time FF/REW time Image device Lens Filter diameter LCD monitor/Viewfinder Size/dot number LCD monitor Method Viewfinder Connectors Video output S-video output Audio ... width): Mini DV cassette SP: approx. 18.81mm/s LP: approx. 12.56mm/s SP: 60 minutes (when using DVM 60), LP: 90 minutes (when using DVM 60) Approx. 180 sec. (using DVM60 tape) CCD (Charge Coupled Device) F1.4 10x(Optical), 800x(Digital) Electronic zoom lens Ø37 3.5inchs...
User Manual (user Manual) (ver.5.0) (Spanish)
Page 25
...Pack Table of continuous recording time based on model and battery type. ✤ If you close the LCD screen, it switches off and the viewfinder switches on usage. El tiempo real de grabación depende del uso de la videocámara. es de menos de 0°C (32&#...time depends on automatically. ✤ The continuous recording times given in an environment of the battery pack to be charged in a room temperature that is used se deja durante largos periodos expuesta a temperaturas in temperatures below 32°F (0°C). between 32°F (0°C) and 104°F (40°C)....
...Pack Table of continuous recording time based on model and battery type. ✤ If you close the LCD screen, it switches off and the viewfinder switches on usage. El tiempo real de grabación depende del uso de la videocámara. es de menos de 0°C (32&#...time depends on automatically. ✤ The continuous recording times given in an environment of the battery pack to be charged in a room temperature that is used se deja durante largos periodos expuesta a temperaturas in temperatures below 32°F (0°C). between 32°F (0°C) and 104°F (40°C)....


