Samsung SCD27 No Display

Related Manual Pages


Similar Questions

Display Do Not Turn On
WHEN I TURN ON THE VIDEO CAMERA THE DISPLAY REMAINS OFF. ALSO CONTROLS OF DISPLAY DO NOT OPERATE.
WHEN I TURN ON THE VIDEO CAMERA THE DISPLAY REMAINS OFF. ALSO CONTROLS OF DISPLAY DO NOT OPERATE.
(Posted by raulm70 11 years ago)

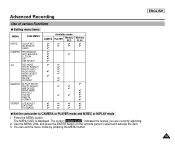
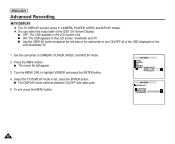
Date Display In Recording
How to I get date and time to show in recording? It is on in lcd display. How do I get it in record...
How to I get date and time to show in recording? It is on in lcd display. How do I get it in record...
(Posted by crashcutter 12 years ago)

Why Won't My Display Turn On If The Camera Is Turned On?
(Posted by douglasfields 13 years ago)