User Manual
Page 1
SCB-2001(P) SCB-2001PH DIGITAL COLOR CAMERA user manual imagine the possibilities Thank you for purchasing this Samsung product. To receive more complete service, please register your product at www.samsungsecurity.com
SCB-2001(P) SCB-2001PH DIGITAL COLOR CAMERA user manual imagine the possibilities Thank you for purchasing this Samsung product. To receive more complete service, please register your product at www.samsungsecurity.com

User Manual
Page 2
...SUCH CASE, IMMEDIATELY DISCONNECT THE POWER SOURCE AND CONTACT THE SERVICE CENTER. DIGITAL COLOR CAMERA USING ANY OTHER ADAPTER COULD CAUSE FIRE, ELECTRICAL SHOCK, OR DAMAGE TO THE PRODUCT. 2. THE FALL OF CAMERA MAY CAUSE PERSONAL INJURY. 6. DOING SO MAY CAUSE FIRE OR ELECTRIC SHOCK. 8.... EXCEEDING THE CAPACITY MAY CAUSE ABNORMAL HEAT GENERATION OR FIRE. 4. REFER SERVICING TO QUALIFIED SERVICE PERSONNEL. WARNING 1. WHEN INSTALLING THE CAMERA, FASTEN IT SECURELY AND FIRMLY. THIS EXCLAMATION POINT SYMBOL IS INTENDED TO ALERT THE USER TO THE PRESENCE OF IMPORTANT OPERATING AND ...
...SUCH CASE, IMMEDIATELY DISCONNECT THE POWER SOURCE AND CONTACT THE SERVICE CENTER. DIGITAL COLOR CAMERA USING ANY OTHER ADAPTER COULD CAUSE FIRE, ELECTRICAL SHOCK, OR DAMAGE TO THE PRODUCT. 2. THE FALL OF CAMERA MAY CAUSE PERSONAL INJURY. 6. DOING SO MAY CAUSE FIRE OR ELECTRIC SHOCK. 8.... EXCEEDING THE CAPACITY MAY CAUSE ABNORMAL HEAT GENERATION OR FIRE. 4. REFER SERVICING TO QUALIFIED SERVICE PERSONNEL. WARNING 1. WHEN INSTALLING THE CAMERA, FASTEN IT SECURELY AND FIRMLY. THIS EXCLAMATION POINT SYMBOL IS INTENDED TO ALERT THE USER TO THE PRESENCE OF IMPORTANT OPERATING AND ...
User Manual
Page 3
...POWER AND THEN MOVE OR REINSTALL IT. 4. KEEP OUT OF DIRECT SUNLIGHT AND HEAT RADIATION SOURCES. IT MAY CAUSE FIRE. 6. AVOID AIMING THE CAMERA DIRECTLY TOWARDS EXTREMELY BRIGHT OBJECTS SUCH AS SUN, AS THIS MAY DAMAGE THE CCD IMAGE SENSOR. 8. DO NOT DROP OBJECTS ON THE PRODUCT OR ... PLUG IS USED AS A DISCONNECT DEVICE AND SHALL STAY READILY OPERABLE AT ANY TIME. NEVER DISASSEMBLE OR MODIFY THIS PRODUCT IN ANY WAY. (SAMSUNG IS NOT LIABLE FOR PROBLEMS CAUSED BY UNAUTHORIZED MODIFICATIONS OR ATTEMPTED REPAIR.) 10. APPARATUS SHALL NOT BE EXPOSED TO DRIPPING OR SPLASHING AND NO OBJECTS...
...POWER AND THEN MOVE OR REINSTALL IT. 4. KEEP OUT OF DIRECT SUNLIGHT AND HEAT RADIATION SOURCES. IT MAY CAUSE FIRE. 6. AVOID AIMING THE CAMERA DIRECTLY TOWARDS EXTREMELY BRIGHT OBJECTS SUCH AS SUN, AS THIS MAY DAMAGE THE CCD IMAGE SENSOR. 8. DO NOT DROP OBJECTS ON THE PRODUCT OR ... PLUG IS USED AS A DISCONNECT DEVICE AND SHALL STAY READILY OPERABLE AT ANY TIME. NEVER DISASSEMBLE OR MODIFY THIS PRODUCT IN ANY WAY. (SAMSUNG IS NOT LIABLE FOR PROBLEMS CAUSED BY UNAUTHORIZED MODIFICATIONS OR ATTEMPTED REPAIR.) 10. APPARATUS SHALL NOT BE EXPOSED TO DRIPPING OR SPLASHING AND NO OBJECTS...
User Manual
Page 4
... they exit from other commercial wastes for environmentally safe recycling. Correct disposal of , these substances can take these items from the apparatus. 11. DIGITAL COLOR CAMERA Do not install near water. 6. Unplug this apparatus during lightning storms or when unused for details of where and how they purchased this product (Applicable...
... they exit from other commercial wastes for environmentally safe recycling. Correct disposal of , these substances can take these items from the apparatus. 11. DIGITAL COLOR CAMERA Do not install near water. 6. Unplug this apparatus during lightning storms or when unused for details of where and how they purchased this product (Applicable...
User Manual
Page 5
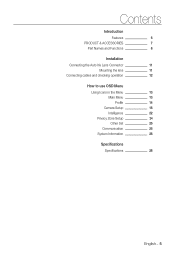
Contents Introduction Features 6 PRODUCT & ACCESSORIES 7 Part Names and Functions 8 Installation Connecting the Auto Iris Lens Connector 11 Mounting the lens 11 Connecting cables and checking operation 12 How to use OSD Menu Using Icons in the Menu 13 Main Menu 13 Profile 14 Camera Setup 16 Intelligence 22 Privacy Zone Setup 24 Other Set 25 Communication 26 System Information 26 Specifications Specifications 28 English - 5
Contents Introduction Features 6 PRODUCT & ACCESSORIES 7 Part Names and Functions 8 Installation Connecting the Auto Iris Lens Connector 11 Mounting the lens 11 Connecting cables and checking operation 12 How to use OSD Menu Using Icons in the Menu 13 Main Menu 13 Profile 14 Camera Setup 16 Intelligence 22 Privacy Zone Setup 24 Other Set 25 Communication 26 System Information 26 Specifications Specifications 28 English - 5

User Manual
Page 6
...filing, and digital zooming. ❖ OSD(On Screen Display) Menu • OSD menu is provided to display the status of camera and to configure the functions interactively. ❖ Coaxial Cable Communication • This is an intelligent function that overlaps the coaxial cable...Intelligent Motion Detection & Tracking • This is a remote control function that automatically detects a motion of an object. In installation or repair, this camera. ❖ Output Signal Setting • You can set a virtual fence so it sounds an alert if an object passes / enters /exits the...
...filing, and digital zooming. ❖ OSD(On Screen Display) Menu • OSD menu is provided to display the status of camera and to configure the functions interactively. ❖ Coaxial Cable Communication • This is an intelligent function that overlaps the coaxial cable...Intelligent Motion Detection & Tracking • This is a remote control function that automatically detects a motion of an object. In installation or repair, this camera. ❖ Output Signal Setting • You can set a virtual fence so it sounds an alert if an object passes / enters /exits the...
User Manual
Page 7
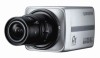
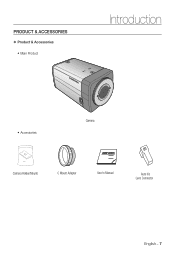
PRODUCT & ACCESSORIES ❖ Product & Accessories • Main Product Introduction • Accessories Camera Camera Holder(Mount) C Mount Adapter User's Manual Auto Iris Lens Connector English - 7
PRODUCT & ACCESSORIES ❖ Product & Accessories • Main Product Introduction • Accessories Camera Camera Holder(Mount) C Mount Adapter User's Manual Auto Iris Lens Connector English - 7

User Manual
Page 8
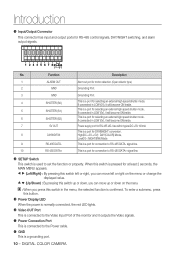
...View Mount Adapter Fixing Grooves Auto Iris Lens Connector Auto Iris Lens Control Cable Camera Lens • Auto Iris Lens Connector This groove is used for screwing the mount adapter, a part of the bracket where the camera will be installed. • Auto Iris Lens Control Cable This cable transmits ...the power and signals from the camera for controlling the Auto Iris Lens. • Mount Adapter Fixing Grooves These grooves are ...
...View Mount Adapter Fixing Grooves Auto Iris Lens Connector Auto Iris Lens Control Cable Camera Lens • Auto Iris Lens Connector This groove is used for screwing the mount adapter, a part of the bracket where the camera will be installed. • Auto Iris Lens Control Cable This cable transmits ...the power and signals from the camera for controlling the Auto Iris Lens. • Mount Adapter Fixing Grooves These grooves are ...
User Manual
Page 10
... and it will become ON inside . 7 5V OUT Power supply port for RS-485 control signals, DAY/NIGHT switching, and alarm output signals. DIGITAL COLOR CAMERA No. This is normally connected, the red LED lights. cd (Up/Down) : By pressing this switch in LOW (0V), it outputs the Video signals. When...
... and it will become ON inside . 7 5V OUT Power supply port for RS-485 control signals, DAY/NIGHT switching, and alarm output signals. DIGITAL COLOR CAMERA No. This is normally connected, the red LED lights. cd (Up/Down) : By pressing this switch in LOW (0V), it outputs the Video signals. When...

User Manual
Page 12
.... 12 - You can connect 2 lines of the BNC cable to the VIDEO IN Port on the rear of the camera. ② Connect another end of the power adapter to the camera. Installation CONNECTING CABLES AND CHECKING OPERATION ① Connect one end of the BNC cable to the VIDEO OUT Port on... the monitor. ③ Finally connect the power adapter to the camera using the Slot Head screwdriver as shown in the picture....
.... 12 - You can connect 2 lines of the BNC cable to the VIDEO IN Port on the rear of the camera. ② Connect another end of the power adapter to the camera. Installation CONNECTING CABLES AND CHECKING OPERATION ① Connect one end of the BNC cable to the VIDEO OUT Port on... the monitor. ③ Finally connect the power adapter to the camera using the Slot Head screwdriver as shown in the picture....

User Manual
Page 13
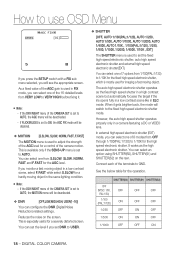
... according to save your settings, they will remain even if you select QUIT in the menu. Displays the system information including the camera version and communication settings. Once you delete your settings, they will not be restored even if you save your settings of MASK AREA..., or select QUIT to cancel. • (RET) Returns to the previous menu. • (SAVE) Used to the camera installation conditions. • CAMERA SET Configure Camera related functions and data. • INTELLIGENCE You can configure the settings of motion detection, tracking and more. •...
... according to save your settings, they will remain even if you select QUIT in the menu. Displays the system information including the camera version and communication settings. Once you delete your settings, they will not be restored even if you save your settings of MASK AREA..., or select QUIT to cancel. • (RET) Returns to the previous menu. • (SAVE) Used to the camera installation conditions. • CAMERA SET Configure Camera related functions and data. • INTELLIGENCE You can configure the settings of motion detection, tracking and more. •...

User Manual
Page 14
... AUTOx2 MID AUTO ON ON BACKLIGHT DAY/NIGHT ALC DC 0 BLC NORM MID OFF AUTOx4 MID DAY OFF OFF ALC DC 0 OFF (F.FAST)--- DIGITAL COLOR CAMERA DNR MID SHUTTER OFF SENS-UP AUTOx4 XDR MID DAY/ NIGHT AUTO NIGHT - BURST OFF EXT - BURST OFF ITS ALC DC 0 OFF (F.FAST)--- MID ... AUTOx4 MID AUTO OFF OFF GAMING ALC DC 0 OFF SLOW MID OFF AUTOx4 MID DAY OFF OFF 14 - LENS DC LEVEL 0 BACKLIGHT OFF MOTION (F.FAST)--- CAMERA SET Menu Previous Menu Sub-menus STANDARD IRIS ALC ALC - How to use OSD Menu PROFILE ePROFILEf ÃSTANDARD ITS BACKLIGHT DAY/NIGHT GAMING CUSTOM...
... AUTOx2 MID AUTO ON ON BACKLIGHT DAY/NIGHT ALC DC 0 BLC NORM MID OFF AUTOx4 MID DAY OFF OFF ALC DC 0 OFF (F.FAST)--- DIGITAL COLOR CAMERA DNR MID SHUTTER OFF SENS-UP AUTOx4 XDR MID DAY/ NIGHT AUTO NIGHT - BURST OFF EXT - BURST OFF ITS ALC DC 0 OFF (F.FAST)--- MID ... AUTOx4 MID AUTO OFF OFF GAMING ALC DC 0 OFF SLOW MID OFF AUTOx4 MID DAY OFF OFF 14 - LENS DC LEVEL 0 BACKLIGHT OFF MOTION (F.FAST)--- CAMERA SET Menu Previous Menu Sub-menus STANDARD IRIS ALC ALC - How to use OSD Menu PROFILE ePROFILEf ÃSTANDARD ITS BACKLIGHT DAY/NIGHT GAMING CUSTOM...

User Manual
Page 15
... will be set automatically so it optimizes to the day or night conditions, respectively. ❖ GAMING It will be set automatically to use OSD Menu CAMERA SET Menu Previous Menu Sub-menus STANDARD WHITE BAL DAY DAY - BRIGHTNESS User setting allowed MODE OFF RED User setting allowed BLUE User setting allowed...
... will be set automatically so it optimizes to the day or night conditions, respectively. ❖ GAMING It will be set automatically to use OSD Menu CAMERA SET Menu Previous Menu Sub-menus STANDARD WHITE BAL DAY DAY - BRIGHTNESS User setting allowed MODE OFF RED User setting allowed BLUE User setting allowed...

User Manual
Page 16
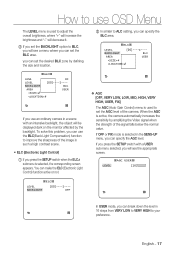
... If you press the SETUP switch with an ALCbased sub menu selected, you must select DC for a DC-type lens, and select VIDEO for the CAMERA ID. OFF 16 - For normal operation, you will see the appropriate screen. ‹ALC‹ LENS LEVEL BACKLIGHT DC [00]----I---- XDR MID d...NEGA PIP AUTO OFF [2] INT LOW OFF + OFF d c DIS OFF Setup the general functions of radiation incoming to use OSD Menu CAMERA SETUP eCAMERA SETf CAMERA ID OFF IRIS ALC MOTION (F.FAST)--- You can enter up to 54 alphanumeric or special characters for a VIDEOtype lens. Use the cdef ...
... If you press the SETUP switch with an ALCbased sub menu selected, you must select DC for a DC-type lens, and select VIDEO for the CAMERA ID. OFF 16 - For normal operation, you will see the appropriate screen. ‹ALC‹ LENS LEVEL BACKLIGHT DC [00]----I---- XDR MID d...NEGA PIP AUTO OFF [2] INT LOW OFF + OFF d c DIS OFF Setup the general functions of radiation incoming to use OSD Menu CAMERA SETUP eCAMERA SETf CAMERA ID OFF IRIS ALC MOTION (F.FAST)--- You can enter up to 54 alphanumeric or special characters for a VIDEOtype lens. Use the cdef ...
User Manual
Page 17
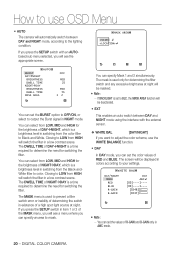
...a menu where you can specify the BLC area. ‹ELC‹ LEVEL BACKLIGHT AREA [00]----I ---- English - 17 When the AGC is active, the camera automatically increases the sensitivity by the backlight. How to use OSD Menu The LEVEL menu is used to your preference. If you press the SETUP..., where "+" will increase the brightness and "-" will be displayed dark on the monitor affected by amplifying the Video signal when the strength of the camera. you can set the desired BLC zone by defining the size and location. ‹ALC‹ LENS DC LEVEL [00]----I ---BLC USER...
...a menu where you can specify the BLC area. ‹ELC‹ LEVEL BACKLIGHT AREA [00]----I ---- English - 17 When the AGC is active, the camera automatically increases the sensitivity by the backlight. How to use OSD Menu The LEVEL menu is used to your preference. If you press the SETUP..., where "+" will increase the brightness and "-" will be displayed dark on the monitor affected by amplifying the Video signal when the strength of the camera. you can set the desired BLC zone by defining the size and location. ‹ALC‹ LENS DC LEVEL [00]----I ---BLC USER...
User Manual
Page 18
..., the MOTION menu will switch to the fixed high speed electronic shutter mode. You can select one of the AGC gain is used in a camera featuring a DC or VIDEO lens. As a fixed value of 8 modes from S.SLOW, SLOW, NORM, FAST and F.FAST for the high speed electronic ...- This is set the fixed high-speed electronic shutter, auto high speed electronic shutter and external high speed electronic shutter(EXT). DIGITAL COLOR CAMERA If the DAY/NIGHT menu of the terminals to GND. This is available only if the SENS-UP menu is especially useful for a severely distorted...
..., the MOTION menu will switch to the fixed high speed electronic shutter mode. You can select one of the AGC gain is used in a camera featuring a DC or VIDEO lens. As a fixed value of 8 modes from S.SLOW, SLOW, NORM, FAST and F.FAST for the high speed electronic ...- This is set the fixed high-speed electronic shutter, auto high speed electronic shutter and external high speed electronic shutter(EXT). DIGITAL COLOR CAMERA If the DAY/NIGHT menu of the terminals to GND. This is available only if the SENS-UP menu is especially useful for a severely distorted...
User Manual
Page 20
.... ‹WHITE BAL‹ DAY/NIGHT MODE RED BLUE R-GAIN B-GAIN DAY AWC [00]----I---[00]----I---[0248] [0247] Note : - DIGITAL COLOR CAMERA How to use OSD Menu • AUTO The camera will automatically switch between DAY and NIGHT mode using the interface with an AUTObased sub menu selected, you will see a menu...
.... ‹WHITE BAL‹ DAY/NIGHT MODE RED BLUE R-GAIN B-GAIN DAY AWC [00]----I---[00]----I---[0248] [0247] Note : - DIGITAL COLOR CAMERA How to use OSD Menu • AUTO The camera will automatically switch between DAY and NIGHT mode using the interface with an AUTObased sub menu selected, you will see a menu...
User Manual
Page 21
...switch in real time, according to the ambient conditions. When the zoom factor and position are provided: • ATW1(Auto Tracing White Balance mode 1): The camera can set to larger than 1x, the FENCE function will perform once. • 3200K : Set color temperature to 3200K • 5600K : Set color ... mode. ❖ DIGITAL ZOOM [ON/OFF] You can set to ON, you can not access the NIGHT menu. - if not to OFF, the camera will see the appropriate screen. If you press the SETUP switch with the DIGITAL ZOOM function set the digital zoom factor and position. The color...
...switch in real time, according to the ambient conditions. When the zoom factor and position are provided: • ATW1(Auto Tracing White Balance mode 1): The camera can set to larger than 1x, the FENCE function will perform once. • 3200K : Set color temperature to 3200K • 5600K : Set color ... mode. ❖ DIGITAL ZOOM [ON/OFF] You can set to ON, you can not access the NIGHT menu. - if not to OFF, the camera will see the appropriate screen. If you press the SETUP switch with the DIGITAL ZOOM function set the digital zoom factor and position. The color...

User Manual
Page 22
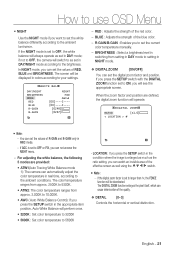
...; Note : - Use of any moving object before tracking the moving route. • FENCE This is set to DETECTION, you select INT, the camera will fix V-SYNC to INT, which can adjust the LL-PHASE. Note : - If the INTELLIGENCE function is detected in the INTELLIGENCE...,TRACKING,DETECTION] • TRACKING Detects and tracks a moving object. • DETECTION Detects a moving object passes through the area. 22 - DIGITAL COLOR CAMERA In a condition where a moving object is set to ON, the PIP function will use OSD Menu ❖ V-SYNC [INT, LINE] Select the...
...; Note : - Use of any moving object before tracking the moving route. • FENCE This is set to DETECTION, you select INT, the camera will fix V-SYNC to INT, which can adjust the LL-PHASE. Note : - If the INTELLIGENCE function is detected in the INTELLIGENCE...,TRACKING,DETECTION] • TRACKING Detects and tracks a moving object. • DETECTION Detects a moving object passes through the area. 22 - DIGITAL COLOR CAMERA In a condition where a moving object is set to ON, the PIP function will use OSD Menu ❖ V-SYNC [INT, LINE] Select the...

User Manual
Page 24
...from PRIVACY 1~12 and press the SETUP switch to ON, the camera will sound an alert if it to ON, a motion or a set ADVANCED function will protect... your setting. DIGITAL COLOR CAMERA Select a mask number and specify the size and position. ‹MASK AREA‹ PRIVACY ZONE...11 12 PRIVACY SET STYLE ON MOSAIC1 ❖ DISPLAY [ON, OFF] With the DISPLAY option set to high, the camera can specify a pixel that you have specified during monitoring. You can detect even a trivial movement of the ...
...from PRIVACY 1~12 and press the SETUP switch to ON, the camera will sound an alert if it to ON, a motion or a set ADVANCED function will protect... your setting. DIGITAL COLOR CAMERA Select a mask number and specify the size and position. ‹MASK AREA‹ PRIVACY ZONE...11 12 PRIVACY SET STYLE ON MOSAIC1 ❖ DISPLAY [ON, OFF] With the DISPLAY option set to high, the camera can specify a pixel that you have specified during monitoring. You can detect even a trivial movement of the ...


