
Instruction Booklet
Page 2
... Supplied with the Camcorder 18 Remote Control ...19 • Self Timer Recording ...19 Adjusting the Hand Strap and Shoulder Strap 20 Lithium Battery Installation ...20 Connecting the Power Source ...21 • To use the AC Power Adaptor and DC Cable 21 • To use the... Battery Pack ...22 Using the Battery Pack ...23 • Refresh ...23 • Time Table ...23 • Battery Level Display ...24 Inserting and Ejecting a Cassette ...25 Making your First Recording "26 • Edit Search ...
... Supplied with the Camcorder 18 Remote Control ...19 • Self Timer Recording ...19 Adjusting the Hand Strap and Shoulder Strap 20 Lithium Battery Installation ...20 Connecting the Power Source ...21 • To use the AC Power Adaptor and DC Cable 21 • To use the... Battery Pack ...22 Using the Battery Pack ...23 • Refresh ...23 • Time Table ...23 • Battery Level Display ...24 Inserting and Ejecting a Cassette ...25 Making your First Recording "26 • Edit Search ...
Instruction Booklet
Page 4
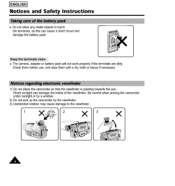
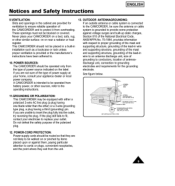
...] Notices and Safety Instructions + Do not allow any metal objects to the viewfinder. A Direct sunlight can cause a short circuit and damage the battery pack. + The camera, adapter or battery pack will not work properly if the terminals are dirty. Be careful when placing the camcorder under sunlight or by a window. 2) Do not...
...] Notices and Safety Instructions + Do not allow any metal objects to the viewfinder. A Direct sunlight can cause a short circuit and damage the battery pack. + The camera, adapter or battery pack will not work properly if the terminals are dirty. Be careful when placing the camcorder under sunlight or by a window. 2) Do not...
Instruction Booklet
Page 5
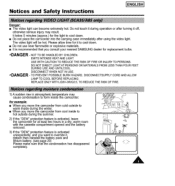
...battery. (see page 20) Please make sure that you want to cool down. • Do not place the camcorder into the carrying case immediately after turning it to cool down. • Do not use near flammable or explosive materials. • It is activated unexpectedly, and you consult your nearest SAMSUNG...-3W/G2.5T, O REDUCETHE RISKOF FIRE. 1) A sudden rise in a dry, warm room with the cassette compartment opened and the battery removed. 3) If the "DEW" protection feature is recommended that _thecondensation has disappeared completely. 1 !, -. % A The video light will...
...battery. (see page 20) Please make sure that you want to cool down. • Do not place the camcorder into the carrying case immediately after turning it to cool down. • Do not use near flammable or explosive materials. • It is activated unexpectedly, and you consult your nearest SAMSUNG...-3W/G2.5T, O REDUCETHE RISKOF FIRE. 1) A sudden rise in a dry, warm room with the cassette compartment opened and the battery removed. 3) If the "DEW" protection feature is recommended that _thecondensation has disappeared completely. 1 !, -. % A The video light will...
Instruction Booklet
Page 6
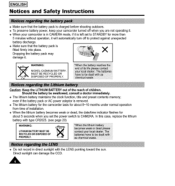
... maintainsthe clock function, titte and preset contentsmemory; Direct sunlight can damage the CCD. In this case, replace the lithium battery with type CR202& (see page 20) LITHIUM BATTERY MUST BE WREACRYNCINLGED: OR DISPOSED OF c_ PROPERLY, ÷ Do not record in CAMERA mode, if it is left...PROPERLY. i!i_en _e:_a_ _E_ill _ill¸ _ 5_tt_ies Caution: Keep the LITHIUM BATTERYout of the reach of installation, ÷ When the lithium battery becomesweak or dead, the date/time indicator flashes for about 5 seconds when you set to STANDBY for more than 5 minutes without operation, it ...
... maintainsthe clock function, titte and preset contentsmemory; Direct sunlight can damage the CCD. In this case, replace the lithium battery with type CR202& (see page 20) LITHIUM BATTERY MUST BE WREACRYNCINLGED: OR DISPOSED OF c_ PROPERLY, ÷ Do not record in CAMERA mode, if it is left...PROPERLY. i!i_en _e:_a_ _E_ill _ill¸ _ 5_tt_ies Caution: Keep the LITHIUM BATTERYout of the reach of installation, ÷ When the lithium battery becomesweak or dead, the date/time indicator flashes for about 5 seconds when you set to STANDBY for more than 5 minutes without operation, it ...
Instruction Booklet
Page 9
... not sure of the type of the CAMCORDER and to protect it from overheating, These openings must not be routed so that they exit from battery power, or other similar surface: on or pinched by items placed upon or against voltage surges and built-up static charges, Section 810 of the...
... not sure of the type of the CAMCORDER and to protect it from overheating, These openings must not be routed so that they exit from battery power, or other similar surface: on or pinched by items placed upon or against voltage surges and built-up static charges, Section 810 of the...
Instruction Booklet
Page 15
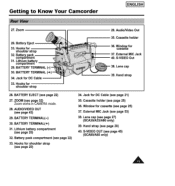
...page 25) 36. BATTERY TERMINAL(+) 31. Cassette holder (see page 22) 27. Window for cassette (see page 21) 35. Hand strap 26. Lens cap (see page 53) 38. Battery pack compartment (see page 22) 33, Hooks for DC Cable (see page 25) 37. External MIC Jack (see page 27) (SCA30/A33/A80 only...) 39. BATTERY TERMINAL 30. Getting to Know Your Camcorder ENGLISH I 27, Zoom 26. Jack for shoulder strap (see page 20) 32. AudioNideo Out 35. S-VIDEO OUT (see...
...page 25) 36. BATTERY TERMINAL(+) 31. Cassette holder (see page 22) 27. Window for cassette (see page 21) 35. Hand strap 26. Lens cap (see page 53) 38. Battery pack compartment (see page 22) 33, Hooks for DC Cable (see page 25) 37. External MIC Jack (see page 27) (SCA30/A33/A80 only...) 39. BATTERY TERMINAL 30. Getting to Know Your Camcorder ENGLISH I 27, Zoom 26. Jack for shoulder strap (see page 20) 32. AudioNideo Out 35. S-VIDEO OUT (see...
Instruction Booklet
Page 16
... OSD on . EIS (SCA35/A85 only) (see page 34) Indicates that the manual focus is working. 0S g. a.Zoom position (see page 33) indicates zoom position, b.Battery level (see page 24) oso cA c, Manual Focus (see page 42) indicates that the EIS is working. I -BLC/BLC is working. (BLC for...
... OSD on . EIS (SCA35/A85 only) (see page 34) Indicates that the manual focus is working. 0S g. a.Zoom position (see page 33) indicates zoom position, b.Battery level (see page 24) oso cA c, Manual Focus (see page 42) indicates that the EIS is working. I -BLC/BLC is working. (BLC for...
Instruction Booklet
Page 18
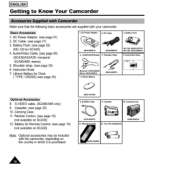
...SCA3O) 4, AudieNideo Cable, (see page 45) (SCA30/A33/A35: monaural SCAS0/A85: stereo) 5, Shoulder strap, (see page 21) 2. DC Cable AD44.0000"_A 4. Baltery Pack NC._20: AD59_10377A NH.180: AD43_3Ot104A 6. Carrying Case. 11. Lithium Battery for Remote Control. (see page 21) 3. ...cable, (SCAS0/A85 only) 9. Remote Control. (see page 19) (not available on SCA30) 12, Battery for Clock ( TYPE: CR2025) (see page 25) 10. Instruction Book. 7. AC Power Adaptor 2. Cassette "_0. L_hium Battery O AD63_Ot107A 3. AD43.10"_30A 8. I ENGLISH] Getting to Know Your Camcorder Make sure ...
...SCA3O) 4, AudieNideo Cable, (see page 45) (SCA30/A33/A35: monaural SCAS0/A85: stereo) 5, Shoulder strap, (see page 21) 2. DC Cable AD44.0000"_A 4. Baltery Pack NC._20: AD59_10377A NH.180: AD43_3Ot104A 6. Carrying Case. 11. Lithium Battery for Remote Control. (see page 21) 3. ...cable, (SCAS0/A85 only) 9. Remote Control. (see page 19) (not available on SCA30) 12, Battery for Clock ( TYPE: CR2025) (see page 25) 10. Instruction Book. 7. AC Power Adaptor 2. Cassette "_0. L_hium Battery O AD63_Ot107A 3. AD43.10"_30A 8. I ENGLISH] Getting to Know Your Camcorder Make sure ...
Instruction Booklet
Page 19
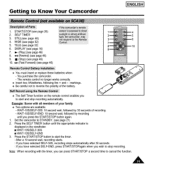
... Know Your Camcorder ENGLISH I (Stop)(see page46) 10. _-I_(Fast Forward) (see page 46) --4 --5 3_ --6 mlO ÷ You must insert or replace these batteries when: - WIDE (see page 32) 5, TELE (see page 32) 6, DISPLAY (see page 26) 2. WAIT-10S/SELF-30S: 10 second wait, followed by recording...STOP button again, 1. I_ (Play) (see page46) 8. ,*4 (Rewind) (see page 46) 4. markings, + Be careful not to reverse the polarity of the battery. ÷ The Self ]liner function on the remote control enables you to start the timer. : After a 10 second wait, recording starts. : If you have ...
... Know Your Camcorder ENGLISH I (Stop)(see page46) 10. _-I_(Fast Forward) (see page 46) --4 --5 3_ --6 mlO ÷ You must insert or replace these batteries when: - WIDE (see page 32) 5, TELE (see page 32) 6, DISPLAY (see page 26) 2. WAIT-10S/SELF-30S: 10 second wait, followed by recording...STOP button again, 1. I_ (Play) (see page46) 8. ,*4 (Rewind) (see page 46) 4. markings, + Be careful not to reverse the polarity of the battery. ÷ The Self ]liner function on the remote control enables you to start the timer. : After a 10 second wait, recording starts. : If you have ...
Instruction Booklet
Page 20
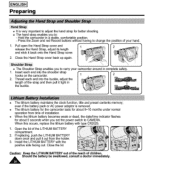
...2.1.Insert each end into the shoulder strap ti [" I hTleohnorgektashdooenf atthchehe sectnaradmpicnaotonrddtehtreh. Close the lid. Should the battery be swallowed, consult a doctor immediately. I _ 7 _'i]i 2 _ ] + The lithium battery maintains the clock function, title and preset contents memory; Caution: Keep the LITHIUM BATTERYout of the reach of...Close the Hand Strap cover back up again, [] | + The Shoulder Strap enables you to CAMERA. even if the battery pack or AC power adaptor is very important to adjust the hand strap for better shooting, ÷ The hand strap...
...2.1.Insert each end into the shoulder strap ti [" I hTleohnorgektashdooenf atthchehe sectnaradmpicnaotonrddtehtreh. Close the lid. Should the battery be swallowed, consult a doctor immediately. I _ 7 _'i]i 2 _ ] + The lithium battery maintains the clock function, title and preset contents memory; Caution: Keep the LITHIUM BATTERYout of the reach of...Close the Hand Strap cover back up again, [] | + The Shoulder Strap enables you to CAMERA. even if the battery pack or AC power adaptor is very important to adjust the hand strap for better shooting, ÷ The hand strap...
Instruction Booklet
Page 21
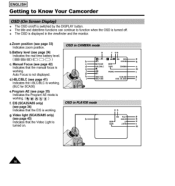
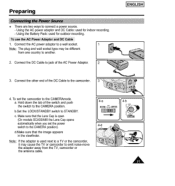
... emit noise-move the adaptor away from one country to the CAMERAmode. a. d.Make sure that the Lens Cap is used for indoor recording. - Using the Battery Pack: used next to the CAMERA position. To set the power switchto the CAMERA position). c. Hold down the tab of the AC Power Adaptor. 3. Make...
... emit noise-move the adaptor away from one country to the CAMERAmode. a. d.Make sure that the Lens Cap is used for indoor recording. - Using the Battery Pack: used next to the CAMERA position. To set the power switchto the CAMERA position). c. Hold down the tab of the AC Power Adaptor. 3. Make...
Instruction Booklet
Page 22
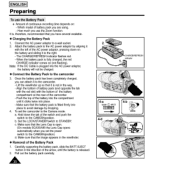
... and push the switch to a wall socket. 2. Make sure that the image appears in the viewfinder, • Removal of the Battery Pack 1, Carefully supporting the battery pack, slide the BATT,EJECT button in the way. - The CHARGE/REFRESH indicator flashes red. - b, Set the LOCK/STANDBYswitch to... the camcorder. - I ENGLISH] Preparing + Amount of continuous recording time depends on the rear of the camcorder. - Make sure that the battery pack is fitted firmly into place to avoid damage by dropping. 4, To set the power switch to the CAMERAposition) d, Make sure that the ...
... and push the switch to a wall socket. 2. Make sure that the image appears in the viewfinder, • Removal of the Battery Pack 1, Carefully supporting the battery pack, slide the BATT,EJECT button in the way. - The CHARGE/REFRESH indicator flashes red. - b, Set the LOCK/STANDBYswitch to... the camcorder. - I ENGLISH] Preparing + Amount of continuous recording time depends on the rear of the camcorder. - Make sure that the battery pack is fitted firmly into place to avoid damage by dropping. 4, To set the power switch to the CAMERAposition) d, Make sure that the ...
Instruction Booklet
Page 23
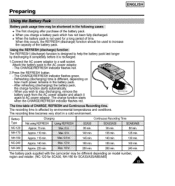
.... 145rain. 190min. 280 min, 90 min. 135 rain. 140 rain. 180 min. 260 rain. 80 rain. 125 min, 130 rain, 160 min. 240 min, The battery pack supplied with the camcorder may be used for SCA33/A35/A8O/A85) The CHARGE/REFRESH indicator flashes red. 2.Press the REFRESH button. - The recording... AC power adaptor and attach it is affected by discharging it completely before it again to AC power adaptor. Approx, 140 rnin, Approx, 220 rnin. Battery Type NC-120 NH-170 NH-180 NC-240 NH-340 Charging Not using REFRESH Approx. 70 min, Approx. 110 min. When you charge...
.... 145rain. 190min. 280 min, 90 min. 135 rain. 140 rain. 180 min. 260 rain. 80 rain. 125 min, 130 rain, 160 min. 240 min, The battery pack supplied with the camcorder may be used for SCA33/A35/A8O/A85) The CHARGE/REFRESH indicator flashes red. 2.Press the REFRESH button. - The recording... AC power adaptor and attach it is affected by discharging it completely before it again to AC power adaptor. Approx, 140 rnin, Approx, 220 rnin. Battery Type NC-120 NH-170 NH-180 NC-240 NH-340 Charging Not using REFRESH Approx. 70 min, Approx. 110 min. When you charge...
Instruction Booklet
Page 24
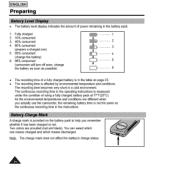
... at 77°F(25°C). The continuous recording time in the operating instructions is in the table on the battery pack to help you remember whether it has been charged or not. Fullycharged 2. 10% consumed 3, 40% consumed 4, 80% consumed (prepare a charged one ...means charged and which one ) 5. 95% consumed (change the battery) 6. 98% consumed (camcorder will turn off soon, change the battery as soon as the continuous recording time in the instructions, A charge mark is provided on page 23, The recording time is...
... at 77°F(25°C). The continuous recording time in the operating instructions is in the table on the battery pack to help you remember whether it has been charged or not. Fullycharged 2. 10% consumed 3, 40% consumed 4, 80% consumed (prepare a charged one ...means charged and which one ) 5. 95% consumed (change the battery) 6. 98% consumed (camcorder will turn off soon, change the battery as soon as the continuous recording time in the instructions, A charge mark is provided on page 23, The recording time is...
Instruction Booklet
Page 25
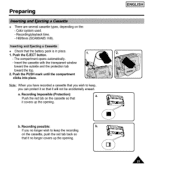
... recorded a cassette that you wish to keep, you no longerwish to keep the recording on the cassette, push the red tab back so that the battery pack is in place. 1. Push the PUSH mark until the compartment clicks into place. Color system used. - HiS/8mm (SCA80/A85: Hi8). + Check that it...
... recorded a cassette that you wish to keep, you no longerwish to keep the recording on the cassette, push the red tab back so that the battery pack is in place. 1. Push the PUSH mark until the compartment clicks into place. Color system used. - HiS/8mm (SCA80/A85: Hi8). + Check that it...
Instruction Booklet
Page 26
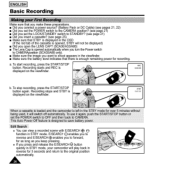
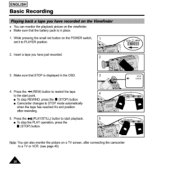
... If you press and release the E/SEARCH _ button quickly in STBY mode, your camcorder will not be displayed) • Did you open the LENS CAP? (SCA30/A33/A80) • The Lens Cap is opened . To stop recording, press the START/STOP button again. STBY will play back in reverse for recording...a recorded scene with E/SEARCH _) O function in STBY mode. I ENGLISH] Basic Recording Make sure that you make these preparations. • Did you connect a power source.,?(Battery Pack or DC Cable) (see pages 21, 22) • Did you set the POWER switch to the CAMERA position? (see page 21) • Did you...
... If you press and release the E/SEARCH _ button quickly in STBY mode, your camcorder will not be displayed) • Did you open the LENS CAP? (SCA30/A33/A80) • The Lens Cap is opened . To stop recording, press the START/STOP button again. STBY will play back in reverse for recording...a recorded scene with E/SEARCH _) O function in STBY mode. I ENGLISH] Basic Recording Make sure that you make these preparations. • Did you connect a power source.,?(Battery Pack or DC Cable) (see pages 21, 22) • Did you set the POWER switch to the CAMERA position? (see page 21) • Did you...
Instruction Booklet
Page 28
insert a tape you have just recorded. 3. Make sure that the battery pack is displayed in place. 1. Note: You can monitor the playback picture on the POWER switch, set it 's end position after connecting the camcorder to ...
insert a tape you have just recorded. 3. Make sure that the battery pack is displayed in place. 1. Note: You can monitor the playback picture on the POWER switch, set it 's end position after connecting the camcorder to ...
Instruction Booklet
Page 32
... tends to Lookunprofessional during playback and reduces the usage time of two zoom speeds according to your shots; You can also select one of the battery pack. 1. Move the zoom lever a little for a gradual zoom, move the lever to vary your requirements: • Gradual zoom (9~12 seconds from TELE/WIDE to...
... tends to Lookunprofessional during playback and reduces the usage time of two zoom speeds according to your shots; You can also select one of the battery pack. 1. Move the zoom lever a little for a gradual zoom, move the lever to vary your requirements: • Gradual zoom (9~12 seconds from TELE/WIDE to...
Instruction Booklet
Page 38
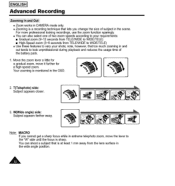
... only. Press the MENU/ENTER button. • The MENU OSD is displayed. • The cursor shows the feature you have installed the LITHIUM BATTERY, (see page 20) The LITHIUM BATTERY is set , 3 DZOOM OFF PROGRAM AE DSE SELECT 4, Rotate the MENU Dial so as you will be reminded of CAMERA mode only...
... only. Press the MENU/ENTER button. • The MENU OSD is displayed. • The cursor shows the feature you have installed the LITHIUM BATTERY, (see page 20) The LITHIUM BATTERY is set , 3 DZOOM OFF PROGRAM AE DSE SELECT 4, Rotate the MENU Dial so as you will be reminded of CAMERA mode only...
Instruction Booklet
Page 39
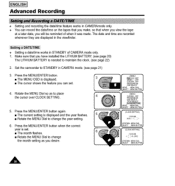
... MENU/ENTER button after setting the minute. Note: • ft your date and time settings are not maintained in camcorder, it means the installed LITHIUM BATTERY is set the DATE/TIME. (see page 20) • You cannot conceal the recorded date or time during playback. Press the DATE/TIME button. •...
... MENU/ENTER button after setting the minute. Note: • ft your date and time settings are not maintained in camcorder, it means the installed LITHIUM BATTERY is set the DATE/TIME. (see page 20) • You cannot conceal the recorded date or time during playback. Press the DATE/TIME button. •...


