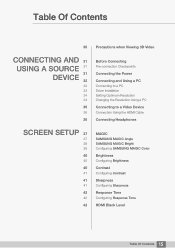
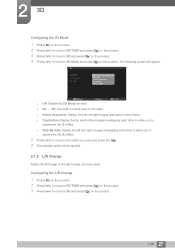
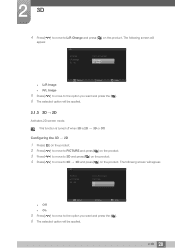
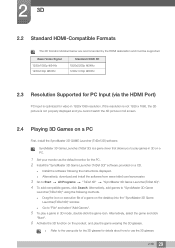
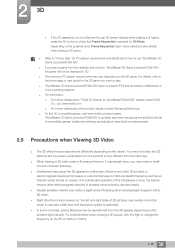
User Manual (user Manual) (ver.1.0) (English)
Page 14
... Checking the Contents Removing the Packaging Checking the Components Parts Frontal Buttons Reverse Side Tidying Up the Connected Cables Kensington Lock Adjusting the Product Tilt 3D 26 26 27 28 29 29 29 3D 3D Mode L/R Change 3D ª2D Standard HDMI-Compatible Formats Resolution Supported for PC Input (via the HDMI Port) Playing...
User Manual (user Manual) (ver.1.0) (English)
Page 15
Table Of Contents 30 Precautions when Viewing 3D Video CONNECTING AND 31 USING A SOURCE 31 31 DEVICE 32 32 33 34 34 36 36 36 Before Connecting Pre-connection Checkpoints Connecting the Power ... Connection Using the HDMI Cable Connecting Headphones SCREEN SETUP 37 37 38 39 40 40 40 41 41 41 42 42 42 MAGIC SAMSUNG MAGIC Angle SAMSUNG MAGIC Bright Configuring SAMSUNG MAGIC Color Brightness Configuring Brightness Contrast Configuring Contrast Sharpness Configuring Sharpness Response Time Configuring Response Time HDMI Black Level 15 Table Of...
User Manual (user Manual) (ver.1.0) (English)
Page 20
Components Quick Setup guide Warranty (Not available In some locations) User Manual Cleaning cloth Power cable DC power adapter 3D Glasses & 3D Glasses User Manual DP cable Wire holders z Components may differ from whom you purchased the product if any item is only supplied with the black high-glossy model. 20 1 Preparations z The cleaning cloth is missing. 1 Preparations 1.1.2 Checking the Components z Contact the dealer from the image shown. z The appearance of the components and items sold separately may differ in different locations.
User Manual (user Manual) (ver.1.0) (English)
Page 22
Pressing the [ ] button when the OSD menu is locked, z Brightness, Contrast and 3D can be adjusted, and INFORMATION can be used by pressing the [ ] button, a message that was configured as Customized Key before locking the OSD control can ... with a finger. Move to "10.2 PowerSaver" for an option on the product or change the input source (HDMI/DP). Configure Customized Key and press [ enabled. 3D - MAGIC - z This is operating normally. z OSD control lock: Maintain the current settings, or lock the OSD control to prevent unintended changes to the last menu...
User Manual (user Manual) (ver.1.0) (English)
Page 26
..., protective goggles, etc. If your child shows any symptom such as 3D movies. 2 3D This feature allows you to 120Hz using (SyncMaster-dedicated) Samsung 3D glasses. 2.1 3D z You can view 3D content using the display settings menu on the 3D glasses, and select whichever 3D mode that offers the best 3D effect from for the video input, and view...
User Manual (user Manual) (ver.1.0) (English)
Page 27
... images overlapping each other to allow you to experience the 3D effect. 5 Press [ ] to move to the option you to experience the 3D effect. z 2D ª3D: Converts a normal video to 3D Mode and press [ ] on the product. 2 3D 27 The following screen will be applied. 2.1.2 L/R Change... will appear. ' ' 0RGH L/R Change 'ª2D : Off 'ĺ' Frame Sequential Top-Bottom Side-by-Side Return Move Enter z Off: Disable the 3D Mode function. z Frame Sequential: Display the left image to the right image, and vice versa. z Top Bottom: Display the top and bottom images overlapping...
User Manual (user Manual) (ver.1.0) (English)
Page 28
... Return Move Enter z R/L Image 5 Press [ ] to move to the option you want and press the [ ]. 6 The selected option will be applied. 2 3D 28 Configuring the 3D ª2D 1 Press [m ] on the product. 2 Press [ ] to move to PICTURE and press [ ] on the product. 3 Press [ ] to move to... [ ] to move to the option you want and press the [ ]. 6 The selected option will be applied. 2.1.3 3D ª2D Activates 2D screen mode. The following screen will appear. 3D 3D Mode L/R Change 3Dª2D : Frame Sequential : L/R Image : Off On z Off Return Move Enter z On 5 Press [ ] to...
User Manual (user Manual) (ver.1.0) (English)
Page 29
...execution file of a game on the product, and play the game wearing the 3D glasses. z Refer to the user guide for the 3D glasses for the PC. 2 Install the "SyncMaster 3D Game Launcher (TriDef 3D)" software provided on a PC. 1 Set your monitor as the default monitor ... the instructions displayed. Alternatively, select the game and click "Start". 6 Activate the 3D function on the desktop into the "SyncMaster 3D Game Launcher(TriDef 3D)" window. 2 3D 2.2 Standard HDMI-Compatible Formats The 3D formats indicated below are recommended by the HDMI association and must be supported. Basic Video...
User Manual (user Manual) (ver.1.0) (English)
Page 30
... frequency such as an Internet router) turned on nearby. www.tridef.com For further details about how to 50Hz or 100Hz. 2 3D 30 z Right after the monitor powers on, the left and right sides of screen flickering. z The minimum PC system requirements may overlap more...on the graphics card, Frame Sequential might not be displayed in 50Hz, 3D video. It may cause the 3D glasses to malfunction if there is selected for PC system requirements and details about the product, please contact Samsung Electronics. z In some countries, strong flickering may notice a slight screen...
User Manual (user Manual) (ver.1.0) (English)
Page 40
... the general brightness of the picture. (Range: 0~100) A higher value will make the object appear clearer. Not available when Bright is in the picture. PICTURE 3D MAGIC Brightness Contrast Sharpness Response Time HDMI Black Level Normal Low Return Adjust 4 Adjust the Brightness using the [ ] button. 50 75 60 Enter 4.3 Contrast Adjust...
User Manual (user Manual) (ver.1.0) (English)
Page 41
PICTURE 3D MAGIC Brightness Contrast Sharpness Response Time HDMI Black Level Return 4 Adjust the Contrast using the [ ] button. 50 75 60 Enter 41 4 Screen Setup 4 Screen Setup 4.3.1 ... [ ] to move to PICTURE and press [ ] on the product. 3 Press [ ] to move to Sharpness and press [ ] on the product. The following screen will appear. PICTURE 3D MAGIC Brightness Contrast Sharpness Response Time HDMI Black Level Normal Low Return Adjust 4 Adjust the Sharpness using the [ ] button. Normal Low Adjust 50 75 60...
User Manual (user Manual) (ver.1.0) (English)
Page 42
... set-top box is best to set Response Time to Normal or Faster when you want and press the [ ]. 5 The selected option will appear. PICTURE 3D MAGIC Brightness Contrast Sharpness Response Time HDMI Black Level Normal Faster Fastest Ü Ü 75 60 2200 4 Press [ Return Move Enter ] to move to the...
User Manual (user Manual) (ver.1.0) (English)
Page 43
PICTURE 3D MAGIC Brightness Contrast Sharpness Response Time HDMI Black Level : Normal : Low Ü Ü 75 60 2200 Return Move Enter z Normal: Select this mode to reduce ...
User Manual (user Manual) (ver.1.0) (English)
Page 62
SETUP&RESET Customized Key Off Timer On/Off Off Timer Setting Reset 3D ECO MAGIC Imege Size Return Move Enter z Can be applied. 7.9 Off Timer On/Off Enable or disable the off timer that automatically powers off the ... By configuring Customized Key to suit your preferences, you want and press the [ ]. 5 The selected option will appear. The following screen will be set to 3D, ECO or MAGIC, Image Size. 4 Press [ ] to move to the option you can change the screen settings more conveniently. 7.8.1 Configuring Customized Key 1 Press [m ] on the...
User Manual (user Manual) (ver.1.0) (English)
Page 63
...RESET and press [ ] on the product. 3 Press [ ] to move to Off Timer On/Off and press [ ] on the product. SETUP&RESET Customized Key 3D Off Timer On/Off On Off Timer Setting 10 h Reset Return Adjust Enter 4 Press [ ] to configure Off Timer Setting. 63 7 Setup and Reset SETUP...&RESET Customized Key Off Timer On/Off Off Timer Setting Reset 3D Off : On Return Move Enter z Off: Deactivate the off timer so that the product powers off automatically. 4 Press [ ] to move to the option...
User Manual (user Manual) (ver.1.0) (English)
Page 64
7 Setup and Reset 7.11 Reset Return all the settings for the product to the default factory settings. 7.11.1 Initializing Settings (Reset) 1 Press [m ] on the product. 2 Press [ ] to move to SETUP&RESET and press [ ] on the product. 3 Press [ ] to move to Reset and press [ ] on the product. The following screen will be applied. 64 7 Setup and Reset SETUP&RESET Customized Key 3D Off Timer On/Off On Off Timer Setting 10 h Reset No Yes 4 Press [ Return Move Enter ] to move to the option you want and press the [ ]. 5 The selected option will appear.
User Manual (user Manual) (ver.1.0) (English)
Page 75
..., the screen may degrade the picture quality. Therefore, a resolution other than the specified resolution may be set to the graphics card user manual. DP Normal / 3D Resolution 1920 x 1080 100 Hz 1920 x 1080 120 Hz Horizontal Frequency (kHz) 113.221 Vertical Frequency (Hz) 99.930 Pixel Clock (MHz) 235.500 Sync...
User Manual (user Manual) (ver.1.0) (English)
Page 77
....500 + / + 1280 x 720,720p 60Hz, FramePacking 90.000 60.000 148.500 + / + 1920 x 1080,1080i 50Hz,SBS(Half) 28.130 50.000 74.250 + / + 1920 x 3D 1080,1080i 60Hz,SBS(Half) 33.750 60.000 74.250 + / + 1920 x 1080,1080p 50Hz,SBS(Half) 56.250 50.000 148.500 + / + 1920 x 1080...
User Manual (user Manual) (ver.1.0) (English)
Page 86
Index Numerics 3D 26 3D Mode 26 A Adjusting the Product Tilt and Height 25 Appendix 79 Auto Source 60 C Changing the Resolution Using a PC 34 Checking the Resolution and Frequency 67 Cleaning 4 Connecting Headphones 36 Connecting to a PC 32 Connecting to a Video Device 36 Connection Using the HDMI Cable 36 Contact SAMSUNG WORLDWIDE 79... Response Time 42 Reverse Side 23 S Safety Precautions 5 Screen Fit 48 Securing the Installation Space 5 Setting Optimum Resolution 34 Standard Signal Mode Table 75 SyncMaster 3D GAME Launcher (TriDef 3D) 29 T Testing the Product 67 Index 86
User Manual (user Manual) (ver.1.0) (Korean)
Page 28
... Launcher(TriDef 3D SyncMaster 3D Game Launcher(TriDef 3D)는 PC 3D 1 PC 2 CD SyncMaster 3D Game Launcher(TriDef 3D z z www.tridef.com/syncmaster 3 TriDef 3D" ª "SyncMaster 3D Game Launcher(TriDef 3D 4 SyncMaster 3D Game Launcher(TriDef 3D z SyncMaster 3D Game Launcher(TriDef 3D)" 창안 z 5 3D 6 제품의3D 3D z 3D 3D z 3D 3D 3D 3D z "SyncMaster 3D Game Launcher(TriDef 3D PC z "SyncMaster 3D Game Launcher(TriDef 3D z 3D PC 3D 3D z "SyncMaster 3D Game Launcher...