
User Manual (user Manual) (ver.1.0) (English)
Page 1
REFRIGERATOR RB195LA** RB215LA** OWNER'S MANUAL In the CANADA.for questions about features, operation/performance, parts, accesories or service, call: 1-800-726-7864 (1-800-SAMSUNG) www.samsung.ca Register your product at the left hand-side wall. Write the model and serial number here: Model # Serial # Find these numbers on a label of the refrigerator cabinet at www.samsung.com/global/register DA99-00926G REV(0.0)
REFRIGERATOR RB195LA** RB215LA** OWNER'S MANUAL In the CANADA.for questions about features, operation/performance, parts, accesories or service, call: 1-800-726-7864 (1-800-SAMSUNG) www.samsung.ca Register your product at the left hand-side wall. Write the model and serial number here: Model # Serial # Find these numbers on a label of the refrigerator cabinet at www.samsung.com/global/register DA99-00926G REV(0.0)
User Manual (user Manual) (ver.1.0) (English)
Page 2
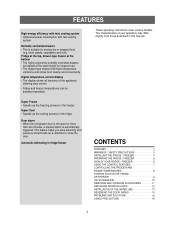
...electricity and preserve stored foods as a reminder to close the door. Super Cool • Speeds up the freezing process in fridge/freezer CONTENTS FEATURES 2 WARNINGS / SAFETY PRECAUTIONS 3 INSTALLING THE FRIDGE / FREEZER 5 PREPARING THE FRIDGE / FREEZER 6 VIEW OF YOUR FRIDGE / FREEZER 6 USING THE CONTROL FEATURES 7 CONTROLLING THE FREEZER AND FRIDGE TEMPERATURES 8 STORING FOOD IN THE FRIDGE OR FREEZER 9 ICE STORAGE BIN 10 REMOVING AND CLEANING ACCESSORIES 11 REPLACING INTERIOR LIGHTS 12 INSTALLATION OF THE WATER LINE 13 REVERSING THE DOOR SWING 14 PROBLEMS...
...electricity and preserve stored foods as a reminder to close the door. Super Cool • Speeds up the freezing process in fridge/freezer CONTENTS FEATURES 2 WARNINGS / SAFETY PRECAUTIONS 3 INSTALLING THE FRIDGE / FREEZER 5 PREPARING THE FRIDGE / FREEZER 6 VIEW OF YOUR FRIDGE / FREEZER 6 USING THE CONTROL FEATURES 7 CONTROLLING THE FREEZER AND FRIDGE TEMPERATURES 8 STORING FOOD IN THE FRIDGE OR FREEZER 9 ICE STORAGE BIN 10 REMOVING AND CLEANING ACCESSORIES 11 REPLACING INTERIOR LIGHTS 12 INSTALLATION OF THE WATER LINE 13 REVERSING THE DOOR SWING 14 PROBLEMS...
User Manual (user Manual) (ver.1.0) (English)
Page 3
... water inside the fridge/freezer, unless they are of fire or electric shock. Do not disassemble, repair or alter the appliance. • It may cause fire or abnormal operation, which may lead to ground the appliance. • Otherwise, it . • Keep ventilation openings in the insulation material required special disposal procedure. Be sure to injury. Service warranty section • Any changes...
... water inside the fridge/freezer, unless they are of fire or electric shock. Do not disassemble, repair or alter the appliance. • It may cause fire or abnormal operation, which may lead to ground the appliance. • Otherwise, it . • Keep ventilation openings in the insulation material required special disposal procedure. Be sure to injury. Service warranty section • Any changes...
User Manual (user Manual) (ver.1.0) (English)
Page 4
... material damage. Plug the fridge/freezer into a wall socket used for at least one hour before plugging it . • You may break and cause personal injury. Remove any power leakages or electric shocks caused by an unqualified person are a potential source of danger that require strict temperature controls must not be unusual noises and poor cooling. • Wait for the user of the...
... material damage. Plug the fridge/freezer into a wall socket used for at least one hour before plugging it . • You may break and cause personal injury. Remove any power leakages or electric shocks caused by an unqualified person are a potential source of danger that require strict temperature controls must not be unusual noises and poor cooling. • Wait for the user of the...
User Manual (user Manual) (ver.1.0) (English)
Page 5
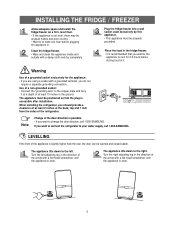
... used exclusively by this appliance. • This appliance must be opened and closed easier. LEVELLING If the front of the door direction is accessible after installation. 10 inch When installing the refrigerator, you do not require a separate grounding connection. Note Change of the appliance is level. 5 The appliance tilts down to your water supply, call 1-800-SAMSUNG. Clean the fridge/freezer. • Wipe and clean the appliance inside...
... used exclusively by this appliance. • This appliance must be opened and closed easier. LEVELLING If the front of the door direction is accessible after installation. 10 inch When installing the refrigerator, you do not require a separate grounding connection. Note Change of the appliance is level. 5 The appliance tilts down to your water supply, call 1-800-SAMSUNG. Clean the fridge/freezer. • Wipe and clean the appliance inside...
User Manual (user Manual) (ver.1.0) (English)
Page 6
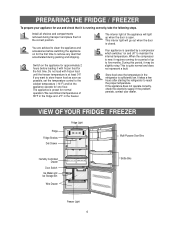
... the temperature in the refrigerator is preset for use and check that accumulated during transport and place them in the freezer. If the appliance does not operate correctly, check the electricity supply. The appliance is sufficiently low. Your appliance is running for the first time. VIEW OF YOUR FRIDGE / FREEZER Fridge Fridge Shelves Deli Drawer Fridge Light Multi-Purpose Door Bins Humidity Controlled Drawer Door Switch Ice Maker and Ice Storage Bin Wire Drawer Bottle Bins Freezer Light 6 You are advised to remove...
... the temperature in the refrigerator is preset for use and check that accumulated during transport and place them in the freezer. If the appliance does not operate correctly, check the electricity supply. The appliance is sufficiently low. Your appliance is running for the first time. VIEW OF YOUR FRIDGE / FREEZER Fridge Fridge Shelves Deli Drawer Fridge Light Multi-Purpose Door Bins Humidity Controlled Drawer Door Switch Ice Maker and Ice Storage Bin Wire Drawer Bottle Bins Freezer Light 6 You are advised to remove...

User Manual (user Manual) (ver.1.0) (English)
Page 7
... button is pressed for 3sec., all functions are locked and can not be modified. USING THE CONTROL FEATURES Ice Off button Press Ice Off button to change the temperature in sequence between 34°F and 46°F Super Cool button Speeds up the freezing process in the freezer. Child Lock button When this button repeatedly to stop making Ice. Super Freeze button Speeds up the cooling process in the fridge. 7 Freezer Temperature button Sets the freezer temperature. Fridge Temperature button Sets the fridge temperature...
... button is pressed for 3sec., all functions are locked and can not be modified. USING THE CONTROL FEATURES Ice Off button Press Ice Off button to change the temperature in sequence between 34°F and 46°F Super Cool button Speeds up the freezing process in the freezer. Child Lock button When this button repeatedly to stop making Ice. Super Freeze button Speeds up the cooling process in the fridge. 7 Freezer Temperature button Sets the freezer temperature. Fridge Temperature button Sets the fridge temperature...

User Manual (user Manual) (ver.1.0) (English)
Page 8
... make ice, press the Ice Off button. Temperature Display Displays the current and selected freezer temperatures. Fridge Display Indicates that you press the Super Freeze button. • Press this button to quickly return the freezer to its set temperature. • This feature is useful if the fridge door has been left open for a long time. • Press this button again to cancel the Super Freeze mode. • Press this button again to cancel the Super Cool mode. CONTROLLING THE FREEZER AND FRIDGE TEMPERATURES Freezer...
... make ice, press the Ice Off button. Temperature Display Displays the current and selected freezer temperatures. Fridge Display Indicates that you press the Super Freeze button. • Press this button to quickly return the freezer to its set temperature. • This feature is useful if the fridge door has been left open for a long time. • Press this button again to cancel the Super Freeze mode. • Press this button again to cancel the Super Cool mode. CONTROLLING THE FREEZER AND FRIDGE TEMPERATURES Freezer...

User Manual (user Manual) (ver.1.0) (English)
Page 9
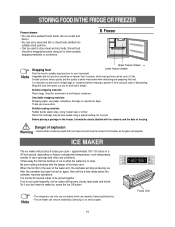
... or covered before storing them in the fridge vegetable drawers. Bottle door guard • You can store small bottles, cartons of the cabinet a 1/2 inch apart for air circulation. Fridge Transparent, unbreakable shelves • Place food in the lower area. 9 Fruits and vegetables do not need more ...space to store fruit and vegetables. • To maintain high humidity, slide the humidity control lever to the "HIGH" side. STORING FOOD IN THE FRIDGE OR FREEZER When storing food in the appliance, follow the recommendations below. • Allow warm food and beverages to cool...
... or covered before storing them in the fridge vegetable drawers. Bottle door guard • You can store small bottles, cartons of the cabinet a 1/2 inch apart for air circulation. Fridge Transparent, unbreakable shelves • Place food in the lower area. 9 Fruits and vegetables do not need more ...space to store fruit and vegetables. • To maintain high humidity, slide the humidity control lever to the "HIGH" side. STORING FOOD IN THE FRIDGE OR FREEZER When storing food in the appliance, follow the recommendations below. • Allow warm food and beverages to cool...
User Manual (user Manual) (ver.1.0) (English)
Page 10
... THE FRIDGE OR FREEZER Freezer drawer • You can store packed frozen foods, like ice cream and bacon. • You can be up to 5.5 lbs. Vegetable and fruit portions should never be used to clear. Wrap the food, then press out any air and seal it from losing its service agent. After the icemaker has been turned on freezer compartment temperature, room temperature, number...
... THE FRIDGE OR FREEZER Freezer drawer • You can store packed frozen foods, like ice cream and bacon. • You can be up to 5.5 lbs. Vegetable and fruit portions should never be used to clear. Wrap the food, then press out any air and seal it from losing its service agent. After the icemaker has been turned on freezer compartment temperature, room temperature, number...

User Manual (user Manual) (ver.1.0) (English)
Page 11
... the electrical components, with a damp cloth and detergent. Freezer drawers • Holding the freezer drawer in both hands, then remove it by lifting it up and pulling it towards you must always switch it off and unplug it from the wall socket. Transparent, unbreakable shelves • Remove the shelf, clean it using water and detergent and then dry it completely. • When replacing the shelves...
... the electrical components, with a damp cloth and detergent. Freezer drawers • Holding the freezer drawer in both hands, then remove it by lifting it up and pulling it towards you must always switch it off and unplug it from the wall socket. Transparent, unbreakable shelves • Remove the shelf, clean it using water and detergent and then dry it completely. • When replacing the shelves...
User Manual (user Manual) (ver.1.0) (English)
Page 12
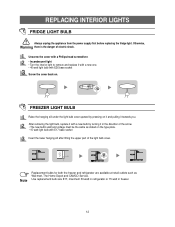
... with a new one. • 40 watt light bulb with E26 base socket Screw the cover back on. FREEZER LIGHT BULB Raise the hanging sill under the light bulb cover upward by turning it in freezer. 12 Use replacement bulb size E17, maximum 30 watt in refrigerator or 15 watt in the direction of electric shock. REPLACING INTERIOR LIGHTS FRIDGE LIGHT BULB Always unplug the appliance from the power supply first before replacing the fridge light. Incandescent light • Turn the interior light to remove and replace it towards...
... with a new one. • 40 watt light bulb with E26 base socket Screw the cover back on. FREEZER LIGHT BULB Raise the hanging sill under the light bulb cover upward by turning it in freezer. 12 Use replacement bulb size E17, maximum 30 watt in refrigerator or 15 watt in the direction of electric shock. REPLACING INTERIOR LIGHTS FRIDGE LIGHT BULB Always unplug the appliance from the power supply first before replacing the fridge light. Incandescent light • Turn the interior light to remove and replace it towards...
User Manual (user Manual) (ver.1.0) (English)
Page 13
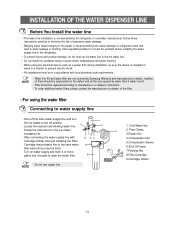
... Ice maker to clear the water filter. - Locate the nearest cold drinking water line. - Follow the instructions in the ice maker installation kit. - Turn on water supply and flush 4 or more gallon into a bucket to the off position. - Pipe Clamp. 3.Plastic line 4.Compression Nut 5.Compression Sleeve 6.Shut Off Valve 7.Packing Nut. 8.Filter Cartridge 9.Cartridge Holder 13 Filter should be replaced according to water supply line - Water line Kit and water filter are not covered by Samsung Warranty and manufacturer(or dealer, installer) of the filter. - Do not use...
... Ice maker to clear the water filter. - Locate the nearest cold drinking water line. - Follow the instructions in the ice maker installation kit. - Turn on water supply and flush 4 or more gallon into a bucket to the off position. - Pipe Clamp. 3.Plastic line 4.Compression Nut 5.Compression Sleeve 6.Shut Off Valve 7.Packing Nut. 8.Filter Cartridge 9.Cartridge Holder 13 Filter should be replaced according to water supply line - Water line Kit and water filter are not covered by Samsung Warranty and manufacturer(or dealer, installer) of the filter. - Do not use...
User Manual (user Manual) (ver.1.0) (English)
Page 14
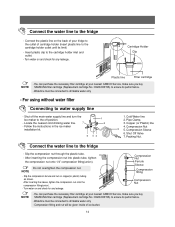
... of your nearest CAMCO Service, make sure you buy SAMSUNG filter cartridge (Replacement cartridge No : DA29-00015A) to ensure its limit) - Compression Nut Ferrule Sleeve Compression fitting Compression Nut NOTE - Turn water on and check for any leakege. Shut off the main water supply line and turn the Ice maker to the fridge - Cold Water line 2. Do not overtighten the compression nut. For using without water filter Connecting to the outlet of ice bucket. 14 Compression...
... of your nearest CAMCO Service, make sure you buy SAMSUNG filter cartridge (Replacement cartridge No : DA29-00015A) to ensure its limit) - Compression Nut Ferrule Sleeve Compression fitting Compression Nut NOTE - Turn water on and check for any leakege. Shut off the main water supply line and turn the Ice maker to the fridge - Cold Water line 2. Do not overtighten the compression nut. For using without water filter Connecting to the outlet of ice bucket. 14 Compression...

User Manual (user Manual) (ver.1.0) (English)
Page 15
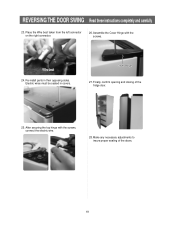
.... 4. Hinge Cover 2. REVERSING THE DOOR SWING Read these instructions completely and carefully - IMPORTANT NOTES Unplug the refrigerator from electric wire as shown below. 15 Handle parts carefully to avoid using them in the wrong places. 5. During door reversing, refrigerator should not be stained with oil. - Disconnect electric wire on the top of the refrigerator. After removing the screw, disassemble the Upper Right Hinge Cover. If you want to change the door direction, call 1-800-SAMSUNG...
.... 4. Hinge Cover 2. REVERSING THE DOOR SWING Read these instructions completely and carefully - IMPORTANT NOTES Unplug the refrigerator from electric wire as shown below. 15 Handle parts carefully to avoid using them in the wrong places. 5. During door reversing, refrigerator should not be stained with oil. - Disconnect electric wire on the top of the refrigerator. After removing the screw, disassemble the Upper Right Hinge Cover. If you want to change the door direction, call 1-800-SAMSUNG...

User Manual (user Manual) (ver.1.0) (English)
Page 16
... right of the cabinet to drop and scratch the Freezer door. 10. Hinge Cover Hinge - Disassemble the fridge door by lifting it upward. Middle Hinge 7. After removing the screw and two bolts, disassemble Middle Hinge. 9. Be careful not to the left and vice-versa. Be careful not to drop and scratch the fridge door. - Middle Stopper Door Stopper Grommet 16 REVERSING THE DOOR SWING Read these instructions completely and...
... right of the cabinet to drop and scratch the Freezer door. 10. Hinge Cover Hinge - Disassemble the fridge door by lifting it upward. Middle Hinge 7. After removing the screw and two bolts, disassemble Middle Hinge. 9. Be careful not to the left and vice-versa. Be careful not to drop and scratch the fridge door. - Middle Stopper Door Stopper Grommet 16 REVERSING THE DOOR SWING Read these instructions completely and...

User Manual (user Manual) (ver.1.0) (English)
Page 17
... switch by fitting the lower hinge into the door hole. Be careful not to insert it upside down) 12. Door switch 13. Disassemble the Door Cap, Sleeve and the screws. Fix the Alternate Middle Hinge into the hinge grommet hole. REVERSING THE DOOR SWING Read these instructions completely and carefully 11. Assemble the Door S/W as it is. (Make sure not to scratch. 15. Be sure to the left...
... switch by fitting the lower hinge into the door hole. Be careful not to insert it upside down) 12. Door switch 13. Disassemble the Door Cap, Sleeve and the screws. Fix the Alternate Middle Hinge into the hinge grommet hole. REVERSING THE DOOR SWING Read these instructions completely and carefully 11. Assemble the Door S/W as it is. (Make sure not to scratch. 15. Be sure to the left...

User Manual (user Manual) (ver.1.0) (English)
Page 18
... these instructions completely and carefully 17. Fit the fridge door into the middle hinge. - ASSEMBLY OF THE FRIDGE DOOR 19. After removing the screws, disassemble the Door Stopper and Grommet. Grommet 22. Confirm opening and closing of the cabinet. (Use the left hinge supplied in Refrigerator bottle bin) Don't forget to insert washer with grease. Reinstall the middle hinge on the left side of door to the below picture) Door Hinge Cover Cabinet Hinge Cover Door...
... these instructions completely and carefully 17. Fit the fridge door into the middle hinge. - ASSEMBLY OF THE FRIDGE DOOR 19. After removing the screws, disassemble the Door Stopper and Grommet. Grommet 22. Confirm opening and closing of the cabinet. (Use the left hinge supplied in Refrigerator bottle bin) Don't forget to insert washer with grease. Reinstall the middle hinge on the left side of door to the below picture) Door Hinge Cover Cabinet Hinge Cover Door...
User Manual (user Manual) (ver.1.0) (English)
Page 19
Finally, confirm opening and closing of the doors. 19 Cover Hinge 27. Assemble the Cover Hinge with the screws, connect the electric wire. 28. After securing the top hinge with the screws. Make any necessary adjustments to insure proper sealing of the fridge door. 25. Re-install parts in covers. Wire boot 24. Electric wires must be sealed in their opposing sides. REVERSING THE DOOR SWING Read these instructions completely and carefully 23. Place the Wire boot taken from the left connector on the right connector. 26.
Finally, confirm opening and closing of the doors. 19 Cover Hinge 27. Assemble the Cover Hinge with the screws, connect the electric wire. 28. After securing the top hinge with the screws. Make any necessary adjustments to insure proper sealing of the fridge door. 25. Re-install parts in covers. Wire boot 24. Electric wires must be sealed in their opposing sides. REVERSING THE DOOR SWING Read these instructions completely and carefully 23. Place the Wire boot taken from the left connector on the right connector. 26.
User Manual (user Manual) (ver.1.0) (English)
Page 20
...-proof pipes are unusual noises • Check that the power plug is normal. There are installed in the refrigerator. • Defrost the freezer when ice builds up. this noise is caused by the refrigerant circuit and is opened, the less ice will impair the transfer of cold to cool food in the front corners of ice will form in the freezer. • When freezing food or storing...
...-proof pipes are unusual noises • Check that the power plug is normal. There are installed in the refrigerator. • Defrost the freezer when ice builds up. this noise is caused by the refrigerant circuit and is opened, the less ice will impair the transfer of cold to cool food in the front corners of ice will form in the freezer. • When freezing food or storing...


