
Open Source Guide (ENGLISH)
Page 1
... License, you legal permission to distribute software through any work are distributed under the OpenSSL Project. it and this service if you wish), that you receive source code or can change the software or use the GPL(version 2) and LGPL (version 2.1). If the Program specifies a version number of this License which applies to it free software which are not derived from the conditions...
... License, you legal permission to distribute software through any work are distributed under the OpenSSL Project. it and this service if you wish), that you receive source code or can change the software or use the GPL(version 2) and LGPL (version 2.1). If the Program specifies a version number of this License which applies to it free software which are not derived from the conditions...

Open Source Guide (ENGLISH)
Page 2
... AS PERMITTED ABOVE, BE LIABLE TO YOU FOR DAMAGES, INCLUDING ANY GENERAL, SPECIAL, INCIDENTAL OR CONSEQUENTIAL DAMAGES ARISING OUT OF THE USE OR INABILITY TO USE THE LIBRARY (INCLUDING BUT NOT LIMITED TO LOSS OF DATA OR DATA BEING RENDERED INACCURATE OR LOSSES SUSTAINED BY YOU OR THIRD PARTIES...should have at least the "copyright" line and a pointer to most effectively convey the exclusion of warranty; You can redistribute and change. It is found. How to Apply These Terms to Your New Libraries If you develop a new library, and you want it free software that everyone can do so by ...
... AS PERMITTED ABOVE, BE LIABLE TO YOU FOR DAMAGES, INCLUDING ANY GENERAL, SPECIAL, INCIDENTAL OR CONSEQUENTIAL DAMAGES ARISING OUT OF THE USE OR INABILITY TO USE THE LIBRARY (INCLUDING BUT NOT LIMITED TO LOSS OF DATA OR DATA BEING RENDERED INACCURATE OR LOSSES SUSTAINED BY YOU OR THIRD PARTIES...should have at least the "copyright" line and a pointer to most effectively convey the exclusion of warranty; You can redistribute and change. It is found. How to Apply These Terms to Your New Libraries If you develop a new library, and you want it free software that everyone can do so by ...
User Manual (ENGLISH)
Page 4
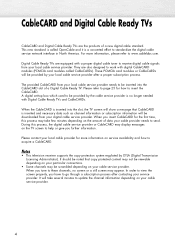
... several minutes to update the channel information depending on your cable provider needs to be noted that CableCARD is a concerted effort to insert the CableCARD. This new standard is called CableCARDs). Digital Cable Ready TVs are the products of a new digital cable standard. A digital set-top box which used to send. When you insert CableCARD for how to standardize the digital cable service network interface in North...
... several minutes to update the channel information depending on your cable provider needs to be noted that CableCARD is a concerted effort to insert the CableCARD. This new standard is called CableCARDs). Digital Cable Ready TVs are the products of a new digital cable standard. A digital set-top box which used to send. When you insert CableCARD for how to standardize the digital cable service network interface in North...
User Manual (ENGLISH)
Page 5
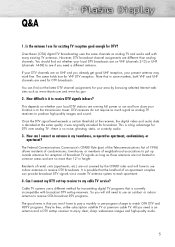
... can find out whether your location is an antenna and a DTV set-top receiver to watch OTA DTV and HDTV programs. They're free, unlike subscription satellite TV or premium cable TV. How difficult is decoded at the receiver, the digital video and audio data is it was originally encoded for your present antenna may work fine. Once the DTV signal level exceeds a certain threshold at the...
... can find out whether your location is an antenna and a DTV set-top receiver to watch OTA DTV and HDTV programs. They're free, unlike subscription satellite TV or premium cable TV. How difficult is decoded at the receiver, the digital video and audio data is it was originally encoded for your present antenna may work fine. Once the DTV signal level exceeds a certain threshold at the...
User Manual (ENGLISH)
Page 6
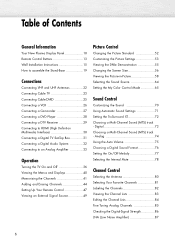
...Plasma Display Panel 10 Remote Control Buttons 13 Wall Installation Instructions 15 How to assemble the Stand-Base 19 Connections Connecting VHF and UHF Antennas 22 Connecting Cable TV 23 Connecting CableCARD 25 Connecting a VCR 26 Connecting a Camcorder 27 Connecting a DVD Player 28 Connecting a DTV Receiver 29 Connecting to HDMI (High Definition Multimedia Interface 30 Connecting a Digital TV Set-Top Box 31 Connecting a Digital Audio System 32 Connecting to an Analog Amplifier 33 Operation Turning the TV On and Off 36 Viewing the Menus and Displays 40 Memorizing the Channels...
...Plasma Display Panel 10 Remote Control Buttons 13 Wall Installation Instructions 15 How to assemble the Stand-Base 19 Connections Connecting VHF and UHF Antennas 22 Connecting Cable TV 23 Connecting CableCARD 25 Connecting a VCR 26 Connecting a Camcorder 27 Connecting a DVD Player 28 Connecting a DTV Receiver 29 Connecting to HDMI (High Definition Multimedia Interface 30 Connecting a Digital TV Set-Top Box 31 Connecting a Digital Audio System 32 Connecting to an Analog Amplifier 33 Operation Turning the TV On and Off 36 Viewing the Menus and Displays 40 Memorizing the Channels...
User Manual (ENGLISH)
Page 7
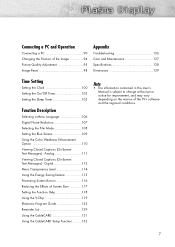
... of the Image 94 Picture Quality Adjustment 95 Image Reset 98 Appendix Troubleshooting 136 Care and Maintenance 137 Specifications 138 Dimensions 139 Time Setting Setting the Clock 100 Setting the On/Off Timer 102 Setting the Sleep Timer 103 Function Description Selecting a Menu Language 106 Digital Noise Reduction 107 Selecting the Film Mode 108 Setting the Blue Screen 109 Using the Color Weakness Enhancement Option 110 Viewing Closed Captions (On-Screen Text Messages) - Analog 111 Viewing Closed Captions (On-Screen Text...
... of the Image 94 Picture Quality Adjustment 95 Image Reset 98 Appendix Troubleshooting 136 Care and Maintenance 137 Specifications 138 Dimensions 139 Time Setting Setting the Clock 100 Setting the On/Off Timer 102 Setting the Sleep Timer 103 Function Description Selecting a Menu Language 106 Digital Noise Reduction 107 Selecting the Film Mode 108 Setting the Blue Screen 109 Using the Color Weakness Enhancement Option 110 Viewing Closed Captions (On-Screen Text Messages) - Analog 111 Viewing Closed Captions (On-Screen Text...
User Manual (ENGLISH)
Page 12
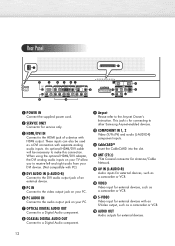
Rear Panel Œ POWER IN Connect the supplied power cord. ´ SERVICE ONLY Connector for service only. ˇ HDMI/DVI IN Connect to the HDMI jack of an external device. ˆ PC IN Connect to the video output jack on your PC. Ø PC AUDIO IN Connect to the audio output jack on your TV allow you to receive left and right audio from your PC. ∏ OPTICAL DIGITAL AUDIO OUT Connect to a Digital Audio component. When using the optional HDMI/DVI adapter, the DVI analog...
Rear Panel Œ POWER IN Connect the supplied power cord. ´ SERVICE ONLY Connector for service only. ˇ HDMI/DVI IN Connect to the HDMI jack of an external device. ˆ PC IN Connect to the video output jack on your PC. Ø PC AUDIO IN Connect to the audio output jack on your TV allow you to receive left and right audio from your PC. ∏ OPTICAL DIGITAL AUDIO OUT Connect to a Digital Audio component. When using the optional HDMI/DVI adapter, the DVI analog...

User Manual (ENGLISH)
Page 13
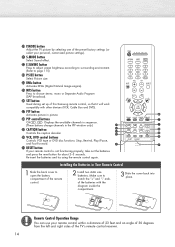
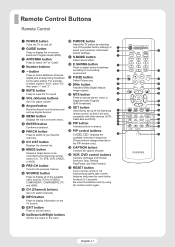
...the Samsung remote control (i.e., TV, STB, VCR, CABLE, or DVD). Ú PRE-CH button Tunes to the previous channel. Æ SOURCE button Press to display all of the available video sources (TV, AV, S-VIDEO, COMPONENT1, COMPONENT2, PC, and HDMI). ı CH (Channel) buttons Use it to adjust volume. " Anynet button Runs the Anynet view functions and sets up Anynet devices. ' MENU button Displays the main on -screen Electronic Program Guide (EPG). ˇ ANTENNA button Press to select "Air" or "Cable". ¨ Number buttons ˆ - Remote Control Buttons Remote Control Œ POWER button Turns...
...the Samsung remote control (i.e., TV, STB, VCR, CABLE, or DVD). Ú PRE-CH button Tunes to the previous channel. Æ SOURCE button Press to display all of the available video sources (TV, AV, S-VIDEO, COMPONENT1, COMPONENT2, PC, and HDMI). ı CH (Channel) buttons Use it to adjust volume. " Anynet button Runs the Anynet view functions and sets up Anynet devices. ' MENU button Displays the main on -screen Electronic Program Guide (EPG). ˇ ANTENNA button Press to select "Air" or "Cable". ¨ Number buttons ˆ - Remote Control Buttons Remote Control Œ POWER button Turns...
User Manual (ENGLISH)
Page 14
... left and right sides of the TV's remote control receiver. 14 Re-insert the batteries and try using the remote control again. SET button Used during set up of the remote control. 2 Install two AAA size batteries. PIP button Activates picture in picture. ÷ PIP control buttons CH , : Displays the available channels in sequence. (These buttons change channels in Your Remote Control 1 Slide the back cover to match the "+" and "-" ends of the batteries with other devices (VCR, Cable Box and DVD). -
... left and right sides of the TV's remote control receiver. 14 Re-insert the batteries and try using the remote control again. SET button Used during set up of the remote control. 2 Install two AAA size batteries. PIP button Activates picture in picture. ÷ PIP control buttons CH , : Displays the available channels in sequence. (These buttons change channels in Your Remote Control 1 Slide the back cover to match the "+" and "-" ends of the batteries with other devices (VCR, Cable Box and DVD). -
User Manual (ENGLISH)
Page 38
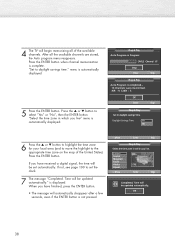
... button when channel memorization is not pressed. is automatically displayed. "Select the time zone in which you have received a digital signal, the time will be updated automatically." Time will automatically disappear after a few seconds, even if the ENTER button is complete. Time will begin memorizing all the available channels are stored, the Auto program menu reappears. AIR : 9, Cable : 5. If not, see page 100 to set automatically. 4 The TV will be updated...
... button when channel memorization is not pressed. is automatically displayed. "Select the time zone in which you have received a digital signal, the time will be updated automatically." Time will automatically disappear after a few seconds, even if the ENTER button is complete. Time will begin memorizing all the available channels are stored, the Auto program menu reappears. AIR : 9, Cable : 5. If not, see page 100 to set automatically. 4 The TV will be updated...
User Manual (ENGLISH)
Page 47
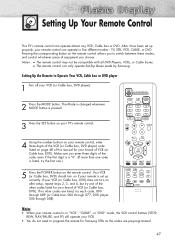
... POWER button on the remote control allows you to program the remote for your remote is pressed. 3 Press the SET button on your TV's remote control. 4 Using the number buttons on your remote control, enter three digits of the VCR (or Cable box, DVD player) code listed on if your brand of the other codes are pre-programmed. 47 Pressing the corresponding button on the remote control. The Mode is changed whenever MODE button is set up correctly. If your VCR (or Cable box, DVD) does not turn...
... POWER button on the remote control allows you to program the remote for your remote is pressed. 3 Press the SET button on your TV's remote control. 4 Using the number buttons on your remote control, enter three digits of the VCR (or Cable box, DVD player) code listed on if your brand of the other codes are pre-programmed. 47 Pressing the corresponding button on the remote control. The Mode is changed whenever MODE button is set up correctly. If your VCR (or Cable box, DVD) does not turn...
User Manual (ENGLISH)
Page 57
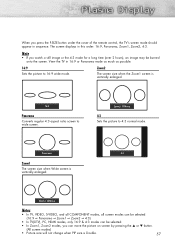
... TV(DTV), PC, HDMI modes, only 16:9 & 4:3 modes can move the picture on screen by pressing the ▲ or ▼ button. (All screen modes) • Picture size will not change when PIP size is vertically enlarged. Note • If you watch a still image or the 4:3 mode for a long time (over 2 hours), an image may be selected. • In Zoom1, Zoom2 modes, you press the P.SIZE button under the cover of the remote control, the TV's screen mode...
... TV(DTV), PC, HDMI modes, only 16:9 & 4:3 modes can move the picture on screen by pressing the ▲ or ▼ button. (All screen modes) • Picture size will not change when PIP size is vertically enlarged. Note • If you watch a still image or the 4:3 mode for a long time (over 2 hours), an image may be selected. • In Zoom1, Zoom2 modes, you press the P.SIZE button under the cover of the remote control, the TV's screen mode...
User Manual (ENGLISH)
Page 78
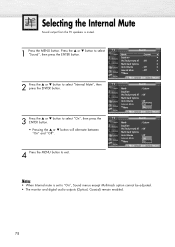
... "On" and "Off". 4 Press the MENU button to "On", Sound menus except Multi-track option cannot be adjusted. • The monitor and digital audio outputs (Optical, Coaxial) remain enabled. 78 TV Sound Mode : Custom √ Equalizer √ SRS TruSurround XT : Off √ Multi-Track Options √ Auto Volume : Off √ Internal Mute : Off √ † More Move Enter Return TV Sound Mode Equalizer SRS TruSurround XT Multi...
... "On" and "Off". 4 Press the MENU button to "On", Sound menus except Multi-track option cannot be adjusted. • The monitor and digital audio outputs (Optical, Coaxial) remain enabled. 78 TV Sound Mode : Custom √ Equalizer √ SRS TruSurround XT : Off √ Multi-Track Options √ Auto Volume : Off √ Internal Mute : Off √ † More Move Enter Return TV Sound Mode Equalizer SRS TruSurround XT Multi...

User Manual (ENGLISH)
Page 125
... mini program guide. I H B CE D F G Viewing the Electronic Program Guide A Displays which channel is currently selected to view detailed information for the selected digital program. Press the Red button on the remote control. Note • You can use the GUIDE button on the broadcaster.) I Displays the current time and date. F Scrolls forward quickly (2 hours). The EPG will vary depending on the remote control to help you are receiving digital channels. 125 Press the Blue button on the remote control. E Displays...
... mini program guide. I H B CE D F G Viewing the Electronic Program Guide A Displays which channel is currently selected to view detailed information for the selected digital program. Press the Red button on the remote control. Note • You can use the GUIDE button on the broadcaster.) I Displays the current time and date. F Scrolls forward quickly (2 hours). The EPG will vary depending on the remote control to help you are receiving digital channels. 125 Press the Blue button on the remote control. E Displays...
User Manual (ENGLISH)
Page 136
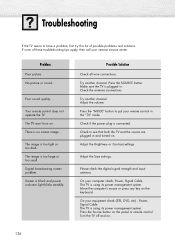
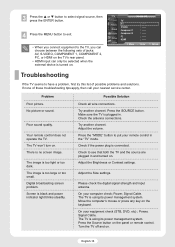
...; Problem Poor picture. The image is using its power management system. Press the SOURCE button. Try another channel. Check to put your remote control in . The TV won't turn on the panel or remote control. Power, Signal Cable. Power, Signal Cable. Check the antenna connections. Move the computer's mouse or press any key on . 136 Troubleshooting If the TV seems to have a problem, first try this list of these troubleshooting tips apply, then call your nearest service center. Adjust the Size settings. Turn...
...; Problem Poor picture. The image is using its power management system. Press the SOURCE button. Try another channel. Check to put your remote control in . The TV won't turn on the panel or remote control. Power, Signal Cable. Power, Signal Cable. Check the antenna connections. Move the computer's mouse or press any key on . 136 Troubleshooting If the TV seems to have a problem, first try this list of these troubleshooting tips apply, then call your nearest service center. Adjust the Size settings. Turn...
User Manual (ENGLISH)
Page 138
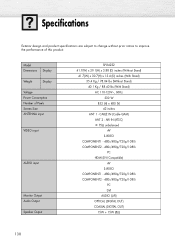
... COMPONENT2 - 480i/480p/720p/1080i PC DVI AUDIO (L/R) OPTICAL (DIGITAL OUT) COAXIAL (DIGITAL OUT) 15W + 15W (8Ω) 138 Model Dimensions Display Weight Display Voltage Power Consumption Number of this product. Specifications Exterior design and product specifications are subject to change without prior notice to improve the performance of Pixels Screen Size ANTENNA input VIDEO input AUDIO input Monitor Output Audio Output Speaker Output SP-R4232 41.7(W) x 29.1(H) x 3.88 (D) inches (Without Stand) 41.7(W) x 30.7(H) x 13.4 (D) inches (With Stand) 35.4 Kg / 78.04 lbs (Without...
... COMPONENT2 - 480i/480p/720p/1080i PC DVI AUDIO (L/R) OPTICAL (DIGITAL OUT) COAXIAL (DIGITAL OUT) 15W + 15W (8Ω) 138 Model Dimensions Display Weight Display Voltage Power Consumption Number of this product. Specifications Exterior design and product specifications are subject to change without prior notice to improve the performance of Pixels Screen Size ANTENNA input VIDEO input AUDIO input Monitor Output Audio Output Speaker Output SP-R4232 41.7(W) x 29.1(H) x 3.88 (D) inches (Without Stand) 41.7(W) x 30.7(H) x 13.4 (D) inches (With Stand) 35.4 Kg / 78.04 lbs (Without...
Quick Guide (ENGLISH)
Page 8
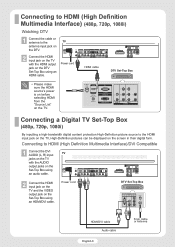
... VIDEO output jack on the Set-Top Box using an HDMI cable. Connecting a Digital TV Set-Top Box (480p, 720p, 1080i) By inputting a high-bandwidth digital content protection High-Definition picture source to HDMI (High Definition Multimedia Interface)/DVI Compatible 1 Connect the DVI AUDIO (L, R) input TV jacks on the TV with the HDMI output jack on the DTV Set-Top Box using an HDMI/DVI cable. Power cord HDMI cable DTV Set-Top Box • Please make sure the HDMI source's power is on before selecting HDMI from the "Source List" on the screen in their digital...
... VIDEO output jack on the Set-Top Box using an HDMI cable. Connecting a Digital TV Set-Top Box (480p, 720p, 1080i) By inputting a high-bandwidth digital content protection High-Definition picture source to HDMI (High Definition Multimedia Interface)/DVI Compatible 1 Connect the DVI AUDIO (L, R) input TV jacks on the TV with the HDMI output jack on the DTV Set-Top Box using an HDMI/DVI cable. Power cord HDMI cable DTV Set-Top Box • Please make sure the HDMI source's power is on before selecting HDMI from the "Source List" on the screen in their digital...
Quick Guide (ENGLISH)
Page 11
... available video sources (TV, AV, S-VIDEO, COMPONENT1, COMPONENT2, PC, and HDMI). ı CH (Channel) buttons Use it to switch channels. ˜ INFO button Press to display information on -screen Electronic Program Guide (EPG). ˇ ANTENNA button Press to select "Air" or "Cable". ¨ Number buttons ˆ - button Press to select additional channels (digital and analog) being broadcast by selecting one of this Samsung remote control, so that it to adjust volume. " Anynet button Runs the Anynet view functions and sets up...
... available video sources (TV, AV, S-VIDEO, COMPONENT1, COMPONENT2, PC, and HDMI). ı CH (Channel) buttons Use it to switch channels. ˜ INFO button Press to display information on -screen Electronic Program Guide (EPG). ˇ ANTENNA button Press to select "Air" or "Cable". ¨ Number buttons ˆ - button Press to select additional channels (digital and analog) being broadcast by selecting one of this Samsung remote control, so that it to adjust volume. " Anynet button Runs the Anynet view functions and sets up...

Quick Guide (ENGLISH)
Page 15
...the ENTER button to receive digital TV signals. Note • The TV must be connected to an antenna in order to start the auto program. Viewing an External Signal Source Use the remote control to select "Source List". Setting the Signal Source 1 Press the MENU button. TV Input Source List : TV √ ➤ Quick way to access viewing an external signal source : Edit Name Anynet √ √ Just press the "SOURCE" button on the remote control. Press the ▲ or ▼ button to memorize channels. Digital Channel : STD √ Analog Channel : STD...
...the ENTER button to receive digital TV signals. Note • The TV must be connected to an antenna in order to start the auto program. Viewing an External Signal Source Use the remote control to select "Source List". Setting the Signal Source 1 Press the MENU button. TV Input Source List : TV √ ➤ Quick way to access viewing an external signal source : Edit Name Anynet √ √ Just press the "SOURCE" button on the remote control. Press the ▲ or ▼ button to memorize channels. Digital Channel : STD √ Analog Channel : STD...
Quick Guide (ENGLISH)
Page 16
Poor sound quality. Digital broadcasting screen problem. Screen is connected. Press the SOURCE button. Adjust the Brightness or Contrast settings. Adjust the Size settings. No picture or sound. Check if the power plug is black and power indicator light blinks steadily. Please check the digital signal strength and input antenna. Press the Source button on . Turn the TV off and on the panel or remote control. The image is using its power management system. Possible Solution Check all wire connections. Adjust the volume. On your equipment check (STB, DVD, ...
Poor sound quality. Digital broadcasting screen problem. Screen is connected. Press the SOURCE button. Adjust the Brightness or Contrast settings. Adjust the Size settings. No picture or sound. Check if the power plug is black and power indicator light blinks steadily. Please check the digital signal strength and input antenna. Press the Source button on . Turn the TV off and on the panel or remote control. The image is using its power management system. Possible Solution Check all wire connections. Adjust the volume. On your equipment check (STB, DVD, ...


