
User Manual
Page 3
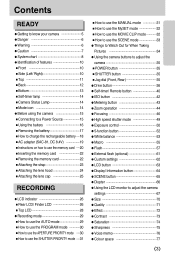
... 14 ƈMode icon 14 ƃBefore using the camera 15 ƈConnecting to a Power Source 15 ƈUsing the battery 16 ƈRemoving the battery 17 ƈHow to charge the rechargeable battery 18 ƈAC adapter (SAC-81, DC 8.4V) 19 ƈInstructions on how to use the memory card 20...
... 14 ƈMode icon 14 ƃBefore using the camera 15 ƈConnecting to a Power Source 15 ƈUsing the battery 16 ƈRemoving the battery 17 ƈHow to charge the rechargeable battery 18 ƈAC adapter (SAC-81, DC 8.4V) 19 ƈInstructions on how to use the memory card 20...
User Manual
Page 5
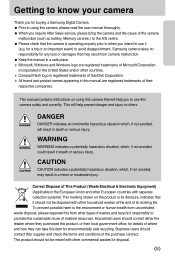
...user manual thoroughly. ƃ When you require After Sales service, please bring the camera and the cause of the camera malfunction (such as battery, Memory card etc.) to the A/S centre. ƃ Please check that the camera is registered trademarks of SanDisk Corporation. Ҭ All ... Ҭ CompactFlash logo is operating properly prior to when you to use it (e.g. Getting to know your camera Thank you for buying a Samsung Digital Camera. ƃ Prior to using this camera that will help prevent danger and injury to others. CAUTION CAUTION indicates a potentially hazardous situation...
...user manual thoroughly. ƃ When you require After Sales service, please bring the camera and the cause of the camera malfunction (such as battery, Memory card etc.) to the A/S centre. ƃ Please check that the camera is registered trademarks of SanDisk Corporation. Ҭ All ... Ҭ CompactFlash logo is operating properly prior to when you to use it (e.g. Getting to know your camera Thank you for buying a Samsung Digital Camera. ƃ Prior to using this camera that will help prevent danger and injury to others. CAUTION CAUTION indicates a potentially hazardous situation...

User Manual
Page 6
...cause a fire. ƈ When in any form of injury from the camera's moving parts. ƈ Batteries and camera may result in fire, injury, electric shock or severe damage to you or your dealer or Samsung Camera Service centre. ƈ Please do not use this product in a well-ventilated area. ŝ6&#...350; If an accident should be the case, allow the camera to sit idle for a few minutes to allow it may cause heat to cool. ƈ Do not recharge non rechargeable batteries. This...
...cause a fire. ƈ When in any form of injury from the camera's moving parts. ƈ Batteries and camera may result in fire, injury, electric shock or severe damage to you or your dealer or Samsung Camera Service centre. ƈ Please do not use this product in a well-ventilated area. ŝ6&#...350; If an accident should be the case, allow the camera to sit idle for a few minutes to allow it may cause heat to cool. ƈ Do not recharge non rechargeable batteries. This...

User Manual
Page 7
... moving the camera. After use the camera for the camera. ҮDo not short circuit, heat or dispose of battery in fire. ҮDo not insert the batteries with hands or objects. Batteries may damage the cords or cables and cause a fire or electric shock. ƈ The Lens is in contact with... the reverse polarities. ƈ Remove the batteries when not planning to do not rotate the zoom ring quickly. It may cause a camera malfunction. ƈ Do not pull the lens by force. Then...
... moving the camera. After use the camera for the camera. ҮDo not short circuit, heat or dispose of battery in fire. ҮDo not insert the batteries with hands or objects. Batteries may damage the cords or cables and cause a fire or electric shock. ƈ The Lens is in contact with... the reverse polarities. ƈ Remove the batteries when not planning to do not rotate the zoom ring quickly. It may cause a camera malfunction. ƈ Do not pull the lens by force. Then...
User Manual
Page 8
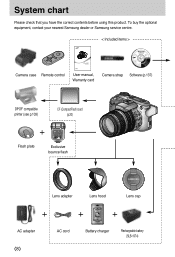
System chart Please check that you have the correct contents before using this product. To buy the optional equipment, contact your nearest Samsung dealer or Samsung service centre. < Included items > Camera case Remote control User manual, Warranty card Camera strap Software (p.137) DPOF compatible printer (see p.103) CF (CompactFlash) card (p.20) Flash plate Exclusive bounce flash Lens adapter Lens hood Lens cap AC adapter ŝ8Ş AC cord Battery charger Rechargeable battery (SLB-1974)
System chart Please check that you have the correct contents before using this product. To buy the optional equipment, contact your nearest Samsung dealer or Samsung service centre. < Included items > Camera case Remote control User manual, Warranty card Camera strap Software (p.137) DPOF compatible printer (see p.103) CF (CompactFlash) card (p.20) Flash plate Exclusive bounce flash Lens adapter Lens hood Lens cap AC adapter ŝ8Ş AC cord Battery charger Rechargeable battery (SLB-1974)

User Manual
Page 13
Identification of features Bottom Battery chamber cover & lock Tripod socket Battery chamber Diopter adjustment ring Battery chamber Battery holder ŝ13Ş
Identification of features Bottom Battery chamber cover & lock Tripod socket Battery chamber Diopter adjustment ring Battery chamber Battery holder ŝ13Ş

User Manual
Page 15
... mode, 8M image size Fine image quality, Shot to shot interval : 30Sec. CAUTION ƃ Please ensure that you can use the exclusive battery with power. The data can use battery or alternatively, you use the AC adaptor. ƈ Specification of user's usage. ŝ15Ş Using the flash every two times....to provide the camera with the correct specification for the camera. Before using the camera Connecting to a Power Source ƈ There are measured under Samsung's standard conditions and Shooting conditions and may affect your nearest Samsung dealer or Samsung service centre.
... mode, 8M image size Fine image quality, Shot to shot interval : 30Sec. CAUTION ƃ Please ensure that you can use the exclusive battery with power. The data can use battery or alternatively, you use the AC adaptor. ƈ Specification of user's usage. ŝ15Ş Using the flash every two times....to provide the camera with the correct specification for the camera. Before using the camera Connecting to a Power Source ƈ There are measured under Samsung's standard conditions and Shooting conditions and may affect your nearest Samsung dealer or Samsung service centre.

User Manual
Page 16
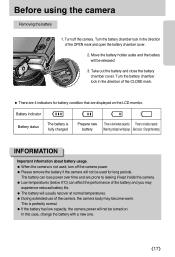
Before using the camera Using the battery : If the camera does not turn the battery chamber lock in the direction of the arrow (CLOSE). ŝ16Ş Turn the battery chamber lock in the direction of the arrow (OPEN) and open the battery chamber cover. 2. Close the battery chamber cover and turn on after you have inserted battery, please check whether the battery is inserted with the correct polarity (+/-). 1. Insert the battery taking note of the polarity (+/-). 3.
Before using the camera Using the battery : If the camera does not turn the battery chamber lock in the direction of the arrow (CLOSE). ŝ16Ş Turn the battery chamber lock in the direction of the arrow (OPEN) and open the battery chamber cover. 2. Close the battery chamber cover and turn on after you have inserted battery, please check whether the battery is inserted with the correct polarity (+/-). 1. Insert the battery taking note of the polarity (+/-). 3.
User Manual
Page 17
...; There are 4 indicators for long periods. Before using the camera Removing the battery 1. Turn off the camera power. ƃ Please remove the battery if the camera will not be released. 3. Battery indicator Battery status The battery is fully charged Prepare new There is low battery capacity There is not used, turn off the camera. Turn the...
...; There are 4 indicators for long periods. Before using the camera Removing the battery 1. Turn off the camera power. ƃ Please remove the battery if the camera will not be released. 3. Battery indicator Battery status The battery is fully charged Prepare new There is low battery capacity There is not used, turn off the camera. Turn the...

User Manual
Page 18
... on Green LED is on Yellow LED is on Yellow LED is inserted with the correct polarity (+/-). ſ Check the battery charging status with the Charging LED of the charger. Place the battery in the charger as shown. ſ If the charging LED doesn't blink as red or blinks as yellow, please... check whether the battery is blinking ŝ18Ş Plug the AC cord's power plug into the wall outlet and insert the AC cord into the charger. 2. Before using ...
... on Green LED is on Yellow LED is on Yellow LED is inserted with the correct polarity (+/-). ſ Check the battery charging status with the Charging LED of the charger. Place the battery in the charger as shown. ſ If the charging LED doesn't blink as red or blinks as yellow, please... check whether the battery is blinking ŝ18Ş Plug the AC cord's power plug into the wall outlet and insert the AC cord into the charger. 2. Before using ...

User Manual
Page 19
... will restart at the operating temperature and this is not camera malfunction. ƃ Samsung warrants the charger for a period of one year and the Lithium Ion battery for a period of the product. ƃ Wear and tear on the lithium battery is 0°C ~ 40°C. Failure to indicate something like flash charging status. Remove...
... will restart at the operating temperature and this is not camera malfunction. ƃ Samsung warrants the charger for a period of one year and the Lithium Ion battery for a period of the product. ƃ Wear and tear on the lithium battery is 0°C ~ 40°C. Failure to indicate something like flash charging status. Remove...

User Manual
Page 26
Description 1 Drive modes 2 Image size 3 Self-timer/ Remote control 4 Metering 5 Battery status 6 High speed shutter mode/Camera shake warning 7 Voice memo 8 Contrast 9 Saturation 10 Image quality 11 Sharpness 12 Focus Lock 13 Focus mode Icons ŝ...
Description 1 Drive modes 2 Image size 3 Self-timer/ Remote control 4 Metering 5 Battery status 6 High speed shutter mode/Camera shake warning 7 Voice memo 8 Contrast 9 Saturation 10 Image quality 11 Sharpness 12 Focus Lock 13 Focus mode Icons ŝ...

User Manual
Page 28
Description 1 Recording mode 2 ISO 3 Shutter speed 4 Camera shake warning 5 Exposure lock 6 Aperture value 7 Saturation 8 Sharpness 9 Image size 10 Image quality 11 Number of shots remaining 12 Drive mode 13 Metering 14 Battery status 15 Macro 16 Focal length ŝ28Ş Icons 1/1600 F2.2 25 28mm Page p.29~33 p.42 p.30~31 p.34 p.51 p.30~31 p.74 p.75 p.70 p.71 p.21 p.36~39 p.43 p.17 p.55~56 p.44 LCD indicator Top LCD No.
Description 1 Recording mode 2 ISO 3 Shutter speed 4 Camera shake warning 5 Exposure lock 6 Aperture value 7 Saturation 8 Sharpness 9 Image size 10 Image quality 11 Number of shots remaining 12 Drive mode 13 Metering 14 Battery status 15 Macro 16 Focal length ŝ28Ş Icons 1/1600 F2.2 25 28mm Page p.29~33 p.42 p.30~31 p.34 p.51 p.30~31 p.74 p.75 p.70 p.71 p.21 p.36~39 p.43 p.17 p.55~56 p.44 LCD indicator Top LCD No.

User Manual
Page 29
Insert the battery and memory card. (p.16, 22) 2. Point the camera towards the subject and compose the image by rotating the mode dial. 4. Press the shutter button to ...
Insert the battery and memory card. (p.16, 22) 2. Point the camera towards the subject and compose the image by rotating the mode dial. 4. Press the shutter button to ...

User Manual
Page 34
..., it means the camera is charged, the flash status lamp (Red) will be saved. ƈ If there is selected in order to extend battery life. ƈ Under certain conditions the auto focus system may appear on the LCD. However, should your desired shot require this please use a ...[ Press the shutter button ] ƈ The available recording time may vary depending on the subject and a beep will drain the battery. Refer to confirm focus and flash battery charge (p.14). - When the flash is focused on shooting conditions and camera settings. ƈ When the Flash Off or Slow synchro...
..., it means the camera is charged, the flash status lamp (Red) will be saved. ƈ If there is selected in order to extend battery life. ƈ Under certain conditions the auto focus system may appear on the LCD. However, should your desired shot require this please use a ...[ Press the shutter button ] ƈ The available recording time may vary depending on the subject and a beep will drain the battery. Refer to confirm focus and flash battery charge (p.14). - When the flash is focused on shooting conditions and camera settings. ƈ When the Flash Off or Slow synchro...

User Manual
Page 35
... the image and stores the relevant data regarding the shot. Refer to page 113 for more information about the auto power off automatically to save battery life. If you select voice memo recording, the recording will be set up by using the camera buttons. Using the camera buttons to stop recording...
... the image and stores the relevant data regarding the shot. Refer to page 113 for more information about the auto power off automatically to save battery life. If you select voice memo recording, the recording will be set up by using the camera buttons. Using the camera buttons to stop recording...

User Manual
Page 39
... is taken. - Press the Right button and select a desired menu by rotating the Rear jog dial (JOG2). 2. Drive button ƃ How to use a fully charged battery or AC adapter when you take the interval shots. ŝ39Ş Press the shutter button to capture an image. After a set the number of...
... is taken. - Press the Right button and select a desired menu by rotating the Rear jog dial (JOG2). 2. Drive button ƃ How to use a fully charged battery or AC adapter when you take the interval shots. ŝ39Ş Press the shutter button to capture an image. After a set the number of...

User Manual
Page 41
... file types, you operate the Mode dial and Self-timer button during the self-timer operation, the selftimer function is toward the bottom while installing batteries for the remote control Make sure the + polarity is toward the top and the - Assemble the cover into the remote control as shown. The ...remote control takes a CR 2025 3V battery. INFORMATION ƃ If you can still take an image by using the remote control, refer to prevent the camera from shaking. ŝ41Ş ...
... file types, you operate the Mode dial and Self-timer button during the self-timer operation, the selftimer function is toward the bottom while installing batteries for the remote control Make sure the + polarity is toward the top and the - Assemble the cover into the remote control as shown. The ...remote control takes a CR 2025 3V battery. INFORMATION ƃ If you can still take an image by using the remote control, refer to prevent the camera from shaking. ŝ41Ş ...

User Manual
Page 47
... the centre of the centre, use the focus lock 1. This function is pressed halfway down. ſ Note that using the Continuous Auto Focus uses more battery than the Single Auto Focus. ŝ47Ş The frame turns green and Focus lock icon ( ) will be cancelled. ƃ AF-S : Single Auto Focus This...
... the centre of the centre, use the focus lock 1. This function is pressed halfway down. ſ Note that using the Continuous Auto Focus uses more battery than the Single Auto Focus. ŝ47Ş The frame turns green and Focus lock icon ( ) will be cancelled. ƃ AF-S : Single Auto Focus This...

User Manual
Page 60
Do not move until the second flash fires. ƃ Using the flash frequently will reduce the life of the battery. ƃ Under normal operating conditions the charging time for the flash is too close or highly reflective. ƃ If you attach the supplied lens hood, ... will fire to check the shooting conditions like the subject's distance and intensity of the flash. Flash ƈ Available flash mode, by settings. If the batteries are default OO X X X OX OO OO OO O OO OO OO X X X OX OO OO OO O OO OO OOOOO OX OO OO OO O OO OO X OO X X OX...
Do not move until the second flash fires. ƃ Using the flash frequently will reduce the life of the battery. ƃ Under normal operating conditions the charging time for the flash is too close or highly reflective. ƃ If you attach the supplied lens hood, ... will fire to check the shooting conditions like the subject's distance and intensity of the flash. Flash ƈ Available flash mode, by settings. If the batteries are default OO X X X OX OO OO OO O OO OO OO X X X OX OO OO OO O OO OO OOOOO OX OO OO OO O OO OO X OO X X OX...
