User Manual (ENGLISH)
Page 6
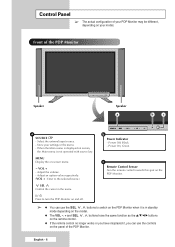
...c a SOURCE - Power On; Green c Remote Control Sensor Aim the remote control towards this spot on the panel of the PDP Monitor. Adjust an option value respectively. (VOL + : Enter to switch on the PDP Monitor...+ - I / Press to turn the PDP Monitor on screen, the Main menu is in standby mode depending on the model. ◆ The VOL -, + and SEL , buttons have the same function as the buttons on the remote control.... cursor in the menu. - MENU Display the on your model. Control Panel ➢ The actual configuration of your PDP Monitor may be different, depending on -screen menu. -
...c a SOURCE - Power On; Green c Remote Control Sensor Aim the remote control towards this spot on the panel of the PDP Monitor. Adjust an option value respectively. (VOL + : Enter to switch on the PDP Monitor...+ - I / Press to turn the PDP Monitor on screen, the Main menu is in standby mode depending on the model. ◆ The VOL -, + and SEL , buttons have the same function as the buttons on the remote control.... cursor in the menu. - MENU Display the on your model. Control Panel ➢ The actual configuration of your PDP Monitor may be different, depending on -screen menu. -
User Manual (ENGLISH)
Page 7
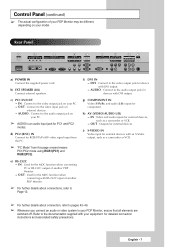
... PC2 modes. OUT : Used for detailed connection instructions and associated safety precautions. AUDIO : Connect to the video output jack on your model. DVI : Connect to the documentation supplied with your equipment for the MDC function when connecting with an S-Video output, such as a... camcorder or VCR. - Control Panel (continued) ➢ The actual configuration of your PDP Monitor may be different, depending on your PC. - c) PC1 IN/OUT - d) PC2...
... PC2 modes. OUT : Used for detailed connection instructions and associated safety precautions. AUDIO : Connect to the video output jack on your model. DVI : Connect to the documentation supplied with your equipment for the MDC function when connecting with an S-Video output, such as a... camcorder or VCR. - Control Panel (continued) ➢ The actual configuration of your PDP Monitor may be different, depending on your PC. - c) PC1 IN/OUT - d) PC2...
User Manual (ENGLISH)
Page 11
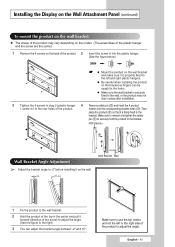
Then place the product (@) so that it is securely fixed to the wall, or the product may vary depending on the model. (The assemblies of the plastic hanger and the screw are the same) 1 Remove the 4 screws on the back of the product. 2 Insert the screw into .... PDP Monitor Wall Bracket Angle Adjustment ➢ Adjust the bracket angle to the rear holes of the product. Installing the Display on the Wall Attachment Panel (continued) To mount the product on the wall bracket ◆ The shape of the product may not stay in place after installation. 3 Tighten the 4 screws...
Then place the product (@) so that it is securely fixed to the wall, or the product may vary depending on the model. (The assemblies of the plastic hanger and the screw are the same) 1 Remove the 4 screws on the back of the product. 2 Insert the screw into .... PDP Monitor Wall Bracket Angle Adjustment ➢ Adjust the bracket angle to the rear holes of the product. Installing the Display on the Wall Attachment Panel (continued) To mount the product on the wall bracket ◆ The shape of the product may not stay in place after installation. 3 Tighten the 4 screws...
User Manual (ENGLISH)
Page 37
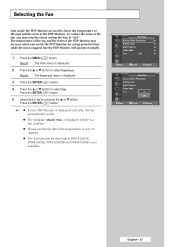
... will operate normally. 1 Press the MENU ( ) button. To reduce the noise of the fan, you may increase when you watch the PDP Monitor for the models PPM-42M5SS, PPM42M5SS, PPM-42M5SB and PPM42M5SB is displayed. 2 Press the ▲ or ▼ button to "Off". The temperature of the top and the front...
... will operate normally. 1 Press the MENU ( ) button. To reduce the noise of the fan, you may increase when you watch the PDP Monitor for the models PPM-42M5SS, PPM42M5SS, PPM-42M5SB and PPM42M5SB is displayed. 2 Press the ▲ or ▼ button to "Off". The temperature of the top and the front...
User Manual (ENGLISH)
Page 50
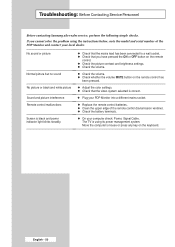
... mains lead has been connected to a wall socket. ◆ Check that the video system selected is using the instructions below, note the model and serial number of the remote control (transmission window). ◆ Check the battery terminals. ◆ On your local dealer. Move the ... color settings. ◆ Check that you cannot solve the problem using its power management system. Troubleshooting: Before Contacting Service Personnel Before contacting Samsung after-sales service, perform the following simple checks. If you have pressed the ON or OFF button on the remote control. ◆ ...
... mains lead has been connected to a wall socket. ◆ Check that the video system selected is using the instructions below, note the model and serial number of the remote control (transmission window). ◆ Check the battery terminals. ◆ On your local dealer. Move the ... color settings. ◆ Check that you cannot solve the problem using its power management system. Troubleshooting: Before Contacting Service Personnel Before contacting Samsung after-sales service, perform the following simple checks. If you have pressed the ON or OFF button on the remote control. ◆ ...


