User Manual (user Manual) (ver.1.0) (English)
Page 1
... your product at www.samsung.com/register Model Serial No Country Customer Care Center CANADA 1-800-SAMSUNG (726-7864) U.S.A 1-800-SAMSUNG (726-7864) Web Site www.samsung.com/ca www.samsung.com/us Address Samsung Electronics Canada Inc., Customer... Service 55 Standish Court Mississauga, Ontario L5R 4B2 Canada Samsung Electronics America, Inc. 85 Challenger Road Ridgefield Park, NJ 07660-2112 Plasma TV user manual © 2010 Samsung...
... your product at www.samsung.com/register Model Serial No Country Customer Care Center CANADA 1-800-SAMSUNG (726-7864) U.S.A 1-800-SAMSUNG (726-7864) Web Site www.samsung.com/ca www.samsung.com/us Address Samsung Electronics Canada Inc., Customer... Service 55 Standish Court Mississauga, Ontario L5R 4B2 Canada Samsung Electronics America, Inc. 85 Challenger Road Ridgefield Park, NJ 07660-2112 Plasma TV user manual © 2010 Samsung...
User Manual (user Manual) (ver.1.0) (English)
Page 2
...used for more information on warranty terms. Wide screen format PDP Displays (16:9, the aspect ratio of the product. • Avoid operating the TV at temperatures below 41°F (5°C) • A still image displayed too long may leave traces of borders displayed on the screen. In...the product. Burn-in 4:3 format for reference only and may be changed without notice. Product design and specifications may be performed by a SAMSUNG Authorized Service Center. Displaying stationary graphics and images on screen, such as the dark side-bars on no more than 5% of the product...
...used for more information on warranty terms. Wide screen format PDP Displays (16:9, the aspect ratio of the product. • Avoid operating the TV at temperatures below 41°F (5°C) • A still image displayed too long may leave traces of borders displayed on the screen. In...the product. Burn-in 4:3 format for reference only and may be changed without notice. Product design and specifications may be performed by a SAMSUNG Authorized Service Center. Displaying stationary graphics and images on screen, such as the dark side-bars on no more than 5% of the product...
User Manual (user Manual) (ver.1.0) (English)
Page 3
... Menu 17 Changing the Preset Picture Mode 17 Adjusting Picture Settings 17 Economical Solutions 17 Changing the Picture Options 18 Setting up the TV with Your PC 20 yy Sound Menu 21 Changing the Preset Sound Mode 21 Adjusting Sound Settings 21 Sound Settings 21 yy Setup ... AllShare 45 Other Information yy Installing the Wall Mount 47 yy Assembling the Cables 48 yy Securing the Installation Space 48 yy Securing the TV to open the relevant submenu within the OSD (on the remote control. Additional Functions 39 yy Anynet 41 Setting Up Anynet+ 42 Switching...
... Menu 17 Changing the Preset Picture Mode 17 Adjusting Picture Settings 17 Economical Solutions 17 Changing the Picture Options 18 Setting up the TV with Your PC 20 yy Sound Menu 21 Changing the Preset Sound Mode 21 Adjusting Sound Settings 21 Sound Settings 21 yy Setup ... AllShare 45 Other Information yy Installing the Wall Mount 47 yy Assembling the Cables 48 yy Securing the Installation Space 48 yy Securing the TV to open the relevant submenu within the OSD (on the remote control. Additional Functions 39 yy Anynet 41 Setting Up Anynet+ 42 Switching...
User Manual (user Manual) (ver.1.0) (English)
Page 4
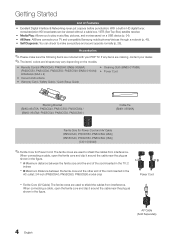
...3301-002049) ✎✎Ferrite Core for Power Cord: The ferrite cores are used to make sure the following items are included with your TV and compatible Samsung mobile phones/devices through a network (p. 45). When connecting a cable, open the ferrite core and clip it around the cable near the...movies saved on the models. Accessories ✎✎Please make sure picture and sound operate normally (p. 26). yy AllShare: AllShare connects your PDP TV. When connecting a cable, open the ferrite core and clip it around the cable near the plug as shown in the figure. If any ...
...3301-002049) ✎✎Ferrite Core for Power Cord: The ferrite cores are used to make sure the following items are included with your TV and compatible Samsung mobile phones/devices through a network (p. 45). When connecting a cable, open the ferrite core and clip it around the cable near the...movies saved on the models. Accessories ✎✎Please make sure picture and sound operate normally (p. 26). yy AllShare: AllShare connects your PDP TV. When connecting a cable, open the ferrite core and clip it around the cable near the plug as shown in the figure. If any ...
User Manual (user Manual) (ver.1.0) (English)
Page 5
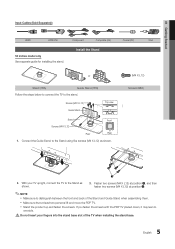
... only See separate guide for installing the stand. xx Stand the product up and fasten the screws. If you fasten the screws with the PDP TV placed down, it may lean to the stand. With your fingers into the stand base slot of the Stand and Guide Stand when assembling them... (M4 X L12) Rear Rear 1. xx Make sure that at position 2. ✎✎NOTE xx Make sure to distinguish between the front and back of the TV when installing the stand base. 5 English Connect the Guide Stand to the Stand as shown. (M4 X L12) Screws (9EA) 2 1 2. Fasten two screws (M4 X L12) at...
... only See separate guide for installing the stand. xx Stand the product up and fasten the screws. If you fasten the screws with the PDP TV placed down, it may lean to the stand. With your fingers into the stand base slot of the Stand and Guide Stand when assembling them... (M4 X L12) Rear Rear 1. xx Make sure that at position 2. ✎✎NOTE xx Make sure to distinguish between the front and back of the TV when installing the stand base. 5 English Connect the Guide Stand to the Stand as shown. (M4 X L12) Screws (9EA) 2 1 2. Fasten two screws (M4 X L12) at...
User Manual (user Manual) (ver.1.0) (English)
Page 6
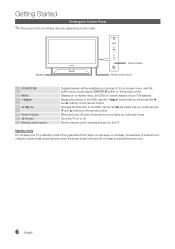
...use the ◄ and ► buttons on the remote control. Changes the channels. Turns the TV on the TV. Aim the remote control towards this button as you would use the ▼ and ▲ ...buttons on and lights up in standby mode for example). A small amount of your TV in standby mode. It is turned off when the power is on the remote control. In the...the ENTERE button on the remote control. Blinks and turns off . Standby mode Do not leave your TV's features. Getting Started Viewing the Control Panel ✎✎The product color and shape may vary depending...
...use the ◄ and ► buttons on the remote control. Changes the channels. Turns the TV on the TV. Aim the remote control towards this button as you would use the ▼ and ▲ ...buttons on and lights up in standby mode for example). A small amount of your TV in standby mode. It is turned off when the power is on the remote control. In the...the ENTERE button on the remote control. Blinks and turns off . Standby mode Do not leave your TV's features. Getting Started Viewing the Control Panel ✎✎The product color and shape may vary depending...
User Manual (user Manual) (ver.1.0) (English)
Page 7
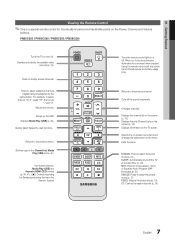
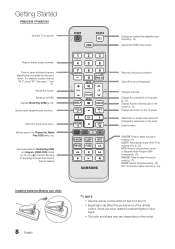
01 Getting Started Viewing the Remote Control ✎✎This is a special remote control for Samsung recorders that have the Anynet+ feature) POWER ON/OFF SOURCE PRE-CH MEDIA.P CH LIST MENU FAV.CH TOOLS INFO RETURN EXIT A B CD S.MODE...the previous channel. Displays and selects the available video sources (p. 14). CC: Controls the caption decoder (p. 24). 7 English PN50C550 / PN50C590 / PN58C550 / PN58C590 Turns the TV on the TV screen. Using the remote control with this button set to ON will reduce the battery usage time. SLEEP: Automatically shuts off the...
01 Getting Started Viewing the Remote Control ✎✎This is a special remote control for Samsung recorders that have the Anynet+ feature) POWER ON/OFF SOURCE PRE-CH MEDIA.P CH LIST MENU FAV.CH TOOLS INFO RETURN EXIT A B CD S.MODE...the previous channel. Displays and selects the available video sources (p. 14). CC: Controls the caption decoder (p. 24). 7 English PN50C550 / PN50C590 / PN58C550 / PN58C590 Turns the TV on the TV screen. Using the remote control with this button set to ON will reduce the battery usage time. SLEEP: Automatically shuts off the...
User Manual (user Manual) (ver.1.0) (English)
Page 8
...select channel "54-3", press "54", then press "-" and "3". Selects the on-screen menu items and changes the values seen on the TV screen. Buttons used functions. Displays Favorite Channel Lists on the screen (p. 15). xx The color and shape may affect the performance of ...list on the screen (p. 15). Avoid use when nearby fluorescent lights or neon signs. Changes channels. Getting Started PN50C540 / PN58C540 Turns the TV on Samsung recorders that have the Anynet+ feature) POWER SOURCE HDMI MUTE PRE-CH MEDIA.P CH LIST MENU FAV.CH TOOLS INFO RETURN EXIT A ...
...select channel "54-3", press "54", then press "-" and "3". Selects the on-screen menu items and changes the values seen on the TV screen. Buttons used functions. Displays Favorite Channel Lists on the screen (p. 15). xx The color and shape may affect the performance of ...list on the screen (p. 15). Avoid use when nearby fluorescent lights or neon signs. Changes channels. Getting Started PN50C540 / PN58C540 Turns the TV on Samsung recorders that have the Anynet+ feature) POWER SOURCE HDMI MUTE PRE-CH MEDIA.P CH LIST MENU FAV.CH TOOLS INFO RETURN EXIT A ...
User Manual (user Manual) (ver.1.0) (English)
Page 9
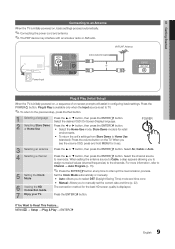
... HD screen quality is for 5 sec. 3 Selecting an antenna 4 Selecting a channel 5 Setting the Clock Mode 6 Viewing the HD Connection Guide. 7 Enjoy your TV. Press the ▲ or ▼ button, then press the ENTERE button. For more information, refer to Channel → Auto Program (p. 15). ✎✎...Time) mode and time zone yy Manual: Allows you to assign numerical values (channel frequencies) to the channels. If You Want to manually set to TV. ✎✎To return to the previous step, press the Red button. 1 Selecting a language Press the ▲ or ▼ button, ...
... HD screen quality is for 5 sec. 3 Selecting an antenna 4 Selecting a channel 5 Setting the Clock Mode 6 Viewing the HD Connection Guide. 7 Enjoy your TV. Press the ▲ or ▼ button, then press the ENTERE button. For more information, refer to Channel → Auto Program (p. 15). ✎✎...Time) mode and time zone yy Manual: Allows you to assign numerical values (channel frequencies) to the channels. If You Want to manually set to TV. ✎✎To return to the previous step, press the Red button. 1 Selecting a language Press the ▲ or ▼ button, ...
User Manual (user Manual) (ver.1.0) (English)
Page 10
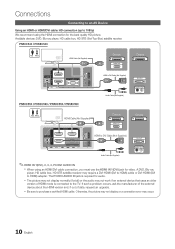
... for video. Otherwise, the picture may not display or a connection error may require a DVI-HDMI (DVI to HDMI) cable or DVI-HDMI (DVI to the TV. Connections Connecting to an AV Device Using an HDMI or HDMI/DVI cable: HD connection (up to purchase a certified HDMI cable. Available devices: DVD, Blu...
... for video. Otherwise, the picture may not display or a connection error may require a DVI-HDMI (DVI to HDMI) cable or DVI-HDMI (DVI to the TV. Connections Connecting to an AV Device Using an HDMI or HDMI/DVI cable: HD connection (up to purchase a certified HDMI cable. Available devices: DVD, Blu...
User Manual (user Manual) (ver.1.0) (English)
Page 11
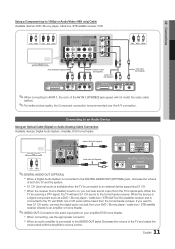
...CH audio, connect the digital audio out jack from the home theater receiver. xx When the receiver (home theater) is receiving a DTV signal, the TV will be heard from your DVD / Blu-ray player / cable box / STB satellite receiver directly to an amplifier or home theater. ✎✎... want to on your amplifier/DVD home theater. xx When connecting, use the appropriate connector. xx 5.1 CH (channel) audio is available when the TV is connected to an external device supporting 5.1 CH. Connecting to an Audio Device Using an Optical Cable (Digital) or Audio (Analog) Cable Connection ...
...CH audio, connect the digital audio out jack from the home theater receiver. xx When the receiver (home theater) is receiving a DTV signal, the TV will be heard from your DVD / Blu-ray player / cable box / STB satellite receiver directly to an amplifier or home theater. ✎✎... want to on your amplifier/DVD home theater. xx When connecting, use the appropriate connector. xx 5.1 CH (channel) audio is available when the TV is connected to an external device supporting 5.1 CH. Connecting to an Audio Device Using an Optical Cable (Digital) or Audio (Analog) Cable Connection ...
User Manual (user Manual) (ver.1.0) (English)
Page 14
... List, connected inputs will be highlighted. ✎✎ In the Source List, PC is connected to the HDMI IN 1(DVI) port, you should set the TV to DVI PC mode under Edit Name. ✎✎When connecting an HDMI/DVI cable to the HDMI IN 1(DVI) port, you should set the...; Input → Edit Name → ENTERE ■■ VCR / DVD / Cable STB / Satellite STB / PVR STB / AV Receiver / Game / Camcorder / PC / DVI PC / DVI Devices / TV / IPTV / Blu-ray / HD DVD / DMA: Name the device connected to the input jacks to Operate the OSD (On Screen Display) The access step may...
... List, connected inputs will be highlighted. ✎✎ In the Source List, PC is connected to the HDMI IN 1(DVI) port, you should set the TV to DVI PC mode under Edit Name. ✎✎When connecting an HDMI/DVI cable to the HDMI IN 1(DVI) port, you should set the...; Input → Edit Name → ENTERE ■■ VCR / DVD / Cable STB / Satellite STB / PVR STB / AV Receiver / Game / Camcorder / PC / DVI PC / DVI Devices / TV / IPTV / Blu-ray / HD DVD / DMA: Name the device connected to the input jacks to Operate the OSD (On Screen Display) The access step may...
User Manual (user Manual) (ver.1.0) (English)
Page 15
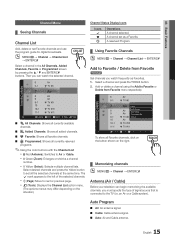
...frequently as a Favorite. Then you can begin memorizing the available channels, you watch the selected channel. 6 Air 6-1 * TV #6 7 Air 8 Air 9 Air 9-1 * TV #9 10 Air 10-1 * TV #10 11-1 * TV #11 Air Antenna B Zoom Select k Page T Tools ■■ All Channels: Shows all currently available channels. &#...9998;✎Using the color buttons with the Channel List xx Red (Antenna): Switches to Favorite Timer Viewing Channel Name Edit Select All * TV #10 * TV #11 Air Antenna B Zoom Select k Page T Tools To show all the selected channels at the same time. xx B Green ...
...frequently as a Favorite. Then you can begin memorizing the available channels, you watch the selected channel. 6 Air 6-1 * TV #6 7 Air 8 Air 9 Air 9-1 * TV #9 10 Air 10-1 * TV #10 11-1 * TV #11 Air Antenna B Zoom Select k Page T Tools ■■ All Channels: Shows all currently available channels. &#...9998;✎Using the color buttons with the Channel List xx Red (Antenna): Switches to Favorite Timer Viewing Channel Name Edit Select All * TV #10 * TV #11 Air Antenna B Zoom Select k Page T Tools To show all the selected channels at the same time. xx B Green ...
User Manual (user Manual) (ver.1.0) (English)
Page 16
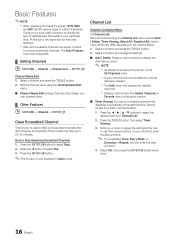
... to filter out scrambled channels after Auto Program is completed. Basic Features ✎✎NOTE xx When selecting the Cable TV system: STD, HRC and IRC identify various types of cable TV systems. Contact your local cable company to identify the type of cable system that exists in your remote to enter...
... to filter out scrambled channels after Auto Program is completed. Basic Features ✎✎NOTE xx When selecting the Cable TV system: STD, HRC and IRC identify various types of cable TV systems. Contact your local cable company to identify the type of cable system that exists in your remote to enter...
User Manual (user Manual) (ver.1.0) (English)
Page 17
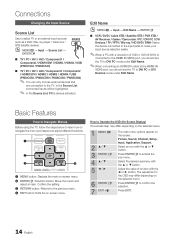
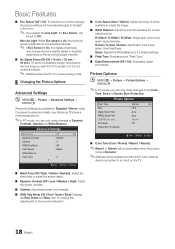
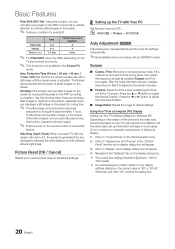
Scroll to the TV. ¦¦ Economical Solutions OO MENUm → Picture → Eco Solution → ENTERE The Eco Function can be displayed for about 4 seconds. 17 English xx ... selected program(s). ■■ Information: Display a show you have reserved to reduce power consumption. Until the screen turns on the right-hand side of the TV in order to watch . Highlight a program and press the TOOLS button to display Options. ■■ Change Info: Change a show you have to fine tune...
Scroll to the TV. ¦¦ Economical Solutions OO MENUm → Picture → Eco Solution → ENTERE The Eco Function can be displayed for about 4 seconds. 17 English xx ... selected program(s). ■■ Information: Display a show you have reserved to reduce power consumption. Until the screen turns on the right-hand side of the TV in order to watch . Highlight a program and press the TOOLS button to display Options. ■■ Change Info: Change a show you have to fine tune...
User Manual (user Manual) (ver.1.0) (English)
Page 18
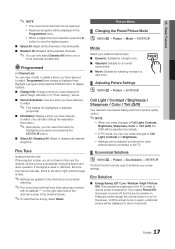
... (red, green, blue) brightness. Picture Options OO MENUm → Picture → Picture Options → ENTERE ✎✎In PC mode, you want the TV to remain on the TV. ■■ Black Tone (Off / Dark / Darker / Darkest): Select the black level to an input on if it 's default settings. ■■... Contrast, Gamma and White Balance. the picture settings will automatically adapt to the light in Standard / Movie mode) Compared to previous models, new Samsung TVs have a more natural picture. R-Gain / G-Gain / B-Gain: Adjust each color's (red, green, blue) darkness.
... (red, green, blue) brightness. Picture Options OO MENUm → Picture → Picture Options → ENTERE ✎✎In PC mode, you want the TV to remain on the TV. ■■ Black Tone (Off / Dark / Darker / Darkest): Select the black level to an input on if it 's default settings. ■■... Contrast, Gamma and White Balance. the picture settings will automatically adapt to the light in Standard / Movie mode) Compared to previous models, new Samsung TVs have a more natural picture. R-Gain / G-Gain / B-Gain: Adjust each color's (red, green, blue) darkness.
User Manual (user Manual) (ver.1.0) (English)
Page 19
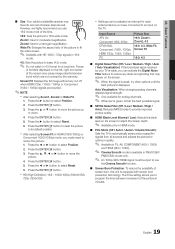
...Press the ► button to its own set of the time. Press the ENTERE button. 5. Zoom1: Use for optimum quality. ✎✎ Available in TV, AV, COMPONENT (480i / 1080i) and HDMI (480i / 1080i). ✎✎ Cinema Smooth mode is available in HDMI (1080i/1080p) or Component (.../ Auto): Reduces MPEG noise to provide improved picture quality. ■■ HDMI Black Level (Normal / Low): Selects the black level on the TV. Press the ENTERE button to reset the picture to select Position. 2. The Time setting allows you can be input to select Reset. 6. 03 Basic...
...Press the ► button to its own set of the time. Press the ENTERE button. 5. Zoom1: Use for optimum quality. ✎✎ Available in TV, AV, COMPONENT (480i / 1080i) and HDMI (480i / 1080i). ✎✎ Cinema Smooth mode is available in HDMI (1080i/1080p) or Component (.../ Auto): Reduces MPEG noise to provide improved picture quality. ■■ HDMI Black Level (Normal / Low): Selects the black level on the TV. Press the ENTERE button to reset the picture to select Position. 2. The Time setting allows you can be input to select Reset. 6. 03 Basic...
User Manual (user Manual) (ver.1.0) (English)
Page 20
...exists on the Windows start menu. 2. Picture Reset (OK / Cancel) Resets your computer manufacturer or Samsung Dealer.) 1. Click on the screen. Otherwise, just click "OK" and exit the dialog box. 20 English TV/AV/Component/ HDMI/PC 4 4 4 min. ✎✎ The Pixel Shift value may differ ... Adjust frequency values/positions and fine tune the settings automatically. ✎✎Not available when connecting with the screen ratio set -up the TV with a still image until the screen saver is not available in most cases. (If not, contact your current picture mode to its...
...exists on the Windows start menu. 2. Picture Reset (OK / Cancel) Resets your computer manufacturer or Samsung Dealer.) 1. Click on the screen. Otherwise, just click "OK" and exit the dialog box. 20 English TV/AV/Component/ HDMI/PC 4 4 4 min. ✎✎ The Pixel Shift value may differ ... Adjust frequency values/positions and fine tune the settings automatically. ✎✎Not available when connecting with the screen ratio set -up the TV with a still image until the screen saver is not available in most cases. (If not, contact your current picture mode to its...
User Manual (user Manual) (ver.1.0) (English)
Page 21
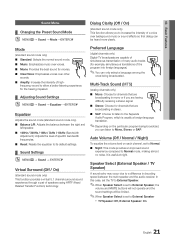
...only) This function provides a virtual 5.1 channel surround sound experience through a pair of high- Preferred Language (digital channels only) Digital-TV broadcasts are capable of simultaneous transmission of many audio tracks (for example, simultaneous translations of a voice over background music or sound effects ...so that dialog can listen to External Speaker xx TV Speaker: Off, External Speaker: On 21 English MTS ■■ Stereo: Choose for the hearing impaired. ¦¦ Adjusting...
...only) This function provides a virtual 5.1 channel surround sound experience through a pair of high- Preferred Language (digital channels only) Digital-TV broadcasts are capable of simultaneous transmission of many audio tracks (for example, simultaneous translations of a voice over background music or sound effects ...so that dialog can listen to External Speaker xx TV Speaker: Off, External Speaker: On 21 English MTS ■■ Stereo: Choose for the hearing impaired. ¦¦ Adjusting...
User Manual (user Manual) (ver.1.0) (English)
Page 22
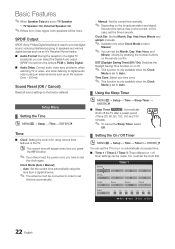
...in order to set the time automatically. −− Manual: Set the current time manually. ✎✎ Depending on / off timer settings can set the TV to turn on automatically at a preset time. ■■ Timer 1 / Timer 2 / Timer 3: Three different on the broadcast station and signal, the ... → Setup → Time → Timer 1→ ENTERE You can be correct. Basic Features ✎✎When Speaker Select is set to TV Speaker xx TV Speaker: On, External Speaker: On ✎✎If there is set to Auto. ¦¦ Using the Sleep Timer OO MENUm → Setup...
...in order to set the time automatically. −− Manual: Set the current time manually. ✎✎ Depending on / off timer settings can set the TV to turn on automatically at a preset time. ■■ Timer 1 / Timer 2 / Timer 3: Three different on the broadcast station and signal, the ... → Setup → Time → Timer 1→ ENTERE You can be correct. Basic Features ✎✎When Speaker Select is set to TV Speaker xx TV Speaker: On, External Speaker: On ✎✎If there is set to Auto. ¦¦ Using the Sleep Timer OO MENUm → Setup...


