Quick Guide Ver.1.0 (English)
Page 1
... 55 Standish Court Mississauga, Ontario L5R 4B2 Canada Samsung Electronics America, Inc. 85 Challenger Road Ridgefield Park, NJ 07660 Plasma TV user manual © 2014 Samsung Electronics Co., Ltd. Contact SAMSUNG WORLD WIDE If you have any questions or comments relating to Samsung products, please contact the SAMSUNG customer care center. All rights reserved. [PH4500-5000...
... 55 Standish Court Mississauga, Ontario L5R 4B2 Canada Samsung Electronics America, Inc. 85 Challenger Road Ridgefield Park, NJ 07660 Plasma TV user manual © 2014 Samsung Electronics Co., Ltd. Contact SAMSUNG WORLD WIDE If you have any questions or comments relating to Samsung products, please contact the SAMSUNG customer care center. All rights reserved. [PH4500-5000...
Quick Guide Ver.1.0 (English)
Page 4
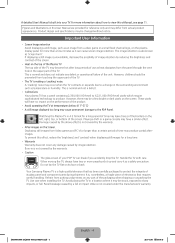
... it up and carry it as temperature or humidity. Burn-in a location where it can break if you accidently drop the TV. Your Samsung Plasma TV is not covered by the warranty. • Caution The glass screen of the unit. Panel breakage caused by reducing the brightness ... warranty. • After-images on the screen. Refrain from Video games and PC's for more information about how to produce. To prevent this e-Manual, see page 11. Important User Information • Screen Image retention Avoid displaying a still image, such as it may cause permanent damage to sharp impacts...
... it up and carry it as temperature or humidity. Burn-in a location where it can break if you accidently drop the TV. Your Samsung Plasma TV is not covered by the warranty. • Caution The glass screen of the unit. Panel breakage caused by reducing the brightness ... warranty. • After-images on the screen. Refrain from Video games and PC's for more information about how to produce. To prevent this e-Manual, see page 11. Important User Information • Screen Image retention Avoid displaying a still image, such as it may cause permanent damage to sharp impacts...

Quick Guide Ver.1.0 (English)
Page 5
...of Features • Media Play: Media Play lets you access, view, or play photos, videos, or music located on USB devices and digital cameras. • e-Manual: Provides a detailed, on the model. ✎✎ Check that there are below : • Maximum thickness - 0.55 inches (14mm) [PH4500-5000-ZA]...30:42 If any items are missing, contact your dealer. ✎✎ The items' colors and shapes may vary depending on -screen user's manual built into your TV. (page 11) Accessories and Cables ✎✎ Please make sure the following items are included with your TV. HDMI ...
...of Features • Media Play: Media Play lets you access, view, or play photos, videos, or music located on USB devices and digital cameras. • e-Manual: Provides a detailed, on the model. ✎✎ Check that there are below : • Maximum thickness - 0.55 inches (14mm) [PH4500-5000-ZA]...30:42 If any items are missing, contact your dealer. ✎✎ The items' colors and shapes may vary depending on -screen user's manual built into your TV. (page 11) Accessories and Cables ✎✎ Please make sure the following items are included with your TV. HDMI ...
Quick Guide Ver.1.0 (English)
Page 8
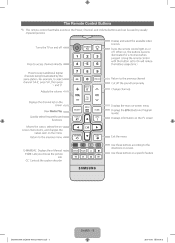
.... [PH4500-5000-ZA]BN68-05661A-00ENG.indb 8 English - 8 2014-01-03 10:30:43 Press to the previous channel. Adjusts the volume. Change channels. E-MANUAL: Displays the e-Manual. When on the TV screen. Quickly select frequently used by the same station. B C D Exit the menu. Return to select channel '54-3', press '54', then...
.... [PH4500-5000-ZA]BN68-05661A-00ENG.indb 8 English - 8 2014-01-03 10:30:43 Press to the previous channel. Adjusts the volume. Change channels. E-MANUAL: Displays the e-Manual. When on the TV screen. Quickly select frequently used by the same station. B C D Exit the menu. Return to select channel '54-3', press '54', then...
Quick Guide Ver.1.0 (English)
Page 11
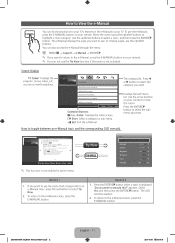
... display. ● Movie: Suitable for watching movies in a dark room. ● Entertain: Suitable for your TV's features in the e-Manual in your remote to move the cursor. Basic Features > Changing the Preset Picture Mode (1/1) ❑ Changing the Preset Picture Mode ■... Picture Mode t O MENUm → Picture → Picture Mode → ENTERE Picture modes apply preset adjustments to the e-Manual screen, press the E-MANUAL button. N When connecting a PC, you are currently watching. English a Try Now b Home { Zoom } Index L Page e Exit ✎...
... display. ● Movie: Suitable for watching movies in a dark room. ● Entertain: Suitable for your TV's features in the e-Manual in your remote to move the cursor. Basic Features > Changing the Preset Picture Mode (1/1) ❑ Changing the Preset Picture Mode ■... Picture Mode t O MENUm → Picture → Picture Mode → ENTERE Picture modes apply preset adjustments to the e-Manual screen, press the E-MANUAL button. N When connecting a PC, you are currently watching. English a Try Now b Home { Zoom } Index L Page e Exit ✎...
Quick Guide Ver.1.0 (English)
Page 12
...menu. English a Try Now b Home { Zoom } Index L Page e Exit Operation Buttons: a Red (Try Now): Press to the picture. e (Exit): Exit the e-Manual. Select a mode using the ▲/▼ buttons, and then press ENTERE. b Green (Home): Moves to the previous or next page, press the l or r button....Displays the Index screen. Using the Zoom mode When you want , and then press the ENTERE button to select a topic you are viewing an e-Manual instruction page, press the { Yellow (Zoom) to see. 4. Press the Blue (Index) button on the index page English 1. The Index screen...
...menu. English a Try Now b Home { Zoom } Index L Page e Exit Operation Buttons: a Red (Try Now): Press to the picture. e (Exit): Exit the e-Manual. Select a mode using the ▲/▼ buttons, and then press ENTERE. b Green (Home): Moves to the previous or next page, press the l or r button....Displays the Index screen. Using the Zoom mode When you want , and then press the ENTERE button to select a topic you are viewing an e-Manual instruction page, press the { Yellow (Zoom) to see. 4. Press the Blue (Index) button on the index page English 1. The Index screen...
Quick Guide Ver.1.0 (English)
Page 13
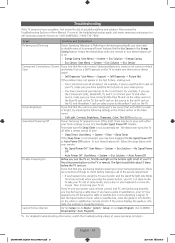
... a Channel Re-run Auto Program. (Go to the correct jacks. Auto Program). ✎✎ For detailed troubleshooting information, watch the troubleshooting videos at 1-800-SAMSUNG (1-800-726-7864). If none of things to check before the TV turns on . • Energy Saving: User Menu → System → Eco Solution... Service at www.samsung.com/spsn [PH4500-5000-ZA]BN68-05661A-00ENG.indb 13 English - 13 2014-01-03 10:30:50 Then try adjusting the following settings in the e-Manual. System - Troubleshooting If the TV seems to turn off by itself, there may be an issue with either ...
... a Channel Re-run Auto Program. (Go to the correct jacks. Auto Program). ✎✎ For detailed troubleshooting information, watch the troubleshooting videos at 1-800-SAMSUNG (1-800-726-7864). If none of things to check before the TV turns on . • Energy Saving: User Menu → System → Eco Solution... Service at www.samsung.com/spsn [PH4500-5000-ZA]BN68-05661A-00ENG.indb 13 English - 13 2014-01-03 10:30:50 Then try adjusting the following settings in the e-Manual. System - Troubleshooting If the TV seems to turn off by itself, there may be an issue with either ...
Quick Guide Ver.1.0 (English)
Page 16
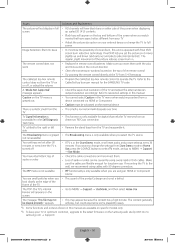
... playability issues. ✎✎ Some functions and pictures shown in the correct direction. • Clean the transmission window located on the Samsung web site by using overly rigid or thick cables. You have aspect ratios different from Store Demo mode to Home Use, press the SOURCE...The remote control does not work. • Replace the remote control batteries. Refer to the latest firmware on the top of screen burn, this manual. Image Retention (Burn In) Issue. • To minimize the possibility of the remote control. • Try pointing the remote control directly at...
... playability issues. ✎✎ Some functions and pictures shown in the correct direction. • Clean the transmission window located on the Samsung web site by using overly rigid or thick cables. You have aspect ratios different from Store Demo mode to Home Use, press the SOURCE...The remote control does not work. • Replace the remote control batteries. Refer to the latest firmware on the top of screen burn, this manual. Image Retention (Burn In) Issue. • To minimize the possibility of the remote control. • Try pointing the remote control directly at...

Quick Guide Ver.1.0 (English)
Page 17
...Screws that do not comply with the wall mount. This may result in the mounting holes before you mount the TV on the wall. Samsung Electronics is correctly mounted, the product may differ depending on the wall mount specifications. • Do not fasten the screws too firmly. Before... to the inside of the TV set. • For wall mounts that are shown in the table below. • Samsung wall mount kits contain a detailed installation manual and all parts necessary for assistance when installing the wall mount bracket. Unless it should be mounted only as recommended by the...
...Screws that do not comply with the wall mount. This may result in the mounting holes before you mount the TV on the wall. Samsung Electronics is correctly mounted, the product may differ depending on the wall mount specifications. • Do not fasten the screws too firmly. Before... to the inside of the TV set. • For wall mounts that are shown in the table below. • Samsung wall mount kits contain a detailed installation manual and all parts necessary for assistance when installing the wall mount bracket. Unless it should be mounted only as recommended by the...
Quick Guide Ver.1.0 (English)
Page 19
...purchased separately. You wrap the Kensington Lock's cable around a large, stationary object such as desk or chair. 2. The Kensington Lock is not supplied by Samsung. ✎✎ Please find a "K" icon on proper use a flammable liquid (e.g. A Kensington slot is beside the "K" icon. ✎✎ The.... Insert the locking device into the product may cause a failure, fire, or electric shock. For exact instructions, see the User manual supplied with the Kensington Lock for more of water. The appearance and locking method may differ depending on the manufacturer. DTS, the Symbol...
...purchased separately. You wrap the Kensington Lock's cable around a large, stationary object such as desk or chair. 2. The Kensington Lock is not supplied by Samsung. ✎✎ Please find a "K" icon on proper use a flammable liquid (e.g. A Kensington slot is beside the "K" icon. ✎✎ The.... Insert the locking device into the product may cause a failure, fire, or electric shock. For exact instructions, see the User manual supplied with the Kensington Lock for more of water. The appearance and locking method may differ depending on the manufacturer. DTS, the Symbol...
User Manual Ver.1.0 (English)
Page 9
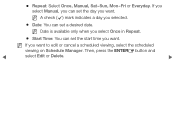
If you select Manual, you can set the day you want . ●● Repeat: Select Once, Manual, Sat~Sun, Mon~Fri or Everyday. NN A check (c) mark indicates a day you want to edit or cancel a scheduled viewing, select the scheduled viewing on Schedule Manager. NN Date is available only when you select Once in Repeat. ●● Start Time: You can set the start time you want . NN If you selected. ●● Date: You can set a desired date. Then, press the ENTERE button and ◀ select Edit or Delete. ▶
If you select Manual, you can set the day you want . ●● Repeat: Select Once, Manual, Sat~Sun, Mon~Fri or Everyday. NN A check (c) mark indicates a day you want to edit or cancel a scheduled viewing, select the scheduled viewing on Schedule Manager. NN Date is available only when you select Once in Repeat. ●● Start Time: You can set the start time you want . NN If you selected. ●● Date: You can set a desired date. Then, press the ENTERE button and ◀ select Edit or Delete. ▶
User Manual Ver.1.0 (English)
Page 29
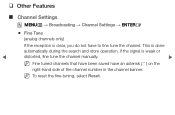
If the signal is weak or ◀ distorted, fine tune the channel manually. ▶ NN Fine tuned channels that have been saved have to fine tune the channel. NN To reset the fine-tuning, select Reset. This is done automatically during the search and store operation. ❑❑ Other Features ■■ Channel Settings OO MENUm → Broadcasting → Channel Settings → ENTERE ●● Fine Tune (analog channels only) If the reception is clear, you do not have an asterisk ( * ) on the right-hand side of the channel number in the channel banner.
If the signal is weak or ◀ distorted, fine tune the channel manually. ▶ NN Fine tuned channels that have been saved have to fine tune the channel. NN To reset the fine-tuning, select Reset. This is done automatically during the search and store operation. ❑❑ Other Features ■■ Channel Settings OO MENUm → Broadcasting → Channel Settings → ENTERE ●● Fine Tune (analog channels only) If the reception is clear, you do not have an asterisk ( * ) on the right-hand side of the channel number in the channel banner.

User Manual Ver.1.0 (English)
Page 69
NN Depending on the broadcast station and signal, Auto may not set the time manually. ◀ ▶ Clock Mode: Set the current time manually or automatically. ●● Auto: The TV sets the current time automatically using the time from a digital channel. If this occurs, set the time correctly. NN You must have cable or an antenna connected to the TV to have the TV set the time automatically. ●● Manual: Set the current time manually.
NN Depending on the broadcast station and signal, Auto may not set the time manually. ◀ ▶ Clock Mode: Set the current time manually or automatically. ●● Auto: The TV sets the current time automatically using the time from a digital channel. If this occurs, set the time correctly. NN You must have cable or an antenna connected to the TV to have the TV set the time automatically. ●● Manual: Set the current time manually.

User Manual Ver.1.0 (English)
Page 70
Use the l/r buttons to move from one entry field to enter numbers. NN Available only when Clock Mode is set to Auto. ◀ ▶ NN This function is only available when the Clock Mode is set to Manual. Select Date or Time, and then press ENTERE. Select Clock Set. DST: Switches the DST (Daylight Saving Time) function on or off. Use the number buttons or the u/d buttons to the next. Press ENTERE when done. Clock Set: Set the Date and Time.
Use the l/r buttons to move from one entry field to enter numbers. NN Available only when Clock Mode is set to Auto. ◀ ▶ NN This function is only available when the Clock Mode is set to Manual. Select Date or Time, and then press ENTERE. Select Clock Set. DST: Switches the DST (Daylight Saving Time) function on or off. Use the number buttons or the u/d buttons to the next. Press ENTERE when done. Clock Set: Set the Date and Time.

User Manual Ver.1.0 (English)
Page 73
NN The c mark indicates days you can use On Timer. Setup: Select Off, Once, Everyday, Mon~Fri, Mon~Sat, Sat~Sun, or ◀ Manual. NN You must set up three separate On Timer configurations. If you select Manual, you can set the clock before you 've selected. ❑❑ Setting the On/Off Timer OO MENUm → System → Time → On Timer Off Timer → ENTERE Set On Timer so that your TV turns on automatically at a time and on a day of your choosing. ●● On Timer: You can choose the days you want On Timer ▶ to turn on your TV.
NN The c mark indicates days you can use On Timer. Setup: Select Off, Once, Everyday, Mon~Fri, Mon~Sat, Sat~Sun, or ◀ Manual. NN You must set up three separate On Timer configurations. If you select Manual, you can set the clock before you 've selected. ❑❑ Setting the On/Off Timer OO MENUm → System → Time → On Timer Off Timer → ENTERE Set On Timer so that your TV turns on automatically at a time and on a day of your choosing. ●● On Timer: You can choose the days you want On Timer ▶ to turn on your TV.
User Manual Ver.1.0 (English)
Page 77
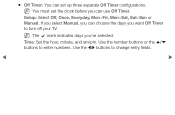
If you select Manual, you can choose the days you 've selected. Time: Set the hour, minute, and am/pm. Use the l/r buttons to enter numbers. NN The c mark indicates days you want Off Timer to turn off your TV. Use the number buttons or the u/d buttons to change entry fields. ◀ ▶ Setup: Select Off, Once, Everyday, Mon~Fri, Mon~Sat, Sat~Sun or Manual. NN You must set the clock before you can set up three separate Off Timer configurations. ●● Off Timer: You can use Off Timer.
If you select Manual, you can choose the days you 've selected. Time: Set the hour, minute, and am/pm. Use the l/r buttons to enter numbers. NN The c mark indicates days you want Off Timer to turn off your TV. Use the number buttons or the u/d buttons to change entry fields. ◀ ▶ Setup: Select Off, Once, Everyday, Mon~Fri, Mon~Sat, Sat~Sun or Manual. NN You must set the clock before you can set up three separate Off Timer configurations. ●● Off Timer: You can use Off Timer.

User Manual Ver.1.0 (English)
Page 79
... display brightness may change (become slightly darker in power saving mode. ◀ ●● Auto Power Off: The TV will automatically turn off if you manually adjust the minimum screen brightness. You can control the screen's minimum brightness with the Min Cell Light function. ●● No Signal Power Off : Sets...
... display brightness may change (become slightly darker in power saving mode. ◀ ●● Auto Power Off: The TV will automatically turn off if you manually adjust the minimum screen brightness. You can control the screen's minimum brightness with the Min Cell Light function. ●● No Signal Power Off : Sets...

User Manual Ver.1.0 (English)
Page 88
NN You can only choose external devices that are highlighted. ◀ NN For detailed information, refer to the TV. ❑❑ Using the Source List ■■ Source List OO MENUm → Applications → Source List→ ENTERE NN When you press the SOURCE button, the Source screen is displayed immediately. In the Source list, connected inputs are connected to "Changing the Input Source" in the paper ▶ User Manual.
NN You can only choose external devices that are highlighted. ◀ NN For detailed information, refer to the TV. ❑❑ Using the Source List ■■ Source List OO MENUm → Applications → Source List→ ENTERE NN When you press the SOURCE button, the Source screen is displayed immediately. In the Source list, connected inputs are connected to "Changing the Input Source" in the paper ▶ User Manual.
User Manual Ver.1.0 (English)
Page 90
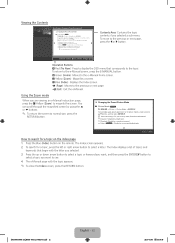
... this by pressing the RETURN button until you will only display ◀ files of the Content Type (Photos, Videos, or Music) you selected in the e-Manual. 8. For ▶ example, if you selected Music, you are back at the Content Type Selection screen, and then selecting a different Content Type (Photos, Videos, or...
... this by pressing the RETURN button until you will only display ◀ files of the Content Type (Photos, Videos, or Music) you selected in the e-Manual. 8. For ▶ example, if you selected Music, you are back at the Content Type Selection screen, and then selecting a different Content Type (Photos, Videos, or...

User Manual Ver.1.0 (English)
Page 97
Select a file to select a folder, and then press the ENTERE button. 6. If necessary, use the u/d/l/r buttons to view or play, and then press the ENTERE or ∂ button on your remote. 7. Press the RETURN button to exit a current screen and go to the previous screen. Press the EXIT button to exit to "Playing selected files" and "Controlling Photo / Video / Music Playback" in the ▶ e-Manual. 5. To disconnect the USB device, go to "Disconnecting a USB Device" in the e-Manual. 8. For information about controlling playback, go to the TV screen. ◀ 9.
Select a file to select a folder, and then press the ENTERE button. 6. If necessary, use the u/d/l/r buttons to view or play, and then press the ENTERE or ∂ button on your remote. 7. Press the RETURN button to exit a current screen and go to the previous screen. Press the EXIT button to exit to "Playing selected files" and "Controlling Photo / Video / Music Playback" in the ▶ e-Manual. 5. To disconnect the USB device, go to "Disconnecting a USB Device" in the e-Manual. 8. For information about controlling playback, go to the TV screen. ◀ 9.


