
User Manual (user Manual) (ver.1.0) (English)
Page 5
...the wide screen 16:9 ratio format, or expanded to fill the screen if your Samsung limited warranty. 3 SAFETY Displaying any stationary images that exceed the above for viewing. Be careful in the television picture. Wide screen format televisions (16:9, the aspect ratio of the screen width to...full-motion video. On television models that leave subtle, but permanent burned-in ghost images in the selection and duration of picture tubes (CRTs) that offer picture sizing features, use , as well as other stationary images and text such as stock market reports, video game displays, station...
...the wide screen 16:9 ratio format, or expanded to fill the screen if your Samsung limited warranty. 3 SAFETY Displaying any stationary images that exceed the above for viewing. Be careful in the television picture. Wide screen format televisions (16:9, the aspect ratio of the screen width to...full-motion video. On television models that leave subtle, but permanent burned-in ghost images in the selection and duration of picture tubes (CRTs) that offer picture sizing features, use , as well as other stationary images and text such as stock market reports, video game displays, station...

User Manual (user Manual) (ver.1.0) (English)
Page 6
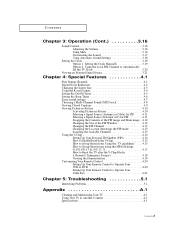
... Channels 3.11 To Store Your Favorite Channels 3.11 To View Your Favorite Channels 3.11 Adding and Erasing Channels (Manual Method 3.12 Labeling the Channels 3.13 Picture Control 3.14 Customizing the Picture 3.14 Using Automatic Picture Settings 3.15 Selecting the Color Tone 3.16
... Channels 3.11 To Store Your Favorite Channels 3.11 To View Your Favorite Channels 3.11 Adding and Erasing Channels (Manual Method 3.12 Labeling the Channels 3.13 Picture Control 3.14 Customizing the Picture 3.14 Using Automatic Picture Settings 3.15 Selecting the Color Tone 3.16
User Manual (user Manual) (ver.1.0) (English)
Page 7
... Feature 4.4 Setting the On/Off Timer 4.5 Setting the Sleep Timer 4.6 Extra sound settings 4.7 Choosing a Multi-Channel Sound (MTS) track 4.8 Viewing Closed Captions 4.9 Viewing Picture-in-Picture 4.10 Activating Picture-in-Picture 4.10 Selecting a Signal Source (Antenna or Cable) for PIP . . . . .4.11 Selecting a Signal Source (External A/V) for PIP 4.11 Swapping the Contents of the PIP...
... Feature 4.4 Setting the On/Off Timer 4.5 Setting the Sleep Timer 4.6 Extra sound settings 4.7 Choosing a Multi-Channel Sound (MTS) track 4.8 Viewing Closed Captions 4.9 Viewing Picture-in-Picture 4.10 Activating Picture-in-Picture 4.10 Selecting a Signal Source (Antenna or Cable) for PIP . . . . .4.11 Selecting a Signal Source (External A/V) for PIP 4.11 Swapping the Contents of the PIP...

User Manual (user Manual) (ver.1.0) (English)
Page 8
...menu system • Automatic timer to turn the TV on and off • Adjustable picture and sound settings that can be stored in the TV's memory • Automatic channel ...special filter to reduce or eliminate reception problems • Fine tuning control for the sharpest picture possible • A built-in multi-channel sound decoder for stereo and bilingual listening • ...Built-in, dual channel speakers • A special sleep timer • Picture-in-Picture • Component Video Input jacks to obtain a sharper image from external sources • Perfect...
...menu system • Automatic timer to turn the TV on and off • Adjustable picture and sound settings that can be stored in the TV's memory • Automatic channel ...special filter to reduce or eliminate reception problems • Fine tuning control for the sharpest picture possible • A built-in multi-channel sound decoder for stereo and bilingual listening • ...Built-in, dual channel speakers • A special sleep timer • Picture-in-Picture • Component Video Input jacks to obtain a sharper image from external sources • Perfect...

User Manual (user Manual) (ver.1.0) (English)
Page 10
... it down as a camcorder or video game. (For information on the shelf, hold the center of space from the front and sides for the optimum picture set in figure below. 4 Shut the door by pressing the " " symbol. Using the Component Shelf You can use the front or side panel jacks to...
... it down as a camcorder or video game. (For information on the shelf, hold the center of space from the front and sides for the optimum picture set in figure below. 4 Shut the door by pressing the " " symbol. Using the Component Shelf You can use the front or side panel jacks to...

User Manual (user Manual) (ver.1.0) (English)
Page 12
... shown in regular sequence. Ò Menu Displays the main on-screen menu. Ú Caption Controls the caption decoder. Æ PIP Activates picture in picture. ı Perfect Focus Press to adjust for automatic shutoff. Ø Display Press to display the current channel and the audio-video settings. ...to change channels. VOL -, VOL + Press increase or decrease the volume. ˆ Sleep Press to select a preset time interval for the optimum picture set in effect that adds clarity, punch and dynamics to the sound. ' MTS (Multichannel Television Stereo) Press to choose stereo, mono or Separate ...
... shown in regular sequence. Ò Menu Displays the main on-screen menu. Ú Caption Controls the caption decoder. Æ PIP Activates picture in picture. ı Perfect Focus Press to adjust for automatic shutoff. Ø Display Press to display the current channel and the audio-video settings. ...to change channels. VOL -, VOL + Press increase or decrease the volume. ˆ Sleep Press to select a preset time interval for the optimum picture set in effect that adds clarity, punch and dynamics to the sound. ' MTS (Multichannel Television Stereo) Press to choose stereo, mono or Separate ...

User Manual (user Manual) (ver.1.0) (English)
Page 13
... control(i.e., TV, VCR, Cable box or DVD). ≠ Set Used during set up of this Samsung remote control, so that is currently displayed on models HCN4226W/HCN4727W, HCN5527W/PCN5425R. YOUR NEW TV Remote Control (continued) ¯ ANT A/B Press to select the ANT A or ANT B. ˘ R.surf Press to ...the TV sound by selecting one of the preset factory settings (or select your personal, customized sound settings). ¸ P.Mode Adjust the TV picture by selecting one of the available signal sources for the PIP window. Add/Erase Press to memorize (scan) the available channels. Scan Press ...
... control(i.e., TV, VCR, Cable box or DVD). ≠ Set Used during set up of this Samsung remote control, so that is currently displayed on models HCN4226W/HCN4727W, HCN5527W/PCN5425R. YOUR NEW TV Remote Control (continued) ¯ ANT A/B Press to select the ANT A or ANT B. ˘ R.surf Press to ...the TV sound by selecting one of the preset factory settings (or select your personal, customized sound settings). ¸ P.Mode Adjust the TV picture by selecting one of the available signal sources for the PIP window. Add/Erase Press to memorize (scan) the available channels. Scan Press ...
User Manual (user Manual) (ver.1.0) (English)
Page 19
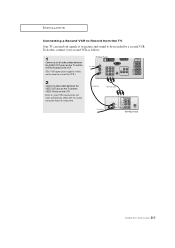
... do this kind of connection. 2.6 CHAPTER TWO: INSTALLATION INSTALLATION Connecting a Second VCR to Record from the TV Your TV can send out signals of its picture and sound to record using this , connect your second VCR as follows: 1 Connect a set of audio cables between the VIDEO OUT jack on the TV...
... do this kind of connection. 2.6 CHAPTER TWO: INSTALLATION INSTALLATION Connecting a Second VCR to Record from the TV Your TV can send out signals of its picture and sound to record using this , connect your second VCR as follows: 1 Connect a set of audio cables between the VIDEO OUT jack on the TV...

User Manual (user Manual) (ver.1.0) (English)
Page 23
...TV and the DVI OUT jack on the screen in order to digitally connect the TV with 480p, 720p, and 1080i picture signals. INSTALLATION Connecting to DVI (Digital Visual Interface)(480p, 720p, 1080i) By inputting a high-bandwidth Digital Content Protection high-definition... picture source to the DVI INPUT jack on the TV, high-definition pictures can only be displayed on the Set Top Box. Note: For an explanation of a personal computer. • Use...
...TV and the DVI OUT jack on the screen in order to digitally connect the TV with 480p, 720p, and 1080i picture signals. INSTALLATION Connecting to DVI (Digital Visual Interface)(480p, 720p, 1080i) By inputting a high-bandwidth Digital Content Protection high-definition... picture source to the DVI INPUT jack on the TV, high-definition pictures can only be displayed on the Set Top Box. Note: For an explanation of a personal computer. • Use...

User Manual (user Manual) (ver.1.0) (English)
Page 27
... function doesn't operate when component input is distorted after moving the TV set, use the Perfect Focus feature to adjust for the optimum picture size set in the Factory. 1 Press the Menu button. Press Menu button to select "Function", then press the VOL + button....& Play Convergence Caption Time Auto Clock Set V-Chip Function : English w You can 't make manual adjustments. OPERATION Using the Perfect Focus Feature When the picture size is in the following sequence: Green ➝ Red ➝ Blue. Language Plug & Play Convergence Caption Time Auto Clock Set V-Chip Function :...
... function doesn't operate when component input is distorted after moving the TV set, use the Perfect Focus feature to adjust for the optimum picture size set in the Factory. 1 Press the Menu button. Press Menu button to select "Function", then press the VOL + button....& Play Convergence Caption Time Auto Clock Set V-Chip Function : English w You can 't make manual adjustments. OPERATION Using the Perfect Focus Feature When the picture size is in the following sequence: Green ➝ Red ➝ Blue. Language Plug & Play Convergence Caption Time Auto Clock Set V-Chip Function :...
User Manual (user Manual) (ver.1.0) (English)
Page 30
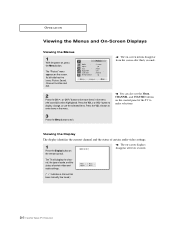
... video and audio settings. (" * " indicates a channel has been manually fine tuned.) 3.6 CHAPTER THREE: TV OPERATION Mode Adjust Size Digital NR Color tone Demonstration Picture : Custom : Wide : Off : Normal w The on -screen displays disappear after thirty seconds. 2 Press the CH or CH button to exit. w The on... -screen menus disappear from the screen after ten seconds. The "Picture" menu appears on , press the Menu button. Press the VOL + or VOL - The TV will display the channel, the type of audio,...
... video and audio settings. (" * " indicates a channel has been manually fine tuned.) 3.6 CHAPTER THREE: TV OPERATION Mode Adjust Size Digital NR Color tone Demonstration Picture : Custom : Wide : Off : Normal w The on -screen displays disappear after thirty seconds. 2 Press the CH or CH button to exit. w The on... -screen menus disappear from the screen after ten seconds. The "Picture" menu appears on , press the Menu button. Press the VOL + or VOL - The TV will display the channel, the type of audio,...
User Manual (user Manual) (ver.1.0) (English)
Page 38
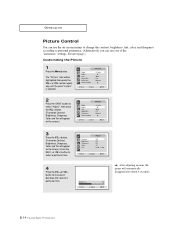
...VOL + button. (The words Contrast, Brightness, Sharpness, Color, and Tint will appear on the screen.) Mode Adjust Size Digital NR Color tone Demonstration Picture : Custom : Wide : Off : Normal 3 Press the VOL + button. (The words Contrast, Brightness, Sharpness, Color, and Tint will automatically... disappear(after about 4 seconds). 3.14 CHAPTER THREE: TV OPERATION OPERATION Picture Control You can use the on the screen.) Press the CH or CH button to select a particular item. Brightness 50 w After adjusting...
...VOL + button. (The words Contrast, Brightness, Sharpness, Color, and Tint will appear on the screen.) Mode Adjust Size Digital NR Color tone Demonstration Picture : Custom : Wide : Off : Normal 3 Press the VOL + button. (The words Contrast, Brightness, Sharpness, Color, and Tint will automatically... disappear(after about 4 seconds). 3.14 CHAPTER THREE: TV OPERATION OPERATION Picture Control You can use the on the screen.) Press the CH or CH button to select a particular item. Brightness 50 w After adjusting...
User Manual (user Manual) (ver.1.0) (English)
Page 39
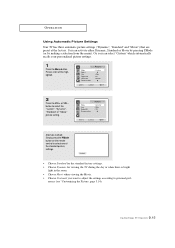
... select "Custom" which automatically recalls your personalized picture settings. 1 Press the Menu button. Or, you want to adjust the settings according to personal pref- Picture icon will be highlighted. Mode Adjust Size Digital NR Color tone Demonstration Picture : Custom : Wide : Off : Normal ... P.Mode button on the remote control to select the "Custom", "Dynamic", "Standard" or "Movie" picture setting. OPERATION Using Automatic Picture Settings Your TV has three automatic picture settings ("Dynamic", "Standard" and "Movie") that are preset at the factory. Standard • Choose ...
... select "Custom" which automatically recalls your personalized picture settings. 1 Press the Menu button. Or, you want to adjust the settings according to personal pref- Picture icon will be highlighted. Mode Adjust Size Digital NR Color tone Demonstration Picture : Custom : Wide : Off : Normal ... P.Mode button on the remote control to select the "Custom", "Dynamic", "Standard" or "Movie" picture setting. OPERATION Using Automatic Picture Settings Your TV has three automatic picture settings ("Dynamic", "Standard" and "Movie") that are preset at the factory. Standard • Choose ...

User Manual (user Manual) (ver.1.0) (English)
Page 40
Then press the VOL + button. Mode Adjust Size Digital NR Color tone Demonstration Picture : Custom : Wide : Off : Normal 3 Press the VOL + or VOL button to select "Normal", "Warm1", "Warm2", "Cool2" or "Cool1" Press the Menu button to select "... - or VOL + button. 3.16 CHAPTER THREE: TV OPERATION Mode Adjust Size Digital NR Color tone Demonstration Picture : Custom : Wide : Off : Normal 2 Press the CH button to exit. Mode Adjust Size Digital NR Color tone Demonstration Picture : Custom : Wide : Off : Warm1 Sound Control Adjusting the Volume Press the VOL + or VOL - OPERATION ...
Then press the VOL + button. Mode Adjust Size Digital NR Color tone Demonstration Picture : Custom : Wide : Off : Normal 3 Press the VOL + or VOL button to select "Normal", "Warm1", "Warm2", "Cool2" or "Cool1" Press the Menu button to select "... - or VOL + button. 3.16 CHAPTER THREE: TV OPERATION Mode Adjust Size Digital NR Color tone Demonstration Picture : Custom : Wide : Off : Normal 2 Press the CH button to exit. Mode Adjust Size Digital NR Color tone Demonstration Picture : Custom : Wide : Off : Warm1 Sound Control Adjusting the Volume Press the VOL + or VOL - OPERATION ...

User Manual (user Manual) (ver.1.0) (English)
Page 47
... press the VOL + button. Mode Adjust Size Digital NR Color tone Demonstration Picture : Custom : Wide : On : Normal 4.2 CHAPTER FOUR: SPECIAL FEATURES Press the CH button to exit. SPECIAL FEATURES Digital Noise Reduction If the broadcast signal received by ...your TV is weak, you can activate the Digital Noise Reduction feature to select "On". Mode Adjust Size Digital NR Color tone Demonstration Picture : Custom : Wide : Off : Normal 3 Press the VOL + or VOL button to help reduce any static and ghosting that may appear on the screen. 1 Press the...
... press the VOL + button. Mode Adjust Size Digital NR Color tone Demonstration Picture : Custom : Wide : On : Normal 4.2 CHAPTER FOUR: SPECIAL FEATURES Press the CH button to exit. SPECIAL FEATURES Digital Noise Reduction If the broadcast signal received by ...your TV is weak, you can activate the Digital Noise Reduction feature to select "On". Mode Adjust Size Digital NR Color tone Demonstration Picture : Custom : Wide : Off : Normal 3 Press the VOL + or VOL button to help reduce any static and ghosting that may appear on the screen. 1 Press the...
User Manual (user Manual) (ver.1.0) (English)
Page 48
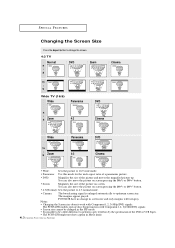
... 4:3 4 : 3 Cinema Cinema Wide Wide 16 : 9 Zoom Zoom Panorama Panorama 4:3 4 : 3 DVD DVD Cinema Cinema • Wide: Sets the picture to perform a grey letterbox by the specification of the DVD or VCR Tapes. • The PCN5425R might not show caption in Movie mode. 4.3 CHAPTER FOUR: SPECIAL FEATURES Notes • Changing the Screen size doesn...
... 4:3 4 : 3 Cinema Cinema Wide Wide 16 : 9 Zoom Zoom Panorama Panorama 4:3 4 : 3 DVD DVD Cinema Cinema • Wide: Sets the picture to perform a grey letterbox by the specification of the DVD or VCR Tapes. • The PCN5425R might not show caption in Movie mode. 4.3 CHAPTER FOUR: SPECIAL FEATURES Notes • Changing the Screen size doesn...
User Manual (user Manual) (ver.1.0) (English)
Page 54
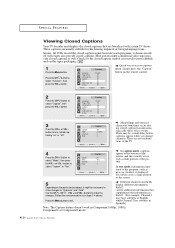
... bottom of the screen, and they usually cover only a small portion of the screen. 5 Depending on " or "off". Text often covers a large portion of the picture. In text mode, information unrelated to select "Caption", then press the VOL + button. All VCRs record the closed caption signal from television programs, so home...
... bottom of the screen, and they usually cover only a small portion of the screen. 5 Depending on " or "off". Text often covers a large portion of the picture. In text mode, information unrelated to select "Caption", then press the VOL + button. All VCRs record the closed caption signal from television programs, so home...
User Manual (user Manual) (ver.1.0) (English)
Page 55
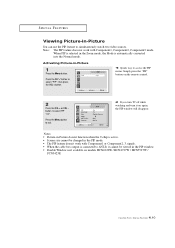
...off while watching and turn it cannot be viewed in the Zoom mode, the Mode is connected to select PIP "On". Notes • Picture-in-Picture doesn't function when the V-chip is active. • Screen size cannot be changed in the PIP mode. • The PIP feature...the remote control. 2 Press the VOL + or VOL button to ANT-B, it on models HCN4226W / HCN4727W / HCN5527W / PCN5425R. 4.10 CHAPTER FOUR: SPECIAL FEATURES SPECIAL FEATURES Viewing Picture-in -Picture 1 Press the Menu button. Note: The PIP feature does not work with Component1, Component2, Component3 mode. When PIP is ...
...off while watching and turn it cannot be viewed in the Zoom mode, the Mode is connected to select PIP "On". Notes • Picture-in-Picture doesn't function when the V-chip is active. • Screen size cannot be changed in the PIP mode. • The PIP feature...the remote control. 2 Press the VOL + or VOL button to ANT-B, it on models HCN4226W / HCN4727W / HCN5527W / PCN5425R. 4.10 CHAPTER FOUR: SPECIAL FEATURES SPECIAL FEATURES Viewing Picture-in -Picture 1 Press the Menu button. Note: The PIP feature does not work with Component1, Component2, Component3 mode. When PIP is ...
User Manual (user Manual) (ver.1.0) (English)
Page 57
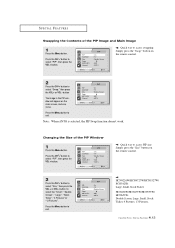
...selected, the PIP Swap function doesn't work. Press the CH button to select the "Small", "Double Screen", "Large", "Stock Ticker", "4 Pictures" or "13 Pictures". w 2 Press the CH button to exit. Press the Menu button to select "Size," then press the VOL + or VOL - PIP ...CATV Channel PIP : On : TV : Double Screen : ANT : ANT 4 HCN4226W/HCN4727W/HCN5527W/ PCN5425R: Large, Small, Stock Ticker HCN436W/HCN473W/HCN553W/ HCN653W: Double Screen, Large, Small, Stock Ticker, 4 Pictures, 13 Pictures. 4.12 CHAPTER FOUR: SPECIAL FEATURES Changing the Size of the PIP Image and Main Image 1 ...
...selected, the PIP Swap function doesn't work. Press the CH button to select the "Small", "Double Screen", "Large", "Stock Ticker", "4 Pictures" or "13 Pictures". w 2 Press the CH button to exit. Press the Menu button to select "Size," then press the VOL + or VOL - PIP ...CATV Channel PIP : On : TV : Double Screen : ANT : ANT 4 HCN4226W/HCN4727W/HCN5527W/ PCN5425R: Large, Small, Stock Ticker HCN436W/HCN473W/HCN553W/ HCN653W: Double Screen, Large, Small, Stock Ticker, 4 Pictures, 13 Pictures. 4.12 CHAPTER FOUR: SPECIAL FEATURES Changing the Size of the PIP Image and Main Image 1 ...
User Manual (user Manual) (ver.1.0) (English)
Page 62
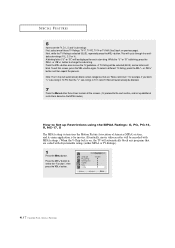
...: SPECIAL FEATURES SPECIAL FEATURES 6 How to set up Restrictions using the MPAA Ratings: G, PG, PG-13, R, NC-17, X The MPAA rating system uses the Motion Picture Association of America (MPAA) system, and its main application is blinking, press the CH or CH button to select the "Function", then press the VOL...
...: SPECIAL FEATURES SPECIAL FEATURES 6 How to set up Restrictions using the MPAA Ratings: G, PG, PG-13, R, NC-17, X The MPAA rating system uses the Motion Picture Association of America (MPAA) system, and its main application is blinking, press the CH or CH button to select the "Function", then press the VOL...

