

User Manual (user Manual) (ver.1.0) (English)
Page 6
... All Channels 2.3 Connecting to a Cable Box that Descrambles some Channels 2.3 Connecting a VCR 2.5 Connecting a Second VCR to Record from the TV 2.6 Connecting a Camcorder 2.7 Connecting a DVD Player, DTV Set-Top Box (480i, 480p, 1080i) . . .2.8 Connecting a DTV Set-Top Box 2.9 Connecting to Y, PB, PR (480p, 1080i 2.9 Connecting to DVI (Digital Visual Interface)(480p, 720p, 1080i) . .2.10...
... All Channels 2.3 Connecting to a Cable Box that Descrambles some Channels 2.3 Connecting a VCR 2.5 Connecting a Second VCR to Record from the TV 2.6 Connecting a Camcorder 2.7 Connecting a DVD Player, DTV Set-Top Box (480i, 480p, 1080i) . . .2.8 Connecting a DTV Set-Top Box 2.9 Connecting to Y, PB, PR (480p, 1080i 2.9 Connecting to DVI (Digital Visual Interface)(480p, 720p, 1080i) . .2.10...
User Manual (user Manual) (ver.1.0) (English)
Page 7
... the Volume 3.16 Using Mute 3.16 Customizing the Sound 3.17 Using Automatic Sound Settings 3.18 Setting the Clock 3.19 Option 1: Setting the Clock Manually 3.19 Option 2: Using the Local PBS Channel to Automatically Set the TV Clock 3.20 Viewing an External Signal Source 3.21 Chapter 4: Special Features 4.1 Fine...4.14 How to Enable/Disable the V-Chip 4.15 How to Set up Restrictions Using the "TV guidelines" . . . .4.15 How to Set up Restrictions using the MPAA Ratings: G, PG, PG-13, R, NC-17, X 4.17 How to Reset the TV after the V-Chip Blocks a Channel ("Emergency Escape 4.18 Viewing...
... the Volume 3.16 Using Mute 3.16 Customizing the Sound 3.17 Using Automatic Sound Settings 3.18 Setting the Clock 3.19 Option 1: Setting the Clock Manually 3.19 Option 2: Using the Local PBS Channel to Automatically Set the TV Clock 3.20 Viewing an External Signal Source 3.21 Chapter 4: Special Features 4.1 Fine...4.14 How to Enable/Disable the V-Chip 4.15 How to Set up Restrictions Using the "TV guidelines" . . . .4.15 How to Set up Restrictions using the MPAA Ratings: G, PG, PG-13, R, NC-17, X 4.17 How to Reset the TV after the V-Chip Blocks a Channel ("Emergency Escape 4.18 Viewing...

User Manual (user Manual) (ver.1.0) (English)
Page 8
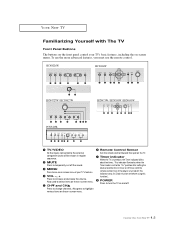
...-to-use remote control • Easy-to-use on-screen menu system • Automatic timer to turn the TV on and off • Adjustable picture and sound settings that can be stored in the TV's memory • Automatic channel tuning for up to 181 channels • A special filter to reduce or eliminate reception... sleep timer • Picture-in-Picture • Component Video Input jacks to obtain a sharper image from external sources • Perfect Focus 1.1 CHAPTER ONE: YOUR NEW TV Chapter One YOUR NEW TV List of Features Your Samsung TV was designed with the latest technology.
...-to-use remote control • Easy-to-use on-screen menu system • Automatic timer to turn the TV on and off • Adjustable picture and sound settings that can be stored in the TV's memory • Automatic channel tuning for up to 181 channels • A special filter to reduce or eliminate reception... sleep timer • Picture-in-Picture • Component Video Input jacks to obtain a sharper image from external sources • Perfect Focus 1.1 CHAPTER ONE: YOUR NEW TV Chapter One YOUR NEW TV List of Features Your Samsung TV was designed with the latest technology.
User Manual (user Manual) (ver.1.0) (English)
Page 9
... HCN436W HCN4727W / HCN5527W HCN473W / HCN553W / HCN653W PCN5425R Œ TV/VIDEO All the inputs connected to the external component jacks will be set to the "On" position after setting the clock and either the On timer or Off timer, with The TV Front Panel Buttons The buttons on the front panel control... your TV's features. ¨ VOL -, + Press to highlight ...
... HCN436W HCN4727W / HCN5527W HCN473W / HCN553W / HCN653W PCN5425R Œ TV/VIDEO All the inputs connected to the external component jacks will be set to the "On" position after setting the clock and either the On timer or Off timer, with The TV Front Panel Buttons The buttons on the front panel control... your TV's features. ¨ VOL -, + Press to highlight ...

User Manual (user Manual) (ver.1.0) (English)
Page 10
... as a camcorder or video game. (For information on connecting equipment, see pages 2.1 - 2.10.) ΠPERFECT FOCUS Press to adjust for ventilation. 1.3 CHAPTER ONE: YOUR NEW TV on the Component Shelf. 1 Press the symbol " " in the center of space from the front and sides for the optimum picture... set in figure below . 4 Shut the door by pressing the " " symbol. Using the Component Shelf You can use the front or side panel jacks to connect ...
... as a camcorder or video game. (For information on connecting equipment, see pages 2.1 - 2.10.) ΠPERFECT FOCUS Press to adjust for ventilation. 1.3 CHAPTER ONE: YOUR NEW TV on the Component Shelf. 1 Press the symbol " " in the center of space from the front and sides for the optimum picture... set in figure below . 4 Shut the door by pressing the " " symbol. Using the Component Shelf You can use the front or side panel jacks to connect ...
User Manual (user Manual) (ver.1.0) (English)
Page 11
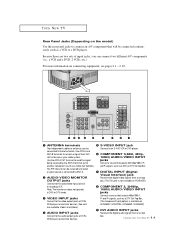
...mode. Connect to the video output jacks of VCRs, (The Component3 jack(option) is available on DVD players and similar devices (Two sets HCN436W / HCN473W / HCN553W / HCN653W) are two sets of input jacks, you can connect two different A/V components (i.e., a VCR and a DVD, 2 VCRs, etc.) For more information on...a signal source is not available on PCN5425R.) Connect to the audio/video input jacks of VCRs, box. connected to the audio output jacks of a recording VCR. The PIP channel can be Connect to an S-VHS VCR or DVD player. YOUR NEW TV Rear Panel Jacks (Depending on the...
...mode. Connect to the video output jacks of VCRs, (The Component3 jack(option) is available on DVD players and similar devices (Two sets HCN436W / HCN473W / HCN553W / HCN653W) are two sets of input jacks, you can connect two different A/V components (i.e., a VCR and a DVD, 2 VCRs, etc.) For more information on...a signal source is not available on PCN5425R.) Connect to the audio/video input jacks of VCRs, box. connected to the audio output jacks of a recording VCR. The PIP channel can be Connect to an S-VHS VCR or DVD player. YOUR NEW TV Rear Panel Jacks (Depending on the...

User Manual (user Manual) (ver.1.0) (English)
Page 12
... it directly at the TV. Press again to resume normal video. ¨ CH and CH (Channel Up/Down) Press CH or CH to change channels. VOL -, VOL + Press increase or decrease the volume. ˆ Sleep Press to select a preset time interval for the optimum picture set in the Factory. ˜...; Fav. YOUR NEW TV Remote Control You can also use the remote control up to stop the action during a particular scene. You can use your remote...
... it directly at the TV. Press again to resume normal video. ¨ CH and CH (Channel Up/Down) Press CH or CH to change channels. VOL -, VOL + Press increase or decrease the volume. ˆ Sleep Press to select a preset time interval for the optimum picture set in the Factory. ˜...; Fav. YOUR NEW TV Remote Control You can also use the remote control up to stop the action during a particular scene. You can use your remote...

User Manual (user Manual) (ver.1.0) (English)
Page 13
... selecting one of the preset factory settings (or select your personal, customized sound settings). ¸ P.Mode Adjust the TV picture by the Samsung remote control(i.e., TV, VCR, Cable box or DVD). ≠ Set Used during set up of this Samsung remote control, so that is currently displayed on models HCN4226W/HCN4727W, HCN5527W/PCN5425R. V.Chip Press to select one of...
... selecting one of the preset factory settings (or select your personal, customized sound settings). ¸ P.Mode Adjust the TV picture by the Samsung remote control(i.e., TV, VCR, Cable box or DVD). ≠ Set Used during set up of this Samsung remote control, so that is currently displayed on models HCN4226W/HCN4727W, HCN5527W/PCN5425R. V.Chip Press to select one of...
User Manual (user Manual) (ver.1.0) (English)
Page 17
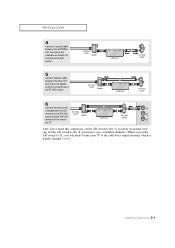
... the VHF/UHF terminal on the rear of the TV. After you will need to tune your TV to the "A" position for normal viewing. Set the A/B switch to the "B" position to view scrambled channels. (When you set the A/B switch to "B," you 've made this connection, set the A/B switch to the cable box's output channel, which...
... the VHF/UHF terminal on the rear of the TV. After you will need to tune your TV to the "A" position for normal viewing. Set the A/B switch to the "B" position to view scrambled channels. (When you set the A/B switch to "B," you 've made this connection, set the A/B switch to the cable box's output channel, which...

User Manual (user Manual) (ver.1.0) (English)
Page 18
... not connect the video cable and the SVideo cable to the instructions on the TV. A coaxial cable is usually included with a VCR. (If not, check your TV to an antenna or a cable TV system (according to video 1 simultaneously. If you have already connected your local electronics... store). 2 Connect a set of audio cables between the ANTENNA OUT terminal on the VCR and the antenna terminal on the TV. The actual configuration on your VCR tape. INSTALLATION Connecting a VCR These instructions assume that...
... not connect the video cable and the SVideo cable to the instructions on the TV. A coaxial cable is usually included with a VCR. (If not, check your TV to an antenna or a cable TV system (according to video 1 simultaneously. If you have already connected your local electronics... store). 2 Connect a set of audio cables between the ANTENNA OUT terminal on the VCR and the antenna terminal on the TV. The actual configuration on your VCR tape. INSTALLATION Connecting a VCR These instructions assume that...
User Manual (user Manual) (ver.1.0) (English)
Page 19
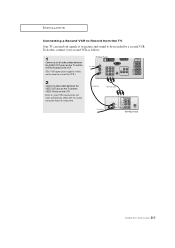
.... Refer to your VCR's instructions for more information about how to record using this , connect your second VCR as follows: 1 Connect a set of audio cables between the VIDEO OUT jack on the TV and the VIDEO IN jack on the front or rear of its picture and sound to Record from the... TV Your TV can send out signals of the VCR.) 2 Connect a video cable between the AUDIO OUT jacks on the TV and the AUDIO IN jacks on the VCR. (The VCR input jacks might be either on...
.... Refer to your VCR's instructions for more information about how to record using this , connect your second VCR as follows: 1 Connect a set of audio cables between the VIDEO OUT jack on the TV and the VIDEO IN jack on the front or rear of its picture and sound to Record from the... TV Your TV can send out signals of the VCR.) 2 Connect a video cable between the AUDIO OUT jacks on the TV and the AUDIO IN jacks on the VCR. (The VCR input jacks might be either on...
User Manual (user Manual) (ver.1.0) (English)
Page 20
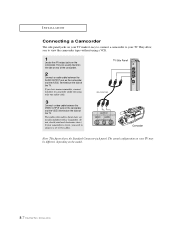
...rear of the camcorder. 2 Connect an audio cable between the VIDEO OUTPUT jack on the camcorder and the VIDEO terminal on the sidet of the TV. Note: This figure shows the Standard Connector-jack panel. If you to view the camcorder tapes without using only one audio cable. 3 Connect a... be different, depending on the model. 2.7 CHAPTER TWO: INSTALLATION They allow you have mono camcorder, connect L(mono) to connect a set of the TV. The actual configuration on the camcorder. They are usually included with a Camcorder. (If not, check your local electronics store.) If your camcorder is ...
...rear of the camcorder. 2 Connect an audio cable between the VIDEO OUTPUT jack on the camcorder and the VIDEO terminal on the sidet of the TV. Note: This figure shows the Standard Connector-jack panel. If you to view the camcorder tapes without using only one audio cable. 3 Connect a... be different, depending on the model. 2.7 CHAPTER TWO: INSTALLATION They allow you have mono camcorder, connect L(mono) to connect a set of the TV. The actual configuration on the camcorder. They are usually included with a Camcorder. (If not, check your local electronics store.) If your camcorder is ...

User Manual (user Manual) (ver.1.0) (English)
Page 21
...the model. 2.8 CHAPTER TWO: INSTALLATION Connecting to regular audio and video jacks 1 Connect a set of audio cables between the DVD audio in jacks on the TV and the AUDIO OUT jacks on the DVD player (or DTV Set-Top Box). 2 To enable Component video viewing, connect video cables between the VIDEO OUT... and the VIDEO IN jack on the TV. Connecting to your TV. INSTALLATION Connecting a DVD Player, DTV Set-Top Box (480i, 480p, 1080i) The rear panel jacks on your TV make it easy to connect a DVD player (or DTV Set-Top Box) to Y, PB, PR 1 Connect a set of audio cables between the AUDIO IN ...
...the model. 2.8 CHAPTER TWO: INSTALLATION Connecting to regular audio and video jacks 1 Connect a set of audio cables between the DVD audio in jacks on the TV and the AUDIO OUT jacks on the DVD player (or DTV Set-Top Box). 2 To enable Component video viewing, connect video cables between the VIDEO OUT... and the VIDEO IN jack on the TV. Connecting to your TV. INSTALLATION Connecting a DVD Player, DTV Set-Top Box (480i, 480p, 1080i) The rear panel jacks on your TV make it easy to connect a DVD player (or DTV Set-Top Box) to Y, PB, PR 1 Connect a set of audio cables between the AUDIO IN ...

User Manual (user Manual) (ver.1.0) (English)
Page 22
..., connect video cables between the Y, PB, and PR inputs on the TV and Y, PB, and PR (or Y, CB, CR) outputs on the TV. Next, connect the Left and Right audio from the set of Component video, see your DTV Set-top box's owner's instruction. 2.9 CHAPTER TWO: INSTALLATION INSTALLATION Connecting a ...DTV Set-Top Box Connecting to Y, PB, PR (480p, 1080i) Connect the Y, PB, ...
..., connect video cables between the Y, PB, and PR inputs on the TV and Y, PB, and PR (or Y, CB, CR) outputs on the TV. Next, connect the Left and Right audio from the set of Component video, see your DTV Set-top box's owner's instruction. 2.9 CHAPTER TWO: INSTALLATION INSTALLATION Connecting a ...DTV Set-Top Box Connecting to Y, PB, PR (480p, 1080i) Connect the Y, PB, ...

User Manual (user Manual) (ver.1.0) (English)
Page 23
... D-VHS are put on the market.) 1 Connect a set of audio cables between the AUDIO INPUT jacks on the TV and the AUDIO OUT jacks on the Set Top Box. 3 Connect a DVI cable between the DTV Set-Top Box audio in order to digitally connect the TV with a DTV decoder. 2.10 CHAPTER TWO: INSTALLATION For... Use a DVI 25-pin cable (commercially available) in jacks on the TV and the AUDIO OUT jacks on the DTV Set-Top box. 2 Connect a set of audio cables between the DVI INPUT jack on the TV and the DVI OUT jack on the Set Top Box. INSTALLATION Connecting to DVI (Digital Visual Interface)(480p, 720p...
... D-VHS are put on the market.) 1 Connect a set of audio cables between the AUDIO INPUT jacks on the TV and the AUDIO OUT jacks on the Set Top Box. 3 Connect a DVI cable between the DTV Set-Top Box audio in order to digitally connect the TV with a DTV decoder. 2.10 CHAPTER TWO: INSTALLATION For... Use a DVI 25-pin cable (commercially available) in jacks on the TV and the AUDIO OUT jacks on the DTV Set-Top box. 2 Connect a set of audio cables between the DVI INPUT jack on the TV and the DVI OUT jack on the Set Top Box. INSTALLATION Connecting to DVI (Digital Visual Interface)(480p, 720p...

User Manual (user Manual) (ver.1.0) (English)
Page 25
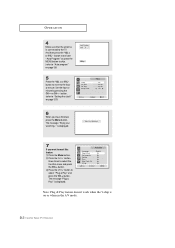
... and Off Press the Power button. continued... 3.1 CHAPTER THREE: TV OPERATION input check, and Auto program/Setting the Clock. 1 Press the Power button on the front panel. The message "Plug & Play" is automatically displayed. 2 Press the VOL + or VOL button to...is displayed. Press the Menu button to select the desired language. Plug & Play Feature When the TV is automatically displayed. Press the Menu button to video signal source. Language Plug & Play Convergence Caption Time Auto Clock Set V-Chip Function : English 3 Press the VOL + or VOL button to select the desired to ...
... and Off Press the Power button. continued... 3.1 CHAPTER THREE: TV OPERATION input check, and Auto program/Setting the Clock. 1 Press the Power button on the front panel. The message "Plug & Play" is automatically displayed. 2 Press the VOL + or VOL button to...is displayed. Press the Menu button to select the desired language. Plug & Play Feature When the TV is automatically displayed. Press the Menu button to video signal source. Language Plug & Play Convergence Caption Time Auto Clock Set V-Chip Function : English 3 Press the VOL + or VOL button to select the desired to ...
User Manual (user Manual) (ver.1.0) (English)
Page 26
...MENU button to skip. (refer to "Auto program" on page 3.6) 5 Press the VOL + or VOL button to move to "Setting the clock" on or when in the A/V mode. 3.2 CHAPTER THREE: TV OPERATION is on page 3.10) Clock On Time Off Time Sleep Timer Time - - : - - Language Plug & Play Convergence... Caption Time Auto Clock Set V-Chip Function : English Note: Plug & Play feature doesn't work when the V-chip is displayed. 7 If ...
...MENU button to skip. (refer to "Auto program" on page 3.6) 5 Press the VOL + or VOL button to move to "Setting the clock" on or when in the A/V mode. 3.2 CHAPTER THREE: TV OPERATION is on page 3.10) Clock On Time Off Time Sleep Timer Time - - : - - Language Plug & Play Convergence... Caption Time Auto Clock Set V-Chip Function : English Note: Plug & Play feature doesn't work when the V-chip is displayed. 7 If ...

User Manual (user Manual) (ver.1.0) (English)
Page 27
... If any error happens during Perfect Focus, then perform Perfect Focus once again. • If you can 't make adjustments after moving the TV set in the following sequence: Green ➝ Red ➝ Blue. Still you can 't make manual adjustments. Language Plug & Play Convergence Caption Time Auto ...Clock Set V-Chip Function : English w You can also select Perfect Focus by pressing the Perfect Focus button. 2 Press the CH button to exit. ...
... If any error happens during Perfect Focus, then perform Perfect Focus once again. • If you can 't make adjustments after moving the TV set in the following sequence: Green ➝ Red ➝ Blue. Still you can 't make manual adjustments. Language Plug & Play Convergence Caption Time Auto ...Clock Set V-Chip Function : English w You can also select Perfect Focus by pressing the Perfect Focus button. 2 Press the CH button to exit. ...

User Manual (user Manual) (ver.1.0) (English)
Page 28
... Convergence Manual Convergence Red Blue Perfect Focus continued... 3.4 CHAPTER THREE: TV OPERATION Press the CH button to select "Convergence", then press the VOL + button. Language Plug & Play Convergence Caption Time Auto Clock Set V-Chip Function : English 2 Press the CH button to select "Function...VOL + button. Be sure to use the remote control for the convergence adjustments. Language Plug & Play Convergence Caption Time Auto Clock Set V-Chip Function : English 3 The "Manual Convergence" screen will appear, and the word "Red" will be highlighted. OPERATION Adjusting...
... Convergence Manual Convergence Red Blue Perfect Focus continued... 3.4 CHAPTER THREE: TV OPERATION Press the CH button to select "Convergence", then press the VOL + button. Language Plug & Play Convergence Caption Time Auto Clock Set V-Chip Function : English 2 Press the CH button to select "Function...VOL + button. Be sure to use the remote control for the convergence adjustments. Language Plug & Play Convergence Caption Time Auto Clock Set V-Chip Function : English 3 The "Manual Convergence" screen will appear, and the word "Red" will be highlighted. OPERATION Adjusting...
User Manual (user Manual) (ver.1.0) (English)
Page 59
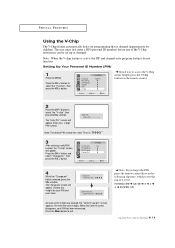
...appear. Re-enter the same 4 digits. When the Confirm screen disappears, your 4-digit PIN number, Note: The default PIN number for a new TV set up or changed. Language Plug & Play Convergence Caption Time V-Chip Function : English w Quick way to access the V-Chip menu: Simply press the... ➜ 8 ➜ 2 ➜ 4 ➜ POWER ON. Enter your PIN has been memorized. Choose any of the V-Chip restrictions can be set is deemed inappropriate for your PIN and enter them. As soon as the 4 digits are entered, the "Confirm new pin" screen appears. Note : When ...
...appear. Re-enter the same 4 digits. When the Confirm screen disappears, your 4-digit PIN number, Note: The default PIN number for a new TV set up or changed. Language Plug & Play Convergence Caption Time V-Chip Function : English w Quick way to access the V-Chip menu: Simply press the... ➜ 8 ➜ 2 ➜ 4 ➜ POWER ON. Enter your PIN has been memorized. Choose any of the V-Chip restrictions can be set is deemed inappropriate for your PIN and enter them. As soon as the 4 digits are entered, the "Confirm new pin" screen appears. Note : When ...


