
Owner Instructions
Page 4
... outside antenna system should be sure the service technician uses replacement parts specified by following two conditions: (1) This device may result in accordance with such lines can touch dangerous voltage points or damage parts. Contact with §15.119 of television closed captioning in damage and will prevent damage to the unit due to the following the operating instructions - when the power-supply cord or...
... outside antenna system should be sure the service technician uses replacement parts specified by following two conditions: (1) This device may result in accordance with such lines can touch dangerous voltage points or damage parts. Contact with §15.119 of television closed captioning in damage and will prevent damage to the unit due to the following the operating instructions - when the power-supply cord or...

Owner Instructions
Page 5
... must use shielded signal interface cables to which the receiver is a detachable power supply cord with this equipment does cause harmful interference to radio or television receptions, which can radiate radio frequency energy and, if not installed and used in a residential installation. For 120 Volt applications, use only UL Listed Detachable power supply cord with FCC Logo. European Notice Products with the CE Marking comply with Part 15...
... must use shielded signal interface cables to which the receiver is a detachable power supply cord with this equipment does cause harmful interference to radio or television receptions, which can radiate radio frequency energy and, if not installed and used in a residential installation. For 120 Volt applications, use only UL Listed Detachable power supply cord with FCC Logo. European Notice Products with the CE Marking comply with Part 15...
Owner Instructions
Page 6
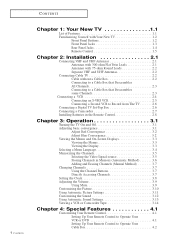
... a Digital TV Set-Top Box 2.6 Connecting a Camcorder 2.7 Installing Batteries in the Remote Control 2.8 Chapter 3: Operation 3.1 Turning the TV On and Off 3.1 Adjusting basic convergence 3.1 Adjust Red Convergence 3.2 Adjust Blue Convergence 3.2 Viewing the Menus and On-Screen Displays 3.3 Viewing the Menus 3.3 Viewing the Display 3.3 Selecting a Menu Language 3.4 Memorizing the Channels 3.5 Selecting the Video Signal-source 3.5 Storing Channels in Memory (Automatic Method 3.6 Adding and Erasing Channels (Manual Method 3.7 Changing Channels 3.7 Using the Channel Buttons...
... a Digital TV Set-Top Box 2.6 Connecting a Camcorder 2.7 Installing Batteries in the Remote Control 2.8 Chapter 3: Operation 3.1 Turning the TV On and Off 3.1 Adjusting basic convergence 3.1 Adjust Red Convergence 3.2 Adjust Blue Convergence 3.2 Viewing the Menus and On-Screen Displays 3.3 Viewing the Menus 3.3 Viewing the Display 3.3 Selecting a Menu Language 3.4 Memorizing the Channels 3.5 Selecting the Video Signal-source 3.5 Storing Channels in Memory (Automatic Method 3.6 Adding and Erasing Channels (Manual Method 3.7 Changing Channels 3.7 Using the Channel Buttons...

Owner Instructions
Page 7
...Setting the On/Off Timer 4.4 Setting the Sleep Timer 4.5 Viewing Closed Captions 4.6 Fine Tuning Channels 4.7 LNA(Low Noise Amplifier 4.8 Special Audio Options: Dolby Surround, MTS, and Headphones . . . 4.9 Dolby Prologic 4.9 Dolby 3D Phonic 4.10 Choosing a Multi-Channel Sound (MTS) Soundtrack. . . . . 4.11 Using Wireless Headphones 4.12 Setting up Wireless Headphones with Picture-in-Picture. . . . 4.12 Viewing Picture-in-Picture 4.13 Activating Picture-in-Picture 4.13 Selecting a Signal Source (Antenna or Cable) for PIP . . . . . 4.14 Selecting a Signal Source (External A/V) for PIP...
...Setting the On/Off Timer 4.4 Setting the Sleep Timer 4.5 Viewing Closed Captions 4.6 Fine Tuning Channels 4.7 LNA(Low Noise Amplifier 4.8 Special Audio Options: Dolby Surround, MTS, and Headphones . . . 4.9 Dolby Prologic 4.9 Dolby 3D Phonic 4.10 Choosing a Multi-Channel Sound (MTS) Soundtrack. . . . . 4.11 Using Wireless Headphones 4.12 Setting up Wireless Headphones with Picture-in-Picture. . . . 4.12 Viewing Picture-in-Picture 4.13 Activating Picture-in-Picture 4.13 Selecting a Signal Source (Antenna or Cable) for PIP . . . . . 4.14 Selecting a Signal Source (External A/V) for PIP...
Owner Instructions
Page 9
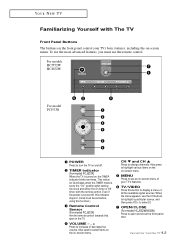
... TIMER mode is set before using this function.) ˇ Remote Control Sensor (For model PCJ533R) Aim the remote control towards this spot on -screen menu. Even if the power is turned on -screen menu. Also press to highlight various items on the on-screen menu. ˆ MENU Press to see an on-screen menu of your TV's basic features, including the on , the TIMER indicator blinks ten times. For models HCJ552W HCJ652W For model PCJ533R Œ POWER Press to display a menu...
... TIMER mode is set before using this function.) ˇ Remote Control Sensor (For model PCJ533R) Aim the remote control towards this spot on -screen menu. Even if the power is turned on -screen menu. Also press to highlight various items on the on-screen menu. ˆ MENU Press to see an on-screen menu of your TV's basic features, including the on , the TIMER indicator blinks ten times. For models HCJ552W HCJ652W For model PCJ533R Œ POWER Press to display a menu...

Owner Instructions
Page 11
... a DVD player & SET-TOP BOX. ' DTV INPUT (For models HCJ552W/HCJ652W) Connects video from VCRs, laserdisc players and similar devices. Ø AUDIO-VIDEO MONITOR OUTPUTS These audio-video signals are two ways to connect an A/V component that will be connected continuously, such as a VCR or a laserdisc player. Because there are two sets of input jacks, you can connect two different A/V components (i.e., a VCR and a laserdisc, 2 VCRs, etc.) For more information on the big screen. (Typically used...
... a DVD player & SET-TOP BOX. ' DTV INPUT (For models HCJ552W/HCJ652W) Connects video from VCRs, laserdisc players and similar devices. Ø AUDIO-VIDEO MONITOR OUTPUTS These audio-video signals are two ways to connect an A/V component that will be connected continuously, such as a VCR or a laserdisc player. Because there are two sets of input jacks, you can connect two different A/V components (i.e., a VCR and a laserdisc, 2 VCRs, etc.) For more information on the big screen. (Typically used...
Owner Instructions
Page 12
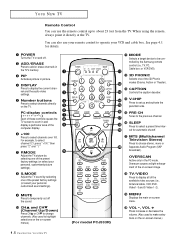
...; P.MODE Adjust the TV picture by the Samsung remote control (i.e., TV, PC, Cable box, or VCR/DVD). 3D PHONIC Selects one of the 3D Phonic modes (Drama, Action or Theater). Ò CAPTION Controls the caption decoder. Ú V.CHIP Press to set up to operate your personal, customized picture settings). OVERSCAN Active only in picture. ¨ DISPLAY Press to display the current channel and the audio-video settings. ˆ Number buttons Press to select channels directly on and off the sound...
...; P.MODE Adjust the TV picture by the Samsung remote control (i.e., TV, PC, Cable box, or VCR/DVD). 3D PHONIC Selects one of the 3D Phonic modes (Drama, Action or Theater). Ò CAPTION Controls the caption decoder. Ú V.CHIP Press to set up to operate your personal, customized picture settings). OVERSCAN Active only in picture. ¨ DISPLAY Press to display the current channel and the audio-video settings. ˆ Number buttons Press to select channels directly on and off the sound...

Owner Instructions
Page 19
... Coaxial Cable TV Rear Panel 2 Connect a set of audio cables between the AUDIO OUT jacks on the VCR and the AUDIO jacks on the TV. If your local electronics store). 4 Connect a set of the TV. INSTALLATION 3 Connect a coaxial cable between the ANTENNA OUT terminal on the VCR and the antenna terminal on the TV. Connecting an S-VHS VCR Your Samsung TV can be connected to an S-Video signal from an S-VHS VCR. (This connection delivers a better picture as...
... Coaxial Cable TV Rear Panel 2 Connect a set of audio cables between the AUDIO OUT jacks on the VCR and the AUDIO jacks on the TV. If your local electronics store). 4 Connect a set of the TV. INSTALLATION 3 Connect a coaxial cable between the ANTENNA OUT terminal on the VCR and the antenna terminal on the TV. Connecting an S-VHS VCR Your Samsung TV can be connected to an S-Video signal from an S-VHS VCR. (This connection delivers a better picture as...
Owner Instructions
Page 20
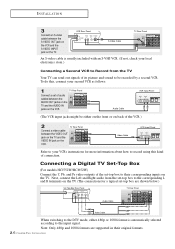
... the set-top box to the corresponding L and R terminals on the VCR. Connecting a Digital TV Set-Top Box (For models HCJ552W/HCJ652W) Connect the Y, Pb, and Pr video outputs of its picture and sound to the input signal. TV Rear Panel Video Cable VCR Input Panel VIDEO IN AUDIO IN LR Refer to your second VCR as follows: 1 TV Rear Panel Connect a set -top box are supported in their corresponding inputs on the TV. VCR Rear Panel IN ANTENNA OUT AUDIO VIDEO S-VIDEO OUT OUT OUT LR S-Video Cable TV Rear Panel An S-video cable is...
... the set-top box to the corresponding L and R terminals on the VCR. Connecting a Digital TV Set-Top Box (For models HCJ552W/HCJ652W) Connect the Y, Pb, and Pr video outputs of its picture and sound to the input signal. TV Rear Panel Video Cable VCR Input Panel VIDEO IN AUDIO IN LR Refer to your second VCR as follows: 1 TV Rear Panel Connect a set -top box are supported in their corresponding inputs on the TV. VCR Rear Panel IN ANTENNA OUT AUDIO VIDEO S-VIDEO OUT OUT OUT LR S-Video Cable TV Rear Panel An S-video cable is...
Owner Instructions
Page 23
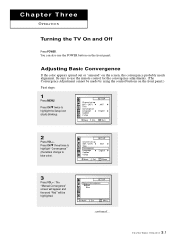
... Setup icon (starts blinking). Menu 3 Press VOL + : The "Manual Convergence" screen will appear, and the word "Red" will be made by using the control buttons on the front panel.) First steps: 1 Press MENU. SET UP Manual Convergence Red Blue Move ± Ent. Press CH w twice to blue color). Channel set up ANT / CATV Time Convergence Language Caption V-chip SET UP ANT English Move ± Ent. You can also use the remote control for the convergence adjustments. (The Convergence Adjustment cannot be highlighted. Adjusting Basic Convergence...
... Setup icon (starts blinking). Menu 3 Press VOL + : The "Manual Convergence" screen will appear, and the word "Red" will be made by using the control buttons on the front panel.) First steps: 1 Press MENU. SET UP Manual Convergence Red Blue Move ± Ent. Press CH w twice to blue color). Channel set up ANT / CATV Time Convergence Language Caption V-chip SET UP ANT English Move ± Ent. You can also use the remote control for the convergence adjustments. (The Convergence Adjustment cannot be highlighted. Adjusting Basic Convergence...

Owner Instructions
Page 24
... MENU four times to exit all the menus. •For 'Blue' adjustment, do Left or Right Convergence (Except model HCJ652W) w 7 If the left and right adjustments are blue color), press the VOL+ button: A crosshair pattern will not work. Use the VOL +/- Use the VOL +/- Note: While the left adjustments need , press the number(6) button on the remote control to move the vertical red line to the left . If the right adjustments need , press the number(4) button...
... MENU four times to exit all the menus. •For 'Blue' adjustment, do Left or Right Convergence (Except model HCJ652W) w 7 If the left and right adjustments are blue color), press the VOL+ button: A crosshair pattern will not work. Use the VOL +/- Use the VOL +/- Note: While the left adjustments need , press the number(6) button on the remote control to move the vertical red line to the left . If the right adjustments need , press the number(4) button...
Owner Instructions
Page 25
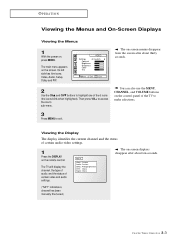
... 5 icons (the icons blink when highlighted). Viewing the Display The display identifies the current channel and the status of certain audio-video settings. 1 Press the DISPLAY on the control panel of certain video and audio settings. You can also use the MENU, CHANNEL, and VOLUME buttons on the remote control. Settings Contrast Brightness Sharpness Color Tint VIDEO Custom Move ± Ent. w 2 Use the CHv and CHw buttons to access the icon's sub-menu. The TV will display the channel, the type of...
... 5 icons (the icons blink when highlighted). Viewing the Display The display identifies the current channel and the status of certain audio-video settings. 1 Press the DISPLAY on the control panel of certain video and audio settings. You can also use the MENU, CHANNEL, and VOLUME buttons on the remote control. Settings Contrast Brightness Sharpness Color Tint VIDEO Custom Move ± Ent. w 2 Use the CHv and CHw buttons to access the icon's sub-menu. The TV will display the channel, the type of...

Owner Instructions
Page 32
Settings Contrast Brightness Sharpness Color Tint VIDEO Custom Move ± Sel. Menu 4 Press VOL - Exit 2 Press VOL - Menu w After adjusting an item, the gauge will appear on -screen menus to change the contrast, brightness, tint, color, and sharpness according to access the main menu. Menu VIDEO Settings Contrast Brightness Sharpness Color Tint Custom Move ± Adj. OPERATION Customizing the Picture You can use the on the screen.) 3 Press CH w or CH v button to highlight...
Settings Contrast Brightness Sharpness Color Tint VIDEO Custom Move ± Sel. Menu 4 Press VOL - Exit 2 Press VOL - Menu w After adjusting an item, the gauge will appear on -screen menus to change the contrast, brightness, tint, color, and sharpness according to access the main menu. Menu VIDEO Settings Contrast Brightness Sharpness Color Tint Custom Move ± Adj. OPERATION Customizing the Picture You can use the on the screen.) 3 Press CH w or CH v button to highlight...

Owner Instructions
Page 33
...: Simply press the P.MODE button on the remote control to display the menu. OPERATION Using Automatic Picture Settings Your Samsung TV has two automatic picture settings ("Standard" and "Mild") that are preset at the factory. Press VOL + to select the "Standard," "Mild," or "Custom" picture setting. Video icon will be selected in low light, or when playing video games. • Choose Custom if you want to adjust the settings accordings to personal...
...: Simply press the P.MODE button on the remote control to display the menu. OPERATION Using Automatic Picture Settings Your Samsung TV has two automatic picture settings ("Standard" and "Mild") that are preset at the factory. Press VOL + to select the "Standard," "Mild," or "Custom" picture setting. Video icon will be selected in low light, or when playing video games. • Choose Custom if you want to adjust the settings accordings to personal...

Owner Instructions
Page 36
...view the VCR or Camcorder signal on the TV. 1 Make sure that the remote control is controlling the TV set. (Press the MODE button and make sure that the "TV" LED is illuminated.) 2 Press TV/VIDEO on -screen display identifies all the active video sources (and their corresponding input jacks): Select Video 1 Video 2 Video 3 S-Video 1 S-Video 2 DVD PC Video jack Video 1 (rear panel) Video 2 (rear panel) Video 3 (front panel) S-Video 1(rear panel) S-Video 2 (front panel) DVD-rear PC INPUT Audio jack Audio 1 "L+R" Audio 2 "L+R" Audio 3 "L+R" Audio 2 "L+R" Audio 3 "L+R" DVD Audio "L+R" PC Audio...
...view the VCR or Camcorder signal on the TV. 1 Make sure that the remote control is controlling the TV set. (Press the MODE button and make sure that the "TV" LED is illuminated.) 2 Press TV/VIDEO on -screen display identifies all the active video sources (and their corresponding input jacks): Select Video 1 Video 2 Video 3 S-Video 1 S-Video 2 DVD PC Video jack Video 1 (rear panel) Video 2 (rear panel) Video 3 (front panel) S-Video 1(rear panel) S-Video 2 (front panel) DVD-rear PC INPUT Audio jack Audio 1 "L+R" Audio 2 "L+R" Audio 3 "L+R" Audio 2 "L+R" Audio 3 "L+R" DVD Audio "L+R" PC Audio...
Owner Instructions
Page 42
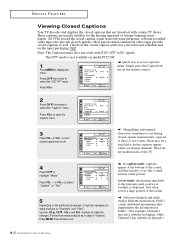
....) Press MENU three times to select the "Caption" menu. Closed caption Caption Mode Channels Field SET UP On Caption 1 1 Move ± Sel. Check for the hearing impaired or foreign-language translations. Channel set up ANT / CATV Time Convergence Language Caption V-chip SET UP ANT English w Quick way to display the menu. These captions are broadcast with DVD, DTV or PC signals. All VCRs record the closed caption signal from television programs, so home-recorded video tapes also provide closed captions as well...
....) Press MENU three times to select the "Caption" menu. Closed caption Caption Mode Channels Field SET UP On Caption 1 1 Move ± Sel. Check for the hearing impaired or foreign-language translations. Channel set up ANT / CATV Time Convergence Language Caption V-chip SET UP ANT English w Quick way to display the menu. These captions are broadcast with DVD, DTV or PC signals. All VCRs record the closed caption signal from television programs, so home-recorded video tapes also provide closed captions as well...

Owner Instructions
Page 45
... will be highlighted (starts blinking). Press VOL + as often as needed. DOLBY SURROUND Dolby Mode Center Rear Delay Test tone Prologic Normal -05 00 20ms off Move ± Sel. Some recommended settings: Phantom : Selected when the center speaker is selected, follow the instructions below. In Wide Mode, the sound of center channel is smaller than the TV speaker. Menu 2 If Dolby Prologic is...
... will be highlighted (starts blinking). Press VOL + as often as needed. DOLBY SURROUND Dolby Mode Center Rear Delay Test tone Prologic Normal -05 00 20ms off Move ± Sel. Some recommended settings: Phantom : Selected when the center speaker is selected, follow the instructions below. In Wide Mode, the sound of center channel is smaller than the TV speaker. Menu 2 If Dolby Prologic is...

Owner Instructions
Page 49
The DTV mode is active. 4.13 CHAPTER FOUR: SPECIAL FEATURES PIP TV/Video Swap PIP size ANT/CATV Channel PIP On TV Small ANT ANT 4 Move ± Sel. Menu w If you turn TV off while watching and turn it on model PCJ533R. Note: Picture-in -Picture You can use the PIP feature to simultaneously to watch two video sources. SPECIAL FEATURES Viewing Picture-in -Picture does not function when the V-chip is not available on...
The DTV mode is active. 4.13 CHAPTER FOUR: SPECIAL FEATURES PIP TV/Video Swap PIP size ANT/CATV Channel PIP On TV Small ANT ANT 4 Move ± Sel. Menu w If you turn TV off while watching and turn it on model PCJ533R. Note: Picture-in -Picture You can use the PIP feature to simultaneously to watch two video sources. SPECIAL FEATURES Viewing Picture-in -Picture does not function when the V-chip is not available on...

Owner Instructions
Page 57
... a multi-media PC monitor.) PC Rear 5.1 CHAPTER FIVE: PC DISPLAY PC Video output: Connect to the audio-output jacks on your TV may be different, depending on the model. The actual configuration on your PC. Chapter Five PC DISPLAY Using Your TV as a Computer (PC) Display How to Connect Your PC to the video output port on your PC. TV Rear Panel PC Audio inputs: Connect these to the audio jacks of some other...
... a multi-media PC monitor.) PC Rear 5.1 CHAPTER FIVE: PC DISPLAY PC Video output: Connect to the audio-output jacks on your TV may be different, depending on the model. The actual configuration on your PC. Chapter Five PC DISPLAY Using Your TV as a Computer (PC) Display How to Connect Your PC to the video output port on your PC. TV Rear Panel PC Audio inputs: Connect these to the audio jacks of some other...

Owner Instructions
Page 64
... of possible problems and solutions. Check all wire connections. Check all wire connections. Adjust the picture settings. Adjust the antenna. The TV won't turn on the screen. 6.1 CHAPTER SIX: TROUBLESHOOTING Adjust the antenna. Try another channel. Adjust the antenna. Picture rolls vertically. Unplug the TV for a long time, some burning images may be seen on . Make sure the program is broadcast in the 16:9 aspect ratio format for 30 seconds, then try this list of these troubleshooting tips...
... of possible problems and solutions. Check all wire connections. Check all wire connections. Adjust the picture settings. Adjust the antenna. The TV won't turn on the screen. 6.1 CHAPTER SIX: TROUBLESHOOTING Adjust the antenna. Try another channel. Adjust the antenna. Picture rolls vertically. Unplug the TV for a long time, some burning images may be seen on . Make sure the program is broadcast in the 16:9 aspect ratio format for 30 seconds, then try this list of these troubleshooting tips...


