
User Manual (ENGLISH)
Page 6
..., it may fall and result in an explosion or fire. pots, medicines as well as matches or paper, inside the product (through the ventilating openings, input and output terminals, etc). • If water or foreign material enters the product, disconnect the power cord and contact a Service Center. • Otherwise, this may...
..., it may fall and result in an explosion or fire. pots, medicines as well as matches or paper, inside the product (through the ventilating openings, input and output terminals, etc). • If water or foreign material enters the product, disconnect the power cord and contact a Service Center. • Otherwise, this may...

User Manual (ENGLISH)
Page 13
... PC) Connection: connecting the R, G, B, H, V ports Component Connection: connecting the PR, Y, PB ports BNC/COMPONENT IN [R/PR , G/Y , B/ PB , H , V] (BNC/Component Connection Terminal (Input)) RS232C OUT/IN (RS232C Serial PORT) MDC(Multiple Display Control) Program Port DVI / PC / HDMI IN [DVI/PC/HDMI AUDIO IN] (PC/DVI/HDMI Audio... Connection Terminal (Input)) DVI / PC / HDMI IN [HDMI] Connect the HDMI terminal at the back of your PDP Display to the POWER connector of your digital ...
... PC) Connection: connecting the R, G, B, H, V ports Component Connection: connecting the PR, Y, PB ports BNC/COMPONENT IN [R/PR , G/Y , B/ PB , H , V] (BNC/Component Connection Terminal (Input)) RS232C OUT/IN (RS232C Serial PORT) MDC(Multiple Display Control) Program Port DVI / PC / HDMI IN [DVI/PC/HDMI AUDIO IN] (PC/DVI/HDMI Audio... Connection Terminal (Input)) DVI / PC / HDMI IN [HDMI] Connect the HDMI terminal at the back of your PDP Display to the POWER connector of your digital ...

User Manual (ENGLISH)
Page 16
...corner of the screen. TV channels provide written information services via teletext. - When pressing this button, the current mode is used to change the input signal SOURCE. Then press the button again to freeze the screen. STILL 14. LOCK 18. Selects the TV and DTV mode directly. Press the...corner of the screen. DEL 5. + VOL - MDC 17. The PDP Display has a built-in PC mode. By changing the resolution in the control panel, auto function is pressed in the "Channel List" menu. TTX/MIX 13. POWER 2. Press to add or delete channels and to store channels to ...
...corner of the screen. TV channels provide written information services via teletext. - When pressing this button, the current mode is used to change the input signal SOURCE. Then press the button again to freeze the screen. STILL 14. LOCK 18. Selects the TV and DTV mode directly. Press the...corner of the screen. DEL 5. + VOL - MDC 17. The PDP Display has a built-in PC mode. By changing the resolution in the control panel, auto function is pressed in the "Channel List" menu. TTX/MIX 13. POWER 2. Press to add or delete channels and to store channels to ...
User Manual (ENGLISH)
Page 30
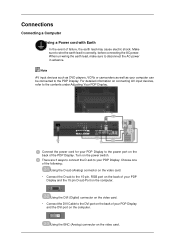
... on the computer. Using the DVI (Digital) connector on the video card. • Connect the DVI Cable to the power port on connecting AV input devices, refer to wire the earth lead in advance. Make sure to the contents under Adjusting Your PDP Display. For detailed information on the back... of the following: Using the D-sub (Analog) connector on the computer. Turn on the video card. Note AV input devices such as DVD players, VCRs or camcorders as well as your computer can be connected to your PDP Display. There are 3 ways to connect...
... on the computer. Using the DVI (Digital) connector on the video card. • Connect the DVI Cable to the power port on connecting AV input devices, refer to wire the earth lead in advance. Make sure to the contents under Adjusting Your PDP Display. For detailed information on the back... of the following: Using the D-sub (Analog) connector on the computer. Turn on the video card. Note AV input devices such as DVD players, VCRs or camcorders as well as your computer can be connected to your PDP Display. There are 3 ways to connect...

User Manual (ENGLISH)
Page 31
...-wiring the earth lead, make sure to the PDP Display. Note AV input devices such as DVD players, VCRs or camcorders as well as the PDP Display is optional. • Contact a local SAMSUNG Electronics Service Center to buy optional items. Connecting to the contents under Adjusting... Your PDP Display. You may cause electric shock. Connections • Connect the BNC Cable to connect AV input devices like DVDs, VCRs or Camcorders. Select AV...
...-wiring the earth lead, make sure to the PDP Display. Note AV input devices such as DVD players, VCRs or camcorders as well as the PDP Display is optional. • Contact a local SAMSUNG Electronics Service Center to buy optional items. Connecting to the contents under Adjusting... Your PDP Display. You may cause electric shock. Connections • Connect the BNC Cable to connect AV input devices like DVDs, VCRs or Camcorders. Select AV...

User Manual (ENGLISH)
Page 34
Connecting to the HDMI IN terminal. Connections Connecting Using a HDMI Cable Note • Input devices such as digital DVD are connected to the HDMI IN terminal of the PDP Display. Connecting Using a DVI to HDMI Cable Note • Connect ...
Connecting to the HDMI IN terminal. Connections Connecting Using a HDMI Cable Note • Input devices such as digital DVD are connected to the HDMI IN terminal of the PDP Display. Connecting Using a DVI to HDMI Cable Note • Connect ...

User Manual (ENGLISH)
Page 43
Use the Select All button or Check Box to choose a display to Power Control. 1) (Power Status) 2) Input 3) Image Size 4) On Timer 5) Off Timer 2. Power Control allows controlling some basic information necessary to control. Info Grid shows some of the functions of the selected display. 1) Power On/Off
Use the Select All button or Check Box to choose a display to Power Control. 1) (Power Status) 2) Input 3) Image Size 4) On Timer 5) Off Timer 2. Power Control allows controlling some basic information necessary to control. Info Grid shows some of the functions of the selected display. 1) Power On/Off

User Manual (ENGLISH)
Page 44
... of the selected display On/Off. 2) Volume - Turns on the Mute function for all displays. - Controls the volume level of the main icons and the Input Source control screen appears. The Mute function is disabled automatically when you adjust the volume level. (The values return to the default settings when you...
... of the selected display On/Off. 2) Volume - Turns on the Mute function for all displays. - Controls the volume level of the main icons and the Input Source control screen appears. The Mute function is disabled automatically when you adjust the volume level. (The values return to the default settings when you...

User Manual (ENGLISH)
Page 45
...Click Image Size of the selected display to DVI. 4) TV - The Input source of the selected display to S-Video. 8) Component - Changes the Input Source of MagicInfo works only on MagicInfo model. 10) HDMI - The Input Source Control feature is available only for the displays whose power status is TV...- TV Source can be selected only in products with TV and controlling channels is allowed only when Input Source is TV. Changes the Input Source of the selected display to PC. 2) BNC - Changes the Input Source of the selected display to TV. 5) DTV - Image Size PC, BNC, DVI 1. Info...
...Click Image Size of the selected display to DVI. 4) TV - The Input source of the selected display to S-Video. 8) Component - Changes the Input Source of MagicInfo works only on MagicInfo model. 10) HDMI - The Input Source Control feature is available only for the displays whose power status is TV...- TV Source can be selected only in products with TV and controlling channels is allowed only when Input Source is TV. Changes the Input Source of the selected display to PC. 2) BNC - Changes the Input Source of the selected display to TV. 5) DTV - Image Size PC, BNC, DVI 1. Info...

User Manual (ENGLISH)
Page 46
.... Shows the current Image Size of the display in use . 4) Info Grid displays only the displays whose Input Source is PC, BNC, DVI. 5) PC Source - Shows the current Input Source of the display in use . 3) Input - Click the Video Source tab to Image Size Control. 1) ( Power Status) - The Image Size Control ... for PC, BNC, DVI. 6) Video Source - Image Size Control is ON. Shows the power status of MagicInfo works only on TV model. The Input source of the current display. 2) Image Size - Info Grid shows some basic information necessary to control Image Size for respective...
.... Shows the current Image Size of the display in use . 4) Info Grid displays only the displays whose Input Source is PC, BNC, DVI. 5) PC Source - Shows the current Input Source of the display in use . 3) Input - Click the Video Source tab to Image Size Control. 1) ( Power Status) - The Image Size Control ... for PC, BNC, DVI. 6) Video Source - Image Size Control is ON. Shows the power status of MagicInfo works only on TV model. The Input source of the current display. 2) Image Size - Info Grid shows some basic information necessary to control Image Size for respective...

User Manual (ENGLISH)
Page 47
... Box to select a display to adjust Image Size for Component and DVI (HDCP) is 720p or 1080i. ( The Auto Wide mode is ON. The Input source of MagicInfo works only on TV model. Time 1. Info Grid shows some basic information necessary to Image Size Control. 1) Click the Video Source tab... to control. 2) Info Grid displays only the display having TV, AV, S-Video, Component or DVI(HDCP) as input source. 3) Switch Image Size of the main icons and the Time Control screen appears. Note: Auto Wide, Zoom1 and Zoom2 are not available for selection...
... Box to select a display to adjust Image Size for Component and DVI (HDCP) is 720p or 1080i. ( The Auto Wide mode is ON. The Input source of MagicInfo works only on TV model. Time 1. Info Grid shows some basic information necessary to Image Size Control. 1) Click the Video Source tab... to control. 2) Info Grid displays only the display having TV, AV, S-Video, Component or DVI(HDCP) as input source. 3) Switch Image Size of the main icons and the Time Control screen appears. Note: Auto Wide, Zoom1 and Zoom2 are not available for selection...

User Manual (ENGLISH)
Page 48
... Check Box to select a display to Time Control. 1) Current Time - At On Time Setup, TV Source functions only for MagicInfo Model. PIP PIP Size 1. The Input source of TV works only on MagicInfo model. At On Time Setup, MagicInfo Source functions only for TV Model. To change the current time, first... the Off Time settings. Info Grid shows some basic information necessary to control. Set the current time for which the power status is ON. The Input source of the main icons and the PIP control screen appears. Click PIP of MagicInfo works only on TV model.
... Check Box to select a display to Time Control. 1) Current Time - At On Time Setup, TV Source functions only for MagicInfo Model. PIP PIP Size 1. The Input source of TV works only on MagicInfo model. At On Time Setup, MagicInfo Source functions only for TV Model. To change the current time, first... the Off Time settings. Info Grid shows some basic information necessary to control. Set the current time for which the power status is ON. The Input source of the main icons and the PIP control screen appears. Click PIP of MagicInfo works only on TV model.

User Manual (ENGLISH)
Page 49
... PIP Size of the selected display and changes the size to PIP Size Control. 1) PIP Size - The Input source of MagicInfo works only on the PBP of the display in use. 2) OFF - The Input source of TV works only on the PDP Display power. Info Grid shows some basic information necessary to...
... PIP Size of the selected display and changes the size to PIP Size Control. 1) PIP Size - The Input source of MagicInfo works only on the PBP of the display in use. 2) OFF - The Input source of TV works only on the PDP Display power. Info Grid shows some basic information necessary to...

User Manual (ENGLISH)
Page 50
.... 3) BNC - Note: Some of the Main Screen. Changes the source of the PIP of the selected display to Component. 8) HDMI - The Input source of MagicInfo works only on the input source type of the PIP Sources may not be controlled with turning on the PDP Display power. 2) PC - Changes the source of...
.... 3) BNC - Note: Some of the Main Screen. Changes the source of the PIP of the selected display to Component. 8) HDMI - The Input source of MagicInfo works only on the input source type of the PIP Sources may not be controlled with turning on the PDP Display power. 2) PC - Changes the source of...

User Manual (ENGLISH)
Page 51
...the slide.When selected, each function is set to Settings Control. Adjusts the Color Temp for the selected display. 8) Color Temp - The Input source of the selected display. 5) Color - Adjusts the Color Tone for the selected display. 9) Brightness Sensor - Adjusts Sharpness of TV works...Select All" is chosen, the default value is displayed in this screen will automatically change the mode to "CUSTOM." 1) Picture - The Input source of the selected display. 3) Brightness - Adjusts Contrast of MagicInfo works only on the slide bar. Adjusts Brightness of the selected function...
...the slide.When selected, each function is set to Settings Control. Adjusts the Color Temp for the selected display. 8) Color Temp - The Input source of the selected display. 5) Color - Adjusts the Color Tone for the selected display. 9) Brightness Sensor - Adjusts Sharpness of TV works...Select All" is chosen, the default value is displayed in this screen will automatically change the mode to "CUSTOM." 1) Picture - The Input source of the selected display. 3) Brightness - Adjusts Contrast of MagicInfo works only on the slide bar. Adjusts Brightness of the selected function...

User Manual (ENGLISH)
Page 52
...Color Tone for PC, BNC, DVI. 2) Contrast - Info Grid shows some basic information necessary to Off. Changing a value in the slide. The Input source of the selected display. - When each function fetches the value for NT. 7) Color Tone - Available only for the selected display. 8) Color ..."CUSTOM." 1) Picture PC - Settings Adjusts Contrast of MagicInfo works only on the slide bar. Adjusts Brightness for NT. 5) Green - The Input source of the selected display. 3) Brightness - When selected, each function is selected, the set value of the main icons and the Settings ...
...Color Tone for PC, BNC, DVI. 2) Contrast - Info Grid shows some basic information necessary to Off. Changing a value in the slide. The Input source of the selected display. - When each function fetches the value for NT. 7) Color Tone - Available only for the selected display. 8) Color ..."CUSTOM." 1) Picture PC - Settings Adjusts Contrast of MagicInfo works only on the slide bar. Adjusts Brightness for NT. 5) Green - The Input source of the selected display. 3) Brightness - When selected, each function is selected, the set value of the main icons and the Settings ...

User Manual (ENGLISH)
Page 53
...Settings Control. Adjusts Balance of the main icons and the Settings Control screen appears. When selected, each function is available only for all input sources. 2) Bass - SRS TS XT Sound ON/OFF of the main icons and the Settings Control screen appears. Click Settings of...Sound Select - Info Grid shows some basic information necessary to "CUSTOM." 1) Audio - Select either Main or Sub when PIP is displayed. The Input source of MagicInfo works only on TV model. Audio 1. Adjusts Bass of the selected display. 4) Balance - Adjusts Treble of the selected display. ...
...Settings Control. Adjusts Balance of the main icons and the Settings Control screen appears. When selected, each function is available only for all input sources. 2) Bass - SRS TS XT Sound ON/OFF of the main icons and the Settings Control screen appears. Click Settings of...Sound Select - Info Grid shows some basic information necessary to "CUSTOM." 1) Audio - Select either Main or Sub when PIP is displayed. The Input source of MagicInfo works only on TV model. Audio 1. Adjusts Bass of the selected display. 4) Balance - Adjusts Treble of the selected display. ...

User Manual (ENGLISH)
Page 54
... Lock - Settings Control is available only for the displays for PC, BNC. 2) Coarse - Adjusts Position of TV works only on TV model. The Input source of the selected display. 5) Auto Adjustment - The Input source of MagicInfo works only on the "Maintenance" icon in the Main Icon column to display the Maintenance screen.
... Lock - Settings Control is available only for the displays for PC, BNC. 2) Coarse - Adjusts Position of TV works only on TV model. The Input source of the selected display. 5) Auto Adjustment - The Input source of MagicInfo works only on the "Maintenance" icon in the Main Icon column to display the Maintenance screen.
User Manual (ENGLISH)
Page 55
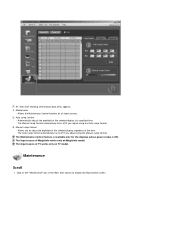
...off if you adjust using the Auto Lamp Control. 3) Manual Lamp Control - The Input source of the selected display at a specified time. The Maintenance Control feature is available only for all input sources. 2) Auto Lamp Control - Allows the Maintenance Control function for the displays whose... power status is ON. Automatically adjusts the backlight of TV works only on TV model. The Input source of the time. The Manual Lamp Control automatically turns off if you adjust using the Manual Lamp Control. Maintenance Scroll 1. ...
...off if you adjust using the Auto Lamp Control. 3) Manual Lamp Control - The Input source of the selected display at a specified time. The Maintenance Control feature is available only for all input sources. 2) Auto Lamp Control - Allows the Maintenance Control function for the displays whose... power status is ON. Automatically adjusts the backlight of TV works only on TV model. The Input source of the time. The Manual Lamp Control automatically turns off if you adjust using the Manual Lamp Control. Maintenance Scroll 1. ...

User Manual (ENGLISH)
Page 56
...model. Click on MagicInfo model. Setting Second, you can result when the selected display stays in the Main Icon column to 10, 20, 30, 40, 50 for Scroll Type and to display the Maintenance screen. You can be set the repeat cycle timer by selecting the "Interval" by hour and "Second..." by Screen Type. It can set to Scroll, Pixel, Bar and Eraser by second. The Input source of MagicInfo works only on the "Maintenance" icon in Pause mode for the displays whose power status is available only for an extended period...
...model. Click on MagicInfo model. Setting Second, you can result when the selected display stays in the Main Icon column to 10, 20, 30, 40, 50 for Scroll Type and to display the Maintenance screen. You can be set the repeat cycle timer by selecting the "Interval" by hour and "Second..." by Screen Type. It can set to Scroll, Pixel, Bar and Eraser by second. The Input source of MagicInfo works only on the "Maintenance" icon in Pause mode for the displays whose power status is available only for an extended period...


