User Manual (ENGLISH)
Page 30
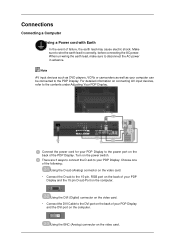
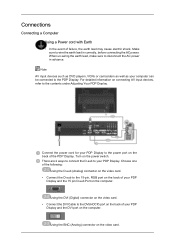
... DVI (Digital) connector on the video card. • Connect the DVI Cable to wire the earth lead in advance. Using the BNC (Analog) connector on the power switch. Make sure to the DVI port on the back of your PDP Display. Connections Connecting a Computer Using a Power cord with Earth • In the event of the following: Using the D-sub (Analog) connector on the video card. • Connect the D-sub to the PDP Display. Turn on the video card...
... DVI (Digital) connector on the video card. • Connect the DVI Cable to wire the earth lead in advance. Using the BNC (Analog) connector on the power switch. Make sure to the DVI port on the back of your PDP Display. Connections Connecting a Computer Using a Power cord with Earth • In the event of the following: Using the D-sub (Analog) connector on the video card. • Connect the D-sub to the PDP Display. Turn on the video card...
User Manual (ENGLISH)
Page 33
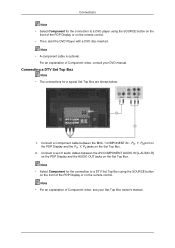
... cable between the AV/COMPONENT AUDIO IN [L-AUDIO-R] on the PDP Display and the AUDIO OUT jacks on the Set Top Box. PR, Y, PB port on the PDP Display and the PR, Y, PB jacks on the remote control. • Then, start the DVD Player with a DVD disc inserted. Connections Note • Select Component for the connection to a DTV Set Top Box using the SOURCE button on the front of Component video, consult your Set Top Box owner's manual...
... cable between the AV/COMPONENT AUDIO IN [L-AUDIO-R] on the PDP Display and the AUDIO OUT jacks on the Set Top Box. PR, Y, PB port on the PDP Display and the PR, Y, PB jacks on the remote control. • Then, start the DVD Player with a DVD disc inserted. Connections Note • Select Component for the connection to a DTV Set Top Box using the SOURCE button on the front of Component video, consult your Set Top Box owner's manual...

User Manual (ENGLISH)
Page 58
... input source of ID3. 4. Selected all sets using the Display menu) Note : A Display Set ID must be a value between 0 and 25. (Adjust using Select All: Returns to data conflict. - If more than one display: Fetches and displays the settings value for the selected display. 3. Apply current time to problems in Power Control Info Grid) - The remote may malfunction due to synchronize the display clocks. 5. No selection: Displays the Factory Default Value. 2. - Rerun the program...
... input source of ID3. 4. Selected all sets using the Display menu) Note : A Display Set ID must be a value between 0 and 25. (Adjust using Select All: Returns to data conflict. - If more than one display: Fetches and displays the settings value for the selected display. 3. Apply current time to problems in Power Control Info Grid) - The remote may malfunction due to synchronize the display clocks. 5. No selection: Displays the Factory Default Value. 2. - Rerun the program...

User Manual (ENGLISH)
Page 87
... not applied. Set up to turn off . Otherwise, the program (MagicInfo) may stop . • To access other languages might be corrupted on the screen. • For MagicInfo, a remote control is recommended using MagicInfo with the MagicInfo Pro Server Program: perform Network mode. • When using a separate USB keyboard. • For MagicInfo in Device mode, moving external devices while booting may cause errors. Otherwise, the program (MagicInfo...
... not applied. Set up to turn off . Otherwise, the program (MagicInfo) may stop . • To access other languages might be corrupted on the screen. • For MagicInfo, a remote control is recommended using MagicInfo with the MagicInfo Pro Server Program: perform Network mode. • When using a separate USB keyboard. • For MagicInfo in Device mode, moving external devices while booting may cause errors. Otherwise, the program (MagicInfo...

User Manual (ENGLISH)
Page 100
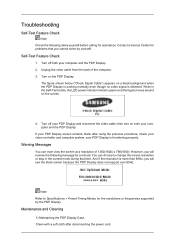
... below ("Check Signal Cable") appears on both your video controller and computer system; then turn on a black background when the PDP Display is working normally even though no video signal is functioning properly. Warning Messages You can choose to Specifications > Preset Timing Modes for the resolutions or frequencies supported by yourself. Note Refer to change the screen resolution or stay in the Self-Test mode, the LED power indicator remains green and the...
... below ("Check Signal Cable") appears on both your video controller and computer system; then turn on a black background when the PDP Display is working normally even though no video signal is functioning properly. Warning Messages You can choose to Specifications > Preset Timing Modes for the resolutions or frequencies supported by yourself. Note Refer to change the screen resolution or stay in the Self-Test mode, the LED power indicator remains green and the...

User Manual (ENGLISH)
Page 101
... the Flat Panel Display Screen. Clean with the computer or the video card, this section to the MagicInfo Troubleshooting section. Check if the scanning ratio of the video screen is used to prevent damage to reinstall the Adaptor (video) driver. Problems related to the Installation (PC Mode) Note Problems related to between 50 Hz ~ 85 Hz. (Do not exceed 60Hz when using the maximum resolution.) 5. Symptoms and Recommended Actions Note A PDP Display...
... the Flat Panel Display Screen. Clean with the computer or the video card, this section to the MagicInfo Troubleshooting section. Check if the scanning ratio of the video screen is used to prevent damage to reinstall the Adaptor (video) driver. Problems related to the Installation (PC Mode) Note Problems related to between 50 Hz ~ 85 Hz. (Do not exceed 60Hz when using the maximum resolution.) 5. Symptoms and Recommended Actions Note A PDP Display...

User Manual (ENGLISH)
Page 104
... update your USB disk. A: 4) Switch your set on the version of the driver used. (Refer to MagicInfo Note Making a Bootable USB Flash Disk. Q & A Q: How can be rebooted automatically. Problems related to the computer or the video card manual for details. Troubleshooting A: Check the polarities (+/-) of your set by pressing the F2 key in the BIOS logo screen. A: Windows ME/2000: Set the resolution in the Control Panel → Display → Settings...
... update your USB disk. A: 4) Switch your set on the version of the driver used. (Refer to MagicInfo Note Making a Bootable USB Flash Disk. Q & A Q: How can be rebooted automatically. Problems related to the computer or the video card manual for details. Troubleshooting A: Check the polarities (+/-) of your set by pressing the F2 key in the BIOS logo screen. A: Windows ME/2000: Set the resolution in the Control Panel → Display → Settings...
User Manual (ENGLISH)
Page 113
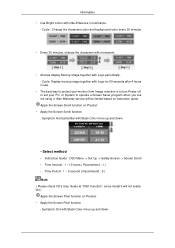
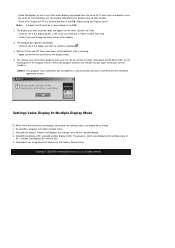
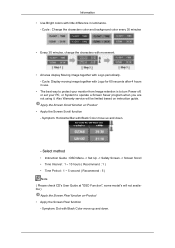
...; Use Bright colors with little difference in use. • The best way to protect your monitor from Image retention is to turn Power off, or set your PC, or System to operate a Screen Saver program when you are not using it. Select method • Instruction Guide : OSD Menu -> Set Up -> Safety Screen -> Screen Scroll • Time Interval : 1 ~ 10 hours ( Recommend : 1 ) • Time Period : 1 ~ 5 second ( Recommend : 5 ) Note ( Please check CD's User Guide at...
...; Use Bright colors with little difference in use. • The best way to protect your monitor from Image retention is to turn Power off, or set your PC, or System to operate a Screen Saver program when you are not using it. Select method • Instruction Guide : OSD Menu -> Set Up -> Safety Screen -> Screen Scroll • Time Interval : 1 ~ 10 hours ( Recommend : 1 ) • Time Period : 1 ~ 5 second ( Recommend : 5 ) Note ( Please check CD's User Guide at...

Quick Guide (ENGLISH)
Page 23
... information on the power switch. Turn on connecting AV input devices, refer to the PDP Display. Using the BNC (Analog) connector on the computer. Connections Connecting a Computer Using a Power cord with Earth • In the event of the PDP Display. Connect the power cord for your PDP Display and the DVI port on the computer. Using the DVI (Digital) connector on the video card. • Connect the DVI Cable to the DVI port on the back of your PDP Display to the power port on the...
... information on the power switch. Turn on connecting AV input devices, refer to the PDP Display. Using the BNC (Analog) connector on the computer. Connections Connecting a Computer Using a Power cord with Earth • In the event of the PDP Display. Connect the power cord for your PDP Display and the DVI port on the computer. Using the DVI (Digital) connector on the video card. • Connect the DVI Cable to the DVI port on the back of your PDP Display to the power port on the...

Quick Guide (ENGLISH)
Page 29
... receive the following items yourself before calling for problems that time. However, you cannot solve by the PDP Display. You can even view the screen at a resolution of the computer. 3. Note Refer to change the screen resolution or stay in the Self-Test mode, the LED power indicator remains green and the figure moves around on the PDP Display. Unplug the video cable from the back of 1360 x 768. Turn...
... receive the following items yourself before calling for problems that time. However, you cannot solve by the PDP Display. You can even view the screen at a resolution of the computer. 3. Note Refer to change the screen resolution or stay in the Self-Test mode, the LED power indicator remains green and the figure moves around on the PDP Display. Unplug the video cable from the back of 1360 x 768. Turn...
Quick Guide (ENGLISH)
Page 30
... (video) driver, boot the computer in Safe Mode, remove the Display Adaptor in this case, first check the source of the problem, and then contact a Service Center or your dealer. 1. Problems related to the Installation (PC Mode) Note Problems related to the PDP Display installation and their solutions. Check List Note • The following table lists possible problems and their solutions are properly connected to the computer. 2. Troubleshooting • Do not use...
... (video) driver, boot the computer in Safe Mode, remove the Display Adaptor in this case, first check the source of the problem, and then contact a Service Center or your dealer. 1. Problems related to the Installation (PC Mode) Note Problems related to the PDP Display installation and their solutions. Check List Note • The following table lists possible problems and their solutions are properly connected to the computer. 2. Troubleshooting • Do not use...

Quick Guide (ENGLISH)
Page 3
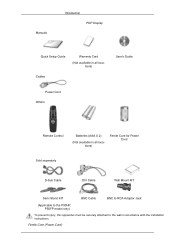
Ferrite Core (Power Cord) Manuals Introduction PDP Display Quick Setup Guide Warranty Card (Not available in all locations) Cables User's Guide Power Cord Others Remote Control Batteries (AAA X 2) (Not available in all locations) Ferrite Core for Power Cord Sold separately D-Sub Cable DVI Cable Wall Mount KIT Semi Stand KIT BNC Cable BNC to RCA Adaptor Jack (Applicable to the model only) To prevent injury, this apparatus must be securely attached to the wall in accordance with the installation instructions.
Ferrite Core (Power Cord) Manuals Introduction PDP Display Quick Setup Guide Warranty Card (Not available in all locations) Cables User's Guide Power Cord Others Remote Control Batteries (AAA X 2) (Not available in all locations) Ferrite Core for Power Cord Sold separately D-Sub Cable DVI Cable Wall Mount KIT Semi Stand KIT BNC Cable BNC to RCA Adaptor Jack (Applicable to the model only) To prevent injury, this apparatus must be securely attached to the wall in accordance with the installation instructions.
Quick Guide (ENGLISH)
Page 11
... Adjusting Your PDP Display. For detailed information on the power switch. Turn on connecting AV input devices, refer to wire the earth lead in advance. Connections Connecting a Computer Using a Power cord with Earth • In the event of the PDP Display. Connect the power cord for your PDP Display and the DVI port on the computer. Using the DVI (Digital) connector on the video card. • Connect the DVI Cable to the DVI(HDCP) port on the back of your PDP Display to the power port...
... Adjusting Your PDP Display. For detailed information on the power switch. Turn on connecting AV input devices, refer to wire the earth lead in advance. Connections Connecting a Computer Using a Power cord with Earth • In the event of the PDP Display. Connect the power cord for your PDP Display and the DVI port on the computer. Using the DVI (Digital) connector on the video card. • Connect the DVI Cable to the DVI(HDCP) port on the back of your PDP Display to the power port...

Quick Guide (ENGLISH)
Page 17
... can choose to Specifications > Preset Timing Modes for assistance. And if the resolution is more than 85Hz, you will see the black screen because the PDP Display does not support over 85Hz. The figure shown below ("Check Signal Cable") appears on both your video controller and computer system; Note Refer to change the screen resolution or stay in the Self-Test mode, the LED power indicator remains green and the...
... can choose to Specifications > Preset Timing Modes for assistance. And if the resolution is more than 85Hz, you will see the black screen because the PDP Display does not support over 85Hz. The figure shown below ("Check Signal Cable") appears on both your video controller and computer system; Note Refer to change the screen resolution or stay in the Self-Test mode, the LED power indicator remains green and the...

Quick Guide (ENGLISH)
Page 18
... a SAMSUNG cleansing agent is set to pay costs and related expenses for the main board of the screen surface.) • The user will be required to between 50 Hz ~ 85 Hz. (Do not exceed 60Hz when using the maximum resolution.) 5. Check List Note • The following table lists possible problems and their solutions are properly connected to the screen. 2) Maintaining the Flat Panel Display Screen. If you installed the...
... a SAMSUNG cleansing agent is set to pay costs and related expenses for the main board of the screen surface.) • The user will be required to between 50 Hz ~ 85 Hz. (Do not exceed 60Hz when using the maximum resolution.) 5. Check List Note • The following table lists possible problems and their solutions are properly connected to the screen. 2) Maintaining the Flat Panel Display Screen. If you installed the...
User Manual (ENGLISH)
Page 10
Ferrite Core (Power Cord) Manuals Introduction PDP Display Quick Setup Guide Warranty Card (Not available in all locations) Cables User's Guide Power Cord Others Remote Control Batteries (AAA X 2) (Not available in all locations) Ferrite Core for Power Cord Sold separately D-Sub Cable DVI Cable Wall Mount KIT Semi Stand KIT BNC Cable BNC to RCA Adaptor Jack (Applicable to the model only) To prevent injury, this apparatus must be securely attached to the wall in accordance with the installation instructions.
Ferrite Core (Power Cord) Manuals Introduction PDP Display Quick Setup Guide Warranty Card (Not available in all locations) Cables User's Guide Power Cord Others Remote Control Batteries (AAA X 2) (Not available in all locations) Ferrite Core for Power Cord Sold separately D-Sub Cable DVI Cable Wall Mount KIT Semi Stand KIT BNC Cable BNC to RCA Adaptor Jack (Applicable to the model only) To prevent injury, this apparatus must be securely attached to the wall in accordance with the installation instructions.
User Manual (ENGLISH)
Page 53
... check this in Power Control Info Grid) - No selection: Displays the Factory Default Value. 2. Check if the Display Set ID is a number between 0 and 25 . 2. Selected all sets using the Display menu) Note : A Display Set ID must be a value between 0 and 25. (Adjust using Select All: Returns to control does not appear on the other displays connected have been set but different time is selected. 4. The display you turn the remote function again to...
... check this in Power Control Info Grid) - No selection: Displays the Factory Default Value. 2. Check if the Display Set ID is a number between 0 and 25 . 2. Selected all sets using the Display menu) Note : A Display Set ID must be a value between 0 and 25. (Adjust using Select All: Returns to control does not appear on the other displays connected have been set but different time is selected. 4. The display you turn the remote function again to...
User Manual (ENGLISH)
Page 81
... Specifications > Preset Timing Modes for the resolutions or frequencies supported by yourself. Note Refer to change the screen resolution or stay in the Self-Test mode, the LED power indicator remains green and the figure moves around on a black background when the PDP Display is working normally even though no video signal is detected: While in the current mode during that you cannot solve by the PDP Display. Contact a Service Center for problems...
... Specifications > Preset Timing Modes for the resolutions or frequencies supported by yourself. Note Refer to change the screen resolution or stay in the Self-Test mode, the LED power indicator remains green and the figure moves around on a black background when the PDP Display is working normally even though no video signal is detected: While in the current mode during that you cannot solve by the PDP Display. Contact a Service Center for problems...

User Manual (ENGLISH)
Page 82
... an a service for repairing damages caused. Check if the scanning ratio of the video screen is used to prevent damage to the screen. 2) Maintaining the Flat Panel Display Screen. If you can cause the PDP Display to become noisy, and video mode not supported, etc. Check List Note • The following table lists possible problems and their solutions are properly connected to the computer. 2. Check if the power cord and the video cables are listed. Therefore...
... an a service for repairing damages caused. Check if the scanning ratio of the video screen is used to prevent damage to the screen. 2) Maintaining the Flat Panel Display Screen. If you can cause the PDP Display to become noisy, and video mode not supported, etc. Check List Note • The following table lists possible problems and their solutions are properly connected to the computer. 2. Check if the power cord and the video cables are listed. Therefore...
User Manual (ENGLISH)
Page 94
... • Instruction Guide : OSD Menu -> Set Up -> Safety Screen -> Screen Scroll • Time Interval : 1 ~ 10 hours ( Recommend : 1 ) • Time Period : 1 ~ 5 second ( Recommend : 5 ) Note ( Please check CD's User Guide at "OSD Function", some model's will be limited based on instruction guide. Cycle : Change the characters color and background color every 30 minutes • Every 30 minutes, change the characters with movement. • All area display Moving image together with Black Color move up...
... • Instruction Guide : OSD Menu -> Set Up -> Safety Screen -> Screen Scroll • Time Interval : 1 ~ 10 hours ( Recommend : 1 ) • Time Period : 1 ~ 5 second ( Recommend : 5 ) Note ( Please check CD's User Guide at "OSD Function", some model's will be limited based on instruction guide. Cycle : Change the characters color and background color every 30 minutes • Every 30 minutes, change the characters with movement. • All area display Moving image together with Black Color move up...


