User Manual (ENGLISH)
Page 2
... in all times Disconnect the plug from the outlet Ground to prevent an electric shock When not used for extended period of time, set it may result in death or personal injury. Safety Instructions Notational Note These safety instructions must be followed to ensure your computer to ...this may result in electric shock or fire. Warning / Caution Otherwise, it may result in personal injury or property damage. If using screen saver, set your safety and prevent property damage. Make sure to connect the power cord to a grounded power outlet. • Otherwise, it to read the ...
... in all times Disconnect the plug from the outlet Ground to prevent an electric shock When not used for extended period of time, set it may result in death or personal injury. Safety Instructions Notational Note These safety instructions must be followed to ensure your computer to ...this may result in electric shock or fire. Warning / Caution Otherwise, it may result in personal injury or property damage. If using screen saver, set your safety and prevent property damage. Make sure to connect the power cord to a grounded power outlet. • Otherwise, it to read the ...
User Manual (ENGLISH)
Page 6
... terminals, etc). • If water or foreign material enters the product, disconnect the power cord and contact a Service Center. • Otherwise, this may be damaged. Set a resolution and frequency appropriate to the product. • Otherwise, your product for a long time, an afterimage or stain may fall and result in electric shock...
... terminals, etc). • If water or foreign material enters the product, disconnect the power cord and contact a Service Center. • Otherwise, this may be damaged. Set a resolution and frequency appropriate to the product. • Otherwise, your product for a long time, an afterimage or stain may fall and result in electric shock...
User Manual (ENGLISH)
Page 11
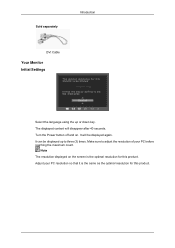
Note The resolution displayed on . It will disappear after 40 seconds. Turn the Power button off and on the screen is the same as the optimal resolution for this product. It can be displayed again. Adjust your PC before reaching the maximum count. Make sure to three (3) times. Sold separately Introduction DVI Cable Your Monitor Initial Settings Select the language using the up to adjust the resolution of your PC resolution so that it is the optimal resolution for this product. The displayed content will be displayed up or down key.
Note The resolution displayed on . It will disappear after 40 seconds. Turn the Power button off and on the screen is the same as the optimal resolution for this product. It can be displayed again. Adjust your PC before reaching the maximum count. Make sure to three (3) times. Sold separately Introduction DVI Cable Your Monitor Initial Settings Select the language using the up to adjust the resolution of your PC resolution so that it is the optimal resolution for this product. The displayed content will be displayed up or down key.
User Manual (ENGLISH)
Page 15
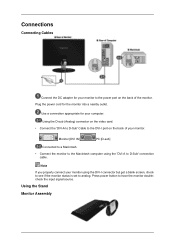
... video card. • Connect the 'DVI-A to D-Sub' Cable to the DVI-I connector but get a blank screen, check to see if the monitor status is set to analog. Plug the power cord for your computer. Press power button to have the monitor doublecheck the input signal source. Using the Stand Monitor...
... video card. • Connect the 'DVI-A to D-Sub' Cable to the DVI-I connector but get a blank screen, check to see if the monitor status is set to analog. Plug the power cord for your computer. Press power button to have the monitor doublecheck the input signal source. Using the Stand Monitor...
User Manual (ENGLISH)
Page 18
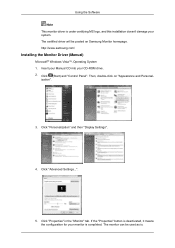
Then, double-click on Samsung Monitor homepage. ization". 3. Click "Advanced Settings...". 5. The monitor can be posted on "Appearance and Personal- Using the Software Note This monitor driver is under certifying MS logo, and this installation doesn't damage your monitor is completed. http://www.samsung.com/ Installing the Monitor Driver (Manual) Microsoft® Windows Vista..." in the "Monitor" tab. The certified driver will be used as is deactivated, it means the configuration for your system. Click "Personalization" and then "Display Settings". 4.
Then, double-click on Samsung Monitor homepage. ization". 3. Click "Advanced Settings...". 5. The monitor can be posted on "Appearance and Personal- Using the Software Note This monitor driver is under certifying MS logo, and this installation doesn't damage your monitor is completed. http://www.samsung.com/ Installing the Monitor Driver (Manual) Microsoft® Windows Vista..." in the "Monitor" tab. The certified driver will be used as is deactivated, it means the configuration for your system. Click "Personalization" and then "Display Settings". 4.
User Manual (ENGLISH)
Page 21
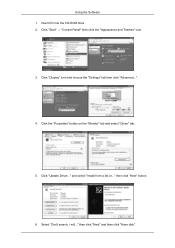
then click "Next" button. 6. Click the "Properties" button on the "Monitor" tab and select "Driver" tab. 5. and select "Install from a list or..." Click "Start" → "Control Panel" then click the "Appearance and Themes" icon. 3. then click "Next" and then click "Have disk". Using the Software 1. Insert CD into the CD-ROM drive. 2. Click "Display" icon and choose the "Settings" tab then click "Advanced...". 4. Click "Update Driver..." Select "Don't search, I will..."
then click "Next" button. 6. Click the "Properties" button on the "Monitor" tab and select "Driver" tab. 5. and select "Install from a list or..." Click "Start" → "Control Panel" then click the "Appearance and Themes" icon. 3. then click "Next" and then click "Have disk". Using the Software 1. Insert CD into the CD-ROM drive. 2. Click "Display" icon and choose the "Settings" tab then click "Advanced...". 4. Click "Update Driver..." Select "Don't search, I will..."
User Manual (ENGLISH)
Page 23
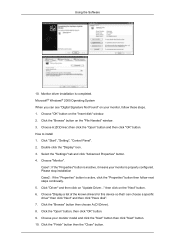
...Browse" button on "Update Driver..." Choose "Monitor". Click "Driver" and then click on the "File Needed" window. 3. Click "Start", "Setting", "Control Panel". 2. Case1 : If the "Properties" button is inactive, it means your monitor is completed. Click the "Browse" button then ...; Windows® 2000 Operating System When you can choose a specific driver" then click "Next" and then click "Have disk". 7. Select the "Settings" tab and click "Advanced Properties" button. 4. Choose your monitor, follow next steps continually. 5. Choose A:(D:\Driver) then click the "Open" button ...
...Browse" button on "Update Driver..." Choose "Monitor". Click "Driver" and then click on the "File Needed" window. 3. Click "Start", "Setting", "Control Panel". 2. Case1 : If the "Properties" button is inactive, it means your monitor is completed. Click the "Browse" button then ...; Windows® 2000 Operating System When you can choose a specific driver" then click "Next" and then click "Have disk". 7. Select the "Settings" tab and click "Advanced Properties" button. 4. Choose your monitor, follow next steps continually. 5. Choose A:(D:\Driver) then click the "Open" button ...
User Manual (ENGLISH)
Page 24
... Disk" button. 9. Note If there is no Mode at the first and the second screen after clicking "Test". Set a mouse for setting your mouse. 3. Select the "Settings" tab and click "Advanced Properties" button. 4. Double click the "Display" icon. 3. Choose "Specify the location ... and vertical frequency by referring to make the X86Config file, which is for selecting a keyboard. Click "Start", "Settings", "Control Panel", and then double-click "Display" icon. 2. Microsoft® Windows® Millennium Operating System 1. In Display Registration Information ...
... Disk" button. 9. Note If there is no Mode at the first and the second screen after clicking "Test". Set a mouse for setting your mouse. 3. Select the "Settings" tab and click "Advanced Properties" button. 4. Double click the "Display" icon. 3. Choose "Specify the location ... and vertical frequency by referring to make the X86Config file, which is for selecting a keyboard. Click "Start", "Settings", "Control Panel", and then double-click "Display" icon. 2. Microsoft® Windows® Millennium Operating System 1. In Display Registration Information ...
User Manual (ENGLISH)
Page 25
...executed. quested hardware. This system is not D:\, enter the applicable drive.) Execute X-Window after setting other images scanned by Samsung Electronics in using a computer is the very solution for setting your monitor. (You can enter the frequency directly.) 9. Natural Color Natural Color Software Program...your monitor. (You can enter the frequency directly.) 8. You have finished setting up your monitor. First of your monitor. To install the program manually, insert the CD included with the Samsung monitor into the CD-ROM Drive, click the [Start] button of the...
...executed. quested hardware. This system is not D:\, enter the applicable drive.) Execute X-Window after setting other images scanned by Samsung Electronics in using a computer is the very solution for setting your monitor. (You can enter the frequency directly.) 9. Natural Color Natural Color Software Program...your monitor. (You can enter the frequency directly.) 8. You have finished setting up your monitor. First of your monitor. To install the program manually, insert the CD included with the Samsung monitor into the CD-ROM Drive, click the [Start] button of the...

User Manual (ENGLISH)
Page 26
... network environment. MagicTune™ execution icon may not appear depending on your desktop. Using the Software How to delete the Natural Color software program Select "Setting/Control Panel" on the CD. 3. Select installation Language, Click "Next". 4. Click "Install". 8.
... network environment. MagicTune™ execution icon may not appear depending on your desktop. Using the Software How to delete the Natural Color software program Select "Setting/Control Panel" on the CD. 3. Select installation Language, Click "Next". 4. Click "Install". 8.

User Manual (ENGLISH)
Page 27
... MB Hard disk space above For more information, visit the MagicTune™ website. Click on Windows® XP, go to [Task Tray] → [Start] → [Settings] and select [Control Panel] in Control Panel. 3. Note Visit the MagicTune™ website for technical support for MagicTune™, FAQs (questions and answers) and software...
... MB Hard disk space above For more information, visit the MagicTune™ website. Click on Windows® XP, go to [Task Tray] → [Start] → [Settings] and select [Control Panel] in Control Panel. 3. Note Visit the MagicTune™ website for technical support for MagicTune™, FAQs (questions and answers) and software...

User Manual (ENGLISH)
Page 29
Perform the following steps remove Multiscreen. Select Multiscreen from the list and then click the "Add/Delete" button. Using the Software Hardware • 32 MB Memory above • 60 MB Hard disk space above Uninstall The Multiscreen program can be removed only by using the "Add or Remove Programs" option of the Windows® Control Panel. Select "Setting/Control Panel" on the "Start" menu and then double-click "Add/Delete a program".
Perform the following steps remove Multiscreen. Select Multiscreen from the list and then click the "Add/Delete" button. Using the Software Hardware • 32 MB Memory above • 60 MB Hard disk space above Uninstall The Multiscreen program can be removed only by using the "Add or Remove Programs" option of the Windows® Control Panel. Select "Setting/Control Panel" on the "Start" menu and then double-click "Add/Delete a program".

User Manual (ENGLISH)
Page 30
... in order to your preferences. Unlock : Hold down the MENU button for the Custom button according to keep the current states of settings or prevent others from adjusting the current settings. If you can customize key assignment for more accuracy. OSD Lock & Unlock When pressing the AUTO button after locking the OSD...
... in order to your preferences. Unlock : Hold down the MENU button for the Custom button according to keep the current states of settings or prevent others from adjusting the current settings. If you can customize key assignment for more accuracy. OSD Lock & Unlock When pressing the AUTO button after locking the OSD...

User Manual (ENGLISH)
Page 32
... the on -screen menus to change the brightness according to personal preference. Adjusting the Monitor INFORMATION LED Brightness Off Timer On/ Off Timer Auto Off Setting Source AV Mode Display Time Customized Key PICTURE Brightness (Not available in MagicBright mode of Dynamic Contrast.) You can use the on -screen menus to...
... the on -screen menus to change the brightness according to personal preference. Adjusting the Monitor INFORMATION LED Brightness Off Timer On/ Off Timer Auto Off Setting Source AV Mode Display Time Customized Key PICTURE Brightness (Not available in MagicBright mode of Dynamic Contrast.) You can use the on -screen menus to...
User Manual (ENGLISH)
Page 33
... by simply pressing Customized Key control button. Adjusting the Monitor The larger the number, the clearer the screen. You can easily select one of seven settings by using the OSD menu. • Text For documents or works involving heavy text. • Internet For working with a mixture of images such as texts...
... by simply pressing Customized Key control button. Adjusting the Monitor The larger the number, the clearer the screen. You can easily select one of seven settings by using the OSD menu. • Text For documents or works involving heavy text. • Internet For working with a mixture of images such as texts...

User Manual (ENGLISH)
Page 35
.... Displays vivid natural color with clearness. • Intelligent - Red Adjusts individual Red color balance. MENU MENU • Normal - Deactivates the Response Time function so that Samsung has exclusively developed to improve digital image and to red. ( Not available in MagicBright mode of Full and Intelligent. ) Adjusting the Monitor Note • If...
.... Displays vivid natural color with clearness. • Intelligent - Red Adjusts individual Red color balance. MENU MENU • Normal - Deactivates the Response Time function so that Samsung has exclusively developed to improve digital image and to red. ( Not available in MagicBright mode of Full and Intelligent. ) Adjusting the Monitor Note • If...
User Manual (ENGLISH)
Page 38
... only) You can move the position of the screen to dim. Adjusting the Monitor MENU MENU • Mode 1 : Sets the screen to the default brightness. • Mode 2 : Sets the screen to bright. • Mode 3 : Sets the screen to the left and right by pressing the and buttons, respectively. (Available in Analog mode only...
... only) You can move the position of the screen to dim. Adjusting the Monitor MENU MENU • Mode 1 : Sets the screen to the default brightness. • Mode 2 : Sets the screen to bright. • Mode 3 : Sets the screen to the left and right by pressing the and buttons, respectively. (Available in Analog mode only...

User Manual (ENGLISH)
Page 39
... menu appears on your monitor. A full screen is not performed. Note • If the wide screen which is the optimal resolution for the monitor is set on your monitor. Adjusting the Monitor MENU MENU Image Size You can change the size of the screen displayed on your PC, this function is...
... menu appears on your monitor. A full screen is not performed. Note • If the wide screen which is the optimal resolution for the monitor is set on your monitor. Adjusting the Monitor MENU MENU Image Size You can change the size of the screen displayed on your PC, this function is...

User Manual (ENGLISH)
Page 40
MENU MENU • Off : The menus are displayed in the normal way (non-transparently). • On : The menus are displayed transparently. Language You can select the language used to factory defaults. • No • Yes MENU MENU Menu Transparency Change the transparency of the background of the OSD. MENU MENU SETUP&RESET Reset Reverts the product settings to display the menus. Adjusting the Monitor The larger the number, the more it moves downwards. The smaller the number, the more the OSD menu moves upwards.
MENU MENU • Off : The menus are displayed in the normal way (non-transparently). • On : The menus are displayed transparently. Language You can select the language used to factory defaults. • No • Yes MENU MENU Menu Transparency Change the transparency of the background of the OSD. MENU MENU SETUP&RESET Reset Reverts the product settings to display the menus. Adjusting the Monitor The larger the number, the more it moves downwards. The smaller the number, the more the OSD menu moves upwards.
User Manual (ENGLISH)
Page 41
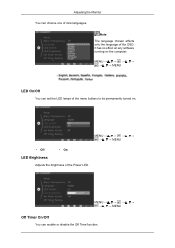
MENU MENU Off Timer On/Off You can enable or disable the Off Time function. MENU → , → MENU LED On/Off You can set the LED lamps of nine languages. Adjusting the Monitor You can choose one of the menu buttons to be permanently turned on the computer. MENU MENU • Off • On LED Brightness Adjusts the brightness of the OSD. It has no effect on any software running on . Note The language chosen affects only the language of the Power LED.
MENU MENU Off Timer On/Off You can enable or disable the Off Time function. MENU → , → MENU LED On/Off You can set the LED lamps of nine languages. Adjusting the Monitor You can choose one of the menu buttons to be permanently turned on the computer. MENU MENU • Off • On LED Brightness Adjusts the brightness of the OSD. It has no effect on any software running on . Note The language chosen affects only the language of the Power LED.


