

Interactive Guide Ver.1.2 (English)
Page 5
...external display device and the computer with the monitor cable and press the F4 key repeatedly until the desired screen appears on and press the F4 key when the booting screen (SAMSUNG logo) appears. 2. Q How can easily and quickly restore the computer to the state when it was... purchased. For detailed information on . A Restore the computer using Samsung Recovery Solution (Optional). 1. A Connect the VGA adapter (Optional) to ...
...external display device and the computer with the monitor cable and press the F4 key repeatedly until the desired screen appears on and press the F4 key when the booting screen (SAMSUNG logo) appears. 2. Q How can easily and quickly restore the computer to the state when it was... purchased. For detailed information on . A Restore the computer using Samsung Recovery Solution (Optional). 1. A Connect the VGA adapter (Optional) to ...

Interactive Guide Ver.1.2 (English)
Page 11
... are not covered with a ground terminal. If the cord is damaged, there is a danger of the arrow. If water or another adapter may cause the screen to do so may cause personal injury and even fatality. Failing to avoid damaging the power cord or AC adapter. Failing to flicker. Chapter 1. Using...
... are not covered with a ground terminal. If the cord is damaged, there is a danger of the arrow. If water or another adapter may cause the screen to do so may cause personal injury and even fatality. Failing to avoid damaging the power cord or AC adapter. Failing to flicker. Chapter 1. Using...
Interactive Guide Ver.1.2 (English)
Page 25
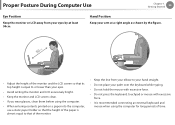
...; Keep the line from your eyes by at a right angle as shown by the figure. • Adjust the height of the monitor and the LCD screen so that its top height is equal to your hand straight. • Do not place your arm at least 50cm. Getting Started 24 Eye Position... away from your elbow to or lower than your eyes. • Avoid setting the monitor and LCD excessively bright. • Keep the monitor and LCD screen clean. • If you wear glasses, clean them before using the computer for long periods of time.
...; Keep the line from your eyes by at a right angle as shown by the figure. • Adjust the height of the monitor and the LCD screen so that its top height is equal to your hand straight. • Do not place your arm at least 50cm. Getting Started 24 Eye Position... away from your elbow to or lower than your eyes. • Avoid setting the monitor and LCD excessively bright. • Keep the monitor and LCD screen clean. • If you wear glasses, clean them before using the computer for long periods of time.
Interactive Guide Ver.1.2 (English)
Page 26
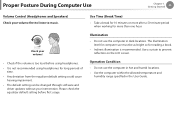
... Condition • Do not use must be changed through software and driver updates without your volume first to listen to prevent reflection on the LCD screen. Please check the equalizer default setting before using headphones for computer use the computer in hot and humid locations. • Use the computer within the...
... Condition • Do not use must be changed through software and driver updates without your volume first to listen to prevent reflection on the LCD screen. Please check the equalizer default setting before using headphones for computer use the computer in hot and humid locations. • Use the computer within the...
Interactive Guide Ver.1.2 (English)
Page 27
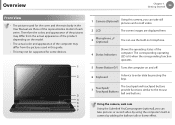
... the cover and the main body in the User Manual are displayed here. 3 Microphone (Optional) You can take still pictures and record video. 2 LCD The screen images are those of the representative model of each series. Overview Chapter 1. The corresponding operating LED is lit when the corresponding function operates. 5 Power Button...
... the cover and the main body in the User Manual are displayed here. 3 Microphone (Optional) You can take still pictures and record video. 2 LCD The screen images are those of the representative model of each series. Overview Chapter 1. The corresponding operating LED is lit when the corresponding function operates. 5 Power Button...
Interactive Guide Ver.1.2 (English)
Page 33
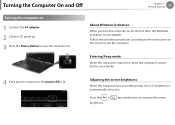
... 32 Turning the computer on 1 Connect the AC adapter. 2 Lift the LCD panel up. 3 Press the Power button to low. Adjusting the screen brightness When the computer runs on . Turning the Computer On and Off Chapter 1. About Windows Activation When you turn the computer on battery power,...'s power button once briefly. 4 If the power is turned on, the power LED is automatically set to turn the computer on the screen to increase the screen Press the + brightness. Follow the activation procedures according to the instructions on for the first time, the Windows activation...
... 32 Turning the computer on 1 Connect the AC adapter. 2 Lift the LCD panel up. 3 Press the Power button to low. Adjusting the screen brightness When the computer runs on . Turning the Computer On and Off Chapter 1. About Windows Activation When you turn the computer on battery power,...'s power button once briefly. 4 If the power is turned on, the power LED is automatically set to turn the computer on the screen to increase the screen Press the + brightness. Follow the activation procedures according to the instructions on for the first time, the Windows activation...
Interactive Guide Ver.1.2 (English)
Page 38
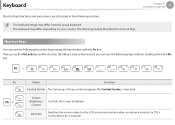
... below with the Fn key. Shortcut Keys You can use the following keys without holding down the Fn key. + Fn Name Function Control Center The Samsung software control program, the Control Center, is connected to the LCD or external monitor when an external monitor (or TV) is launched. Using the computer... sections. • The keyboard image may differ from the actual keyboard. • The keyboard may differ depending on your country. Control CRT/LCD Switches the screen output to the computer. Screen + Brightness Controls the...
... below with the Fn key. Shortcut Keys You can use the following keys without holding down the Fn key. + Fn Name Function Control Center The Samsung software control program, the Control Center, is connected to the LCD or external monitor when an external monitor (or TV) is launched. Using the computer... sections. • The keyboard image may differ from the actual keyboard. • The keyboard may differ depending on your country. Control CRT/LCD Switches the screen output to the computer. Screen + Brightness Controls the...
Interactive Guide Ver.1.2 (English)
Page 43
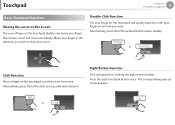
... touchpad and quickly tap twice with your finger in the direction you want. Using the computer 42 Basic Touchpad Functions Moving the cursor on the screen Place your finger. The mouse cursor will move your finger on the touchpad slightly and move accordingly.
... touchpad and quickly tap twice with your finger in the direction you want. Using the computer 42 Basic Touchpad Functions Moving the cursor on the screen Place your finger. The mouse cursor will move your finger on the touchpad slightly and move accordingly.
Interactive Guide Ver.1.2 (English)
Page 46
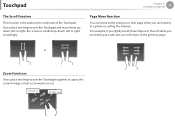
... scrolled up, down, left or right accordingly. Chapter 2. Using the computer 45 Page Move Function You can move them up, down, left or right, the screen is the same as the scroll area of the Touchpad. or Zoom Functions If you are looking at a web site, you place two fingers over...
... scrolled up, down, left or right accordingly. Chapter 2. Using the computer 45 Page Move Function You can move them up, down, left or right, the screen is the same as the scroll area of the Touchpad. or Zoom Functions If you are looking at a web site, you place two fingers over...

Interactive Guide Ver.1.2 (English)
Page 48
... without using the touchpad, you did not connect a USB mouse. This will turn the touchpad off when a USB mouse is not provided for some touch-screen model, checking option locks touchpad even though you can set the touchpad and touchpad button settings in the tabs that appear when clicking Start > Control...
... without using the touchpad, you did not connect a USB mouse. This will turn the touchpad off when a USB mouse is not provided for some touch-screen model, checking option locks touchpad even though you can set the touchpad and touchpad button settings in the tabs that appear when clicking Start > Control...
Interactive Guide Ver.1.2 (English)
Page 53
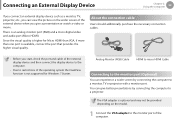
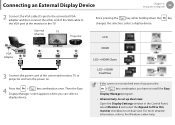
...computer 52 If you connect an external display device such as a monitor, TV, projector, etc., you can view the picture on the wider screen of the external device when you start, check the port and cable of the external display device and then connect the display device to the... function is optional and may not be provided depending on the model. 1 Connect the VGA adapter to a projector. You can experience a wider screen by connecting the computer to the monitor port of the computer. Connecting an External Display Device Chapter 2. The VGA adapter is not supported for Micro...
...computer 52 If you connect an external display device such as a monitor, TV, projector, etc., you can view the picture on the wider screen of the external device when you start, check the port and cable of the external display device and then connect the display device to the... function is optional and may not be provided depending on the model. 1 Connect the VGA adapter to a projector. You can experience a wider screen by connecting the computer to the monitor port of the computer. Connecting an External Display Device Chapter 2. The VGA adapter is not supported for Micro...
Interactive Guide Ver.1.2 (English)
Page 54
Then the Easy Display Manager screen appears where you have to install the Easy Display Manager program. • Alternatively, to set up dual view: Open the Display Settings window in the ...Control Panel, select Monitor 2 and select the Expand to fit to this monitor checkbox to set dual view. LCD + HDMI DualView • If the screen is not switched even if you press the + key combination, you can select a display device. External TV Monitor Projector z VGA Adapter x Since pressing the key...
Then the Easy Display Manager screen appears where you have to install the Easy Display Manager program. • Alternatively, to set up dual view: Open the Display Settings window in the ...Control Panel, select Monitor 2 and select the Expand to fit to this monitor checkbox to set dual view. LCD + HDMI DualView • If the screen is not switched even if you press the + key combination, you can select a display device. External TV Monitor Projector z VGA Adapter x Since pressing the key...

Interactive Guide Ver.1.2 (English)
Page 55
...; When a TV provides more than one HDMI port, connect the computer to the DVI IN port. • When connecting the computer to configure the screen and sound. You have to a TV, switch the external input mode of the TV. Connecting an External Display Device Chapter 2. Since pressing the key ... enjoy both a high visual quality and a high sound quality. LCD HDMI to HDMI. 2 Press the + key combination once. Then the Easy Display Manager screen appears where you have to additionally purchase the HDMI to micro HDMI cable. 1 Connect the HDMI to micro HDMI cable to the HDMI port of...
...; When a TV provides more than one HDMI port, connect the computer to the DVI IN port. • When connecting the computer to configure the screen and sound. You have to a TV, switch the external input mode of the TV. Connecting an External Display Device Chapter 2. Since pressing the key ... enjoy both a high visual quality and a high sound quality. LCD HDMI to HDMI. 2 Press the + key combination once. Then the Easy Display Manager screen appears where you have to additionally purchase the HDMI to micro HDMI cable. 1 Connect the HDMI to micro HDMI cable to the HDMI port of...

Interactive Guide Ver.1.2 (English)
Page 56
... TV is not supported in the DOS Command Prompt window. • Simultaneous output to all 3 (LCD + CRT + HDMI) is not supported. • If the screen is not switched even if you press the + key combination, you can select the mode, select Basic Mode and click OK. 2 Click Display > General Settings... Ratio in the Scaling field, fit the Desktop to install the Easy Display Manager program. If a window appears where you have to the TV screen and click OK. • You can view the graphics card type by selecting Device Manager > Display adapters and then clicking the + symbol. •...
... TV is not supported in the DOS Command Prompt window. • Simultaneous output to all 3 (LCD + CRT + HDMI) is not supported. • If the screen is not switched even if you press the + key combination, you can select the mode, select Basic Mode and click OK. 2 Click Display > General Settings... Ratio in the Scaling field, fit the Desktop to install the Easy Display Manager program. If a window appears where you have to the TV screen and click OK. • You can view the graphics card type by selecting Device Manager > Display adapters and then clicking the + symbol. •...

Interactive Guide Ver.1.2 (English)
Page 57
... HDMI TV in the notification area at the bottom right of the computer to hear sound from actual product depending on the computer model. The screen images and terms may differ from the computer on the TV, connect the TV to the computer using a HDMI cable and then switch to Speakers...
... HDMI TV in the notification area at the bottom right of the computer to hear sound from actual product depending on the computer model. The screen images and terms may differ from the computer on the TV, connect the TV to the computer using a HDMI cable and then switch to Speakers...

Interactive Guide Ver.1.2 (English)
Page 63
...) and click Properties. • The Network Component name may differ depending on the Operating System Installed. • To add a network component, click Install in the screen shown in the figure above. Chapter 2. You can add clients, services, and protocols. Using the computer 62 The LAN Device name may differ depending on...
...) and click Properties. • The Network Component name may differ depending on the Operating System Installed. • To add a network component, click Install in the screen shown in the figure above. Chapter 2. You can add clients, services, and protocols. Using the computer 62 The LAN Device name may differ depending on...
Interactive Guide Ver.1.2 (English)
Page 69
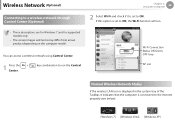
... the Taskbar, it is set to a wireless network through Control Center (Optional) • These descriptions are for Windows 7 and for supported models only. • The screen images and terms may differ from actual product depending on the computer model. Using the computer 68 2 Select Wi-Fi and check if it indicates...
... the Taskbar, it is set to a wireless network through Control Center (Optional) • These descriptions are for Windows 7 and for supported models only. • The screen images and terms may differ from actual product depending on the computer model. Using the computer 68 2 Select Wi-Fi and check if it indicates...
Interactive Guide Ver.1.2 (English)
Page 74
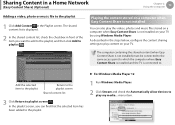
... playlist 1 Click Add Content in the steps below, configure the content sharing settings to play my media... menu item. As described in the Playlist screen. Playing the content stored on a computer when Easy Content Share is not installed You can find that the selected item has been added to the... TV. The shared content list is not installed on your TV by using Windows Media Player. In the playlist screen, you want to add to the playlist, and then click Add to playlist screen . Using the computer 73 Adding a video, photo or music file to . Add the selected item to the...
... playlist 1 Click Add Content in the steps below, configure the content sharing settings to play my media... menu item. As described in the Playlist screen. Playing the content stored on a computer when Easy Content Share is not installed You can find that the selected item has been added to the... TV. The shared content list is not installed on your TV by using Windows Media Player. In the playlist screen, you want to add to the playlist, and then click Add to playlist screen . Using the computer 73 Adding a video, photo or music file to . Add the selected item to the...
Interactive Guide Ver.1.2 (English)
Page 78
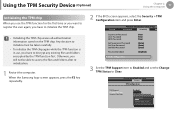
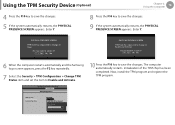
... set the Change TPM Status to decrypt any existing files and folders encrypted by the TPM function first. When the Samsung logo screen appears, press the F2 key repeatedly. 2 If the BIOS screen appears, select the Security > TPM Configuration item and press Enter. Using the TPM Security Device (Optional) Chapter 2. SysInfo Phoenix SecureCore...
... set the Change TPM Status to decrypt any existing files and folders encrypted by the TPM function first. When the Samsung logo screen appears, press the F2 key repeatedly. 2 If the BIOS screen appears, select the Security > TPM Configuration item and press Enter. Using the TPM Security Device (Optional) Chapter 2. SysInfo Phoenix SecureCore...
Interactive Guide Ver.1.2 (English)
Page 79
Using the computer 78 4 Press the F10 key to save the changes. 5 If the system automatically restarts, the PHYSICAL PRESENCE SCREEN appears. Phoenix SecureCore Tiano Setup Security TPM Configuration TPM Support Change TPM Status Security Chip State [Enabled] [No Change] ...State has requested to change to Enable and Activate Do you want to accept it? [Y] Yes [N] No 6 When the computer restarts automatically and the Samsung logo screen appears, press the F2 key repeatedly. 7 Select the Security > TPM Configuration > Change TPM Status item and set the item to save the changes....
Using the computer 78 4 Press the F10 key to save the changes. 5 If the system automatically restarts, the PHYSICAL PRESENCE SCREEN appears. Phoenix SecureCore Tiano Setup Security TPM Configuration TPM Support Change TPM Status Security Chip State [Enabled] [No Change] ...State has requested to change to Enable and Activate Do you want to accept it? [Y] Yes [N] No 6 When the computer restarts automatically and the Samsung logo screen appears, press the F2 key repeatedly. 7 Select the Security > TPM Configuration > Change TPM Status item and set the item to save the changes....


