
User Manual Xp/windows7 Ver.1.8 (English)
Page 2
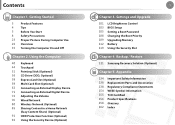
... Use 26 Overview 35 Turning the Computer On and Off Chapter 2. Backup / Restore 121 Samsung Recovery Solution (Optional) Chapter 5. Using the Computer 40 Keyboard 44 Touchpad 51 Pointing Stick (Optional) 56 CD Drive (ODD, Optional) 58 ExpressCard Slot (Optional) 59 Multi Card Slot (Optional) 62 Connecting an External Display Device 71 Connecting an External Digital Device 72 Adjusting the Volume 76 Wired Network 80 Wireless Network (Optional) 85 Sharing Content in a Home Network (Easy Content Share) (Optional) 91 HDD Protection Function (Optional) 92 Using the Security Device (Optional...
... Use 26 Overview 35 Turning the Computer On and Off Chapter 2. Backup / Restore 121 Samsung Recovery Solution (Optional) Chapter 5. Using the Computer 40 Keyboard 44 Touchpad 51 Pointing Stick (Optional) 56 CD Drive (ODD, Optional) 58 ExpressCard Slot (Optional) 59 Multi Card Slot (Optional) 62 Connecting an External Display Device 71 Connecting an External Digital Device 72 Adjusting the Volume 76 Wired Network 80 Wireless Network (Optional) 85 Sharing Content in a Home Network (Easy Content Share) (Optional) 91 HDD Protection Function (Optional) 92 Using the Security Device (Optional...
User Manual Xp/windows7 Ver.1.8 (English)
Page 5
... the Internet default setting restoration window, select Close. To resolve this problem, reinstall Internet Explorer 8 or install Internet Explorer 7 or earlier. Q Connect the display device and the computer with the A monitor and repeatedly press the F4 key while holding down or error Q messages appear continuously while using Samsung Recovery Solution. 1. Getting Started 4 The internet connection has slowed down the Fn key. A Restore Internet Explorer to the corresponding section of the User Manual. To resolve this problem, enter the BIOS Setup...
... the Internet default setting restoration window, select Close. To resolve this problem, reinstall Internet Explorer 8 or install Internet Explorer 7 or earlier. Q Connect the display device and the computer with the A monitor and repeatedly press the F4 key while holding down or error Q messages appear continuously while using Samsung Recovery Solution. 1. Getting Started 4 The internet connection has slowed down the Fn key. A Restore Internet Explorer to the corresponding section of the User Manual. To resolve this problem, enter the BIOS Setup...
User Manual Xp/windows7 Ver.1.8 (English)
Page 25
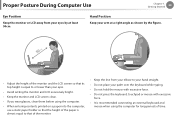
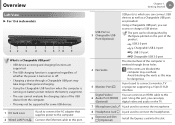
... by the figure. • Adjust the height of the monitor and the LCD screen so that its top height is equal to or lower than your eyes. • Avoid setting the monitor and LCD excessively bright. • Keep the monitor and LCD screen clean. • If you wear glasses, clean them before using the computer. • When entering contents printed on a paper into...
... by the figure. • Adjust the height of the monitor and the LCD screen so that its top height is equal to or lower than your eyes. • Avoid setting the monitor and LCD excessively bright. • Keep the monitor and LCD screen clean. • If you wear glasses, clean them before using the computer. • When entering contents printed on a paper into...

User Manual Xp/windows7 Ver.1.8 (English)
Page 32
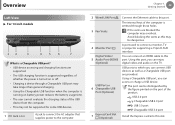
...dangerous. Install the Express card into this port. The port can be distinguished by the figure printed on the port of whether the power is a Chargeable USB port? • USB device accessing and charging functions are blocked the computer may be supported for some USB devices. 1 DC Jack A jack to connect the AC adapter that supplies power to the computer. 2 Wired LAN Port USB Port or 3 Chargeable USB Port (Optional) Digital Video/ 4 Audio Port (HDMI) (Optional) 5 Fan Vents 6 Microphone Jack 7 Headphone Jack 8 ExpressCard Slot (Optional) Connect the Ethernet cable to which...
...dangerous. Install the Express card into this port. The port can be distinguished by the figure printed on the port of whether the power is a Chargeable USB port? • USB device accessing and charging functions are blocked the computer may be supported for some USB devices. 1 DC Jack A jack to connect the AC adapter that supplies power to the computer. 2 Wired LAN Port USB Port or 3 Chargeable USB Port (Optional) Digital Video/ 4 Audio Port (HDMI) (Optional) 5 Fan Vents 6 Microphone Jack 7 Headphone Jack 8 ExpressCard Slot (Optional) Connect the Ethernet cable to which...
User Manual Xp/windows7 Ver.1.8 (English)
Page 33
...turned on or off. • Charging a device through these holes. Getting Started 32 Left View ► For 14 inch models 12 3 4 56 7 What is a Chargeable USB port? • USB device accessing and charging functions are supported. • The USB charging function is supported regardless of the product. A port used to this slot. Using a Chargeable USB port, you can be supported for some USB devices. 1 DC Jack A jack to connect the AC adapter that supplies power to the computer. 2 Wired LAN Port 3 Fan Vents 4 Monitor Port Digital Video/ 5 Audio Port (HDMI) (Optional) USB...
...turned on or off. • Charging a device through these holes. Getting Started 32 Left View ► For 14 inch models 12 3 4 56 7 What is a Chargeable USB port? • USB device accessing and charging functions are supported. • The USB charging function is supported regardless of the product. A port used to this slot. Using a Chargeable USB port, you can be supported for some USB devices. 1 DC Jack A jack to connect the AC adapter that supplies power to the computer. 2 Wired LAN Port 3 Fan Vents 4 Monitor Port Digital Video/ 5 Audio Port (HDMI) (Optional) USB...
User Manual Xp/windows7 Ver.1.8 (English)
Page 34
...off. • Charging a device through a Chargeable USB port may take longer than general charging. • Using the Chargeable USB function when the computer is emitted through these holes. A port used to the computer. A jack used to this port. The port can be supported for some USB devices. 1 DC Jack 2 Wired LAN Port A jack to connect the AC adapter that supplies power to connect the microphone. Install the Express card into this port. Getting Started 33 USB Port or 3 Chargeable USB Port (Optional) 4 Fan Vents 5 Monitor Port Digital Video/ 6 Audio Port (HDMI) (Optional...
...off. • Charging a device through a Chargeable USB port may take longer than general charging. • Using the Chargeable USB function when the computer is emitted through these holes. A port used to the computer. A jack used to this port. The port can be supported for some USB devices. 1 DC Jack 2 Wired LAN Port A jack to connect the AC adapter that supplies power to connect the microphone. Install the Express card into this port. Getting Started 33 USB Port or 3 Chargeable USB Port (Optional) 4 Fan Vents 5 Monitor Port Digital Video/ 6 Audio Port (HDMI) (Optional...
User Manual Xp/windows7 Ver.1.8 (English)
Page 39
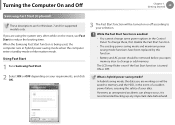
... according to memory and the HDD, in hybrid power-saving mode when the computer enters standby mode or hibernation mode. When the Samsung Fast Start function is being used, the computer runs in the event of a sudden power failure, ensuring the safety of your requirements, and click OK. 3 The Fast Start function will be turned on the move, use Fast Start to change some power options in the Control Panel. However, as...
... according to memory and the HDD, in hybrid power-saving mode when the computer enters standby mode or hibernation mode. When the Samsung Fast Start function is being used, the computer runs in the event of a sudden power failure, ensuring the safety of your requirements, and click OK. 3 The Fast Start function will be turned on the move, use Fast Start to change some power options in the Control Panel. However, as...
User Manual Xp/windows7 Ver.1.8 (English)
Page 41
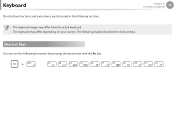
Shortcut Keys You can use the following sections. Using the computer 40 • The keyboard image may differ from the actual keyboard. • The keyboard may differ depending on your country. Keyboard Shortcut key functions and procedures are discussed in the following functions by pressing the keys below with the Fn key. + The following mainly describes the shortcut keys. Chapter 2.
Shortcut Keys You can use the following sections. Using the computer 40 • The keyboard image may differ from the actual keyboard. • The keyboard may differ depending on your country. Keyboard Shortcut key functions and procedures are discussed in the following functions by pressing the keys below with the Fn key. + The following mainly describes the shortcut keys. Chapter 2.
User Manual Xp/windows7 Ver.1.8 (English)
Page 44
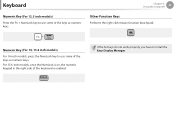
NumLock ScrollLock Chapter 2. If the hot keys do not work properly, you have to install the Easy Display Manager. Using the computer 43 Other Function Keys Performs the right-click mouse function (touchpad). For 15.6-inch models, once the NumLock is on, the numeric keypad in the right side of the keys as numeric keys. + Delete Num Lock Numeric Key (For 14, 15.6 inch models) For 14-inch models, press the NumLock key to use some of the keys as numeric keys. Keyboard Numeric Key (For 12.5 inch models) Press the Fn + NumLock key to use some of the keyboard is enabled.
NumLock ScrollLock Chapter 2. If the hot keys do not work properly, you have to install the Easy Display Manager. Using the computer 43 Other Function Keys Performs the right-click mouse function (touchpad). For 15.6-inch models, once the NumLock is on, the numeric keypad in the right side of the keys as numeric keys. + Delete Num Lock Numeric Key (For 14, 15.6 inch models) For 14-inch models, press the NumLock key to use some of the keys as numeric keys. Keyboard Numeric Key (For 12.5 inch models) Press the Fn + NumLock key to use some of the keyboard is enabled.
User Manual Xp/windows7 Ver.1.8 (English)
Page 59
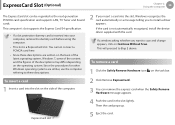
... ExpressCard slot can remove the express card when the Safely Remove Hardware message appears. 4 Push the card in the slot lightly. To insert a card 1 Insert a card into your computer, remove the dummy card before using the computer. • This slot is a ExpressCard slot. This computer's slot supports the Express Card/34 specification. • If a slot protection dummy card is not automatically recognized, install the device driver supplied with the card. Since the procedures for other Windows operating systems...
... ExpressCard slot can remove the express card when the Safely Remove Hardware message appears. 4 Push the card in the slot lightly. To insert a card 1 Insert a card into your computer, remove the dummy card before using the computer. • This slot is a ExpressCard slot. This computer's slot supports the Express Card/34 specification. • If a slot protection dummy card is not automatically recognized, install the device driver supplied with the card. Since the procedures for other Windows operating systems...
User Manual Xp/windows7 Ver.1.8 (English)
Page 70
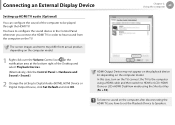
... computer using a HDMI cable and then switch to HDMI or LCD+HDMI Clone or LCD+HDMI DualView mode using the Shortcut Key (Fn + F4). In this case, turn on the TV. Connecting an External Display Device Chapter 2. Using the computer 69 Setting up HDMI TV audio (Optional) You can configure the sound of the Desktop and select Playback Devices. (Alternatively, click the Control Panel > Hardware and Sound > Sound.) 2 Change the setting to hear sound from actual product depending on the computer model. The screen images...
... computer using a HDMI cable and then switch to HDMI or LCD+HDMI Clone or LCD+HDMI DualView mode using the Shortcut Key (Fn + F4). In this case, turn on the TV. Connecting an External Display Device Chapter 2. Using the computer 69 Setting up HDMI TV audio (Optional) You can configure the sound of the Desktop and select Playback Devices. (Alternatively, click the Control Panel > Hardware and Sound > Sound.) 2 Change the setting to hear sound from actual product depending on the computer model. The screen images...

User Manual Xp/windows7 Ver.1.8 (English)
Page 72
... the device. 1 Connect the USB port of the notebook computer and the USB port of the card drive may differ depending on the model. If the window does not appear, click Start > Computer. Connecting an External Digital Device Chapter 2. Using the computer 71 You can copy or move or delete data. Connecting and using the file management functions. 2 The Auto run window appears. Camera Camcorder The device name of the digital device such as a camera...
... the device. 1 Connect the USB port of the notebook computer and the USB port of the card drive may differ depending on the model. If the window does not appear, click Start > Computer. Connecting an External Digital Device Chapter 2. Using the computer 71 You can copy or move or delete data. Connecting and using the file management functions. 2 The Auto run window appears. Camera Camcorder The device name of the digital device such as a camera...
User Manual Xp/windows7 Ver.1.8 (English)
Page 84
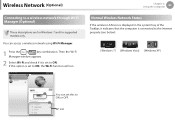
... indicates that the computer is set to the Internet properly (see below). [Windows 7] [Windows Vista] [Windows XP] You can access a wireless network using Wi-Fi Manager. 1 Press the + key combination. Using the computer 83 Normal Wireless Network Status If the wireless LAN icon is displayed in the system tray of the Taskbar, it is connected to ON, the Wi-Fi function will run. Chapter 2. AP List You can set this option...
... indicates that the computer is set to the Internet properly (see below). [Windows 7] [Windows Vista] [Windows XP] You can access a wireless network using Wi-Fi Manager. 1 Press the + key combination. Using the computer 83 Normal Wireless Network Status If the wireless LAN icon is displayed in the system tray of the Taskbar, it is connected to ON, the Wi-Fi function will run. Chapter 2. AP List You can set this option...
User Manual Xp/windows7 Ver.1.8 (English)
Page 92
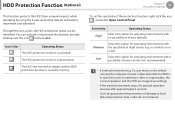
... an impact and the HDD protection function is activated. Low Select this option for operating environments with the possibility of the protection function, right-click the icon , and select Open Control Panel. HDD Protection Function (Optional) This function protects the HDD from external impacts while operating by rightclicking over the icon in the taskbar. You can be guaranteed the prevention of damage to hard disk and protection data...
... an impact and the HDD protection function is activated. Low Select this option for operating environments with the possibility of the protection function, right-click the icon , and select Open Control Panel. HDD Protection Function (Optional) This function protects the HDD from external impacts while operating by rightclicking over the icon in the taskbar. You can be guaranteed the prevention of damage to hard disk and protection data...
User Manual Xp/windows7 Ver.1.8 (English)
Page 94
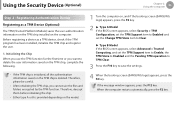
... and register the user. 1. Before registering a device as a TPM Device (Optional) The TPM (Trusted Platform Module) saves the user authentication information on the TPM chip installed on , and if the booting screen (SAMSUNG logo) appears, press the F2 key. 2 ► Type A Model If the BIOS screen appears, select Security > TPM Configuration, set the TPM Support item to Enabled and set the Change TPM State item to Clear. ► Type B Model If the BIOS screen appears, select...
... and register the user. 1. Before registering a device as a TPM Device (Optional) The TPM (Trusted Platform Module) saves the user authentication information on the TPM chip installed on , and if the booting screen (SAMSUNG logo) appears, press the F2 key. 2 ► Type A Model If the BIOS screen appears, select Security > TPM Configuration, set the TPM Support item to Enabled and set the Change TPM State item to Clear. ► Type B Model If the BIOS screen appears, select...
User Manual Xp/windows7 Ver.1.8 (English)
Page 101
Settings and Upgrade LCD Brightness Control 101 BIOS Setup 103 Setting a Boot Password 105 Changing the Boot Priority 108 Upgrading Memory 109 Battery 112 Using the Security Slot 119 Chapter 3.
Settings and Upgrade LCD Brightness Control 101 BIOS Setup 103 Setting a Boot Password 105 Changing the Boot Priority 108 Upgrading Memory 109 Battery 112 Using the Security Slot 119 Chapter 3.
User Manual Xp/windows7 Ver.1.8 (English)
Page 107
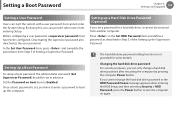
... Setting a Supervisor Password. If you cannot change the hard disk drive password or the HDD Password Frozen message appears when entering the BIOS Setup and then selecting Security > HDD Password, press the Power button to turn the computer on boot item to boot up the Supervisor Password. •• The hard disk drive password setting function is set a password for some models. •• Changing the hard disk drive password For security purposes, you have been configured. By doing this, you set , you can only change a hard disk drive password after...
... Setting a Supervisor Password. If you cannot change the hard disk drive password or the HDD Password Frozen message appears when entering the BIOS Setup and then selecting Security > HDD Password, press the Power button to turn the computer on boot item to boot up the Supervisor Password. •• The hard disk drive password setting function is set a password for some models. •• Changing the hard disk drive password For security purposes, you have been configured. By doing this, you set , you can only change a hard disk drive password after...
User Manual Xp/windows7 Ver.1.8 (English)
Page 110
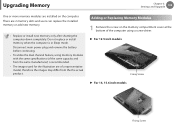
... are 2 memory slots and users can replace the installed memory or add new memory. • Replace or install new memory only after shutting the computer down completely. There are of a representative model, therefore the images may differ from the same manufacturer) is in Sleep mode. Settings and Upgrade 109 One or more memory modules are installed on the memory compartment cover at the bottom of the computer using memory modules with the same specifications (of the...
... are 2 memory slots and users can replace the installed memory or add new memory. • Replace or install new memory only after shutting the computer down completely. There are of a representative model, therefore the images may differ from the same manufacturer) is in Sleep mode. Settings and Upgrade 109 One or more memory modules are installed on the memory compartment cover at the bottom of the computer using memory modules with the same specifications (of the...
User Manual Xp/windows7 Ver.1.8 (English)
Page 115
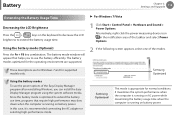
... connecting the AC adapter or selecting high-performance mode. Battery Chapter 3. Samsung Optimized Using the battery modes To use the battery efficiently. Settings and Upgrade 114 Extending the Battery Usage Time Decreasing the LCD Brightness Press the + keys on the keyboard to decrease the LCD brightness to use the power options of the Easy Display Manager program after reinstalling Windows, you to extend the battery usage time. ► For Windows 7/Vista 1 Click Start > Control Panel > Hardware and Sound > Power Options. The battery modes optimized for the operating...
... connecting the AC adapter or selecting high-performance mode. Battery Chapter 3. Samsung Optimized Using the battery modes To use the battery efficiently. Settings and Upgrade 114 Extending the Battery Usage Time Decreasing the LCD Brightness Press the + keys on the keyboard to decrease the LCD brightness to use the power options of the Easy Display Manager program after reinstalling Windows, you to extend the battery usage time. ► For Windows 7/Vista 1 Click Start > Control Panel > Hardware and Sound > Power Options. The battery modes optimized for the operating...
User Manual Xp/windows7 Ver.1.8 (English)
Page 160
... LCD. And because it does not blink, it reduces eye strain. This computer uses the Active Matrix type LCD called XX. HDMI This is required besides the hardware equipment. To connect to the hard disk and turns the CPU and hard disk off. Since an LCD is required. When canceling Hibernation Mode, all data in the early 1980s. LAN (Local Area Network) A communications network connecting computers, printers and other devices on the network. Windows Vista uses...
... LCD. And because it does not blink, it reduces eye strain. This computer uses the Active Matrix type LCD called XX. HDMI This is required besides the hardware equipment. To connect to the hard disk and turns the CPU and hard disk off. Since an LCD is required. When canceling Hibernation Mode, all data in the early 1980s. LAN (Local Area Network) A communications network connecting computers, printers and other devices on the network. Windows Vista uses...

