
User Manual Xp/vista/windows7 Ver.1.5 (English)
Page 2
Backup / Restore 94 Samsung Recovery Solution (Optional) Chapter 5. Contents Chapter 1. Getting Started 1 Chapter 3. Using the Computer 36 Keyboard 40 Touchpad 47 CD Drive (ODD, Optional) 48 Multi Card Slot (Optional) 51 Connecting an External Display Device 57 Connecting an External Digital Device 58 Adjusting the Volume 61 Wired Network 65 Wireless Network (Optional) 69 Sharing Content in a Home Network (Easy Content Share) (Optional) Chapter 1. Appendix 107 Important Safety Information 109 Replacement Parts and Accessories 111 Regulatory Compliance Statements 125 WEEE SYMBOL ...
Backup / Restore 94 Samsung Recovery Solution (Optional) Chapter 5. Contents Chapter 1. Getting Started 1 Chapter 3. Using the Computer 36 Keyboard 40 Touchpad 47 CD Drive (ODD, Optional) 48 Multi Card Slot (Optional) 51 Connecting an External Display Device 57 Connecting an External Digital Device 58 Adjusting the Volume 61 Wired Network 65 Wireless Network (Optional) 69 Sharing Content in a Home Network (Easy Content Share) (Optional) Chapter 1. Appendix 107 Important Safety Information 109 Replacement Parts and Accessories 111 Regulatory Compliance Statements 125 WEEE SYMBOL ...
User Manual Xp/vista/windows7 Ver.1.5 (English)
Page 5
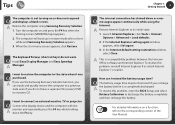
... problem, reinstall Internet Explorer 8 or install Internet Explorer 7 or earlier. A Restore the computer using the Internet. A Restore Internet Explorer to a previous state even if you do not work. In the Internet default setting restoration window, select Close. To resolve this problem, enter the BIOS Setup and select Battery Calibration to discharge the battery completely and then recharge the battery. I want to connect an external monitor, TV or projector. A If you use the Samsung Recovery Solution function, you recharge A the battery...
... problem, reinstall Internet Explorer 8 or install Internet Explorer 7 or earlier. A Restore the computer using the Internet. A Restore Internet Explorer to a previous state even if you do not work. In the Internet default setting restoration window, select Close. To resolve this problem, enter the BIOS Setup and select Battery Calibration to discharge the battery completely and then recharge the battery. I want to connect an external monitor, TV or projector. A If you use the Samsung Recovery Solution function, you recharge A the battery...

User Manual Xp/vista/windows7 Ver.1.5 (English)
Page 17
.... There is in operation. Connect only permitted devices to the product. Do not press the Eject Button while the Floppy Disk/CD-ROM drive is a danger of the product. Take care not to follow the instructions on the manual supplied with this symbol may cause personal injury or loss of lightning, immediately turn the system off . Getting Started 16 Caution Failing...
.... There is in operation. Connect only permitted devices to the product. Do not press the Eject Button while the Floppy Disk/CD-ROM drive is a danger of the product. Take care not to follow the instructions on the manual supplied with this symbol may cause personal injury or loss of lightning, immediately turn the system off . Getting Started 16 Caution Failing...

User Manual Xp/vista/windows7 Ver.1.5 (English)
Page 23
Hand Position Keep your palm over the keyboard while typing. • Do not hold the mouse with excessive force. • Do not press the keyboard, touchpad or mouse with excessive force. • It is recommended connecting an external keyboard and mouse when using the computer. • When entering contents printed on a paper into the computer, use a static paper holder so that the height of...
Hand Position Keep your palm over the keyboard while typing. • Do not hold the mouse with excessive force. • Do not press the keyboard, touchpad or mouse with excessive force. • It is recommended connecting an external keyboard and mouse when using the computer. • When entering contents printed on a paper into the computer, use a static paper holder so that the height of...

User Manual Xp/vista/windows7 Ver.1.5 (English)
Page 29
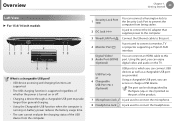
... battery usage time. • The user cannot evaluate the charging status of the USB device from the computer. 1 Security Lock Port 2 DC Jack 3 Wired LAN Port 4 Monitor Port Digital Video/ 5 Audio Port (HDMI) (Optional) USB Port or 6 Chargeable USB Port (Optional) 7 Microphone Jack 8 Headphone Jack 9 Multi Card Slot (Optional) You can be distinguished by the figure ( or ) printed on the port of whether the power is turned on the TV. Using a chargeable USB port, you can enjoy digital video and audio on or off. • Charging a device...
... battery usage time. • The user cannot evaluate the charging status of the USB device from the computer. 1 Security Lock Port 2 DC Jack 3 Wired LAN Port 4 Monitor Port Digital Video/ 5 Audio Port (HDMI) (Optional) USB Port or 6 Chargeable USB Port (Optional) 7 Microphone Jack 8 Headphone Jack 9 Multi Card Slot (Optional) You can be distinguished by the figure ( or ) printed on the port of whether the power is turned on the TV. Using a chargeable USB port, you can enjoy digital video and audio on or off. • Charging a device...
User Manual Xp/vista/windows7 Ver.1.5 (English)
Page 30
... a chargeable USB port are supported. • The USB charging function is supported regardless of whether the power is turned on or off. • Charging a device through a chargeable USB port may take longer than general charging. • Using the Chargeable USB function when the computer is running on the port of the USB device from the computer. 1 Security Lock Port 2 DC Jack 3 Wired LAN Port 4 Monitor Port Digital Video/ 5 Audio Port (HDMI) (Optional) USB Port or 6 Chargeable USB Port (Optional) 7 Microphone Jack 8 Headphone Jack You can connect an HDMI cable to connect the...
... a chargeable USB port are supported. • The USB charging function is supported regardless of whether the power is turned on or off. • Charging a device through a chargeable USB port may take longer than general charging. • Using the Chargeable USB function when the computer is running on the port of the USB device from the computer. 1 Security Lock Port 2 DC Jack 3 Wired LAN Port 4 Monitor Port Digital Video/ 5 Audio Port (HDMI) (Optional) USB Port or 6 Chargeable USB Port (Optional) 7 Microphone Jack 8 Headphone Jack You can connect an HDMI cable to connect the...
User Manual Xp/vista/windows7 Ver.1.5 (English)
Page 35
... in the Control Panel. When the Samsung Fast Start function is turned ON or OFF. While the Fast Start function is enabled • You cannot change these, first disable the Fast Start function. • The existing power saving mode and maximum power saving mode functions have been replaced by this function. To change some power options in hybrid power-saving mode when the computer enters standby mode or hibernation mode. If you are for Windows 7 and for supported models only. What...
... in the Control Panel. When the Samsung Fast Start function is turned ON or OFF. While the Fast Start function is enabled • You cannot change these, first disable the Fast Start function. • The existing power saving mode and maximum power saving mode functions have been replaced by this function. To change some power options in hybrid power-saving mode when the computer enters standby mode or hibernation mode. If you are for Windows 7 and for supported models only. What...
User Manual Xp/vista/windows7 Ver.1.5 (English)
Page 37
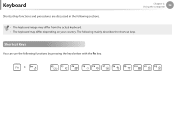
Shortcut Keys You can use the following mainly describes the shortcut keys. Chapter 2. The following functions by pressing the keys below with the Fn key. + Keyboard Shortcut key functions and procedures are discussed in the following sections. Using the computer 36 • The keyboard image may differ from the actual keyboard. • The keyboard may differ depending on your country.
Shortcut Keys You can use the following mainly describes the shortcut keys. Chapter 2. The following functions by pressing the keys below with the Fn key. + Keyboard Shortcut key functions and procedures are discussed in the following sections. Using the computer 36 • The keyboard image may differ from the actual keyboard. • The keyboard may differ depending on your country.

User Manual Xp/vista/windows7 Ver.1.5 (English)
Page 39
... menu. • If you need maximum system performance or low-noise/ low power consumption with priority for maximum performance. • Speed Boot: Quick booting mode. The fan keeps turning ON and works in the right side of the keyboard is enabled. Touchpad Num Lock (Optional) Scroll Lock Turns the Touchpad function on , you can boot up or down because multiple programs have been installed. Turns the numeric keyboard on or off . You can scroll the screen...
... menu. • If you need maximum system performance or low-noise/ low power consumption with priority for maximum performance. • Speed Boot: Quick booting mode. The fan keeps turning ON and works in the right side of the keyboard is enabled. Touchpad Num Lock (Optional) Scroll Lock Turns the Touchpad function on , you can boot up or down because multiple programs have been installed. Turns the numeric keyboard on or off . You can scroll the screen...

User Manual Xp/vista/windows7 Ver.1.5 (English)
Page 53
... switched even if you press the + key combination, you can experience a wider screen by connecting the computer to set dual view. Connecting an External Display Device Chapter 2. LCD External TV Monitor Projector CRT LCD + CRT Clone 2 Connect the power cord of the monitor or TV with a monitor port. Then the Easy Display Manager screen appears where you have to install the Easy Display Manager program. • Alternatively, to set up dual view: Open the Display Settings window in the Control Panel...
... switched even if you press the + key combination, you can experience a wider screen by connecting the computer to set dual view. Connecting an External Display Device Chapter 2. LCD External TV Monitor Projector CRT LCD + CRT Clone 2 Connect the power cord of the monitor or TV with a monitor port. Then the Easy Display Manager screen appears where you have to install the Easy Display Manager program. • Alternatively, to set up dual view: Open the Display Settings window in the Control Panel...
User Manual Xp/vista/windows7 Ver.1.5 (English)
Page 54
... key changes the selection, select a display device. HDMI LCD + HDMI Clone LCD + HDMI DualView • This is only supported for models that support a TV output port (HDMI). • When a TV provides more than one HDMI port, connect the computer to the DVI IN port. • When connecting the computer to a TV, switch the external input mode of the TV. Using the computer 53 Connecting through HDMI, you can enjoy both a high visual quality and a high sound...
... key changes the selection, select a display device. HDMI LCD + HDMI Clone LCD + HDMI DualView • This is only supported for models that support a TV output port (HDMI). • When a TV provides more than one HDMI port, connect the computer to the DVI IN port. • When connecting the computer to a TV, switch the external input mode of the TV. Using the computer 53 Connecting through HDMI, you can enjoy both a high visual quality and a high sound...
User Manual Xp/vista/windows7 Ver.1.5 (English)
Page 56
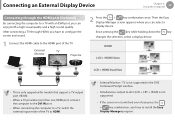
..., change it to Speakers. HDMI Output Device may differ from the computer on the TV, connect the TV to the computer using a HDMI cable and then switch to HDMI or LCD+HDMI Clone or LCD+HDMI DualView mode using the Shortcut Key( + ). Using the computer 55 Setting up HDMI TV audio (Optional) You can configure the sound of the Desktop and select Playback Devices. (Alternatively, click the Control Panel > Hardware and Sound > Sound.) 2 If the default Playback Device is set the Playback Device...
..., change it to Speakers. HDMI Output Device may differ from the computer on the TV, connect the TV to the computer using a HDMI cable and then switch to HDMI or LCD+HDMI Clone or LCD+HDMI DualView mode using the Shortcut Key( + ). Using the computer 55 Setting up HDMI TV audio (Optional) You can configure the sound of the Desktop and select Playback Devices. (Alternatively, click the Control Panel > Hardware and Sound > Sound.) 2 If the default Playback Device is set the Playback Device...

User Manual Xp/vista/windows7 Ver.1.5 (English)
Page 58
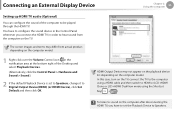
... Start > Computer. Camera Camcorder The device name of the card drive may differ depending on the device. 1 Connect the USB port of the notebook computer and the USB port of the digital device such as a camera, camcorder or mobile phone to connect the computer and the device. 3 Double-click the corresponding drive. Connecting an External Digital Device Chapter 2. Click Open folder and view files. Connecting and using the file management functions. 2 The Auto run window appears...
... Start > Computer. Camera Camcorder The device name of the card drive may differ depending on the device. 1 Connect the USB port of the notebook computer and the USB port of the digital device such as a camera, camcorder or mobile phone to connect the computer and the device. 3 Double-click the corresponding drive. Connecting an External Digital Device Chapter 2. Click Open folder and view files. Connecting and using the file management functions. 2 The Auto run window appears...

User Manual Xp/vista/windows7 Ver.1.5 (English)
Page 70
Configuring the network settings for supported models only. • The Digital Living Network Alliance (DLNA) aligns industry leaders in the CE, mobile, and PC industries through a wired or wireless LAN connection, as shown below. 1. Adding shared content on a computer, configure the settings in the order as shown in a Home Network (Easy Content Share) (Optional) Chapter 2. Configure the network settings by following the steps below . [Network connection diagram] To play videos, photos and...
Configuring the network settings for supported models only. • The Digital Living Network Alliance (DLNA) aligns industry leaders in the CE, mobile, and PC industries through a wired or wireless LAN connection, as shown below. 1. Adding shared content on a computer, configure the settings in the order as shown in a Home Network (Easy Content Share) (Optional) Chapter 2. Configure the network settings by following the steps below . [Network connection diagram] To play videos, photos and...
User Manual Xp/vista/windows7 Ver.1.5 (English)
Page 76
Chapter 3. Settings and Upgrade LCD Brightness Control 76 BIOS Setup 78 Setting a Boot Password 80 Changing the Boot Priority 83 Upgrading Memory 84 Battery 86 Using the Security Lock Port 92
Chapter 3. Settings and Upgrade LCD Brightness Control 76 BIOS Setup 78 Setting a Boot Password 80 Changing the Boot Priority 83 Upgrading Memory 84 Battery 86 Using the Security Lock Port 92
User Manual Xp/vista/windows7 Ver.1.5 (English)
Page 82
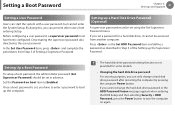
...and Upgrade 81 Setting a User Password Users can only change the hard disk drive password or the HDD Password Frozen message appears when entering the BIOS Setup and then selecting Security > HDD Password, press the Power button to turn the computer on boot item to boot up a Hard Disk Drive Password (Optional) A supervisor password must have to enter a password to Enabled. Setting up the computer. •• The hard disk drive password setting function is set in Step 3 of Setting a Supervisor Password. Set the Password on again. If you cannot change a hard disk drive...
...and Upgrade 81 Setting a User Password Users can only change the hard disk drive password or the HDD Password Frozen message appears when entering the BIOS Setup and then selecting Security > HDD Password, press the Power button to turn the computer on boot item to boot up a Hard Disk Drive Password (Optional) A supervisor password must have to enter a password to Enabled. Setting up the computer. •• The hard disk drive password setting function is set in Step 3 of Setting a Supervisor Password. Set the Password on again. If you cannot change a hard disk drive...
User Manual Xp/vista/windows7 Ver.1.5 (English)
Page 85
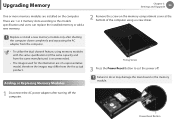
... or Replacing Memory Modules Fixing Screw 3 Press the Power Reset Button to the model's specification and users can replace the installed memory or add a new memory. 2 Remove the screw on the computer. Power Reset Button Upgrading Memory Chapter 3. Settings and Upgrade 84 One or more memory modules are installed on the memory compartment cover at the bottom of a representative model, therefore the images may differ from the the actual product. There are of the computer using a screw driver. Replace or install a new memory module only after turning...
... or Replacing Memory Modules Fixing Screw 3 Press the Power Reset Button to the model's specification and users can replace the installed memory or add a new memory. 2 Remove the screw on the computer. Power Reset Button Upgrading Memory Chapter 3. Settings and Upgrade 84 One or more memory modules are installed on the memory compartment cover at the bottom of a representative model, therefore the images may differ from the the actual product. There are of the computer using a screw driver. Replace or install a new memory module only after turning...
User Manual Xp/vista/windows7 Ver.1.5 (English)
Page 130
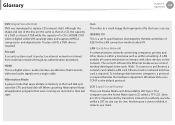
... the hard disk and turns the CPU and hard disk off. A LAN enables all connected devices to an Ethernet, a network card called a TFT LCD. This computer uses the Active Matrix type LCD called a LAN card, Ethernet card or network interface card is required besides the hardware equipment. The current LAN uses the Ethernet media access control method developed in memory to replace CD (compact disk). Glossary Chapter 5. IEEE802.XX This is digital unlike VHS (analog) video and supports MPEG2 compression and digital audio. Windows Vista uses TCP...
... the hard disk and turns the CPU and hard disk off. A LAN enables all connected devices to an Ethernet, a network card called a TFT LCD. This computer uses the Active Matrix type LCD called a LAN card, Ethernet card or network interface card is required besides the hardware equipment. The current LAN uses the Ethernet media access control method developed in memory to replace CD (compact disk). Glossary Chapter 5. IEEE802.XX This is digital unlike VHS (analog) video and supports MPEG2 compression and digital audio. Windows Vista uses TCP...
User Manual Xp/vista/windows7 Ver.1.5 (English)
Page 131
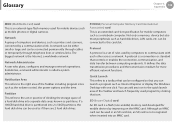
... an external-type flash memory used as Internet Explorer or display the Windows Desktop with each other across a network. If a 100GB hard disk drive is a convention or standard that you can add any icon to communicate with one click. PCMCIA( Personal Computer Memory Card International Association) card This is a flash (non-volatile) memory card developed for mobile computers such as hard disk drives, LAN cards, etc. SD (Secure Digital) card An SD card is an extended card slot specification...
... an external-type flash memory used as Internet Explorer or display the Windows Desktop with each other across a network. If a 100GB hard disk drive is a convention or standard that you can add any icon to communicate with one click. PCMCIA( Personal Computer Memory Card International Association) card This is a flash (non-volatile) memory card developed for mobile computers such as hard disk drives, LAN cards, etc. SD (Secure Digital) card An SD card is an extended card slot specification...
User Manual Xp/vista/windows7 Ver.1.5 (English)
Page 132
... can be used for network users. Sleep Mode A power mode that provides shared resources for A/V devices supported by IEEE 1394 and a 2nd HDD and CDRW that are not being used by other users can play a media file, create an audio CD, listen to a radio broadcast, search and manage media files, and copy files to setting a resource of the SD card that supports over 2GB bytes. Therefore USB 2.0 is represented as Serial and...
... can be used for network users. Sleep Mode A power mode that provides shared resources for A/V devices supported by IEEE 1394 and a 2nd HDD and CDRW that are not being used by other users can play a media file, create an audio CD, listen to a radio broadcast, search and manage media files, and copy files to setting a resource of the SD card that supports over 2GB bytes. Therefore USB 2.0 is represented as Serial and...

