

Instruction Manual
Page 2
... the same rating must be used. If a replacement fuse cover is indicated on this unit. Do NOT connect the plug to the coloured markings identifying the terminals in your dealer. DO NOT OPEN CAUTION: TO REDUCE THE RISK OF ELECTRIC SHOCK, DO NOT REMOVE REAR COVER, NO USER SERVICEABLE PARTS INSIDE, REFER SERVICING TO QUALIFIED SERVICE PERSONNEL. Use of controls adjustments or performance of procedures other...
... the same rating must be used. If a replacement fuse cover is indicated on this unit. Do NOT connect the plug to the coloured markings identifying the terminals in your dealer. DO NOT OPEN CAUTION: TO REDUCE THE RISK OF ELECTRIC SHOCK, DO NOT REMOVE REAR COVER, NO USER SERVICEABLE PARTS INSIDE, REFER SERVICING TO QUALIFIED SERVICE PERSONNEL. Use of controls adjustments or performance of procedures other...
Instruction Manual
Page 3
... MICRO COMPONENT SYSTEM Front Panel View ...4 Remote Control ...5 Rear Panel View ...6 Where to Install Your Micro Component System ...7 Connecting your System to the Power Supply ...7 Inserting Remote Control Batteries ...7 Connecting to an External Source ...8 Speaker Connection ...8 Connecting the AM (MW)/LW Aerial ...9 Connecting the FM Aerial ...9 Viewing the Various Functions on Your System ...10 Setting the Clock ...10 CD-PLAYER To replay the CD/MP3-CD ...11 Regarding the playback of CD-R/RW ...11 Selecting...
... MICRO COMPONENT SYSTEM Front Panel View ...4 Remote Control ...5 Rear Panel View ...6 Where to Install Your Micro Component System ...7 Connecting your System to the Power Supply ...7 Inserting Remote Control Batteries ...7 Connecting to an External Source ...8 Speaker Connection ...8 Connecting the AM (MW)/LW Aerial ...9 Connecting the FM Aerial ...9 Viewing the Various Functions on Your System ...10 Setting the Clock ...10 CD-PLAYER To replay the CD/MP3-CD ...11 Regarding the playback of CD-R/RW ...11 Selecting...
Instruction Manual
Page 7
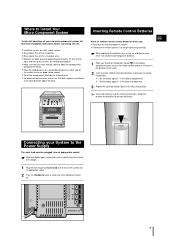
... Full Auto Remote Control Operation Connecting your new micro component system, follow these installation instructions before connecting the unit. Make sure that you must be using the remote control for ventilation purposes. Place the loudspeakers at an equal distance above the floor. Never place this unit on the rear of the system to ensure good stereo sound. If you : Purchase the micro component system Find that both speakers...
... Full Auto Remote Control Operation Connecting your new micro component system, follow these installation instructions before connecting the unit. Make sure that you must be using the remote control for ventilation purposes. Place the loudspeakers at an equal distance above the floor. Never place this unit on the rear of the system to ensure good stereo sound. If you : Purchase the micro component system Find that both speakers...

Instruction Manual
Page 8
... light or with high humidity may influence the quality of the speaker. Examples: A television A video disc player A Hi-Fi stereo video cassette recorder To connect the external source, the source must have an audio output. Do not take the speaker apart from the main. 2 Connect the audio cable to the Main Speaker jacks of System (Right Speaker) (Left Speaker) DIGITAL OUT (OPTICAL) Directions in Installing Speaker Installation in stereo (as if you need an RCA connection cable. 1 Set the system to standby mode...
... light or with high humidity may influence the quality of the speaker. Examples: A television A video disc player A Hi-Fi stereo video cassette recorder To connect the external source, the source must have an audio output. Do not take the speaker apart from the main. 2 Connect the audio cable to the Main Speaker jacks of System (Right Speaker) (Left Speaker) DIGITAL OUT (OPTICAL) Directions in Installing Speaker Installation in stereo (as if you need an RCA connection cable. 1 Set the system to standby mode...
Instruction Manual
Page 9
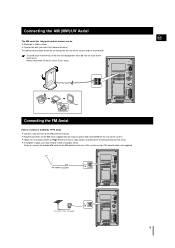
... AM aerial connector terminals are marked AM . DIGITAL OUT (OPTICAL) Connecting the FM Aerial How to the FM antenna terminal. Connect a 75Ω antenna to connect a COAXIAL TYPE aerial. DIGITAL OUT (OPTICAL) DIGITAL OUT (OPTICAL) 9 Connecting the AM (MW)/LW Aerial GB The AM aerial (for long and medium waves) can be: Placed on a stable surface Fixed to the wall (you may need to install an outdoor...
... AM aerial connector terminals are marked AM . DIGITAL OUT (OPTICAL) Connecting the FM Aerial How to the FM antenna terminal. Connect a 75Ω antenna to connect a COAXIAL TYPE aerial. DIGITAL OUT (OPTICAL) DIGITAL OUT (OPTICAL) 9 Connecting the AM (MW)/LW Aerial GB The AM aerial (for long and medium waves) can be: Placed on a stable surface Fixed to the wall (you may need to install an outdoor...
Instruction Manual
Page 10
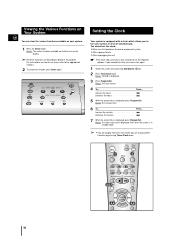
... instructions on how to use them, refer to turn on the display. Mode Display PTY CD 3,5R,7epeat +10 Program/ VOL. TUNER Band CD TAPE AUX Down Tuning Mode Volume Rec/Pause REV.Mode Open/Close Up DemDo/eDmisoplay Sound Mode MIC Setting the Clock Your system is equipped with a clock which allows you have a few seconds to set the clock: When you first purchase the micro component system After a power...
... instructions on how to use them, refer to turn on the display. Mode Display PTY CD 3,5R,7epeat +10 Program/ VOL. TUNER Band CD TAPE AUX Down Tuning Mode Volume Rec/Pause REV.Mode Open/Close Up DemDo/eDmisoplay Sound Mode MIC Setting the Clock Your system is equipped with a clock which allows you have a few seconds to set the clock: When you first purchase the micro component system After a power...
Instruction Manual
Page 11
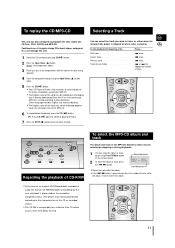
... label on the characteristics of your disc in audio CD format, CD-RW(Rewitable) and editing by pressing Tune/CD Mode button on the respective completed status. (The player may not be indicated depending on the disc facing upwards. 4 Close the compartment by pressing CD( ) button. 2 Press the Open/Close ( ) button. Repeat +10 Program/ Set 2 VOL. 1 Tune/CD Mode VOL. Selecting a Track GB You can damage...
... label on the characteristics of your disc in audio CD format, CD-RW(Rewitable) and editing by pressing Tune/CD Mode button on the respective completed status. (The player may not be indicated depending on the disc facing upwards. 4 Close the compartment by pressing CD( ) button. 2 Press the Open/Close ( ) button. Repeat +10 Program/ Set 2 VOL. 1 Tune/CD Mode VOL. Selecting a Track GB You can damage...
Instruction Manual
Page 12
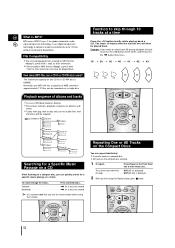
... Explorer display. Tune/CD Mode VOL. Forwards Backwards Press and hold down before using this function. for a Specific Music Passage on a CD When listening to select track 43 during playback of one second It is 680MB. The track 10 tracks after the current one second for audio signal compression technology. GB What is displayed 2 When you want to a compact disc, you turn the volume...
... Explorer display. Tune/CD Mode VOL. Forwards Backwards Press and hold down before using this function. for a Specific Music Passage on a CD When listening to select track 43 during playback of one second It is 680MB. The track 10 tracks after the current one second for audio signal compression technology. GB What is displayed 2 When you want to a compact disc, you turn the volume...
Instruction Manual
Page 13
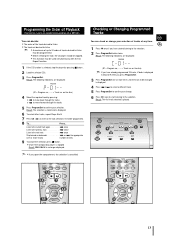
... appropriate number of times 9 To cancel the selection, press button. on the disc) 4 Select the required track by pressing 2 Load the selected CDs. 3 Press Program/Set. TUNER Band CD TAPE Down 4 AUX Rec/Pause Tuning Mode Up 1 Volume Open/Close Demo 4 REV.Mode Sound Mode TAPE REV. REV. RDS CD SYNC. Result: The following indications are displayed: button . (01 = Program no., -- -- = Track no longer displayed. If you open the compartment, the selection is played. Tune/CD Mode...
... appropriate number of times 9 To cancel the selection, press button. on the disc) 4 Select the required track by pressing 2 Load the selected CDs. 3 Press Program/Set. TUNER Band CD TAPE Down 4 AUX Rec/Pause Tuning Mode Up 1 Volume Open/Close Demo 4 REV.Mode Sound Mode TAPE REV. REV. RDS CD SYNC. Result: The following indications are displayed: button . (01 = Program no., -- -- = Track no longer displayed. If you open the compartment, the selection is played. Tune/CD Mode...
Instruction Manual
Page 14
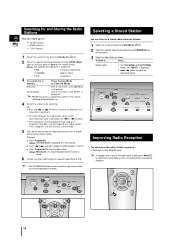
... until AUTO is displayed for a station... Otherwise: a Press Program/Set. Result: The PROGRAM is displayed. Standby/On TUNER 2 CD 4 5 Down Tuning Mode 3 O Up 1 TAPE 4 5 Volume 5 Program/ Set 4 5 VOL. 3 Tune/CD MMooddee 2 Band 45 VOL. Standby/On 1 TUNER 2 CD TAPE Phones AUX Down 3 Rec/Pause Tuning Mode Volume REV.Mode O Up Sound Mode Improving Radio Reception You can improve the quality of the sound will be stored by: or Pressing or buttons to increase or decrease the frequency respectively...
... until AUTO is displayed for a station... Otherwise: a Press Program/Set. Result: The PROGRAM is displayed. Standby/On TUNER 2 CD 4 5 Down Tuning Mode 3 O Up 1 TAPE 4 5 Volume 5 Program/ Set 4 5 VOL. 3 Tune/CD MMooddee 2 Band 45 VOL. Standby/On 1 TUNER 2 CD TAPE Phones AUX Down 3 Rec/Pause Tuning Mode Volume REV.Mode O Up Sound Mode Improving Radio Reception You can improve the quality of the sound will be stored by: or Pressing or buttons to increase or decrease the frequency respectively...
Instruction Manual
Page 15
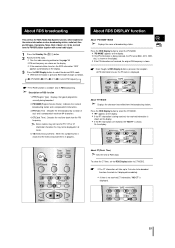
... real time clock from the broadcasting station. Press the RDS Display button to CT MODE. Mode Display PTY 1 EQ/P.Sound Timer Timer/ On/Off Clock Sleep Aux TAPE CD SYNC. The CT information will take up to 2 minutes to be received from the FM RDS station together with normal radio signal. 1 Press the Standby /On ( ) button. 2 Receive the FM radio. RT(Radio Text) : Decodes the text broadcast by...
... real time clock from the broadcasting station. Press the RDS Display button to CT MODE. Mode Display PTY 1 EQ/P.Sound Timer Timer/ On/Off Clock Sleep Aux TAPE CD SYNC. The CT information will take up to 2 minutes to be received from the FM RDS station together with normal radio signal. 1 Press the Standby /On ( ) button. 2 Receive the FM radio. RT(Radio Text) : Decodes the text broadcast by...
Instruction Manual
Page 16
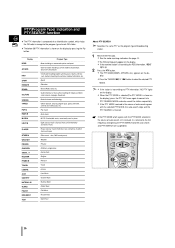
... PTY' lights on the display. x The below 30 PTY information is transmitting the RDS information, "RDS" lights up. 2 Press the PTY button. The FM and frequency appear on the page 14. If the station is finished. If the PTY MODE received in the course of auto-search, isn't received, it is returned to select the desired PTY MODE. Band Set 2 2 Tune/CD Mode 16 cast...
... PTY' lights on the display. x The below 30 PTY information is transmitting the RDS information, "RDS" lights up. 2 Press the PTY button. The FM and frequency appear on the page 14. If the station is finished. If the PTY MODE received in the course of auto-search, isn't received, it is returned to select the desired PTY MODE. Band Set 2 2 Tune/CD Mode 16 cast...

Instruction Manual
Page 17
.... Mode Display PTY CD Repeat +10 Standby/On 1 TUNER Band CD Phones TAPE 4 AUX Op Down 5 Tuning Mode 6 5 Up D Volume Rec/Pause REV.Mode Sound Mode 17 refer, if necessary, to the section entitled "Precautions When Using Audio Cassettes" on page 23. 1 Switch the system on by pressing Standby/On ( ). 2 Open the cassette deck by pushing on the remote con- Tape ( ) button twice. 5 Press the , on the front panel...
.... Mode Display PTY CD Repeat +10 Standby/On 1 TUNER Band CD Phones TAPE 4 AUX Op Down 5 Tuning Mode 6 5 Up D Volume Rec/Pause REV.Mode Sound Mode 17 refer, if necessary, to the section entitled "Precautions When Using Audio Cassettes" on page 23. 1 Switch the system on by pressing Standby/On ( ). 2 Open the cassette deck by pushing on the remote con- Tape ( ) button twice. 5 Press the , on the front panel...
Instruction Manual
Page 18
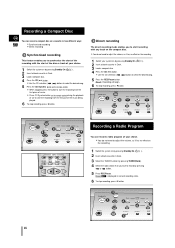
... 5 Tuning Mode 6 Volume REV.Mode O Up 4 Sound Mode 18 Direct recording The direct recording mode enables you to start recording with the start the recording from the first part of the music being played. 6 To stop recording, press button. RDS CD SYNC. You do not need to select the desired song. 5 Press the REC/Pause button. Recording a Compact Disc GB You can record a radio program of your system on the remote control...
... 5 Tuning Mode 6 Volume REV.Mode O Up 4 Sound Mode 18 Direct recording The direct recording mode enables you to start recording with the start the recording from the first part of the music being played. 6 To stop recording, press button. RDS CD SYNC. You do not need to select the desired song. 5 Press the REC/Pause button. Recording a Compact Disc GB You can record a radio program of your system on the remote control...
Instruction Manual
Page 19
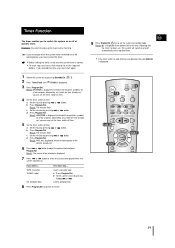
... volume level and press Program/Set. You must cancel the timer. b Select a preset station by pressing or button. GB 9 Press Stanby/On ( ) to set . 6 Press or button to be selected is displayed. 3 Press Program/Set. you have a few seconds, followed by pressing Standby/On ( ) . 2 Press Timer/Clock until TIMER is displayed. 7 Press or button to select the source to be played when the system switches on time. a Set the hour by pressing Tuning...
... volume level and press Program/Set. You must cancel the timer. b Select a preset station by pressing or button. GB 9 Press Stanby/On ( ) to set . 6 Press or button to be selected is displayed. 3 Press Program/Set. you have a few seconds, followed by pressing Standby/On ( ) . 2 Press Timer/Clock until TIMER is displayed. 7 Press or button to select the source to be played when the system switches on time. a Set the hour by pressing Tuning...

Instruction Manual
Page 20
... bass twice as much for you to use the timer, you no longer displayed. Mode Display PTY Repeat Program/ Set VOL. Press Sound Mode on the display. Example: You wish to select "POP © ROCK © CLASSIC © P.SOUND(Power Sound) ©PASS" TUNER Band CD TAPE Down Tuning Mode Volume Open/Close Up Demo AUX Rec/Pause REV.Mode Sound Mode 20 You can turn the sound off temporarily on or in standby mode). Press the button...
... bass twice as much for you to use the timer, you no longer displayed. Mode Display PTY Repeat Program/ Set VOL. Press Sound Mode on the display. Example: You wish to select "POP © ROCK © CLASSIC © P.SOUND(Power Sound) ©PASS" TUNER Band CD TAPE Down Tuning Mode Volume Open/Close Up Demo AUX Rec/Pause REV.Mode Sound Mode 20 You can turn the sound off temporarily on or in standby mode). Press the button...
Instruction Manual
Page 21
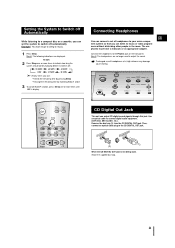
... a compact disc or a cassette, you can set of headphones at a high volume may damage your micro component system so that you can output CD digital sound signals through this jack. Result: The following indications are no longer used . Use an optical cable to connect digital audio equipment. (DAT deck, MD recorder, etc.). Setting the System to Switch off automatically Example: You wish to go to sleep to music. 1 Press...
... a compact disc or a cassette, you can set of headphones at a high volume may damage your micro component system so that you can output CD digital sound signals through this jack. Result: The following indications are no longer used . Use an optical cable to connect digital audio equipment. (DAT deck, MD recorder, etc.). Setting the System to Switch off automatically Example: You wish to go to sleep to music. 1 Press...
Instruction Manual
Page 22
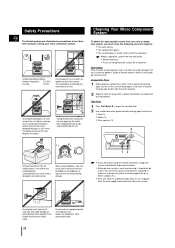
... Micro Component System To obtain the best possible results from your local dealer). Leaking batteries can cause serious damage to direct sun radiation or other heat sources. Standby/On Phones TUNER Band CD TAPE AUX Down Rec/Pause Tuning Mode Volume REV.Mode Open/Close Up Demo Sound Mode Push Eject Full Auto Remote Control Operation During thunderstorms, disconnect the main plug from the socket. Carefully wipe the disc from...
... Micro Component System To obtain the best possible results from your local dealer). Leaking batteries can cause serious damage to direct sun radiation or other heat sources. Standby/On Phones TUNER Band CD TAPE AUX Down Rec/Pause Tuning Mode Volume REV.Mode Open/Close Up Demo Sound Mode Push Eject Full Auto Remote Control Operation During thunderstorms, disconnect the main plug from the socket. Carefully wipe the disc from...
Instruction Manual
Page 23
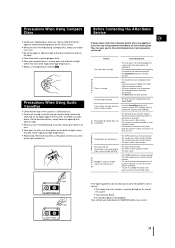
... correct function (TUNER, CD, TAPE, AUX) has not been selected. • You have been disconnected. • The Mute button has been pressed. Do not fix paper or adhesive tape to high temperatures. If you must use compact discs marked COMPACT . G E N E R There is sufficiently taut. leave the system in the player; you have any of earphones. • The loudspeaker wires have connected a set...
... correct function (TUNER, CD, TAPE, AUX) has not been selected. • You have been disconnected. • The Mute button has been pressed. Do not fix paper or adhesive tape to high temperatures. If you must use compact discs marked COMPACT . G E N E R There is sufficiently taut. leave the system in the player; you have any of earphones. • The loudspeaker wires have connected a set...
Instruction Manual
Page 24
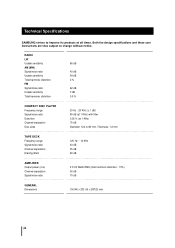
.... Technical Specifications SAMSUNG strives to change without notice. Both the design specifications and these user instructions are thus subject to improve its products at 1 KHz) 75 dB Diameter: 120 or 80 mm. Thickness: 1.2 mm TAPE DECK Frequency range Signal/noise ratio Channel separation Erasing effect 125 Hz ~ 10 KHz 40 dB 35 dB 60 dB AMPLIFIER Output power (4 Ω) Channel separation Signal/noise ratio 2 X 20 Watts RMS...
.... Technical Specifications SAMSUNG strives to change without notice. Both the design specifications and these user instructions are thus subject to improve its products at 1 KHz) 75 dB Diameter: 120 or 80 mm. Thickness: 1.2 mm TAPE DECK Frequency range Signal/noise ratio Channel separation Erasing effect 125 Hz ~ 10 KHz 40 dB 35 dB 60 dB AMPLIFIER Output power (4 Ω) Channel separation Signal/noise ratio 2 X 20 Watts RMS...

