User Manual (ENGLISH)
Page 4
...Printer Features ...1.2 Printer Components ...1.3 Front View ...1.3 Rear View ...1.3 2. Setting Up Your Printer Unpacking ...2.1 Selecting a Location ...2.2 Installing the Toner Cartridge 2.2 Loading Paper ...2.4 Changing the Size of Control Panel Menus 3.3 Information Menu ...3.3 Paper Menu ...3.4 Layout Menu ...3.5 Graphics Menu ... Turning the Printer On ...2.7 Printing a Demo Page ...2.7 Changing the Display Language 2.8 Using the Toner Save Mode ...2.8 Using the Control Panel Button 2.8 Using the Control Panel Menu 2.8 From the Software Application 2.8 Installing Printer Software ...2.8 ...
...Printer Features ...1.2 Printer Components ...1.3 Front View ...1.3 Rear View ...1.3 2. Setting Up Your Printer Unpacking ...2.1 Selecting a Location ...2.2 Installing the Toner Cartridge 2.2 Loading Paper ...2.4 Changing the Size of Control Panel Menus 3.3 Information Menu ...3.3 Paper Menu ...3.4 Layout Menu ...3.5 Graphics Menu ... Turning the Printer On ...2.7 Printing a Demo Page ...2.7 Changing the Display Language 2.8 Using the Toner Save Mode ...2.8 Using the Control Panel Button 2.8 Using the Control Panel Menu 2.8 From the Software Application 2.8 Installing Printer Software ...2.8 ...
User Manual (ENGLISH)
Page 5
... Solving General Printing Problems 7.2 Clearing Paper Jams ...7.4 In the Paper Feed Area (Paper Jam 0 7.4 Around the Toner Cartridge (Paper Jam 1 7.6 In the Paper Exit Area (Paper Jam 2 7.7 In the Duplex Area (Duplex ...Job ...5.1 6. Maintaining Your Printer Printing Information Pages ...6.1 Printing a Configuration Page 6.1 Printing Usage Page ...6.1 Maintaining the Toner Cartridge 6.2 Checking the Toner Remains 6.2 Redistributing Toner ...6.2 Replacing the Toner Cartridge 6.3 Cleaning the Printer ...6.5 Cleaning the Outside of the Printer 6.5 Cleaning the Inside of the Printer 6.5 ...
... Solving General Printing Problems 7.2 Clearing Paper Jams ...7.4 In the Paper Feed Area (Paper Jam 0 7.4 Around the Toner Cartridge (Paper Jam 1 7.6 In the Paper Exit Area (Paper Jam 2 7.7 In the Duplex Area (Duplex ...Job ...5.1 6. Maintaining Your Printer Printing Information Pages ...6.1 Printing a Configuration Page 6.1 Printing Usage Page ...6.1 Maintaining the Toner Cartridge 6.2 Checking the Toner Remains 6.2 Redistributing Toner ...6.2 Replacing the Toner Cartridge 6.3 Cleaning the Printer ...6.5 Cleaning the Outside of the Printer 6.5 Cleaning the Inside of the Printer 6.5 ...

User Manual (ENGLISH)
Page 12
...100 Base TX. All rights reserved. You can use preprinted forms and letterhead. The ML-3561N and ML-3561ND come with a built-in the ML-3560, ML-3561N and ML-3561ND. • Your printer comes with both sides of Zoran Corporation. * 136 PS3 ...Toner Save mode to save paper (N-Up printing). For details, see page 9.1. • A Network interface enables network printing. Expand the printer capacity • This printer has 32 MB of the printer hard disk. The ML-3561N and ML-3561ND come with your printer. (S: Standard, O: Option) Features ML-3560 ML-3561N ML-3561ND...
...100 Base TX. All rights reserved. You can use preprinted forms and letterhead. The ML-3561N and ML-3561ND come with a built-in the ML-3560, ML-3561N and ML-3561ND. • Your printer comes with both sides of Zoran Corporation. * 136 PS3 ...Toner Save mode to save paper (N-Up printing). For details, see page 9.1. • A Network interface enables network printing. Expand the printer capacity • This printer has 32 MB of the printer hard disk. The ML-3561N and ML-3561ND come with your printer. (S: Standard, O: Option) Features ML-3560 ML-3561N ML-3561ND...
User Manual (ENGLISH)
Page 13
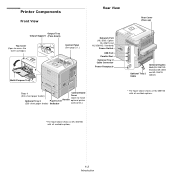
...Rear Cover (Face up) Output Tray Output Support (Face down) Top Cover (Open to access the toner cartridge.) Control Panel (See page 3.1.) Network Port (ML-3560: Option ML-3561N and ML-3561ND: Standard) Power Switch USB Port Parallel Port Optional Tray 2 Cable Connector Power Receptacle Multi-Purpose Tray ... Tray 2 Paper Level Handle optional printer (500-sheet paper feeder) Indicator accessories.) Optional Tray 2 Cable Optional Duplex Unit (ML-3561ND: Standard ML-3560 and ML-3561N: Option) * The figure above shows an ML-3561ND with all available options. * The figure above shows an...
...Rear Cover (Face up) Output Tray Output Support (Face down) Top Cover (Open to access the toner cartridge.) Control Panel (See page 3.1.) Network Port (ML-3560: Option ML-3561N and ML-3561ND: Standard) Power Switch USB Port Parallel Port Optional Tray 2 Cable Connector Power Receptacle Multi-Purpose Tray ... Tray 2 Paper Level Handle optional printer (500-sheet paper feeder) Indicator accessories.) Optional Tray 2 Cable Optional Duplex Unit (ML-3561ND: Standard ML-3560 and ML-3561N: Option) * The figure above shows an ML-3561ND with all available options. * The figure above shows an...
User Manual (ENGLISH)
Page 14
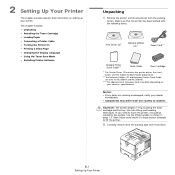
...2 Carefully remove all accessories from the packing carton. Use safe lifting and handling techniques. This chapter includes: • Unpacking • Installing the Toner Cartridge • Loading Paper • Connecting a Printer Cable • Turning the Printer On • Printing a Demo Page • Changing ... the Toner Save Mode • Installing Printer Software Unpacking 1 Remove the printer and all of the power cord may differ from the printer. 2.1 Setting Up Your Printer If you need to another. NOTES: • If any items are only for ML-3561N and ML-3561ND. ...
...2 Carefully remove all accessories from the packing carton. Use safe lifting and handling techniques. This chapter includes: • Unpacking • Installing the Toner Cartridge • Loading Paper • Connecting a Printer Cable • Turning the Printer On • Printing a Demo Page • Changing ... the Toner Save Mode • Installing Printer Software Unpacking 1 Remove the printer and all of the power cord may differ from the printer. 2.1 Setting Up Your Printer If you need to another. NOTES: • If any items are only for ML-3561N and ML-3561ND. ...
User Manual (ENGLISH)
Page 15
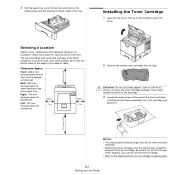
...enough space for ventilation) Left: 100 mm (enough space for ventilation) 100mm (3.9in) 320mm(12.6in) 100mm (3.9in) 2 Remove the starter toner cartridge from the cartridge. They might scratch the drum of the cartridge. 3 Locate the sealing tape at the end of the cartridge and discard... bag. Be careful not to allow opening covers and trays. Pull up on the cartridge wrapping paper. 2.2 Setting Up Your Printer Installing the Toner Cartridge 1 Open the top cover. Selecting a Location Select a level, stable place with adequate space for opening of heat, cold, and humidity...
...enough space for ventilation) Left: 100 mm (enough space for ventilation) 100mm (3.9in) 320mm(12.6in) 100mm (3.9in) 2 Remove the starter toner cartridge from the cartridge. They might scratch the drum of the cartridge. 3 Locate the sealing tape at the end of the cartridge and discard... bag. Be careful not to allow opening covers and trays. Pull up on the cartridge wrapping paper. 2.2 Setting Up Your Printer Installing the Toner Cartridge 1 Open the top cover. Selecting a Location Select a level, stable place with adequate space for opening of heat, cold, and humidity...
User Manual (ENGLISH)
Page 16
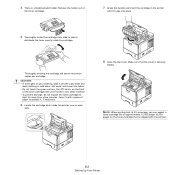
...,000 pages (6,000 pages for more than a few minutes. Cover it with a piece of the toner cartridge with your clothing, wipe it off with the printer). 2.3 Setting Up Your Printer CAUTION: • If toner gets on each side. 8 Close the top cover. Make sure that is shipped with a dry ...in the printer until it , if necessary. 6 Locate the cartridge slots inside the cartridge. Hot water sets toner into place. 5 Thoroughly shake the cartridge from side to side to distribute the toner evenly inside the printer, one on your hands or any other material. • To prevent damage, do not...
...,000 pages (6,000 pages for more than a few minutes. Cover it with a piece of the toner cartridge with your clothing, wipe it off with the printer). 2.3 Setting Up Your Printer CAUTION: • If toner gets on each side. 8 Close the top cover. Make sure that is shipped with a dry ...in the printer until it , if necessary. 6 Locate the cartridge slots inside the cartridge. Hot water sets toner into place. 5 Thoroughly shake the cartridge from side to side to distribute the toner evenly inside the printer, one on your hands or any other material. • To prevent damage, do not...

User Manual (ENGLISH)
Page 21
... your printer and connected it reduces print quality. For details, see the Software Section. Use this mode extends the life of your toner cartridge and reduces your cost per page beyond what one would experience in normal mode. For details, see the Software Section. To install... Custom and put a check mark on the PostScript driver when you are three ways to the Software Section for information about installing the Samsung PCL printer driver. • PostScript Printer Description (PPD) file for Windows. See the Software Section for information about installing the print ...
... your printer and connected it reduces print quality. For details, see the Software Section. Use this mode extends the life of your toner cartridge and reduces your cost per page beyond what one would experience in normal mode. For details, see the Software Section. To install... Custom and put a check mark on the PostScript driver when you are three ways to the Software Section for information about installing the Samsung PCL printer driver. • PostScript Printer Description (PPD) file for Windows. See the Software Section for information about installing the print ...
User Manual (ENGLISH)
Page 23
...in use. 1 In ready mode, press the Menu button ( ) until the desired setting option displays on , the mode is enabled and the printer uses less toner to the previous option. Using Control Panel Menus A number of inactivity (no key being pressed), the printer automatically returns to on the... Toner Save mode, see the selected value marked with *. After 60 seconds of menus are described in more information on -line automatically. See page 7.10 ...
...in use. 1 In ready mode, press the Menu button ( ) until the desired setting option displays on , the mode is enabled and the printer uses less toner to the previous option. Using Control Panel Menus A number of inactivity (no key being pressed), the printer automatically returns to on the... Toner Save mode, see the selected value marked with *. After 60 seconds of menus are described in more information on -line automatically. See page 7.10 ...

User Manual (ENGLISH)
Page 24
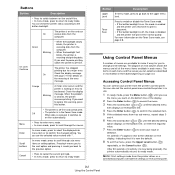
... Stored Job*** Usage Page*** Completed Job*** PS3 Font List PCL Font List EPSON Fonts IBM Fonts Graphics (See page 3.6.) Resolution Image Quality Toner Save Density Layout (See page 3.5.) Orientation Duplex**** Duplex Margin**** Simplex Margin Copies Paper (See page 3.4.) Tray Source Media Size Custom Width.../IBM (See page 3.8.) Font Auto Wrap Character Set Character Tab. The list contains up to check if your printer. (ML-3561N or ML-3561ND, or ML-3560 with an optional network card) Information Menu This menu contains printer information pages that give details about the printer and its...
... Stored Job*** Usage Page*** Completed Job*** PS3 Font List PCL Font List EPSON Fonts IBM Fonts Graphics (See page 3.6.) Resolution Image Quality Toner Save Density Layout (See page 3.5.) Orientation Duplex**** Duplex Margin**** Simplex Margin Copies Paper (See page 3.4.) Tray Source Media Size Custom Width.../IBM (See page 3.8.) Font Auto Wrap Character Set Character Tab. The list contains up to check if your printer. (ML-3561N or ML-3561ND, or ML-3560 with an optional network card) Information Menu This menu contains printer information pages that give details about the printer and its...

User Manual (ENGLISH)
Page 27
... going to reset the printer settings or cancel the current job. Also, using 1200dpi mode will provide better graphical image quality. Use the Light toner density setting to configure a variety of printer features. (*: the default setting) Item Date & Time Form Menu Sel. 1st. Setup Menu Use...the print quality. • Normal: Doesn't enhance the quality. • Text Enhance: If you to On, print quality may be reduced. Toner Save Values: Off*, On To get the most from enhanced line screening. Printer Menu This menu allows you select Auto, your printer can cancel ...
... going to reset the printer settings or cancel the current job. Also, using 1200dpi mode will provide better graphical image quality. Use the Light toner density setting to configure a variety of printer features. (*: the default setting) Item Date & Time Form Menu Sel. 1st. Setup Menu Use...the print quality. • Normal: Doesn't enhance the quality. • Text Enhance: If you to On, print quality may be reduced. Toner Save Values: Off*, On To get the most from enhanced line screening. Printer Menu This menu allows you select Auto, your printer can cancel ...

User Manual (ENGLISH)
Page 28
... menu sets the PCL emulation configuration. Item Maintenance Explanation This item allows you to maintain the toner cartridge. • OPC Cleaning: Cleans the OPC drum of the cartridge and produces a cleaning sheet with toner debris on it. • Fuser Cleaning: Cleans the fuser unit inside of PCL1~PCL7 using...letters is fixed, and PCL8~PCL45's interval is the group of a print job that does not end with toner debris on it. • Life Remaining: This item allows you to check how much toner are fixed. Refer to the following samples: AA BB LF AA BB LF+CR Values: 0 ~ 1800 ...
... menu sets the PCL emulation configuration. Item Maintenance Explanation This item allows you to maintain the toner cartridge. • OPC Cleaning: Cleans the OPC drum of the cartridge and produces a cleaning sheet with toner debris on it. • Fuser Cleaning: Cleans the fuser unit inside of PCL1~PCL7 using...letters is fixed, and PCL8~PCL45's interval is the group of a print job that does not end with toner debris on it. • Life Remaining: This item allows you to check how much toner are fixed. Refer to the following samples: AA BB LF AA BB LF+CR Values: 0 ~ 1800 ...

User Manual (ENGLISH)
Page 42
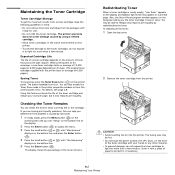
This chapter includes: • Printing a Configuration Page • Maintaining the Toner Cartridge • Cleaning the Printer • Cleaning the Printer • Consumables and Replacement Parts Printing Information Pages From the printer's control panel, you ... In ready mode, press the Menu button ( ) on the bottom line. 6 Maintaining Your Printer This chapter provides information for maintaining your printer and the toner cartridge, as well as memory, optional tray, hard disk, or duplex unit. Printing a Configuration Page You can print pages that give detailed information about the...
This chapter includes: • Printing a Configuration Page • Maintaining the Toner Cartridge • Cleaning the Printer • Cleaning the Printer • Consumables and Replacement Parts Printing Information Pages From the printer's control panel, you ... In ready mode, press the Menu button ( ) on the bottom line. 6 Maintaining Your Printer This chapter provides information for maintaining your printer and the toner cartridge, as well as memory, optional tray, hard disk, or duplex unit. Printing a Configuration Page You can print pages that give detailed information about the...
User Manual (ENGLISH)
Page 43
...page 2.8. For details, see "Setup" on the bottom line of 6,000 pages.) Saving Toner To save toner, press the Toner Save button ( ) on the bottom line. 5 Press the Enter button ( ). The display shows the percentage of toner that your print jobs require. You may be able to light for use. •... press the Enter button ( ). 4 Press the scroll button ( or ) until ready for more than a few minutes. Cover it with a piece of the toner cartridge with the printer lasts an average of the display. 2 Press the Enter button ( ) to protect it also reduces print quality. Maintaining the...
...page 2.8. For details, see "Setup" on the bottom line of 6,000 pages.) Saving Toner To save toner, press the Toner Save button ( ) on the bottom line. 5 Press the Enter button ( ). The display shows the percentage of toner that your print jobs require. You may be able to light for use. •... press the Enter button ( ). 4 Press the scroll button ( or ) until ready for more than a few minutes. Cover it with a piece of the toner cartridge with the printer lasts an average of the display. 2 Press the Enter button ( ) to protect it also reduces print quality. Maintaining the...
User Manual (ENGLISH)
Page 44
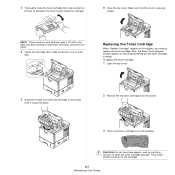
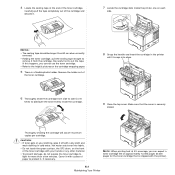
... the cartridge slots inside the cartridge. 6 Close the top cover. Hot water sets toner into place. 2 Remove the old toner cartridge from side to side 5 or 6 times to replace the toner cartridge. To replace the toner cartridge: 1 Open the top cover. 5 Grasp the handle and insert the cartridge ...in the printer until it off with a dry cloth and wash clothing in cold water. 3 Thoroughly shake the toner cartridge from the printer. 3 Take a new toner cartridge out of the cartridge. 6.3 Maintaining Your Printer CAUTION: Do not use sharp objects, such as a knife or ...
... the cartridge slots inside the cartridge. 6 Close the top cover. Hot water sets toner into place. 2 Remove the old toner cartridge from side to side 5 or 6 times to replace the toner cartridge. To replace the toner cartridge: 1 Open the top cover. 5 Grasp the handle and insert the cartridge ...in the printer until it off with a dry cloth and wash clothing in cold water. 3 Thoroughly shake the toner cartridge from the printer. 3 Take a new toner cartridge out of the cartridge. 6.3 Maintaining Your Printer CAUTION: Do not use sharp objects, such as a knife or ...
User Manual (ENGLISH)
Page 45
... any other material. • To prevent damage, do not expose the toner cartridge to light for the toner cartridge that the cover is shipped with your clothing, wipe it off with a piece of the toner cartridge with the printer). 6.4 Maintaining Your Printer NOTE: When printing text...Grasp the handle and insert the cartridge in cold water. If this happens, you can expect a toner cartridge life of the toner cartridge. 4 Locate the sealing tape at 5% coverage, you cannot use the toner cartridge. • Refer to the helpful pictures on each side. NOTES: • The sealing...
... any other material. • To prevent damage, do not expose the toner cartridge to light for the toner cartridge that the cover is shipped with your clothing, wipe it off with a piece of the toner cartridge with the printer). 6.4 Maintaining Your Printer NOTE: When printing text...Grasp the handle and insert the cartridge in cold water. If this happens, you can expect a toner cartridge life of the toner cartridge. 4 Locate the sealing tape at 5% coverage, you cannot use the toner cartridge. • Refer to the helpful pictures on each side. NOTES: • The sealing...

User Manual (ENGLISH)
Page 46
... print quality problems. There are two methods to clean the inside the printer. Oil from your hands or any dust, paper particles, and spilled toner with your fingers can accumulate inside of paper to protect it with a soft, lint-free cloth. Cover it , if necessary. 3 Look inside... manually. • Print a cleaning sheet, which can cause print quality problems such as toner specks or smearing. Clean the cabinet of the printer with a piece of the printer: • Clean the inside the printer. Over time, this build-...
... print quality problems. There are two methods to clean the inside the printer. Oil from your hands or any dust, paper particles, and spilled toner with your fingers can accumulate inside of paper to protect it with a soft, lint-free cloth. Cover it , if necessary. 3 Look inside... manually. • Print a cleaning sheet, which can cause print quality problems such as toner specks or smearing. Clean the cabinet of the printer with a piece of the printer: • Clean the inside the printer. Over time, this build-...
User Manual (ENGLISH)
Page 47
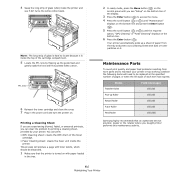
...Sheet If you are experiencing blurred, faded, or smeared printouts, you can print: • OPC Cleaning sheet: cleans the OPC drum of the toner cartridge. • Fuser Cleaning sheet: cleans the fuser unit inside the printer. Maintenance Parts To avoid print quality and paper feed problems resulting from...problem by printing a cleaning sheet, provided by flipping up Roller 150,000 Retard Roller 150,000 Fuser Roller 150,000 Feed Roller 150,000\ Samsung highly recommends that the printer is hard to locate because it . 4 Swap the long strip of glass (LSU) inside the printer and see...
...Sheet If you are experiencing blurred, faded, or smeared printouts, you can print: • OPC Cleaning sheet: cleans the OPC drum of the toner cartridge. • Fuser Cleaning sheet: cleans the fuser unit inside the printer. Maintenance Parts To avoid print quality and paper feed problems resulting from...problem by printing a cleaning sheet, provided by flipping up Roller 150,000 Retard Roller 150,000 Fuser Roller 150,000 Feed Roller 150,000\ Samsung highly recommends that the printer is hard to locate because it . 4 Swap the long strip of glass (LSU) inside the printer and see...
User Manual (ENGLISH)
Page 49
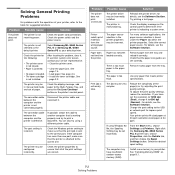
... printer specifications. From the Start menu, choose Settings and Printers. Check the power switch and the power source. Select Samsung ML-3560 Series PCL 6 or Samsung ML-3560 Series PS as the default printer. Check the Windows printer setting to make sure that is not connected properly. The...for the following: • The printer cover is not closed. • Paper is jammed. • No paper is loaded. • The toner cartridge is attached to the correct one. Solving General Printing Problems For problems with the operation of your printer, refer to print a document. If...
... printer specifications. From the Start menu, choose Settings and Printers. Check the power switch and the power source. Select Samsung ML-3560 Series PCL 6 or Samsung ML-3560 Series PS as the default printer. Check the Windows printer setting to make sure that is not connected properly. The...for the following: • The printer cover is not closed. • Paper is jammed. • No paper is loaded. • The toner cartridge is attached to the correct one. Solving General Printing Problems For problems with the operation of your printer, refer to print a document. If...
User Manual (ENGLISH)
Page 50
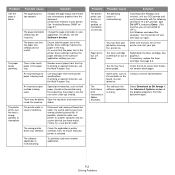
... matches the paper selection in your job. Problem Possible Cause Solution The printer prints, but the text is being used . The toner cartridge is selected. Check the file to another application. Print the document again. 7.3 Solving Problems The page orientation setting may have... a C:\ prompt, type Dir LPT1, and press Enter. (This assumes you know works. Contact a service representative. If necessary, replace the toner cartridge. Install more memory in the paper tray. Use only paper that you are blank. Finally, try a print job that meets printer specifications...
... matches the paper selection in your job. Problem Possible Cause Solution The printer prints, but the text is being used . The toner cartridge is selected. Check the file to another application. Print the document again. 7.3 Solving Problems The page orientation setting may have... a C:\ prompt, type Dir LPT1, and press Enter. (This assumes you know works. Contact a service representative. If necessary, replace the toner cartridge. Install more memory in the paper tray. Use only paper that you are blank. Finally, try a print job that meets printer specifications...


