User Manual (ENGLISH)
Page 21
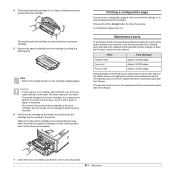
...over the area where the envelope's seams meet. 4.3 The extra flaps and strips might cause wrinkling, creasing, or jams, and may even damage the fuser. • For the best print quality, position margins no closer than 6 mm (0.25 inches) curl, and should not exceed 90 g/m2 (24 ... paper jams and poor print quality. • For the best print quality, use only high quality copier grade paper specifically recommended for use in laser printers. • Avoid using the following factors: - When selecting envelopes, consider the following print media types: - Keep it away from the edges of...
...over the area where the envelope's seams meet. 4.3 The extra flaps and strips might cause wrinkling, creasing, or jams, and may even damage the fuser. • For the best print quality, position margins no closer than 6 mm (0.25 inches) curl, and should not exceed 90 g/m2 (24 ... paper jams and poor print quality. • For the best print quality, use only high quality copier grade paper specifically recommended for use in laser printers. • Avoid using the following factors: - When selecting envelopes, consider the following print media types: - Keep it away from the edges of...
User Manual (ENGLISH)
Page 29
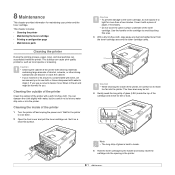
... a piece of paper, if necessary. • Do not touch the green surface underside of the printer, be careful not to light for more than a few minutes. Set it with a soft, lint-free cloth. The fuser area may be harmful for dirt or dust. If you use cloth or tissue dampened with toner..., we recommend you . You can discolor or crack the cabinet. • If your printer and the toner cartridge. Note • The long strip of...
... a piece of paper, if necessary. • Do not touch the green surface underside of the printer, be careful not to light for more than a few minutes. Set it with a soft, lint-free cloth. The fuser area may be harmful for dirt or dust. If you use cloth or tissue dampened with toner..., we recommend you . You can discolor or crack the cabinet. • If your printer and the toner cartridge. Note • The long strip of...
User Manual (ENGLISH)
Page 31
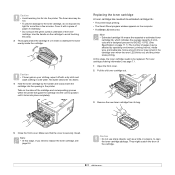
... 7.1. 1 Open the front cover. 2 Pull the old toner cartridge out. 3 Remove the new toner cartridge from its estimated cartridge life.: • The printer stops printing. • The Smart Panel program window appears on your clothing, wipe it off with a piece of paper, if necessary. • Do not... you need to light for more than a few minutes. Cover it locks into the printer. Note • At this area. 3 Thoroughly shake the cartridge 5 or 6 times to open the toner cartridge package. The fuser area may be affected by the handle and slowly insert the cartridge into fabric. 4 ...
... 7.1. 1 Open the front cover. 2 Pull the old toner cartridge out. 3 Remove the new toner cartridge from its estimated cartridge life.: • The printer stops printing. • The Smart Panel program window appears on your clothing, wipe it off with a piece of paper, if necessary. • Do not... you need to light for more than a few minutes. Cover it locks into the printer. Note • At this area. 3 Thoroughly shake the cartridge 5 or 6 times to open the toner cartridge package. The fuser area may be affected by the handle and slowly insert the cartridge into fabric. 4 ...
User Manual (ENGLISH)
Page 32
...with a piece of paper, if necessary. • Do not touch the green surface underside of the cartridge and corresponding grooves within the printer will need to be replaced at the specified number of pages or when the life span of the maintenance parts after their lifespan. Hot ... cartridge by the handle and slowly insert the cartridge into place completely. Items Transfer roller Fuser unit Pick-up roller Yield (Average) Approx. 50,000 pages Approx. 50,000 pages Approx. 50,000 pages Samsung highly recommends that the cover is securely closed. 8.4 Caution • If toner gets ...
...with a piece of paper, if necessary. • Do not touch the green surface underside of the cartridge and corresponding grooves within the printer will need to be replaced at the specified number of pages or when the life span of the maintenance parts after their lifespan. Hot ... cartridge by the handle and slowly insert the cartridge into place completely. Items Transfer roller Fuser unit Pick-up roller Yield (Average) Approx. 50,000 pages Approx. 50,000 pages Approx. 50,000 pages Samsung highly recommends that the cover is securely closed. 8.4 Caution • If toner gets ...
User Manual (ENGLISH)
Page 33
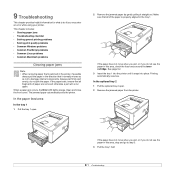
... orange. In the paper feed area In the tray 1 1 Pull the tray 1 open . 2 Remove the jammed paper from the printer. See page 9.2. 3 Insert the tray 1 into the printer until it normally moves so as not to damage internal components. This chapter includes: • Clearing paper jams • Troubleshooting checklist ... If the paper tears, ensure that it snaps into place. do if you do not see the paper in this area, check the fuser area around the toner cartridge. Printing automatically resumes. If the paper does not move when you pull, or if you encounter an error while...
... orange. In the paper feed area In the tray 1 1 Pull the tray 1 open . 2 Remove the jammed paper from the printer. See page 9.2. 3 Insert the tray 1 into the printer until it normally moves so as not to damage internal components. This chapter includes: • Clearing paper jams • Troubleshooting checklist ... If the paper tears, ensure that it snaps into place. do if you do not see the paper in this area, check the fuser area around the toner cartridge. Printing automatically resumes. If the paper does not move when you pull, or if you encounter an error while...

User Manual (ENGLISH)
Page 34
... out. 5 Insert the trays back into the manual feeder, then the printer resumes. 3 Replace the toner cartridge and close the front cover. 3 Load a paper into the printer. Take care when removing paper from the printer. 2 Remove the jammed paper by gently pulling it straight out. 2 ...Open and close the front cover. 4 Pull the paper straight up and out. Around the toner cartridge Note The fuser area is hot. Printing automatically ...
... out. 5 Insert the trays back into the manual feeder, then the printer resumes. 3 Replace the toner cartridge and close the front cover. 3 Load a paper into the printer. Take care when removing paper from the printer. 2 Remove the jammed paper by gently pulling it straight out. 2 ...Open and close the front cover. 4 Pull the paper straight up and out. Around the toner cartridge Note The fuser area is hot. Printing automatically ...


