User Manual (ENGLISH)
Page 5
... Paper 2.6 Changing the Paper Size in the Tray 2.8 Connecting a Printer Cable 2.10 For Local Printing 2.10 For Network Printing 2.12 Turning the Printer On 2.13 Printing a Demo Page 2.14 Changing the Display Language 2.14 Installing Printer Software 2.15 Printer Driver Features 2.16 Installing Printer Software in Windows 2.17 Installing the USB Driver in Windows 98/Me ...... 2.20 Chapter...
... Paper 2.6 Changing the Paper Size in the Tray 2.8 Connecting a Printer Cable 2.10 For Local Printing 2.10 For Network Printing 2.12 Turning the Printer On 2.13 Printing a Demo Page 2.14 Changing the Display Language 2.14 Installing Printer Software 2.15 Printer Driver Features 2.16 Installing Printer Software in Windows 2.17 Installing the USB Driver in Windows 98/Me ...... 2.20 Chapter...
User Manual (ENGLISH)
Page 9
.../Me E.3 In Windows NT 4.0/2000/XP E.4 Setting Up a Network-Connected Printer E.5 Configuring Network Parameters on the Control Panel E.6 Appendix F: PROGRAMME INSTALLING PRINTER OPTIONS Precautions When Installing Printer Options F.2 Installing Memory DIMM F.3 Removing the Memory DIMM F.5 Installing a Network or Serial Interface Card F.6 Installing an Optional Paper Tray F.10 Appendix G: SPECIFICATIONS Printer Specifications G.2 Paper Specifications G.4 Overview G.4 Supported Sizes of Paper G.5 Guidelines...
.../Me E.3 In Windows NT 4.0/2000/XP E.4 Setting Up a Network-Connected Printer E.5 Configuring Network Parameters on the Control Panel E.6 Appendix F: PROGRAMME INSTALLING PRINTER OPTIONS Precautions When Installing Printer Options F.2 Installing Memory DIMM F.3 Removing the Memory DIMM F.5 Installing a Network or Serial Interface Card F.6 Installing an Optional Paper Tray F.10 Appendix G: SPECIFICATIONS Printer Specifications G.2 Paper Specifications G.4 Overview G.4 Supported Sizes of Paper G.5 Guidelines...
User Manual (ENGLISH)
Page 22
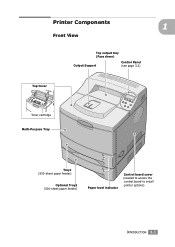
Printer Components 1 Front View Top output tray (Face down) Output Support Control Panel (see page 3.2) Top Cover Toner cartridge Multi-Purpose Tray Tray1 (500-sheet paper feeder) Optional Tray2 (500-sheet paper feeder) Paper level indicator Control board cover (needed to access the control board to install printer options) INTRODUCTION 1.5
Printer Components 1 Front View Top output tray (Face down) Output Support Control Panel (see page 3.2) Top Cover Toner cartridge Multi-Purpose Tray Tray1 (500-sheet paper feeder) Optional Tray2 (500-sheet paper feeder) Paper level indicator Control board cover (needed to access the control board to install printer options) INTRODUCTION 1.5

User Manual (ENGLISH)
Page 24
This chapter includes: • Unpacking • Installing the Toner Cartridge • Loading Paper • Connecting a Printer Cable • Turning the Printer On • Printing a Demo Page • Changing the Display Language • Installing Printer Software 2 SETTING UP YOUR PRINTER This chapter provides step by step information on setting up your printer.
This chapter includes: • Unpacking • Installing the Toner Cartridge • Loading Paper • Connecting a Printer Cable • Turning the Printer On • Printing a Demo Page • Changing the Display Language • Installing Printer Software 2 SETTING UP YOUR PRINTER This chapter provides step by step information on setting up your printer.
User Manual (ENGLISH)
Page 38
... 2.17 for information about installing the Samsung SPL printer driver. • PostScript Printer Description (PPD) file for Windows to Appendix B, "Using Windows PostScript Driver" for information about installing the print software and printing from a Macintosh Go to Appendix C, "Using Your Printer in Windows 98/Me" on -line User's Guide and Acrobat Reader to install the USB driver...
... 2.17 for information about installing the Samsung SPL printer driver. • PostScript Printer Description (PPD) file for Windows to Appendix B, "Using Windows PostScript Driver" for information about installing the print software and printing from a Macintosh Go to Appendix C, "Using Your Printer in Windows 98/Me" on -line User's Guide and Acrobat Reader to install the USB driver...

User Manual (ENGLISH)
Page 40
... Select Run from the window, use the scroll button on your PC before beginning installation. SETTING UP YOUR PRINTER 2.17 Installation will Samsung start automatically. NOTE: If the New Hardware Found window appears during the installation procedure, click the icon in the CD-ROM drive. If you can't find the... menu, type x:\cdsetup.exe in the Open box (where x is the drive letter for the CD-ROM drive) and click OK. Installing Printer Software in Windows System Requirements Verify the following: Item 2 Requirements Operating system Windows 95/98/Me/NT 4.0/2000/XP 95/98/Me 32...
... Select Run from the window, use the scroll button on your PC before beginning installation. SETTING UP YOUR PRINTER 2.17 Installation will Samsung start automatically. NOTE: If the New Hardware Found window appears during the installation procedure, click the icon in the CD-ROM drive. If you can't find the... menu, type x:\cdsetup.exe in the Open box (where x is the drive letter for the CD-ROM drive) and click OK. Installing Printer Software in Windows System Requirements Verify the following: Item 2 Requirements Operating system Windows 95/98/Me/NT 4.0/2000/XP 95/98/Me 32...

User Manual (ENGLISH)
Page 177
Regular users can also open this window from the Terminal screen by typing in "linux-config." 2 The Linux Printer Configuration window shows a list of installed printers at the bottom of tabs that display information regarding the currently selected printer. You can also run it to begin uninstallation. 7 When the uninstallation is completed, click Finished. The...
Regular users can also open this window from the Terminal screen by typing in "linux-config." 2 The Linux Printer Configuration window shows a list of installed printers at the bottom of tabs that display information regarding the currently selected printer. You can also run it to begin uninstallation. 7 When the uninstallation is completed, click Finished. The...

User Manual (ENGLISH)
Page 194
ML-2551N and ML-2552W printers are a ML-2550 user, you are network printers and can be connected to the network via direct attachment to install an optional network interface card. This chapter includes: • About Sharing the Printer on the network. For more information, see Appendix F, "Programme Installing Printer Options." E USING YOUR PRINTER ON A NETWORK If you work in a networked environment...
ML-2551N and ML-2552W printers are a ML-2550 user, you are network printers and can be connected to the network via direct attachment to install an optional network interface card. This chapter includes: • About Sharing the Printer on the network. For more information, see Appendix F, "Programme Installing Printer Options." E USING YOUR PRINTER ON A NETWORK If you work in a networked environment...
User Manual (ENGLISH)
Page 208
This chapter includes: • Precautions When Installing Printer Options • Installing Memory DIMM • Installing a Network or Serial Interface Card • Installing an Optional Paper Tray Recognizing that has been optimised to enhance the printer's capabilities. F PROGRAMMED INSTALLING PRINTER OPTIONS Your printer is a full-featured laser printer that each user may have different requirements, however, Samsung makes several options available to meet most of your printing needs.
This chapter includes: • Precautions When Installing Printer Options • Installing Memory DIMM • Installing a Network or Serial Interface Card • Installing an Optional Paper Tray Recognizing that has been optimised to enhance the printer's capabilities. F PROGRAMMED INSTALLING PRINTER OPTIONS Your printer is a full-featured laser printer that each user may have different requirements, however, Samsung makes several options available to meet most of your printing needs.

User Manual (ENGLISH)
Page 209
... Serial interface cards) are sensitive to static electricity. If you walk round before finishing installation, discharge any device plugged into a grounded power source. Precautions When Installing Printer Options DISCONNECT THE POWER CORD: Never remove the printer control board while the printer is plugged in. To avoid the possibility of an electrical shock, always disconnect the...
... Serial interface cards) are sensitive to static electricity. If you walk round before finishing installation, discharge any device plugged into a grounded power source. Precautions When Installing Printer Options DISCONNECT THE POWER CORD: Never remove the printer control board while the printer is plugged in. To avoid the possibility of an electrical shock, always disconnect the...

User Manual (ENGLISH)
Page 210
This procedure is applicable to either option. 1 Turn the printer power off and unplug all cables from the printer. 2 Remove the two screws on DIMM (Dual In-line Memory Modules). Installing Memory DIMM Additional printer memory option are provided on the rear of the printer, then remove the control board cover. F PROGRAMME INSTALLING PRINTER OPTIONS F.3
This procedure is applicable to either option. 1 Turn the printer power off and unplug all cables from the printer. 2 Remove the two screws on DIMM (Dual In-line Memory Modules). Installing Memory DIMM Additional printer memory option are provided on the rear of the printer, then remove the control board cover. F PROGRAMME INSTALLING PRINTER OPTIONS F.3

User Manual (ENGLISH)
Page 211
F.4 PROGRAMME INSTALLING PRINTER OPTIONS 3 Hold the memory DIMM so that the notch and the connection point are aligned with the slot as shown, and insert it all the way into the lower slot labelled "RAM DIMM" at a 90 degrees angle. 4 Replace the control board cover and tighten the two screws. 5 Reconnect the power cord and printer cable, and turn the printer on.
F.4 PROGRAMME INSTALLING PRINTER OPTIONS 3 Hold the memory DIMM so that the notch and the connection point are aligned with the slot as shown, and insert it all the way into the lower slot labelled "RAM DIMM" at a 90 degrees angle. 4 Replace the control board cover and tighten the two screws. 5 Reconnect the power cord and printer cable, and turn the printer on.

User Manual (ENGLISH)
Page 212
Removing the Memory DIMM 1 Follow steps 1 and 2 on page F.3 to access the control board. 2 Push the clips at each end of the connector slot away from the DIMM. 3 Place the DIMM in its original packaging or wrap it with paper and store it in a box. 4 Follow from Step 4 on a Windows system, refer to Appendix A, "Using Your Printer with a Macintosh." F PROGRAMME INSTALLING PRINTER OPTIONS F.5 For PS printing on page F.4. NOTES: For PostScript driver installation and usage information on a Macintosh system, refer to Appendix B, "Using Windows PostScript Driver."
Removing the Memory DIMM 1 Follow steps 1 and 2 on page F.3 to access the control board. 2 Push the clips at each end of the connector slot away from the DIMM. 3 Place the DIMM in its original packaging or wrap it with paper and store it in a box. 4 Follow from Step 4 on a Windows system, refer to Appendix A, "Using Your Printer with a Macintosh." F PROGRAMME INSTALLING PRINTER OPTIONS F.5 For PS printing on page F.4. NOTES: For PostScript driver installation and usage information on a Macintosh system, refer to Appendix B, "Using Windows PostScript Driver."
User Manual (ENGLISH)
Page 213
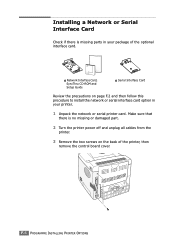
...INSTALLING PRINTER OPTIONS Make sure that there is missing parts in your package of the optional interface card. œ¤Network Interface Card, SyncThru CD-ROM and Setup Guide œ¤Serial Interface Card Review the precautions on the back of the printer, then remove the control board cover. Installing... a Network or Serial Interface Card Check if there is no missing or damaged part. 2 Turn the printer power off and unplug all cables from the printer. 3 Remove the two screws on ...
...INSTALLING PRINTER OPTIONS Make sure that there is missing parts in your package of the optional interface card. œ¤Network Interface Card, SyncThru CD-ROM and Setup Guide œ¤Serial Interface Card Review the precautions on the back of the printer, then remove the control board cover. Installing... a Network or Serial Interface Card Check if there is no missing or damaged part. 2 Turn the printer power off and unplug all cables from the printer. 3 Remove the two screws on ...

User Manual (ENGLISH)
Page 214
F PROGRAMME INSTALLING PRINTER OPTIONS F.7 Push the card firmly into the connector until it is completely inserted into place. You can discard the old bracket. If you are replacing the network interface card with new one or the serial interface card, remove the two screws and the old card. 5 Align the connector on the network or serial interface card with the connector on the control board. 4 Remove the two screws and the bracket from the control board.
F PROGRAMME INSTALLING PRINTER OPTIONS F.7 Push the card firmly into the connector until it is completely inserted into place. You can discard the old bracket. If you are replacing the network interface card with new one or the serial interface card, remove the two screws and the old card. 5 Align the connector on the network or serial interface card with the connector on the control board. 4 Remove the two screws and the bracket from the control board.

User Manual (ENGLISH)
Page 215
F.8 PROGRAMME INSTALLING PRINTER OPTIONS 6 Tighten the two screws which you removed in Step 4. 7 Replace the control board cover and tighten the two screws. 8 If you purchase the network interface card supporting the wireless LAN interface, insert the antenna counterclockwise, as shown.
F.8 PROGRAMME INSTALLING PRINTER OPTIONS 6 Tighten the two screws which you removed in Step 4. 7 Replace the control board cover and tighten the two screws. 8 If you purchase the network interface card supporting the wireless LAN interface, insert the antenna counterclockwise, as shown.

User Manual (ENGLISH)
Page 216
see page E.6. • Because the network and the serial interface cards are inserted into the same connector on the control panel; F PROGRAMME INSTALLING PRINTER OPTIONS F.9 You can also configure the network parameters on the control board, you cannot install both of them. NOTES: • For information about configuring and using the printer on . 9 Connect the network or serial cable, reconnect the power cord and then turn the printer on a network environment, refer to the User's Guide provided with the network interface card.
see page E.6. • Because the network and the serial interface cards are inserted into the same connector on the control panel; F PROGRAMME INSTALLING PRINTER OPTIONS F.9 You can also configure the network parameters on the control board, you cannot install both of them. NOTES: • For information about configuring and using the printer on . 9 Connect the network or serial cable, reconnect the power cord and then turn the printer on a network environment, refer to the User's Guide provided with the network interface card.

User Manual (ENGLISH)
Page 217
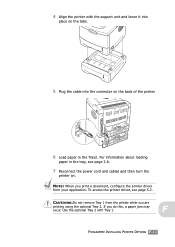
F.10 PROGRAMME INSTALLING PRINTER OPTIONS the support unit and paper tray. Installing an Optional Paper Tray You can increase the paper handling capacity of the support unit's tabs. Support unit Paper tray 1 Turn off the printer and unplug all cables from the printer. 2 Remove the tape fastening the interface cable from the bottom of the support unit. 3 Observe the location of your printer by installing an optional Tray2. The optional paper tray consists of two components;
F.10 PROGRAMME INSTALLING PRINTER OPTIONS the support unit and paper tray. Installing an Optional Paper Tray You can increase the paper handling capacity of the support unit's tabs. Support unit Paper tray 1 Turn off the printer and unplug all cables from the printer. 2 Remove the tape fastening the interface cable from the bottom of the support unit. 3 Observe the location of your printer by installing an optional Tray2. The optional paper tray consists of two components;
User Manual (ENGLISH)
Page 218
... into place on the tabs. 5 Plug the cable into the connector on . F PROGRAMME INSTALLING PRINTER OPTIONS F.11 To access the printer driver, see page 2.6. 7 Reconnect the power cord and cables and then turn the printer on the back of the printer. 6 Load paper in the tray, see page 5.2. For information about loading paper in the...
... into place on the tabs. 5 Plug the cable into the connector on . F PROGRAMME INSTALLING PRINTER OPTIONS F.11 To access the printer driver, see page 2.6. 7 Reconnect the power cord and cables and then turn the printer on the back of the printer. 6 Load paper in the tray, see page 5.2. For information about loading paper in the...

User Manual (ENGLISH)
Page 219
MEMO F.12 PROGRAMME INSTALLING PRINTER OPTIONS
MEMO F.12 PROGRAMME INSTALLING PRINTER OPTIONS


