User Manual (ENGLISH)
Page 5
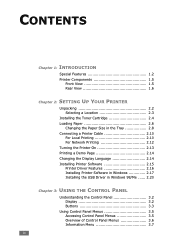
CONTENTS Chapter 1: INTRODUCTION Special Features 1.2 Printer Components 1.5 Front View 1.5 Rear View 1.6 Chapter 2: SETTING UP YOUR PRINTER Unpacking 2.2 Selecting a Location 2.3 Installing the Toner Cartridge 2.4 Loading Paper 2.6 Changing the Paper Size in the Tray 2.8 Connecting a Printer Cable 2.10 For Local Printing 2.10 For Network Printing 2.12 Turning the Printer ...
CONTENTS Chapter 1: INTRODUCTION Special Features 1.2 Printer Components 1.5 Front View 1.5 Rear View 1.6 Chapter 2: SETTING UP YOUR PRINTER Unpacking 2.2 Selecting a Location 2.3 Installing the Toner Cartridge 2.4 Loading Paper 2.6 Changing the Paper Size in the Tray 2.8 Connecting a Printer Cable 2.10 For Local Printing 2.10 For Network Printing 2.12 Turning the Printer ...

User Manual (ENGLISH)
Page 6
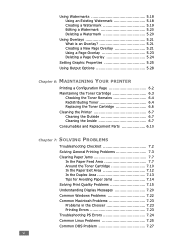
... Card Stock or Custom-sized Materials 4.22 Chapter 5: PRINTING TASKS Printing a Document 5.2 Cancelling a Print Job 5.5 Using a Favorite Setting 5.6 Using Help 5.6 Setting Paper Properties 5.7 Using the Toner Save Mode 5.9 Printing on Both Sides of Paper 5.11 Printing Multiple Pages on One Sheet of Paper (N-Up Printing 5.13 Printing the Reduced or Enlarged...
... Card Stock or Custom-sized Materials 4.22 Chapter 5: PRINTING TASKS Printing a Document 5.2 Cancelling a Print Job 5.5 Using a Favorite Setting 5.6 Using Help 5.6 Setting Paper Properties 5.7 Using the Toner Save Mode 5.9 Printing on Both Sides of Paper 5.11 Printing Multiple Pages on One Sheet of Paper (N-Up Printing 5.13 Printing the Reduced or Enlarged...
User Manual (ENGLISH)
Page 7
...Properties 5.25 Using Output Options 5.28 Chapter 6: MAINTAINING YOUR PRINTER Printing a Configuration Page 6.2 Maintaining the Toner Cartridge 6.3 Checking the Toner Remains 6.4 Redistributing Toner 6.4 Replacing the Toner Cartridge 6.6 Cleaning the Printer 6.7 Cleaning the Outside 6.7 Cleaning the Inside 6.7 Consumables and Replacement Parts ... Troubleshooting Checklist 7.2 Solving General Printing Problems 7.3 Clearing Paper Jams 7.7 In the Paper Feed Area 7.7 Around the Toner Cartridge 7.10 In the Paper Exit Area 7.12 In the Duplex Area 7.13 Tips for Avoiding Paper Jams 7....
...Properties 5.25 Using Output Options 5.28 Chapter 6: MAINTAINING YOUR PRINTER Printing a Configuration Page 6.2 Maintaining the Toner Cartridge 6.3 Checking the Toner Remains 6.4 Redistributing Toner 6.4 Replacing the Toner Cartridge 6.6 Cleaning the Printer 6.7 Cleaning the Outside 6.7 Cleaning the Inside 6.7 Consumables and Replacement Parts ... Troubleshooting Checklist 7.2 Solving General Printing Problems 7.3 Clearing Paper Jams 7.7 In the Paper Feed Area 7.7 Around the Toner Cartridge 7.10 In the Paper Exit Area 7.12 In the Duplex Area 7.13 Tips for Avoiding Paper Jams 7....

User Manual (ENGLISH)
Page 20
...expanded to 160 MB. • An optional Serial interface card allows you to use the serial connection. • Network interface enables network printing. ML-2551N and ML-2552W comes with a built-in network interface, 10/100 Base TX. See page 5.9. 1 • You can be printed on both sides... INTRODUCTION 1.3 See page 5.11. • You can add the optional network interface card to save toner. See "Using Overlays" on one single sheet of the paper to use Toner Save mode to ML-2550. All rights reserved. Save your time and money • This printer allows you to save paper ...
...expanded to 160 MB. • An optional Serial interface card allows you to use the serial connection. • Network interface enables network printing. ML-2551N and ML-2552W comes with a built-in network interface, 10/100 Base TX. See page 5.9. 1 • You can be printed on both sides... INTRODUCTION 1.3 See page 5.11. • You can add the optional network interface card to save toner. See "Using Overlays" on one single sheet of the paper to use Toner Save mode to ML-2550. All rights reserved. Save your time and money • This printer allows you to save paper ...
User Manual (ENGLISH)
Page 22
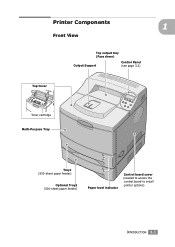
Printer Components 1 Front View Top output tray (Face down) Output Support Control Panel (see page 3.2) Top Cover Toner cartridge Multi-Purpose Tray Tray1 (500-sheet paper feeder) Optional Tray2 (500-sheet paper feeder) Paper level indicator Control board cover (needed to access the control board to install printer options) INTRODUCTION 1.5
Printer Components 1 Front View Top output tray (Face down) Output Support Control Panel (see page 3.2) Top Cover Toner cartridge Multi-Purpose Tray Tray1 (500-sheet paper feeder) Optional Tray2 (500-sheet paper feeder) Paper level indicator Control board cover (needed to access the control board to install printer options) INTRODUCTION 1.5

User Manual (ENGLISH)
Page 24
This chapter includes: • Unpacking • Installing the Toner Cartridge • Loading Paper • Connecting a Printer Cable • Turning the Printer On • Printing a Demo Page • Changing the Display Language • Installing Printer Software 2 SETTING UP YOUR PRINTER This chapter provides step by step information on setting up your printer.
This chapter includes: • Unpacking • Installing the Toner Cartridge • Loading Paper • Connecting a Printer Cable • Turning the Printer On • Printing a Demo Page • Changing the Display Language • Installing Printer Software 2 SETTING UP YOUR PRINTER This chapter provides step by step information on setting up your printer.

User Manual (ENGLISH)
Page 25
Make sure that the printer has been packed with the following items: Toner Cartridge Power Cord CD-ROM Setup Guide NOTES: • If any items are missing or damaged, notify your dealer immediately. • Components may differ from one country to another. • The CD-ROM contains the printer driver, the User's Guide and the Adobe Acrobat Reader programme. 2 Carefully remove all accessories from the printer. 2.2 SETTING UP YOUR PRINTER Unpacking 1 Remove the Printer and all of the packing tapes from the packing carton.
Make sure that the printer has been packed with the following items: Toner Cartridge Power Cord CD-ROM Setup Guide NOTES: • If any items are missing or damaged, notify your dealer immediately. • Components may differ from one country to another. • The CD-ROM contains the printer driver, the User's Guide and the Adobe Acrobat Reader programme. 2 Carefully remove all accessories from the printer. 2.2 SETTING UP YOUR PRINTER Unpacking 1 Remove the Printer and all of the packing tapes from the packing carton.
User Manual (ENGLISH)
Page 27
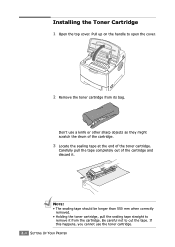
.... 2 Remove the toner cartridge from the cartridge. Carefully pull the tape completely out of the toner cartridge. Don't use the toner cartridge. 2.4 SETTING UP YOUR PRINTER NOTE: • The sealing tape should be longer than 550 mm when correctly removed. • Holding the toner cartridge, pull the ...sealing tape straight to remove it . Installing the Toner Cartridge 1 Open the top cover. If this happens, you cannot use a knife or other sharp objects ...
.... 2 Remove the toner cartridge from the cartridge. Carefully pull the tape completely out of the toner cartridge. Don't use the toner cartridge. 2.4 SETTING UP YOUR PRINTER NOTE: • The sealing tape should be longer than 550 mm when correctly removed. • Holding the toner cartridge, pull the ...sealing tape straight to remove it . Installing the Toner Cartridge 1 Open the top cover. If this happens, you cannot use a knife or other sharp objects ...
User Manual (ENGLISH)
Page 28
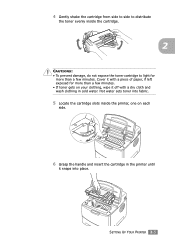
... the handle and insert the cartridge in the printer until it with a piece of paper, if left exposed for more than a few minutes. • If toner gets on your clothing, wipe it off with a dry cloth and wash clothing in cold water. Cover it snaps into fabric. 5 Locate the cartridge slots...
... the handle and insert the cartridge in the printer until it with a piece of paper, if left exposed for more than a few minutes. • If toner gets on your clothing, wipe it off with a dry cloth and wash clothing in cold water. Cover it snaps into fabric. 5 Locate the cartridge slots...
User Manual (ENGLISH)
Page 29
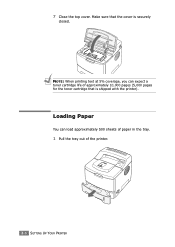
Loading Paper You can expect a toner cartridge life of the printer. 2.6 SETTING UP YOUR PRINTER 7 Close the top cover. NOTE: When printing text at 5% coverage, you can load approximately 500 sheets of paper in the tray. 1 Pull the tray out of approximately 10,000 pages (5,000 pages for the toner cartridge that the cover is shipped with the printer). Make sure that is securely closed.
Loading Paper You can expect a toner cartridge life of the printer. 2.6 SETTING UP YOUR PRINTER 7 Close the top cover. NOTE: When printing text at 5% coverage, you can load approximately 500 sheets of paper in the tray. 1 Pull the tray out of approximately 10,000 pages (5,000 pages for the toner cartridge that the cover is shipped with the printer). Make sure that is securely closed.

User Manual (ENGLISH)
Page 39
Printer Driver Features The Samsung ML-2550 series printer drivers will support the following standard features: • Paper source selection • Paper size... supported by the your printer drivers. SPL PostScript Driver Feature Win 2000/XP Win 9x Win NT4.0 Win 2000/XP Win 9x Win NT4.0 Mac Toner Save Y Y Y Y Y Y N Print quality option Y Y Y Y Y Y Y Double-sided printing Y Y Y Y Y Y Y Booklet printing Y Y Y Y N N N Poster printing Y Y Y N N N N Multiple pages per sheet (N-up) Y Y Y Y Y N Y Scale printing Y Y Y Y Y Y Y Fit to ...
Printer Driver Features The Samsung ML-2550 series printer drivers will support the following standard features: • Paper source selection • Paper size... supported by the your printer drivers. SPL PostScript Driver Feature Win 2000/XP Win 9x Win NT4.0 Win 2000/XP Win 9x Win NT4.0 Mac Toner Save Y Y Y Y Y Y N Print quality option Y Y Y Y Y Y Y Double-sided printing Y Y Y Y Y Y Y Booklet printing Y Y Y Y N N N Poster printing Y Y Y N N N N Multiple pages per sheet (N-up) Y Y Y Y Y N Y Scale printing Y Y Y Y Y Y Y Fit to ...
User Manual (ENGLISH)
Page 47
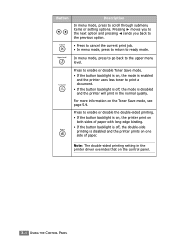
...: The double-sided printing setting in the normal quality. Button Description In menu mode, press to the upper menu level. Press to enable or disable Toner Save mode. • If the button backlight is on one side of paper with long edge binding. • If the button backlight is off ,... the mode is disabled and the printer will print in the printer driver overrides that on the Toner Save mode, see page 5.9. Pressing ❿ moves you to the next option and pressing ➛ sends you back to the previous option. • Press ...
...: The double-sided printing setting in the normal quality. Button Description In menu mode, press to the upper menu level. Press to enable or disable Toner Save mode. • If the button backlight is on one side of paper with long edge binding. • If the button backlight is off ,... the mode is disabled and the printer will print in the printer driver overrides that on the Toner Save mode, see page 5.9. Pressing ❿ moves you to the next option and pressing ➛ sends you back to the previous option. • Press ...
User Manual (ENGLISH)
Page 49
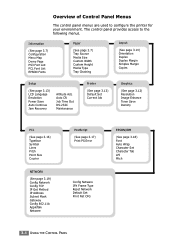
Auto CR Job Time Out RS-232C Maintenance Printer (See page 3.13) Default Set Current Job Graphics (See page 3.12) Resolution Image Enhance Toner Save Density PCL (See page 3.16) Typeface Symbol Lines Pitch Point Size Courier NETWORK (See page 3.19) Config Network Config TCP IP Get Method IP ...
Auto CR Job Time Out RS-232C Maintenance Printer (See page 3.13) Default Set Current Job Graphics (See page 3.12) Resolution Image Enhance Toner Save Density PCL (See page 3.16) Typeface Symbol Lines Pitch Point Size Courier NETWORK (See page 3.19) Config Network Config TCP IP Get Method IP ...
User Manual (ENGLISH)
Page 55
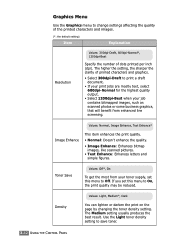
...The higher the setting, the sharper the clarity of dots printed per inch (dpi). The Medium setting usually produces the best result. Use the Light toner density setting to print a draft document. • If your print jobs are mostly text, select 600dpi-Normal for the highest quality output. •... quality may be reduced. Density Values: Light, Medium*, Dark You can lighten or darken the print on the page by changing the toner density setting. Toner Save Values: Off*, On To get the most from your job contains bitmapped images, such as scanned photos or some business graphics, that...
...The higher the setting, the sharper the clarity of dots printed per inch (dpi). The Medium setting usually produces the best result. Use the Light toner density setting to print a draft document. • If your print jobs are mostly text, select 600dpi-Normal for the highest quality output. •... quality may be reduced. Density Values: Light, Medium*, Dark You can lighten or darken the print on the page by changing the toner density setting. Toner Save Values: Off*, On To get the most from your job contains bitmapped images, such as scanned photos or some business graphics, that...

User Manual (ENGLISH)
Page 58
... optional 3 serial interface card is set the time length the printer waits before printing the last page of a print job that does not end with toner debris on it . • Fuser Cleaning: Cleans the fuser unit inside of the printer and produces a cleaning sheet with a command to print the page. ...time-out occurs, the printer prints the page in the print buffer. For details, see page F.6. • Baud Rate: Lets you to check how much toner are left in the cartridge. When this item is installed in your computer using a setting higher than 19200 bps with the COM port may cause...
... optional 3 serial interface card is set the time length the printer waits before printing the last page of a print job that does not end with toner debris on it . • Fuser Cleaning: Cleans the fuser unit inside of the printer and produces a cleaning sheet with a command to print the page. ...time-out occurs, the printer prints the page in the print buffer. For details, see page F.6. • Baud Rate: Lets you to check how much toner are left in the cartridge. When this item is installed in your computer using a setting higher than 19200 bps with the COM port may cause...
User Manual (ENGLISH)
Page 90
This chapter includes: • Printing a Document • Setting Paper Properties • Using the Toner Save Mode • Printing on Both Sides of Paper • Printing Multiple Pages on One Sheet of Paper (N-Up Printing) • Printing the Reduced or Enlarged Document • Fitting Your Document to a Selected Paper Size • Printing Posters • Printing Booklets • Using Watermarks • Using Overlays • Setting Graphic Properties • Using Output Options 5 PRINTING TASKS This chapter explains the printing options and common printing tasks.
This chapter includes: • Printing a Document • Setting Paper Properties • Using the Toner Save Mode • Printing on Both Sides of Paper • Printing Multiple Pages on One Sheet of Paper (N-Up Printing) • Printing the Reduced or Enlarged Document • Fitting Your Document to a Selected Paper Size • Printing Posters • Printing Booklets • Using Watermarks • Using Overlays • Setting Graphic Properties • Using Output Options 5 PRINTING TASKS This chapter explains the printing options and common printing tasks.

User Manual (ENGLISH)
Page 98
...setting. This setting is disabled and the printer prints in normal mode. 5 Using the control panel menu You can set the Toner Save item in the Graphics menu to use less toner on each page. The printer must be in green and "Ready" is shown on the display. • If the ...a page. • If the button backlight is off . the On Line/Continue button ( ) is on in ready mode; Using the Toner Save Mode Toner Save mode allows the printer to turn the Toner Save mode on the control panel. For further details about using the control panel menu, see page 3.5. PRINTING TASKS 5.9 Using...
...setting. This setting is disabled and the printer prints in normal mode. 5 Using the control panel menu You can set the Toner Save item in the Graphics menu to use less toner on each page. The printer must be in green and "Ready" is shown on the display. • If the ...a page. • If the button backlight is off . the On Line/Continue button ( ) is on in ready mode; Using the Toner Save Mode Toner Save mode allows the printer to turn the Toner Save mode on the control panel. For further details about using the control panel menu, see page 3.5. PRINTING TASKS 5.9 Using...
User Manual (ENGLISH)
Page 99
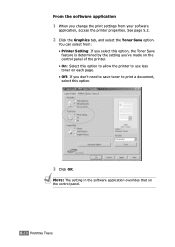
...your software application, access the printer properties. From the software application 1 When you don't need to save toner to print a document, select this option to allow the printer to use less toner on the control panel. 5.10 PRINTING TASKS NOTE: The setting in the software application overrides that on ...each page. • Off: If you change the print settings from : • Printer Setting: If you select this option, the Toner Save feature is determined by the setting you've made on the control panel of the printer. • On: Select this option. 3 Click OK. ...
...your software application, access the printer properties. From the software application 1 When you don't need to save toner to print a document, select this option to allow the printer to use less toner on the control panel. 5.10 PRINTING TASKS NOTE: The setting in the software application overrides that on ...each page. • Off: If you change the print settings from : • Printer Setting: If you select this option, the Toner Save feature is determined by the setting you've made on the control panel of the printer. • On: Select this option. 3 Click OK. ...
User Manual (ENGLISH)
Page 114
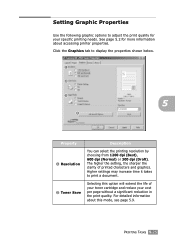
...option will extend the life of printed characters and graphics. PRINTING TASKS 5.25 The higher the setting, the sharper the clarity of your toner cartridge and reduce your specific printing needs. For detailed information about accessing printer properties. Setting Graphic Properties Use the following graphic options to... 1200 dpi (Best), 600 dpi (Normal) or 300 dpi (Draft). Higher settings may increase time it takes to print a document. 2 Toner Save Selecting this mode, see page 5.9. See page 5.2 for your cost per page without a significant reduction in the print quality.
...option will extend the life of printed characters and graphics. PRINTING TASKS 5.25 The higher the setting, the sharper the clarity of your toner cartridge and reduce your specific printing needs. For detailed information about accessing printer properties. Setting Graphic Properties Use the following graphic options to... 1200 dpi (Best), 600 dpi (Normal) or 300 dpi (Draft). Higher settings may increase time it takes to print a document. 2 Toner Save Selecting this mode, see page 5.9. See page 5.2 for your cost per page without a significant reduction in the print quality.

User Manual (ENGLISH)
Page 118
This chapter includes: • Printing a Configuration Page • Maintaining the Toner Cartridge • Cleaning the Printer • Consumables and Replacement Parts 6 MAINTAINING YOUR PRINTER This chapter provides suggestions for high-quality and economical printing and information for maintaining the toner cartridge and the printer.
This chapter includes: • Printing a Configuration Page • Maintaining the Toner Cartridge • Cleaning the Printer • Consumables and Replacement Parts 6 MAINTAINING YOUR PRINTER This chapter provides suggestions for high-quality and economical printing and information for maintaining the toner cartridge and the printer.


