
User Manual (user Manual) (ver.1.00) (English)
Page 3
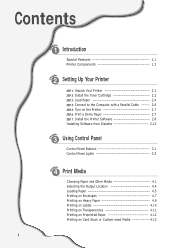
Contents 1 Introduction Special Features 1.1 Printer Components 1.3 2 Setting Up Your Printer STEP 1: Unpack Your Printer 2.1 STEP 2: Install the Toner Cartridge 2.2 STEP 3: Load Paper 2.4 STEP 4: Connect to the Computer with a Parallel Cable ----- 2.6 STEP 5: Turn on the Printer 2.7 STEP 6: Print a Demo Page 2.7 STEP 7: Install the Printer Software 2.8 ...
Contents 1 Introduction Special Features 1.1 Printer Components 1.3 2 Setting Up Your Printer STEP 1: Unpack Your Printer 2.1 STEP 2: Install the Toner Cartridge 2.2 STEP 3: Load Paper 2.4 STEP 4: Connect to the Computer with a Parallel Cable ----- 2.6 STEP 5: Turn on the Printer 2.7 STEP 6: Print a Demo Page 2.7 STEP 7: Install the Printer Software 2.8 ...

User Manual (user Manual) (ver.1.00) (English)
Page 4
... 5.9 Setting Graphic Properties 5.11 Printing Watermarks 5.14 Using Page Overlay 5.17 Reprinting the Last Page 5.21 Printing on a Network Environment 5.22 6 Maintaining Your Printer Maintaining Toner Cartridge 6.1 Cleaning the Printer 6.4 7 Problem Solving Troubleshooting Checklist 7.1 Solving General Printing Problems 7.2 Clearing Paper Jams 7.6 Solving Print Quality Problems 7.11 Troubleshooting Error Messages 7.17 Common Windows...
... 5.9 Setting Graphic Properties 5.11 Printing Watermarks 5.14 Using Page Overlay 5.17 Reprinting the Last Page 5.21 Printing on a Network Environment 5.22 6 Maintaining Your Printer Maintaining Toner Cartridge 6.1 Cleaning the Printer 6.4 7 Problem Solving Troubleshooting Checklist 7.1 Solving General Printing Problems 7.2 Clearing Paper Jams 7.6 Solving Print Quality Problems 7.11 Troubleshooting Error Messages 7.17 Common Windows...
User Manual (user Manual) (ver.1.00) (English)
Page 14
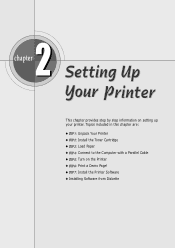
2chapter This chapter provides step by step information on the Printer x STEP 6: Print a Demo Page! Topics included in this chapter are: x STEP 1: Unpack Your Printer x STEP 2: Install the Toner Cartridge x STEP 3: Load Paper x STEP 4: Connect to the Computer with a Parallel Cable x STEP 5: Turn on setting up your printer. x STEP 7: Install the Printer Software x Installing Software from Diskette
2chapter This chapter provides step by step information on the Printer x STEP 6: Print a Demo Page! Topics included in this chapter are: x STEP 1: Unpack Your Printer x STEP 2: Install the Toner Cartridge x STEP 3: Load Paper x STEP 4: Connect to the Computer with a Parallel Cable x STEP 5: Turn on setting up your printer. x STEP 7: Install the Printer Software x Installing Software from Diskette
User Manual (user Manual) (ver.1.00) (English)
Page 15
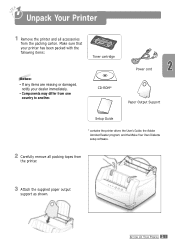
Make sure that your printer has been packed with the following items: Toner cartridge Notes: • If any items are missing or damaged, notify your dealer immediately. • Components may differ from one country to another. CD-ROM* Power ...
Make sure that your printer has been packed with the following items: Toner cartridge Notes: • If any items are missing or damaged, notify your dealer immediately. • Components may differ from one country to another. CD-ROM* Power ...
User Manual (user Manual) (ver.1.00) (English)
Page 16
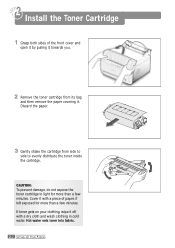
...CAUTION: To prevent damage, do not expose the toner cartridge to evenly distribute the toner inside the cartridge. If toner gets on your clothing, wipe it off with a piece of the front cover and open it by pulling it towards you. 2 Remove the toner cartridge from side to side to light for more than... a few minutes. Hot water sets toner into fabric. 2.2 SETTING UP YOUR PRINTER Discard the paper. 3 Gently shake the cartridge from its bag and then remove the paper covering it ...
...CAUTION: To prevent damage, do not expose the toner cartridge to evenly distribute the toner inside the cartridge. If toner gets on your clothing, wipe it off with a piece of the front cover and open it by pulling it towards you. 2 Remove the toner cartridge from side to side to light for more than... a few minutes. Hot water sets toner into fabric. 2.2 SETTING UP YOUR PRINTER Discard the paper. 3 Gently shake the cartridge from its bag and then remove the paper covering it ...
User Manual (user Manual) (ver.1.00) (English)
Page 17
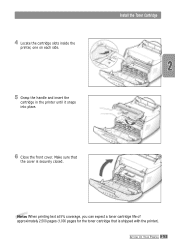
Install the Toner Cartridge 5 Grasp the handle and insert the cartridge in the printer until it snaps into place. 6 Close the front cover. Note: When printing text at 5% coverage, you can expect a toner cartridge life of approximately 2,500 pages (1,000 pages for the toner cartridge that the cover is shipped with the printer). SETTING UP YOUR PRINTER 2.3 Make sure that is securely closed. 4 Locate the cartridge slots inside the printer, one on each side.
Install the Toner Cartridge 5 Grasp the handle and insert the cartridge in the printer until it snaps into place. 6 Close the front cover. Note: When printing text at 5% coverage, you can expect a toner cartridge life of approximately 2,500 pages (1,000 pages for the toner cartridge that the cover is shipped with the printer). SETTING UP YOUR PRINTER 2.3 Make sure that is securely closed. 4 Locate the cartridge slots inside the printer, one on each side.

User Manual (user Manual) (ver.1.00) (English)
Page 54
... feature from : • Printer Setting: If you select this option, this feature is on each page. You can select from your printer Press the Toner Save button on each page. 3 Click OK. There are two ways to access the printer properties. 2 Click the Graphic tab, and then select the...(Data light is on). 5.6 PRINTING TASKS • If the button backlight is determined by the setting you've made on the control panel of your toner cartridge and reduce your software application, access the printer properties. Using Toner Save Mode Toner Save mode allows the printer to Printer Setting.
... feature from : • Printer Setting: If you select this option, this feature is on each page. You can select from your printer Press the Toner Save button on each page. 3 Click OK. There are two ways to access the printer properties. 2 Click the Graphic tab, and then select the...(Data light is on). 5.6 PRINTING TASKS • If the button backlight is determined by the setting you've made on the control panel of your toner cartridge and reduce your software application, access the printer properties. Using Toner Save Mode Toner Save mode allows the printer to Printer Setting.
User Manual (user Manual) (ver.1.00) (English)
Page 72
Topics included in this chapter are: x Maintaining Toner Cartridge x Cleaning the Printer 6chapter This chapter provides suggestions for high-quality and economical printing and information for maintaining the toner cartridge and the printer.
Topics included in this chapter are: x Maintaining Toner Cartridge x Cleaning the Printer 6chapter This chapter provides suggestions for high-quality and economical printing and information for maintaining the toner cartridge and the printer.
User Manual (user Manual) (ver.1.00) (English)
Page 73
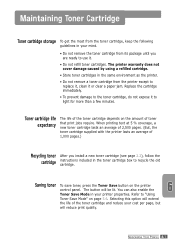
... or clear a paper jam. Saving toner To save toner, press the Toner Save button on page 5.6. Selecting this option will be lit. Toner cartridge life expectancy The life of the toner cartridge depends on the amount of the toner cartridge and reduce your printer properties. Maintaining Toner Cartridge Toner cartridge storage To get the most from the toner cartridge, keep the following guidelines in your...
... or clear a paper jam. Saving toner To save toner, press the Toner Save button on page 5.6. Selecting this option will be lit. Toner cartridge life expectancy The life of the toner cartridge depends on the amount of the toner cartridge and reduce your printer properties. Maintaining Toner Cartridge Toner cartridge storage To get the most from the toner cartridge, keep the following guidelines in your...

User Manual (user Manual) (ver.1.00) (English)
Page 74
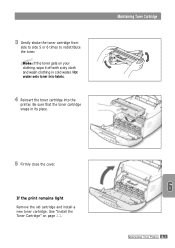
The fusing area may be hot. • To prevent damage to the toner cartridge, do not expose it toward you to open. 2 Remove the toner cartridge from the printer. The following procedures may appear on a printed page. CAUTIONS: • Avoid reaching too far into the printer. You may be ...temporarily improve print quality by both sides of the cover and pull it to light for more than a few minutes. 6.2 MAINTAINING YOUR PRINTER Maintaining Toner Cartridge Redistributing Toner When toner is low, faded or light areas may allow you to finish the current print job before replacing the...
The fusing area may be hot. • To prevent damage to the toner cartridge, do not expose it toward you to open. 2 Remove the toner cartridge from the printer. The following procedures may appear on a printed page. CAUTIONS: • Avoid reaching too far into the printer. You may be ...temporarily improve print quality by both sides of the cover and pull it to light for more than a few minutes. 6.2 MAINTAINING YOUR PRINTER Maintaining Toner Cartridge Redistributing Toner When toner is low, faded or light areas may allow you to finish the current print job before replacing the...
User Manual (user Manual) (ver.1.00) (English)
Page 75
If the print remains light Remove the old cartridge and install a new toner cartridge. See "Install the Toner Cartridge" on your clothing, wipe it off with a dry cloth and wash clothing in its place. 3 Gently shake the toner cartridge from side to side 5 or 6 times to redistribute the toner. Maintaining Toner Cartridge 5 Firmly close the cover. Note: If the toner gets on page 2.2. Hot water sets toner into fabric. 4 Reinsert the toner cartridge into the printer. MAINTAINING YOUR PRINTER 6.3 Be sure that the toner cartridge snaps in cold water.
If the print remains light Remove the old cartridge and install a new toner cartridge. See "Install the Toner Cartridge" on your clothing, wipe it off with a dry cloth and wash clothing in its place. 3 Gently shake the toner cartridge from side to side 5 or 6 times to redistribute the toner. Maintaining Toner Cartridge 5 Firmly close the cover. Note: If the toner gets on page 2.2. Hot water sets toner into fabric. 4 Reinsert the toner cartridge into the printer. MAINTAINING YOUR PRINTER 6.3 Be sure that the toner cartridge snaps in cold water.
User Manual (user Manual) (ver.1.00) (English)
Page 76
... the printer. Cleaning inside the printer will eliminate or reduce these problems. Cleaning inside it. Note: To prevent damage to the toner cartridge, do not touch the black transfer roller inside the printer. As much as thinner, on the roller can damage the printer. .... Notes: • Do not use ammonia-based cleaners or volatile solvents such as possible, keep the printer free from the toner cartridge area and the toner cartridge cavity. 6.4 MAINTAINING YOUR PRINTER By doing so, you can cause print quality problems. Cleaning the Outside Wipe the outside surface ...
... the printer. Cleaning inside the printer will eliminate or reduce these problems. Cleaning inside it. Note: To prevent damage to the toner cartridge, do not touch the black transfer roller inside the printer. As much as thinner, on the roller can damage the printer. .... Notes: • Do not use ammonia-based cleaners or volatile solvents such as possible, keep the printer free from the toner cartridge area and the toner cartridge cavity. 6.4 MAINTAINING YOUR PRINTER By doing so, you can cause print quality problems. Cleaning the Outside Wipe the outside surface ...

User Manual (user Manual) (ver.1.00) (English)
Page 77
Cleaning the Printer 4 Reinsert the toner cartridge and close the cover. 5 Then, plug in the power cord, and turn the power off. 3 Your printer automatically picks up a sheet of paper from the tray and prints out a cleaning sheet with toner debris, which should be discarded. 1 Make ... 6.5 To stop the printing, turn the printer on it. This process will produce a page with the dust or toner particles on . Use this process if you are experiencing blurred, faded or smeared printouts. Printing a cleaning sheet Printing a cleaning sheet cleans the drum inside the toner cartridge.
Cleaning the Printer 4 Reinsert the toner cartridge and close the cover. 5 Then, plug in the power cord, and turn the power off. 3 Your printer automatically picks up a sheet of paper from the tray and prints out a cleaning sheet with toner debris, which should be discarded. 1 Make ... 6.5 To stop the printing, turn the printer on it. This process will produce a page with the dust or toner particles on . Use this process if you are experiencing blurred, faded or smeared printouts. Printing a cleaning sheet Printing a cleaning sheet cleans the drum inside the toner cartridge.

User Manual (user Manual) (ver.1.00) (English)
Page 80
... of your default printer. • The printer cover is not closed. • Paper is jammed. • No paper is loaded. • Toner cartridge is not installed. • Printer system error occurs. Check the Windows printer setting to make sure the printer is attached to the correct port (for... the printer is not connected properly. Solution If no lights are on the printer's control panel to the table for example, LPT1). Select Samsung ML-1250 PCL 6 as the default printer. If possible, attach the cable to another computer that the print job is sent to the correct one port...
... of your default printer. • The printer cover is not closed. • Paper is jammed. • No paper is loaded. • Toner cartridge is not installed. • Printer system error occurs. Check the Windows printer setting to make sure the printer is attached to the correct port (for... the printer is not connected properly. Solution If no lights are on the printer's control panel to the table for example, LPT1). Select Samsung ML-1250 PCL 6 as the default printer. If possible, attach the cable to another computer that the print job is sent to the correct one port...
User Manual (user Manual) (ver.1.00) (English)
Page 83
... setting in the Print dialog box empty. Solution Try printing a job from another application. defective or out of toner. Print the document with the Bitmap Printing checkbox in the software application is Replace the toner cartridge. The file may be defective. Contact a service representative. PROBLEM SOLVING 7.5 Some parts, such as the controller, the...
... setting in the Print dialog box empty. Solution Try printing a job from another application. defective or out of toner. Print the document with the Bitmap Printing checkbox in the software application is Replace the toner cartridge. The file may be defective. Contact a service representative. PROBLEM SOLVING 7.5 Some parts, such as the controller, the...

User Manual (user Manual) (ver.1.00) (English)
Page 85
5 If paper is easier to remove such jams from the inside of the printer than the paper input area. 1 Carefully pull the jammed paper out of the input tray. It is jammed in the face-up output slot, carefully remove the paper as shown. 2 Open and close the front cover. PROBLEM SOLVING 7.7 Clearing Paper Jams Input Area Note: If paper has entered the toner cartridge area, follow the instructions on page 7.8. Printing can be resumed.
5 If paper is easier to remove such jams from the inside of the printer than the paper input area. 1 Carefully pull the jammed paper out of the input tray. It is jammed in the face-up output slot, carefully remove the paper as shown. 2 Open and close the front cover. PROBLEM SOLVING 7.7 Clearing Paper Jams Input Area Note: If paper has entered the toner cartridge area, follow the instructions on page 7.8. Printing can be resumed.

User Manual (user Manual) (ver.1.00) (English)
Page 87
2 Remove the toner cartridge. CAUTION: To prevent damage to light for more than a few minutes. Make sure that there is out of the printer. 3 Gently pull the paper toward you to remove it to the toner cartridge, do not expose it from the printer. Place a piece of paper over the top of the toner cartridge to shield it while it is no paper remaining inside the printer. 4 Reinsert the toner cartridge and close the front cover. Printing can be resumed. Clearing Paper Jams PROBLEM SOLVING 7.9
2 Remove the toner cartridge. CAUTION: To prevent damage to light for more than a few minutes. Make sure that there is out of the printer. 3 Gently pull the paper toward you to remove it to the toner cartridge, do not expose it from the printer. Place a piece of paper over the top of the toner cartridge to shield it while it is no paper remaining inside the printer. 4 Reinsert the toner cartridge and close the front cover. Printing can be resumed. Clearing Paper Jams PROBLEM SOLVING 7.9

User Manual (user Manual) (ver.1.00) (English)
Page 89
... (see page 5.6). • Troubleshoot general printing problems (see page 7.2). • Install a new toner cartridge, then check print quality again (see page 5.12). • Check to temporarily extend the toner cartridge life. See "Cleaning the Printer" on page 6.4. • The surface of the LSU part inside... too moist or too rough). Clean the LSU. If this does not improAveaBthebCpricnt quality, install a new toner cartridge. Adjust the print resolution and Toner Save Mode within the printer properties. Solving Print Quality Problems Problem Light or faded print AaBbCc AaBbCc AaBbCc ...
... (see page 5.6). • Troubleshoot general printing problems (see page 7.2). • Install a new toner cartridge, then check print quality again (see page 5.12). • Check to temporarily extend the toner cartridge life. See "Cleaning the Printer" on page 6.4. • The surface of the LSU part inside... too moist or too rough). Clean the LSU. If this does not improAveaBthebCpricnt quality, install a new toner cartridge. Adjust the print resolution and Toner Save Mode within the printer properties. Solving Print Quality Problems Problem Light or faded print AaBbCc AaBbCc AaBbCc ...

User Manual (user Manual) (ver.1.00) (English)
Page 90
... brand AaofBpbapCecr. Try reprinting the AajoBb.bCc AA• aahThaBBsebbmmCCooicicssttusrpeoctsonotnenittsosfutrhfaecpea. The manufacturing processes can cause some areas to reject toner. AaBbCc If faded areas, generally rounded, occur randomly on page 7.13. • If these steps do not ... on the page: • The photosensitive drum inside the toner cartridge has probably been scratched. Cc • The transfer roller mAayabBebdCirtcy. If black vertical streaks appear on page 6.4. Install a new toner cartridge. 7.12 PROBLEM SOLVING Try a different kind or brand of...
... brand AaofBpbapCecr. Try reprinting the AajoBb.bCc AA• aahThaBBsebbmmCCooicicssttusrpeoctsonotnenittsosfutrhfaecpea. The manufacturing processes can cause some areas to reject toner. AaBbCc If faded areas, generally rounded, occur randomly on page 7.13. • If these steps do not ... on the page: • The photosensitive drum inside the toner cartridge has probably been scratched. Cc • The transfer roller mAayabBebdCirtcy. If black vertical streaks appear on page 6.4. Install a new toner cartridge. 7.12 PROBLEM SOLVING Try a different kind or brand of...

User Manual (user Manual) (ver.1.00) (English)
Page 91
...7.13 c AaBbCc AaBbCc • Clean the inside of the page at even intervals: • The toner cartridge may be damaged. After the printout, if you still have toner on them. aBbCc aBbCc aBbCc aBbCc aBbCc AaBbCc AaBbCc AaBbCc AaBbCc AParBobblCemc Gray background AaBbCc AaBbCc AaBbCc AaBbCc...AaBbCc Solving Print Quality Problems Solution AaBbCc AaBbCc AaBbCc AaBbCc AaBbCc If the amount of background toner shading becomes unacceptable, the procedures below may have the same problems, install a new toner cartridge. • Parts in the printer may help to clear the condition: • ...
...7.13 c AaBbCc AaBbCc • Clean the inside of the page at even intervals: • The toner cartridge may be damaged. After the printout, if you still have toner on them. aBbCc aBbCc aBbCc aBbCc aBbCc AaBbCc AaBbCc AaBbCc AaBbCc AParBobblCemc Gray background AaBbCc AaBbCc AaBbCc AaBbCc...AaBbCc Solving Print Quality Problems Solution AaBbCc AaBbCc AaBbCc AaBbCc AaBbCc If the amount of background toner shading becomes unacceptable, the procedures below may have the same problems, install a new toner cartridge. • Parts in the printer may help to clear the condition: • ...


