

Open Source Guide (ENGLISH)
Page 1
... program normally reads commands interactively when run, you must cause any third party, for a charge no warranty for questions regarding open sources, contact Samsung via Email (vdswmanager@samsung. You are designed to take away your work based on the Program is not required to print an announcement.) These requirements apply to the...
... program normally reads commands interactively when run, you must cause any third party, for a charge no warranty for questions regarding open sources, contact Samsung via Email (vdswmanager@samsung. You are designed to take away your work based on the Program is not required to print an announcement.) These requirements apply to the...

Open Source Guide (ENGLISH)
Page 2
IN NO EVENT UNLESS REQUIRED BY APPLICABLE LAW OR AGREED TO IN WRITING WILL ANY COPYRIGHT HOLDER, OR ANY OTHER PARTY WHO MAY MODIFY AND/OR REDISTRIBUTE THE LIBRARY AS PERMITTED ABOVE, BE LIABLE TO YOU FOR DAMAGES, INCLUDING ANY GENERAL, SPECIAL, INCIDENTAL OR CONSEQUENTIAL DAMAGES ARISING OUT OF THE USE OR INABILITY TO USE THE LIBRARY (INCLUDING BUT NOT LIMITED TO LOSS OF DATA OR DATA BEING RENDERED INACCURATE OR LOSSES SUSTAINED BY YOU OR THIRD PARTIES OR A FAILURE OF THE LIBRARY TO OPERATE WITH ANY OTHER SOFTWARE), EVEN IF SUCH HOLDER OR OTHER PARTY HAS BEEN ADVISED OF THE POSSIBILITY OF SUCH...
IN NO EVENT UNLESS REQUIRED BY APPLICABLE LAW OR AGREED TO IN WRITING WILL ANY COPYRIGHT HOLDER, OR ANY OTHER PARTY WHO MAY MODIFY AND/OR REDISTRIBUTE THE LIBRARY AS PERMITTED ABOVE, BE LIABLE TO YOU FOR DAMAGES, INCLUDING ANY GENERAL, SPECIAL, INCIDENTAL OR CONSEQUENTIAL DAMAGES ARISING OUT OF THE USE OR INABILITY TO USE THE LIBRARY (INCLUDING BUT NOT LIMITED TO LOSS OF DATA OR DATA BEING RENDERED INACCURATE OR LOSSES SUSTAINED BY YOU OR THIRD PARTIES OR A FAILURE OF THE LIBRARY TO OPERATE WITH ANY OTHER SOFTWARE), EVEN IF SUCH HOLDER OR OTHER PARTY HAS BEEN ADVISED OF THE POSSIBILITY OF SUCH...

Quick Guide (easy Manual) (English)
Page 1
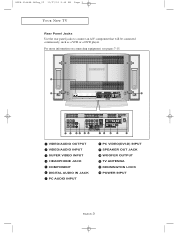
BN68-00448A-04Eng_02 10/27/03 9:45 AM Page 3 YOUR NEW TV Rear Panel Jacks Use the rear panel jacks to connect an A/V component that will be connected continuously, such as a VCR or a DVD player. VIDEO/AUDIO OUTPUT VIDEO/AUDIO INPUT SUPER VIDEO INPUT HEADPHONE JACK COMPONENT DIGITAL AUDIO IN JACK PC AUDIO INPUT PC VIDEO(DVI-D) INPUT SPEAKER OUT JACK WOOFER OUTPUT TV ANTENNA KENSINGTON LOCK POWER INPUT English-1
BN68-00448A-04Eng_02 10/27/03 9:45 AM Page 3 YOUR NEW TV Rear Panel Jacks Use the rear panel jacks to connect an A/V component that will be connected continuously, such as a VCR or a DVD player. VIDEO/AUDIO OUTPUT VIDEO/AUDIO INPUT SUPER VIDEO INPUT HEADPHONE JACK COMPONENT DIGITAL AUDIO IN JACK PC AUDIO INPUT PC VIDEO(DVI-D) INPUT SPEAKER OUT JACK WOOFER OUTPUT TV ANTENNA KENSINGTON LOCK POWER INPUT English-1

Quick Guide (easy Manual) (English)
Page 2
A coaxial cable is stereo, you have a "mono" (non-stereo) VCR, use the Y-connector (not supplied) to hook up to the left and right audio input jacks of the TV. Skip step 1 if you have already connected your TV to an antenna or a cable TV system. If your VCR is usually included with a VCR. (If not, check your VCR tape. # Each external input source device has a different back panel configuration. If you must connect two cables. 5 Connect a video cable between the VIDEO OUT jack on the VCR and the VIDEO jack on the TV. Follow the instructions in "Viewing a VCR or Camcorder Tape" to ...
A coaxial cable is stereo, you have a "mono" (non-stereo) VCR, use the Y-connector (not supplied) to hook up to the left and right audio input jacks of the TV. Skip step 1 if you have already connected your TV to an antenna or a cable TV system. If your VCR is usually included with a VCR. (If not, check your VCR tape. # Each external input source device has a different back panel configuration. If you must connect two cables. 5 Connect a video cable between the VIDEO OUT jack on the VCR and the VIDEO jack on the TV. Follow the instructions in "Viewing a VCR or Camcorder Tape" to ...

Quick Guide (easy Manual) (English)
Page 3
... VCR and the S-VIDEO INPUT jack on the TV. venus-02-en 6/28/03 8:14 AM Page 12 I N S TA L L AT I O N Connecting an S-VHS VCR Your Samsung TV can be connected to an S-Video signal from an S-VHS VCR. (This connection delivers a better picture as compared to a standard VHS VCR.) 1 To begin...
... VCR and the S-VIDEO INPUT jack on the TV. venus-02-en 6/28/03 8:14 AM Page 12 I N S TA L L AT I O N Connecting an S-VHS VCR Your Samsung TV can be connected to an S-Video signal from an S-VHS VCR. (This connection delivers a better picture as compared to a standard VHS VCR.) 1 To begin...

Quick Guide (easy Manual) (English)
Page 4
Note: For an explanation of Component video, see your DVD player owner's manual. # Each external input source device has a different back panel configuration. Connecting a Digital TV Set-Top Box The connections for a typical set-top box are shown below. 1 Connect a set of audio cables between the L, R AUDIO INPUT jacks on the TV and the AUDIO OUT jacks on the DVD player. 2 Connect a video cable between the COMPONENT1 or COMPONENT2 (Y, Pb, Pr) jacks on the TV and the Y, Pb, Pr jacks on the DVD player. Note: For an explanation of Component video, see your Set-Top Box owner's ...
Note: For an explanation of Component video, see your DVD player owner's manual. # Each external input source device has a different back panel configuration. Connecting a Digital TV Set-Top Box The connections for a typical set-top box are shown below. 1 Connect a set of audio cables between the L, R AUDIO INPUT jacks on the TV and the AUDIO OUT jacks on the DVD player. 2 Connect a video cable between the COMPONENT1 or COMPONENT2 (Y, Pb, Pr) jacks on the TV and the Y, Pb, Pr jacks on the DVD player. Note: For an explanation of Component video, see your Set-Top Box owner's ...

Quick Guide (easy Manual) (English)
Page 5
Place the hooks on the TV to select TV. 2. Connect the Subwoofer OUT jack on the speaker and the TV set. 2. venus-02-en 6/28/03 8:15 AM Page 14 I N S TA L L AT I O N Connecting the Speakers 5.1. How to Connect 1. Subwoofer Channel •Wind the speaker cable on and press the TV/Input button to the Subwoofer. Turn the TV on the core twice or more. English-5 Press the Volume button to purchase them. How to Turn the Sound On 1. Connect the speaker cables to secure the hooks. 1. Channel system: 5 Channels - 2 Channels for the front (left and right), 1 Channel for...
Place the hooks on the TV to select TV. 2. Connect the Subwoofer OUT jack on the speaker and the TV set. 2. venus-02-en 6/28/03 8:15 AM Page 14 I N S TA L L AT I O N Connecting the Speakers 5.1. How to Connect 1. Subwoofer Channel •Wind the speaker cable on and press the TV/Input button to the Subwoofer. Turn the TV on the core twice or more. English-5 Press the Volume button to purchase them. How to Turn the Sound On 1. Connect the speaker cables to secure the hooks. 1. Channel system: 5 Channels - 2 Channels for the front (left and right), 1 Channel for...

Quick Guide (easy Manual) (English)
Page 6
DVI-D TV rear panel PC rear D-SUB TV rear panel PC VIDEO CABLE ( DVI-D+DVI-D ) PC AUDIO CABLE PC rear PC VIDEO CABLE ( DVI + D-SUB) PC AUDIO CABLE • PC AUDIO INPUT Connect these to the audio-output jacks on your PC. # Each external input source device has a different back panel configuration. venus-02-en 6/28/03 8:15 AM Page 15 I N S TA L L AT I O N Connecting a PC Note: This figure shows the Standard Connector-jack panel. The actual configuration on your TV may be different, depending on your PC. • PC VIDEO INPUT Connect to the video output port on the model. ...
DVI-D TV rear panel PC rear D-SUB TV rear panel PC VIDEO CABLE ( DVI-D+DVI-D ) PC AUDIO CABLE PC rear PC VIDEO CABLE ( DVI + D-SUB) PC AUDIO CABLE • PC AUDIO INPUT Connect these to the audio-output jacks on your PC. # Each external input source device has a different back panel configuration. venus-02-en 6/28/03 8:15 AM Page 15 I N S TA L L AT I O N Connecting a PC Note: This figure shows the Standard Connector-jack panel. The actual configuration on your TV may be different, depending on your PC. • PC VIDEO INPUT Connect to the video output port on the model. ...

User Manual (user Manual) (ver.02) (English)
Page 2
BN68-00448A-03Eng_01 10/6/03 2:28 PM Page 1 Important Safety Instructions 1) Read these instructions. 2) Keep these instructions. 3) Heed all warnings. 4) Follow all instructions. 5) Do not use this apparatus near water. 6) Clean only with dry cloth. 7) Do not block any ventilation openings, Install in any heat sources such as power-supply cord or plug is used, use attachments/accessories specified by the manufacturer. 12) Use only with cart, stand, tripod, bracket, or table specified by the manufacturer, or sold with one wider than the other apparatus (including amplifiers) that ...
BN68-00448A-03Eng_01 10/6/03 2:28 PM Page 1 Important Safety Instructions 1) Read these instructions. 2) Keep these instructions. 3) Heed all warnings. 4) Follow all instructions. 5) Do not use this apparatus near water. 6) Clean only with dry cloth. 7) Do not block any ventilation openings, Install in any heat sources such as power-supply cord or plug is used, use attachments/accessories specified by the manufacturer. 12) Use only with cart, stand, tripod, bracket, or table specified by the manufacturer, or sold with one wider than the other apparatus (including amplifiers) that ...

User Manual (user Manual) (ver.02) (English)
Page 3
... it. Certain Canadian programs may also be copyrighted and any unauthorized recording in whole or in part may result in particular, specifies that any inside . Samsung Electronics America, Inc. This symbol indicates high voltage is an infringement of plug to rain or moisture. Attention: pour eviter les chocs electriques, introduire la...
... it. Certain Canadian programs may also be copyrighted and any unauthorized recording in whole or in part may result in particular, specifies that any inside . Samsung Electronics America, Inc. This symbol indicates high voltage is an infringement of plug to rain or moisture. Attention: pour eviter les chocs electriques, introduire la...

User Manual (user Manual) (ver.02) (English)
Page 4
...Rules. If necessary, consult your dealer or an experienced radio/television technician for additional suggestions. The party responsible for product compliance: SAMSUNG ELECTRONICS CO., LTD America QA Lab of the Voluntary Control Council for Interference by Information Technology Equipment (VCCI). For 120 Volt .... • Increase the separation between the equipment and receiver. • Connect the equipment into an outlet on the standard of Samsung 3351 Michelson Drive, Suite #290, Irvine, CA92612 USA Warning User must accept any UL Listed personal computer with Canadian ICES-003....
...Rules. If necessary, consult your dealer or an experienced radio/television technician for additional suggestions. The party responsible for product compliance: SAMSUNG ELECTRONICS CO., LTD America QA Lab of the Voluntary Control Council for Interference by Information Technology Equipment (VCCI). For 120 Volt .... • Increase the separation between the equipment and receiver. • Connect the equipment into an outlet on the standard of Samsung 3351 Michelson Drive, Suite #290, Irvine, CA92612 USA Warning User must accept any UL Listed personal computer with Canadian ICES-003....

User Manual (user Manual) (ver.02) (English)
Page 5
... moving . Displaying stationary graphics and images on them should primarily be limited as a full screen picture. When you need to fill the screen if your Samsung limited warranty. [Note] If a still image is displayed for an extended period of picture tubes (LCDs) that leave subtle, but permanent burned-in ghost images...
... moving . Displaying stationary graphics and images on them should primarily be limited as a full screen picture. When you need to fill the screen if your Samsung limited warranty. [Note] If a still image is displayed for an extended period of picture tubes (LCDs) that leave subtle, but permanent burned-in ghost images...

User Manual (user Manual) (ver.02) (English)
Page 7
venus-01-en 6/28/03 8:14 AM Page 6 CONTENTS Chapter 1: Your New TV 1 List of Features 1 List of Parts 1 Familiarizing Yourself with Your New TV 2 Front Panel Buttons 2 Rear Panel Jacks 3 Remote Control 4 Installing Batteries in the Remote Control 6 Chapter 2: Installation 7 Connecting VHF and UHF Antennas 7 Antennas with 300-ohm Flat Twin Leads 7 Antennas with 75-ohm Round Leads 8 Separate VHF and UHF Antennas 8 Connecting Cable TV 8 Cable without a Cable Box 8 Connecting to a Cable Box that Descrambles All Channels . . .9 Connecting to a Cable Box that Descrambles Some Channels...
venus-01-en 6/28/03 8:14 AM Page 6 CONTENTS Chapter 1: Your New TV 1 List of Features 1 List of Parts 1 Familiarizing Yourself with Your New TV 2 Front Panel Buttons 2 Rear Panel Jacks 3 Remote Control 4 Installing Batteries in the Remote Control 6 Chapter 2: Installation 7 Connecting VHF and UHF Antennas 7 Antennas with 300-ohm Flat Twin Leads 7 Antennas with 75-ohm Round Leads 8 Separate VHF and UHF Antennas 8 Connecting Cable TV 8 Cable without a Cable Box 8 Connecting to a Cable Box that Descrambles All Channels . . .9 Connecting to a Cable Box that Descrambles Some Channels...

User Manual (user Manual) (ver.02) (English)
Page 8
venus-01-en 6/28/03 8:14 AM Page 7 CONTENTS Fine Tuning Channels 35 Viewing Picture-in-Picture 36 Activating Picture-in-Picture 36 Swapping the Contents of the PIP and Main image 37 Changing the PIP Channel 37 Changing the Size of the PIP Window 37 Changing the Screen Size 38 Freezing the Picture 38 Adjusting the Background Color 39 Setting the DNIe 40 To Enjoy Dolby Digital Sound 41 Turning the Dolby ProLogic II On 41 Turning the Dynamic Range On 42 Speaker Settings 43 Level 44 Time Delay 45 TRADEMARK & LAVEL LICENSE NOTICE 46 Ideal Speaker Placement 46 Changing the STEREO ...
venus-01-en 6/28/03 8:14 AM Page 7 CONTENTS Fine Tuning Channels 35 Viewing Picture-in-Picture 36 Activating Picture-in-Picture 36 Swapping the Contents of the PIP and Main image 37 Changing the PIP Channel 37 Changing the Size of the PIP Window 37 Changing the Screen Size 38 Freezing the Picture 38 Adjusting the Background Color 39 Setting the DNIe 40 To Enjoy Dolby Digital Sound 41 Turning the Dolby ProLogic II On 41 Turning the Dynamic Range On 42 Speaker Settings 43 Level 44 Time Delay 45 TRADEMARK & LAVEL LICENSE NOTICE 46 Ideal Speaker Placement 46 Changing the STEREO ...

User Manual (user Manual) (ver.02) (English)
Page 9
Remote Control(BN59-00364B) & Batteries (AAA x 2) RF Cable (AA39-00039A) Power Cord (BH39-10339X) Owner's Instructions Front Speaker (BN96-00568C) Stand (BN96-00380A) Core(3301-001456) x 5 English-1 This TV is a high-performance unit that includes the following items are missing, contact your LCD TV. If any items are included with the latest technology. venus-02-en 6/28/03 8:14 AM Page 1 Chapter One YOUR NEW TV List of Parts Please make sure the following special features: • Easy-to-use remote control • Easy-to-use on-screen menu system • Automatic timer to...
Remote Control(BN59-00364B) & Batteries (AAA x 2) RF Cable (AA39-00039A) Power Cord (BH39-10339X) Owner's Instructions Front Speaker (BN96-00568C) Stand (BN96-00380A) Core(3301-001456) x 5 English-1 This TV is a high-performance unit that includes the following items are missing, contact your LCD TV. If any items are included with the latest technology. venus-02-en 6/28/03 8:14 AM Page 1 Chapter One YOUR NEW TV List of Parts Please make sure the following special features: • Easy-to-use remote control • Easy-to-use on-screen menu system • Automatic timer to...

User Manual (user Manual) (ver.02) (English)
Page 10
REMOTE CONTROL SENSOR Aim the remote control towards this spot on -screen menu. To use the more advanced features, you turn on TV by using the Channel buttons.) English-2 VOL + Press to turn the TV on and off . Also press to see an on-screen menu of the available input sources (TV, VIDEO1, VIDEO2, S-VIDEO, Component 1, Component 2, PC/DVI). POWER INDICATOR Lights up when you must use the remote control. TV/VIDEO (See Page 17) Displays a menu of all of your TV's basic features, including the on-screen menu. MENU Press to highlight various items on the on-screen menu. (Without...
REMOTE CONTROL SENSOR Aim the remote control towards this spot on -screen menu. To use the more advanced features, you turn on TV by using the Channel buttons.) English-2 VOL + Press to turn the TV on and off . Also press to see an on-screen menu of the available input sources (TV, VIDEO1, VIDEO2, S-VIDEO, Component 1, Component 2, PC/DVI). POWER INDICATOR Lights up when you must use the remote control. TV/VIDEO (See Page 17) Displays a menu of all of your TV's basic features, including the on-screen menu. MENU Press to highlight various items on the on-screen menu. (Without...
User Manual (user Manual) (ver.02) (English)
Page 11
BN68-00448A-04Eng_02 10/27/03 9:45 AM Page 3 YOUR NEW TV Rear Panel Jacks Use the rear panel jacks to connect an A/V component that will be connected continuously, such as a VCR or a DVD player. VIDEO/AUDIO OUTPUT VIDEO/AUDIO INPUT SUPER VIDEO INPUT HEADPHONE JACK COMPONENT DIGITAL AUDIO IN JACK PC AUDIO INPUT PC VIDEO(DVI-D) INPUT SPEAKER OUT JACK WOOFER OUTPUT TV ANTENNA KENSINGTON LOCK POWER INPUT English-3 For more information on connecting equipment, see pages 7-15.
BN68-00448A-04Eng_02 10/27/03 9:45 AM Page 3 YOUR NEW TV Rear Panel Jacks Use the rear panel jacks to connect an A/V component that will be connected continuously, such as a VCR or a DVD player. VIDEO/AUDIO OUTPUT VIDEO/AUDIO INPUT SUPER VIDEO INPUT HEADPHONE JACK COMPONENT DIGITAL AUDIO IN JACK PC AUDIO INPUT PC VIDEO(DVI-D) INPUT SPEAKER OUT JACK WOOFER OUTPUT TV ANTENNA KENSINGTON LOCK POWER INPUT English-3 For more information on connecting equipment, see pages 7-15.

User Manual (user Manual) (ver.02) (English)
Page 12
INPUT SELECT BUTTON Use to display all of about 23 feet from the TV. Shows the currently selected input source. English-4 venus-02-en 6/28/03 8:14 AM Page 4 YOUR NEW TV Remote Control You can use the remote control up to a distance of the available video sources. (See Page 25-26) JOYSTICK Use to select on -screen menu. (See Page 17) LCD SCREEN Shows the battery status and selected input source device. When using the remote, always point it directly at the TV. POWER Turns the TV on and off. (See Page 16) P.SIZE Press to change the screen size. (See Page 38) P.MODE Adjusts the ...
INPUT SELECT BUTTON Use to display all of about 23 feet from the TV. Shows the currently selected input source. English-4 venus-02-en 6/28/03 8:14 AM Page 4 YOUR NEW TV Remote Control You can use the remote control up to a distance of the available video sources. (See Page 25-26) JOYSTICK Use to select on -screen menu. (See Page 17) LCD SCREEN Shows the battery status and selected input source device. When using the remote, always point it directly at the TV. POWER Turns the TV on and off. (See Page 16) P.SIZE Press to change the screen size. (See Page 38) P.MODE Adjusts the ...

User Manual (user Manual) (ver.02) (English)
Page 13
SWAP Exchanges the video signal that is currently displayed on the main screen with the signal in the PIP window. (While the main screen is in PC mode, it does not work.) RESET When your remote does not work, change channels in the TV's memory. (See Page 25) DNIe BUTTON Press to improve the digital video quality. (See Page 40) PC Press to switch to make the PIP window double, large or small. Press again to resume normal video. (See Page 38) MTS BUTTON Press to select MONO or STEREO mode. (See Page 47) DOLBY DIGITAL BUTTON Press to enjoy theater-quality 3-D sound. (See Page 41-45) PIP ...
SWAP Exchanges the video signal that is currently displayed on the main screen with the signal in the PIP window. (While the main screen is in PC mode, it does not work.) RESET When your remote does not work, change channels in the TV's memory. (See Page 25) DNIe BUTTON Press to improve the digital video quality. (See Page 40) PC Press to switch to make the PIP window double, large or small. Press again to resume normal video. (See Page 38) MTS BUTTON Press to select MONO or STEREO mode. (See Page 47) DOLBY DIGITAL BUTTON Press to enjoy theater-quality 3-D sound. (See Page 41-45) PIP ...

User Manual (user Manual) (ver.02) (English)
Page 14
Did the battery run out? 4. Remove the batteries and store them in the Remote Control 1 Slide the cover out completely. 2 Install two AAA size batteries. Is the TV power switch on? 2. venus-02-en 6/28/03 8:14 AM Page 6 YOUR NEW TV Installing Batteries in a cool, dry place if you won't be used up to match the "+" and "-" ends of the batteries reversed? 3. Is the power out, or is the power cord unplugged? 5. Is there a special fluorescent light or a neon sign nearby? Check the following: 1. Are the plus and minus ends of the batteries with the diagram inside the compartment....
Did the battery run out? 4. Remove the batteries and store them in the Remote Control 1 Slide the cover out completely. 2 Install two AAA size batteries. Is the TV power switch on? 2. venus-02-en 6/28/03 8:14 AM Page 6 YOUR NEW TV Installing Batteries in a cool, dry place if you won't be used up to match the "+" and "-" ends of the batteries reversed? 3. Is the power out, or is the power cord unplugged? 5. Is there a special fluorescent light or a neon sign nearby? Check the following: 1. Are the plus and minus ends of the batteries with the diagram inside the compartment....