User Manual (ENGLISH)
Page 3
...INFORMATION List of Features 3 Accessories 3 Viewing the Control Panel 4 Viewing the Connection Panel 5 Remote Control 7 Installing Batteries in the Remote Control 8 CONNECTIONS Connecting VHF and UHF Antennas 8 Connecting Cable TV 9 Connecting a VCR 10 Connecting an S-VHS VCR 10 Connecting a Camcorder 11 Connecting a DVD...Channels Analog 38 Checking the Digital-Signal Strength Digital 39 LNA (Low Noise Amplifier 39 PICTURE CONTROL Picture Control 40 Customizing the Picture Settings 41 Changing the Picture Size 43 Using the Color Weakness Enhancement Feature 44 Digital Noise ...
...INFORMATION List of Features 3 Accessories 3 Viewing the Control Panel 4 Viewing the Connection Panel 5 Remote Control 7 Installing Batteries in the Remote Control 8 CONNECTIONS Connecting VHF and UHF Antennas 8 Connecting Cable TV 9 Connecting a VCR 10 Connecting an S-VHS VCR 10 Connecting a Camcorder 11 Connecting a DVD...Channels Analog 38 Checking the Digital-Signal Strength Digital 39 LNA (Low Noise Amplifier 39 PICTURE CONTROL Picture Control 40 Customizing the Picture Settings 41 Changing the Picture Size 43 Using the Color Weakness Enhancement Feature 44 Digital Noise ...
User Manual (ENGLISH)
Page 5
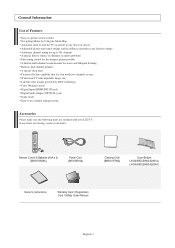
If any time you choose Adjustable picture and sound settings and the ability to memorize your dealer. Remote Control & Batteries (AAA x 2) (BN59-00568A) Power Cord (3903-000144) Cleaning Cloth (BN63-01798A) Cover-Bottom LN-S4095D (BN63-02491A) LN-S4695D (BN63-02624A) Owner's Instructions ... (HDMI/DVI IN) jack Digital Audio Output (OPTICAL) jack Game mode Easy-to-use channel manager menu. General Information List of Features Easy-to-operate remote control Navigating Menus by Using the Menu Map Automatic timer to turn the TV on and off at once Widescreen TV with your LCD TV.
If any time you choose Adjustable picture and sound settings and the ability to memorize your dealer. Remote Control & Batteries (AAA x 2) (BN59-00568A) Power Cord (3903-000144) Cleaning Cloth (BN63-01798A) Cover-Bottom LN-S4095D (BN63-02491A) LN-S4695D (BN63-02624A) Owner's Instructions ... (HDMI/DVI IN) jack Digital Audio Output (OPTICAL) jack Game mode Easy-to-use channel manager menu. General Information List of Features Easy-to-operate remote control Navigating Menus by Using the Menu Map Automatic timer to turn the TV on and off at once Widescreen TV with your LCD TV.
User Manual (ENGLISH)
Page 6
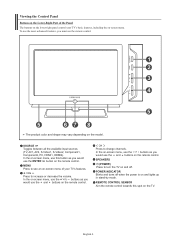
... Component1, Component2, PC, HDMI1, HDMI2). MENU Press to turn the TV on and off when the power is on the remote control. REMOTE CONTROL SENSOR Aim the remote control towards this button as you would use the ENTER button on the remote control. In the on-screen menu, use this spot on -screen ... volume. Viewing the Control Panel Buttons on the Lower-Right Part of your TV's basic features, including the on the model. To use the more advanced features, you would use the and buttons on the remote control. In the on-screen menu, use the buttons as you would use...
... Component1, Component2, PC, HDMI1, HDMI2). MENU Press to turn the TV on and off when the power is on the remote control. REMOTE CONTROL SENSOR Aim the remote control towards this button as you would use the ENTER button on the remote control. In the on-screen menu, use this spot on -screen ... volume. Viewing the Control Panel Buttons on the Lower-Right Part of your TV's basic features, including the on the model. To use the more advanced features, you would use the and buttons on the remote control. In the on-screen menu, use the buttons as you would use...
User Manual (ENGLISH)
Page 9
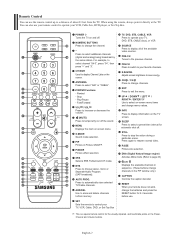
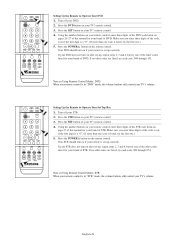
... Selects SRS TruSurround XT mode. ADD/DEL Use to store and delete channels to exit the menu. EXIT Press to /from the TV. This is a special remote control for the visually impaired, and has Braille points on and off . P.MODE Picture effect selection. CH / CH Press to display... Press to switch to change channels in Picture ON/OFF. NUMERIC BUTTONS Press to your favorite channels. AUTO PROG. When using the remote, always point it directly at the TV. VCR/DVD Functions - Press to select on -screen menu. UP / DOWN / LEFT / RIGHT / ENTER Use to automatically ...
... Selects SRS TruSurround XT mode. ADD/DEL Use to store and delete channels to exit the menu. EXIT Press to /from the TV. This is a special remote control for the visually impaired, and has Braille points on and off . P.MODE Picture effect selection. CH / CH Press to display... Press to switch to change channels in Picture ON/OFF. NUMERIC BUTTONS Press to your favorite channels. AUTO PROG. When using the remote, always point it directly at the TV. VCR/DVD Functions - Press to select on -screen menu. UP / DOWN / LEFT / RIGHT / ENTER Use to automatically ...
User Manual (ENGLISH)
Page 10
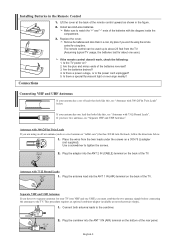
... 300 Ω Flat Twin Leads If you are using the remote control for a long time. ANT 2 IN (CABLE) 2. Separate VHF and UHF Antennas If you must combine the two antenna signals before connecting the antennas to the TV. This procedure requires an optional combiner-adaptor (available at the back... of the remote control upward as a roof antenna or "rabbit ears") that has 300 Ω twin flat leads, ...
... 300 Ω Flat Twin Leads If you are using the remote control for a long time. ANT 2 IN (CABLE) 2. Separate VHF and UHF Antennas If you must combine the two antenna signals before connecting the antennas to the TV. This procedure requires an optional combiner-adaptor (available at the back... of the remote control upward as a roof antenna or "rabbit ears") that has 300 Ω twin flat leads, ...
User Manual (ENGLISH)
Page 17
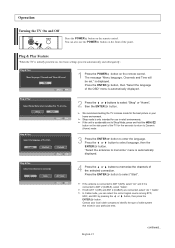
... menu is initially powered on, two basic settings proceed automatically and subsequently: 1 Press the POWER button on the remote control. If both ANT 1 (AIR) and ANT 2 (CABLE) are connected, select "Air + Cable". In...Shop Mode, press and hold the MENU button on the side panel of the TV for use the POWER button on the remote control. If the unit is displayed. The message "Menu language, Channels and ...Time will be set to enter the language. We recommend setting the TV to identify the type...
... menu is initially powered on, two basic settings proceed automatically and subsequently: 1 Press the POWER button on the remote control. If both ANT 1 (AIR) and ANT 2 (CABLE) are connected, select "Air + Cable". In...Shop Mode, press and hold the MENU button on the side panel of the TV for use the POWER button on the remote control. If the unit is displayed. The message "Menu language, Channels and ...Time will be set to enter the language. We recommend setting the TV to identify the type...
User Manual (ENGLISH)
Page 19
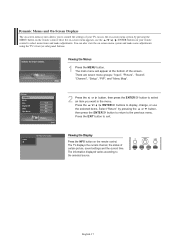
Once the on-screen menu appears, use the selected items. Select "Return" by pressing the MENU button on the remote control. You can also view the on your TV. The main menu will appear at the bottom of certain picture, sound settings and the current time. Press the EXIT button ... "Setup", "PIP", and "Menu Map". 2 Press the or button, then press the ENTER an item you to control the settings of your remote control to select menu items and make some adjustments using the TV's front (or side) panel buttons. button to select Press the / / / /ENTER buttons to the previous menu.
Once the on-screen menu appears, use the selected items. Select "Return" by pressing the MENU button on the remote control. You can also view the on your TV. The main menu will appear at the bottom of certain picture, sound settings and the current time. Press the EXIT button ... "Setup", "PIP", and "Menu Map". 2 Press the or button, then press the ENTER an item you to control the settings of your remote control to select menu items and make some adjustments using the TV's front (or side) panel buttons. button to select Press the / / / /ENTER buttons to the previous menu.

User Manual (ENGLISH)
Page 23
English-21 Select "Return" by using the number buttons on the remote control. • When connecting Digital Cable to a Set-Top Box, Channel Memorization is set to "STD". The TV begins memorizing all available stations. At this point the signal source has been selected. 5 Press the ENTER to start the ... channel directly by pressing the or button, then press the ENTER button to return to the previous menu. By default, the cable TV system is done on the remote control. (see page 32) All available DTV and analog channels are automatically stored in order to receive digital...
English-21 Select "Return" by using the number buttons on the remote control. • When connecting Digital Cable to a Set-Top Box, Channel Memorization is set to "STD". The TV begins memorizing all available stations. At this point the signal source has been selected. 5 Press the ENTER to start the ... channel directly by pressing the or button, then press the ENTER button to return to the previous menu. By default, the cable TV system is done on the remote control. (see page 32) All available DTV and analog channels are automatically stored in order to receive digital...

User Manual (ENGLISH)
Page 25
...these modes, and control whichever piece of cable box. Your VCR should turn on page 26 of this manual for your remote control can operate in five different modes: TV, VCR, Cable, DVD, or Set-Top Box. If no other codes are listed, try each code, 000 through...through 046. Press the VCR button on the remote control. Make sure you choose. Setting Up the Remote to Operate Your VCR 1. If your TV's remote control. 3. Press the POWER button on Using Remote Control Modes: VCR When your VCR. 2. Turn off your remote control is set -up correctly. Pressing the ...
...these modes, and control whichever piece of cable box. Your VCR should turn on page 26 of this manual for your remote control can operate in five different modes: TV, VCR, Cable, DVD, or Set-Top Box. If no other codes are listed, try each code, 000 through...through 046. Press the VCR button on the remote control. Make sure you choose. Setting Up the Remote to Operate Your VCR 1. If your TV's remote control. 3. Press the POWER button on Using Remote Control Modes: VCR When your VCR. 2. Turn off your remote control is set -up correctly. Pressing the ...
User Manual (ENGLISH)
Page 26
... of the code, even if the first digit is a "0". (If more than one code is set up correctly. Turn off your TV's remote control. 3. Your STB should turn on your TV's remote control. 3. Press the SET button on if your brand of STB. Using the number buttons on your...DVD" mode, the volume buttons still control your brand of STB. Setting Up the Remote to Operate Your DVD 1. Note on your TV's remote control. 4. Press the DVD button on Using Remote Control Modes: STB When your remote control is set up correctly. Make sure you enter three digits of the code, ...
... of the code, even if the first digit is a "0". (If more than one code is set up correctly. Turn off your TV's remote control. 3. Your STB should turn on your TV's remote control. 3. Press the SET button on if your brand of STB. Using the number buttons on your...DVD" mode, the volume buttons still control your brand of STB. Setting Up the Remote to Operate Your DVD 1. Note on your TV's remote control. 4. Press the DVD button on Using Remote Control Modes: STB When your remote control is set up correctly. Make sure you enter three digits of the code, ...
User Manual (ENGLISH)
Page 30
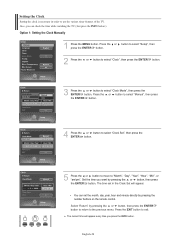
... the ENTER button. Set the time you press the INFO button. The current time will appear. • You can check the time while watching the TV. (Just press the INFO button.) Option 1: Setting the Clock Manually 1 Press the MENU button. Press the or button to select "Manual", then press the ENTER...", "Year", "Hour", "Min", or "am/pm". Also, you can set the month, day, year, hour and minute directly by pressing the number buttons on the remote control. Setting the Clock Setting the clock is necessary in the Clock Set will appear every time you want by pressing the or button, then...
... the ENTER button. Set the time you press the INFO button. The current time will appear. • You can check the time while watching the TV. (Just press the INFO button.) Option 1: Setting the Clock Manually 1 Press the MENU button. Press the or button to select "Manual", then press the ENTER...", "Year", "Hour", "Min", or "am/pm". Also, you can set the month, day, year, hour and minute directly by pressing the number buttons on the remote control. Setting the Clock Setting the clock is necessary in the Clock Set will appear every time you want by pressing the or button, then...
User Manual (ENGLISH)
Page 32
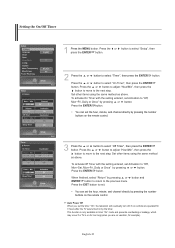
... long (when you set the timer "On", the television will eventually turn off, if no controls are on vacation, for 3 hours after the TV was turned on the remote control. button to select "Setup", then 2 Press the or button to exit. Press the ENTER button. • You can set Activation to "Off..., Mon~Fri, Daily or Once" by the timer. When finished, select "Return" by pressing the number buttons on the remote control. 3 Press the or button to "Off, Mon~Sat, Mon~Fri, Daily or Once" by pressing the number buttons on by pressing or button. To...
... long (when you set the timer "On", the television will eventually turn off, if no controls are on vacation, for 3 hours after the TV was turned on the remote control. button to select "Setup", then 2 Press the or button to exit. Press the ENTER button. • You can set Activation to "Off..., Mon~Fri, Daily or Once" by the timer. When finished, select "Return" by pressing the number buttons on the remote control. 3 Press the or button to "Off, Mon~Sat, Mon~Fri, Daily or Once" by pressing the number buttons on by pressing or button. To...

User Manual (ENGLISH)
Page 33
...", then press the ENTER button. 3 Press the or button to set sleep timer to the previous menu. Alternate method Press the SLEEP button on the remote control repeatedly until the appropriate interval appears (any of the preset values from 30 to 180 minutes). 1 Press the MENU button. Select "Return" by pressing... "Setup", then 2 Press the or button to exit. Press the press the ENTER button. Setting the Sleep Timer The sleep timer automatically shuts off the TV after a preset time (from "off" to "180 min".) English-31
...", then press the ENTER button. 3 Press the or button to set sleep timer to the previous menu. Alternate method Press the SLEEP button on the remote control repeatedly until the appropriate interval appears (any of the preset values from 30 to 180 minutes). 1 Press the MENU button. Select "Return" by pressing... "Setup", then 2 Press the or button to exit. Press the press the ENTER button. Setting the Sleep Timer The sleep timer automatically shuts off the TV after a preset time (from "off" to "180 min".) English-31
User Manual (ENGLISH)
Page 34
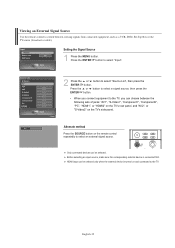
...(broadcast or cable). Before selecting an input source, make sure the corresponding external device is turned on and connected to the TV. Viewing an External Signal Source Use the remote control to switch between the following sets of jacks: "AV1", "S-Video1", "Component1", "Component2", "PC", "HDMI1", or... "HDMI2" on the TV's rear panel, and "AV2", or "S-Video2" on the TV's side panel. Press the or button to select a signal source, ...
...(broadcast or cable). Before selecting an input source, make sure the corresponding external device is turned on and connected to the TV. Viewing an External Signal Source Use the remote control to switch between the following sets of jacks: "AV1", "S-Video1", "Component1", "Component2", "PC", "HDMI1", or... "HDMI2" on the TV's rear panel, and "AV2", or "S-Video2" on the TV's side panel. Press the or button to select a signal source, ...

User Manual (ENGLISH)
Page 37
... window will appear. 4 Press the ENTER button to select "Channel Manager", then press the ENTER button. Alternate method Press the CH MGR button on the remote control to display a list of all channels, added channels, or your favorite channels. Preset : To use the Channel Manager function, first run Auto Program (see...
... window will appear. 4 Press the ENTER button to select "Channel Manager", then press the ENTER button. Alternate method Press the CH MGR button on the remote control to display a list of all channels, added channels, or your favorite channels. Preset : To use the Channel Manager function, first run Auto Program (see...
User Manual (ENGLISH)
Page 42
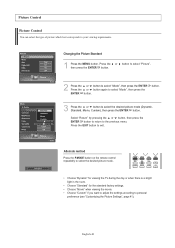
..., Standard, Movie, Custom), then press the ENTER button. Alternate method Press the P.MODE button on the remote control repeatedly to select the desired picture mode. • Choose "Dynamic" for viewing the TV during the day or when there is a bright light in the room. • Choose "Standard" for... the standard factory settings. • Choose "Movie" when viewing the movie. • Choose "Custom" if you want to adjust the settings according to exit. English-40 Press the EXIT...
..., Standard, Movie, Custom), then press the ENTER button. Alternate method Press the P.MODE button on the remote control repeatedly to select the desired picture mode. • Choose "Dynamic" for viewing the TV during the day or when there is a bright light in the room. • Choose "Standard" for... the standard factory settings. • Choose "Movie" when viewing the movie. • Choose "Custom" if you want to adjust the settings according to exit. English-40 Press the EXIT...
User Manual (ENGLISH)
Page 45
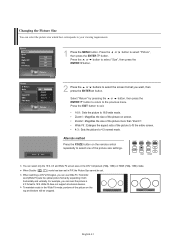
... on screen. • Zoom2 : Magnifies the size of the picture more than "Zoom1". • Wide Fit : Enlarges the aspect ratio of the picture on the remote control repeatedly to select the screen format you want, then press the ENTER button. You can select the picture size which best corresponds to the...
... on screen. • Zoom2 : Magnifies the size of the picture more than "Zoom1". • Wide Fit : Enlarges the aspect ratio of the picture on the remote control repeatedly to select the screen format you want, then press the ENTER button. You can select the picture size which best corresponds to the...
User Manual (ENGLISH)
Page 50
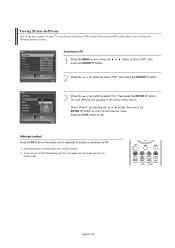
Viewing Picture-In-Picture One of the best features of the screen. The advanced PIP system allows you turn the TV off while watching and turn it on the remote control repeatedly to watch two different pictures at once. or button to select "PIP", then 2 Press the or button to select "PIP", then... button on again, then the mode will return to select "On", then press the ENTER The sub (PIP) picture appears in the corner of your TV is active. English-48 Press the press the ENTER button. This feature doesn't function when the "V-Chip" is the Picture-In-Picture (PIP) feature...
Viewing Picture-In-Picture One of the best features of the screen. The advanced PIP system allows you turn the TV off while watching and turn it on the remote control repeatedly to watch two different pictures at once. or button to select "PIP", then 2 Press the or button to select "PIP", then... button on again, then the mode will return to select "On", then press the ENTER The sub (PIP) picture appears in the corner of your TV is active. English-48 Press the press the ENTER button. This feature doesn't function when the "V-Chip" is the Picture-In-Picture (PIP) feature...

User Manual (ENGLISH)
Page 52
... the or button, then press the ENTER button to return to exit. Alternate method Press the CH or CH button under the cover of the remote control to change the sub picture channels while PIP is easy to change channels. 1 Press the MENU button. English-50 Press the then press the...
... the or button, then press the ENTER button to return to exit. Alternate method Press the CH or CH button under the cover of the remote control to change the sub picture channels while PIP is easy to change channels. 1 Press the MENU button. English-50 Press the then press the...

User Manual (ENGLISH)
Page 53
... to freeze a moving picture. (Normal sound will still be heard.) To cancel this function, press the STILL button again or press any button on the remote control. Freezing the Picture Press the STILL button to select "On" or "Off", then press the ENTER button. Select "Return" by pressing the or button...
... to freeze a moving picture. (Normal sound will still be heard.) To cancel this function, press the STILL button again or press any button on the remote control. Freezing the Picture Press the STILL button to select "On" or "Off", then press the ENTER button. Select "Return" by pressing the or button...

