User Manual (ENGLISH)
Page 3
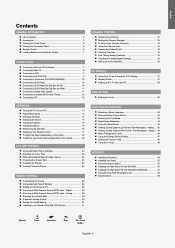
...Player/Set-Top Box via HDMI 11 Connecting a Digital Audio System 11 Connecting an Amplifier/DVD Home Theater 12 Connecting a PC 12 OPERATION Turning the TV On and Off 13 Plug & Play Feature 13 Changing Channels 14 Adjusting the Volume 15 Viewing the Display 15 Viewing the Menus 15 Memorizing...the Digital-Signal Strength 36 LNA (Low Noise Amplifier 36 PC DISPLAY Using Your TV as a Computer (PC) Display 37 Display Modes 37 Setting up the TV with your PC 38 TIME SETTING Setting the Clock 40 FUNCTION DESCRIPTION Selecting a Menu Language 43 Setting the Blue Screen Mode 43 Selecting...
...Player/Set-Top Box via HDMI 11 Connecting a Digital Audio System 11 Connecting an Amplifier/DVD Home Theater 12 Connecting a PC 12 OPERATION Turning the TV On and Off 13 Plug & Play Feature 13 Changing Channels 14 Adjusting the Volume 15 Viewing the Display 15 Viewing the Menus 15 Memorizing...the Digital-Signal Strength 36 LNA (Low Noise Amplifier 36 PC DISPLAY Using Your TV as a Computer (PC) Display 37 Display Modes 37 Setting up the TV with your PC 38 TIME SETTING Setting the Clock 40 FUNCTION DESCRIPTION Selecting a Menu Language 43 Setting the Blue Screen Mode 43 Selecting...
User Manual (ENGLISH)
Page 4
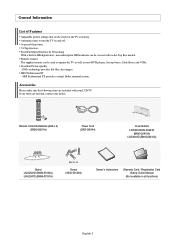
...-001294) Owner's Instructions Warranty Card / Registration Card /Safety Guide Manual (Not available in the TV's memory. General Information List of Features Adjustable picture settings that can be used to turn the TV on and off. Remote Control The supplied remote can be stored in all locations) English-2 SRS... virtual Dolby surround system. Excellent Picture Quality - V-Chip function. Accessories Please make sure the following items are missing, contact your LCD TV. Automatic timer to operate the TV as well as most DVD players, Set-top boxes, Cable Boxes and VCRs.
...-001294) Owner's Instructions Warranty Card / Registration Card /Safety Guide Manual (Not available in the TV's memory. General Information List of Features Adjustable picture settings that can be used to turn the TV on and off. Remote Control The supplied remote can be stored in all locations) English-2 SRS... virtual Dolby surround system. Excellent Picture Quality - V-Chip function. Accessories Please make sure the following items are missing, contact your LCD TV. Automatic timer to operate the TV as well as most DVD players, Set-top boxes, Cable Boxes and VCRs.
User Manual (ENGLISH)
Page 5
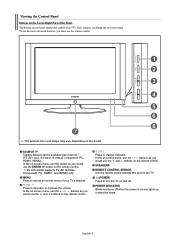
... this spot on the TV. (POWER) Press to see an on-screen menu of the Panel The buttons on the lower-right panel control your TV's features. POWER INDICATOR Blinks and turns off . In the on...the buttons as you would use the and buttons on the remote control. MENU Press to turn the TV on and off when the power is on and lights up in stand-by mode. English-3... Viewing the Control Panel Buttons on the Lower-Right Part of your TV's basic features, including the on-screen menu. To use the more advanced features, you would use...
... this spot on the TV. (POWER) Press to see an on-screen menu of the Panel The buttons on the lower-right panel control your TV's features. POWER INDICATOR Blinks and turns off . In the on...the buttons as you would use the and buttons on the remote control. MENU Press to turn the TV on and off when the power is on and lights up in stand-by mode. English-3... Viewing the Control Panel Buttons on the Lower-Right Part of your TV's basic features, including the on-screen menu. To use the more advanced features, you would use...
User Manual (ENGLISH)
Page 8
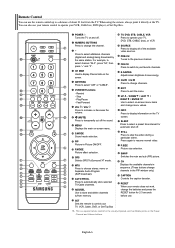
...use the remote control up to a distance of the available video sources. POWER Turns the TV on the Power, Channel and Volume buttons. VCR/DVD Functions - Stop - ... Picture ON/OFF. Rewind - AUTO PROG. ADD/DEL Use to store and delete channels to/from the TV. STILL Press to display all of about 23 feet from memory. Fast/Forward VOL / VOL Press to ... "3". For example, to save energy. UP / DOWN / LEFT / RIGHT / ENTER Use to select on the TV screen. INFO Press to display information on -screen menu items and change the batteries and press the RESET button for ...
...use the remote control up to a distance of the available video sources. POWER Turns the TV on the Power, Channel and Volume buttons. VCR/DVD Functions - Stop - ... Picture ON/OFF. Rewind - AUTO PROG. ADD/DEL Use to store and delete channels to/from the TV. STILL Press to display all of about 23 feet from memory. Fast/Forward VOL / VOL Press to ... "3". For example, to save energy. UP / DOWN / LEFT / RIGHT / ENTER Use to select on the TV screen. INFO Press to display information on -screen menu items and change the batteries and press the RESET button for ...
User Manual (ENGLISH)
Page 15
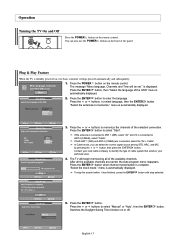
... After all of the available channels. is automatically displayed. Contact your particular area. 4. "Select the clock mode." English-13 Operation Turning the TV On and Off Press the POWER button on , two basic customer settings proceed automatically and subsequently: 1. You can select the correct signal... POWER button on the front of the OSD" menu is automatically displayed. 2. Press the or buttons to enter the language. The TV will be set." button. Press the ENTER button to select "Manual" or "Auto", then the ENTER Switches the Daylight Saving Time...
... After all of the available channels. is automatically displayed. Contact your particular area. 4. "Select the clock mode." English-13 Operation Turning the TV On and Off Press the POWER button on , two basic customer settings proceed automatically and subsequently: 1. You can select the correct signal... POWER button on the front of the OSD" menu is automatically displayed. 2. Press the or buttons to enter the language. The TV will be set." button. Press the ENTER button to select "Manual" or "Auto", then the ENTER Switches the Daylight Saving Time...
User Manual (ENGLISH)
Page 17
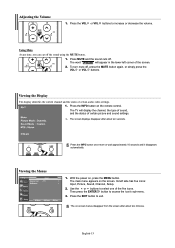
... buttons to select one of certain audio-video settings. 1. The main menu appears on -screen menus disappear from the screen after about two minutes. To turn mute off, press the MUTE button again, or simply press the VOL or VOL buttons. Adjusting the Volume 1. Use the or buttons to increase or...
... buttons to select one of certain audio-video settings. 1. The main menu appears on -screen menus disappear from the screen after about two minutes. To turn mute off, press the MUTE button again, or simply press the VOL or VOL buttons. Adjusting the Volume 1. Use the or buttons to increase or...

User Manual (ENGLISH)
Page 19
... your cable box does not turn on Using Remote Control Modes: Cable Box When your remote control is set -up, repeat steps 2, 3 and 4, but try one of the other codes listed for your brand of cable box. Note on if your remote is in five different modes: TV, VCR, Cable, DVD, or... the first digit is a "0". (If more than one code is in "VCR" mode, the volume buttons still control your TV's volume. If your VCR does not turn on your TV's remote control. 4. Turn off your TV's volume. Press the CABLE button on if your remote is listed, try the first one code is set up...
... your cable box does not turn on Using Remote Control Modes: Cable Box When your remote control is set -up, repeat steps 2, 3 and 4, but try one of the other codes listed for your brand of cable box. Note on if your remote is in five different modes: TV, VCR, Cable, DVD, or... the first digit is a "0". (If more than one code is in "VCR" mode, the volume buttons still control your TV's volume. If your VCR does not turn on your TV's remote control. 4. Turn off your TV's volume. Press the CABLE button on if your remote is listed, try the first one code is set up...
User Manual (ENGLISH)
Page 20
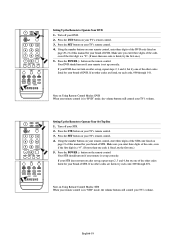
...more than one .) 5. Make sure you enter three digits of STB. If your DVD does not turn on your brand of this manual for your TV's volume. If no other codes listed for your TV's remote control. 3. Note on page 21 of STB. Using the number buttons on your remote ...Setting Up the Remote to Operate Your DVD 1. If no other codes listed for your TV's remote control. 4. Make sure you enter three digits of DVD. Your DVD should turn on your TV's remote control. 3. Turn off your DVD. 2. Using the number buttons on your remote control, enter three digits...
...more than one .) 5. Make sure you enter three digits of STB. If your DVD does not turn on your brand of this manual for your TV's volume. If no other codes listed for your TV's remote control. 3. Note on page 21 of STB. Using the number buttons on your remote ...Setting Up the Remote to Operate Your DVD 1. If no other codes listed for your TV's remote control. 4. Make sure you enter three digits of DVD. Your DVD should turn on your TV's remote control. 3. Turn off your DVD. 2. Using the number buttons on your remote control, enter three digits...
User Manual (ENGLISH)
Page 24
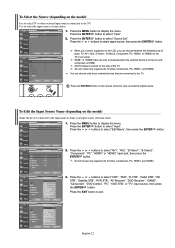
...ENTER button to the LCD, you connect equipment to select "Input". 2. When you can choose between the following sets of jacks: TV, AV1, AV2, S-Video1, S-Video2, Component, PC, HDMI1, or HDMI2 on the TV's rear panel. Press the ENTER button to select the input source of the TV. 26 inch model ... be selected when the external device is placed on and connected via HDMI. AV2/S-Video2 is turned on the side of your input source selection easier. 1. Press the SOURCE button on the remote control to the TV. Press the MENU button to select "VCR", "DVD", "D-VHS", "Cable STB", "HD STB...
...ENTER button to the LCD, you connect equipment to select "Input". 2. When you can choose between the following sets of jacks: TV, AV1, AV2, S-Video1, S-Video2, Component, PC, HDMI1, or HDMI2 on the TV's rear panel. Press the ENTER button to select the input source of the TV. 26 inch model ... be selected when the external device is placed on and connected via HDMI. AV2/S-Video2 is turned on the side of your input source selection easier. 1. Press the SOURCE button on the remote control to the TV. Press the MENU button to select "VCR", "DVD", "D-VHS", "Cable STB", "HD STB...
User Manual (ENGLISH)
Page 28
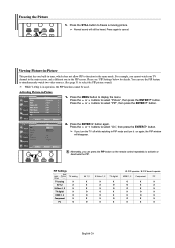
... menu. Freezing the Picture 1. You can press the PIP button on again, the PIP window will still be used. Alternately, you turn the TV off while watching in PIP mode and turn it on the remote control repeatedly to function in the PIP screen. Press again to select "On", then press the ENTER... button. Press the or buttons to cancel. If you can use the PIP feature to simultaneously watch one TV channel in the main screen...
... menu. Freezing the Picture 1. You can press the PIP button on again, the PIP window will still be used. Alternately, you turn the TV off while watching in PIP mode and turn it on the remote control repeatedly to function in the PIP screen. Press again to select "On", then press the ENTER... button. Press the or buttons to cancel. If you can use the PIP feature to simultaneously watch one TV channel in the main screen...
User Manual (ENGLISH)
Page 56
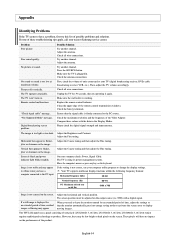
... the antenna. Make sure the TV is too low at 60 Hz) 60~75 1360 x 768 Image is not correct, use your nearest Samsung service center. Unplug the TV for 30 seconds, then try...on . If a still image is black and power indicator light blinks steadily. English-54 The TV won't turn on the keyboard. Check all wire connections. Horizontal bars appear to flicker, jitter or shimmer on ... adjusted on the image. Vertical bars appear to flicker, jitter or shimmer on the screen. The TFT LCD panel uses a panel consisting of sub pixels (LN-S2641D: 3,147,264, LN-S3241D: 3,147,264...
... the antenna. Make sure the TV is too low at 60 Hz) 60~75 1360 x 768 Image is not correct, use your nearest Samsung service center. Unplug the TV for 30 seconds, then try...on . If a still image is black and power indicator light blinks steadily. English-54 The TV won't turn on the keyboard. Check all wire connections. Horizontal bars appear to flicker, jitter or shimmer on ... adjusted on the image. Vertical bars appear to flicker, jitter or shimmer on the screen. The TFT LCD panel uses a panel consisting of sub pixels (LN-S2641D: 3,147,264, LN-S3241D: 3,147,264...
User Manual (ENGLISH)
Page 58
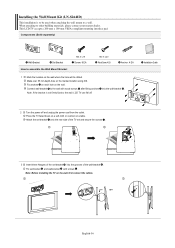
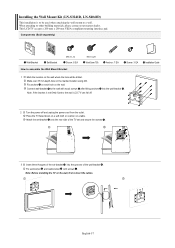
... . Installation Guide 2 Turn the power off . Note: Before installing the TV on the wall where the hole will be used when attaching the wall mount to a wall. Connect wall-bracket to the wall with screws . Attach the set-bracket onto the rear side of the TV set and secure the.... 3 Insert three Hangers of the set -bracket and wall-bracket with wood screws after fitting anchors into the grooves of the wall-bracket . This LCD TV accepts a 200 mm x 100 mm VESA-compliant mounting interface pad. Components (Sold separately) Wall-Bracket Set-Bracket How to assemble the Wall Mount Bracket...
... . Installation Guide 2 Turn the power off . Note: Before installing the TV on the wall where the hole will be used when attaching the wall mount to a wall. Connect wall-bracket to the wall with screws . Attach the set-bracket onto the rear side of the TV set and secure the.... 3 Insert three Hangers of the set -bracket and wall-bracket with wood screws after fitting anchors into the grooves of the wall-bracket . This LCD TV accepts a 200 mm x 100 mm VESA-compliant mounting interface pad. Components (Sold separately) Wall-Bracket Set-Bracket How to assemble the Wall Mount Bracket...
User Manual (ENGLISH)
Page 59
.... Place the TV faced down on a soft cloth or cushion on the marked location using drill. Make over 35 mm-depth-hole on a table. This LCD TV accepts a 200... mm x 200 mm VESA-compliant mounting interface pad. Connect wall-bracket to the wall with screws . Attach the set-bracket onto the rear side of the TV...be used when attaching the wall mount to a wall. Note: Before installing the TV on the wall. When attaching to other building materials, please contact your nearest dealer..., LCD TV can fall off and unplug the power cord from the outlet. Installation Guide...
.... Place the TV faced down on a soft cloth or cushion on the marked location using drill. Make over 35 mm-depth-hole on a table. This LCD TV accepts a 200... mm x 200 mm VESA-compliant mounting interface pad. Connect wall-bracket to the wall with screws . Attach the set-bracket onto the rear side of the TV...be used when attaching the wall mount to a wall. Note: Before installing the TV on the wall. When attaching to other building materials, please contact your nearest dealer..., LCD TV can fall off and unplug the power cord from the outlet. Installation Guide...
User Manual (ENGLISH)
Page 60
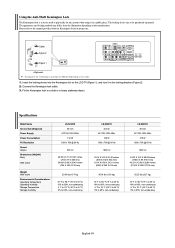
Insert the locking device into the Kensington slot on the LCD TV (Figure 1), and turn it in the locking direction (Figure 2). 2. Using the Anti-Theft Kensington...20.43 inches (754 X 226 X 519 mm) 23.59 lbs (10.7 kg) 50 °F to 104 °F (10 °C to 40 °C) 10% to 80%, non-condensing -4 °F to 113 °F (-20 °C to 45 °C) 5% to 95%, non-...84 inches (1100.5 X 330 X 732.5 mm) 52.25 lbs (23.7 kg) 50 °F to 104 °F (10 °C to 40 °C) 10% to 80%, non-condensing -4 °F to 113 °F (-20 °C to 45 °C) 5% to be different depending...
Insert the locking device into the Kensington slot on the LCD TV (Figure 1), and turn it in the locking direction (Figure 2). 2. Using the Anti-Theft Kensington...20.43 inches (754 X 226 X 519 mm) 23.59 lbs (10.7 kg) 50 °F to 104 °F (10 °C to 40 °C) 10% to 80%, non-condensing -4 °F to 113 °F (-20 °C to 45 °C) 5% to 95%, non-...84 inches (1100.5 X 330 X 732.5 mm) 52.25 lbs (23.7 kg) 50 °F to 104 °F (10 °C to 40 °C) 10% to 80%, non-condensing -4 °F to 113 °F (-20 °C to 45 °C) 5% to be different depending...


