User Manual (ENGLISH)
Page 3
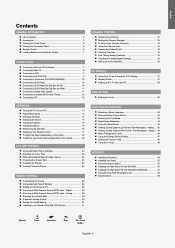
English Contents GENERAL INFORMATION List of the Sub (PIP) Picture 31 CHANNEL CONTROL Selecting the Antenna 32 Setting the Channel Manager 32 To set-up Your Favorite Channels 33 Using the Channel Lists 34 Viewing the Channel Lists 34 Labeling ... Viewing the Control Panel 3 Viewing the Connection Panel 4 Remote Control 6 Installing Batteries in the Remote Control 7 CONNECTIONS Connecting VHF and UHF Antennas 7 Connecting Cable TV 8 Connecting a VCR 9 Connecting an S-VHS VCR 9 Connecting a Camcorder (LN-S3241D/LN-S4041D 10 Connecting a DVD Player 10 Connecting a DVD Player/Set...
English Contents GENERAL INFORMATION List of the Sub (PIP) Picture 31 CHANNEL CONTROL Selecting the Antenna 32 Setting the Channel Manager 32 To set-up Your Favorite Channels 33 Using the Channel Lists 34 Viewing the Channel Lists 34 Labeling ... Viewing the Control Panel 3 Viewing the Connection Panel 4 Remote Control 6 Installing Batteries in the Remote Control 7 CONNECTIONS Connecting VHF and UHF Antennas 7 Connecting Cable TV 8 Connecting a VCR 9 Connecting an S-VHS VCR 9 Connecting a Camcorder (LN-S3241D/LN-S4041D 10 Connecting a DVD Player 10 Connecting a DVD Player/Set...
User Manual (ENGLISH)
Page 4
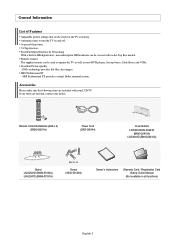
...Adjustable picture settings that can be stored in all locations) English-2 Excellent Digital Interface & Networking With a built-in HD digital tuner, non-subscription HD broadcasts can be viewed with your dealer. Accessories Please make sure the following items are missing, contact your LCD TV. Remote... Screw (6002-001294) Owner's Instructions Warranty Card / Registration Card /Safety Guide Manual (Not available in the TV's memory. A special sleep timer. Excellent Picture Quality - If any items are included with no Set-Top Box needed. Remote Control The supplied remote can ...
...Adjustable picture settings that can be stored in all locations) English-2 Excellent Digital Interface & Networking With a built-in HD digital tuner, non-subscription HD broadcasts can be viewed with your dealer. Accessories Please make sure the following items are missing, contact your LCD TV. Remote... Screw (6002-001294) Owner's Instructions Warranty Card / Registration Card /Safety Guide Manual (Not available in the TV's memory. A special sleep timer. Excellent Picture Quality - If any items are included with no Set-Top Box needed. Remote Control The supplied remote can ...
User Manual (ENGLISH)
Page 8
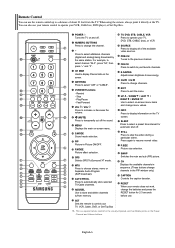
...the available channels in sequence. (These buttons change channels. Stop - Play/Pause - English-6 PIP Picture-in the PIP window only.) CAPTION Controls the caption decoder. TV, DVD, STB, CABLE, VCR Press to operate your TV, DVD, STB, CABLE (box), or VCR SOURCE Press to display all of about 23 feet ...from memory. CH / CH Press to change channels in Picture ON/OFF. STILL Press to resume normal video...
...the available channels in sequence. (These buttons change channels. Stop - Play/Pause - English-6 PIP Picture-in the PIP window only.) CAPTION Controls the caption decoder. TV, DVD, STB, CABLE, VCR Press to operate your TV, DVD, STB, CABLE (box), or VCR SOURCE Press to display all of about 23 feet ...from memory. CH / CH Press to change channels in Picture ON/OFF. STILL Press to resume normal video...
User Manual (ENGLISH)
Page 11
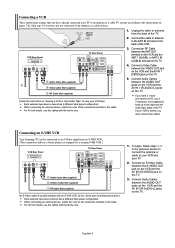
... the cable or antenna from an S-VHS VCR. (This connection delivers a better picture as compared to the instructions on pages 7-8). Connect a Video Cable between the VIDEO OUT jack on the VCR and the AV IN 1 [VIDEO] jack on the TV. 4. Connect an RF Cable between the S-VIDEO OUT jack on the VCR...panel configuration. Connect the cable or antenna to the right and left audio input jacks of the TV. Skip step 1 if you have not yet connected to the cable. Connecting an S-VHS VCR Your Samsung TV can be connected to an S-Video signal from the back of the connection terminal to an ...
... the cable or antenna from an S-VHS VCR. (This connection delivers a better picture as compared to the instructions on pages 7-8). Connect a Video Cable between the VIDEO OUT jack on the VCR and the AV IN 1 [VIDEO] jack on the TV. 4. Connect an RF Cable between the S-VIDEO OUT jack on the VCR...panel configuration. Connect the cable or antenna to the right and left audio input jacks of the TV. Skip step 1 if you have not yet connected to the cable. Connecting an S-VHS VCR Your Samsung TV can be connected to an S-Video signal from the back of the connection terminal to an ...
User Manual (ENGLISH)
Page 17
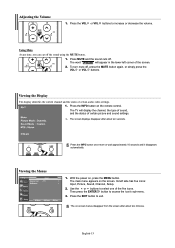
... main menu appears on , press the MENU button. Then press the ENTER button to exit. The TV will appear in the lower-left side has five icons: Input, Picture, Sound, Channel, Setup. 2. Its left corner of certain picture and sound settings. Press the EXIT button to access the icon's sub-menu. 3. English-15...
... main menu appears on , press the MENU button. Then press the ENTER button to exit. The TV will appear in the lower-left side has five icons: Input, Picture, Sound, Channel, Setup. 2. Its left corner of certain picture and sound settings. Press the EXIT button to access the icon's sub-menu. 3. English-15...

User Manual (ENGLISH)
Page 25
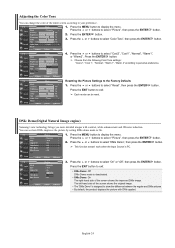
...'t operate in PC mode, Tint, Sharpness and Color are preset at the factory. Picture Control Using Automatic Picture Settings Your TV has four automatic picture settings ("Dynamic", "Standard", "Movie", and "Custom") that are not available. Press the or buttons to select "Picture", then press the ENTER button. 2. Choose Movie when watching movies. Press the EXIT...
...'t operate in PC mode, Tint, Sharpness and Color are preset at the factory. Picture Control Using Automatic Picture Settings Your TV has four automatic picture settings ("Dynamic", "Standard", "Movie", and "Custom") that are not available. Press the or buttons to select "Picture", then press the ENTER button. 2. Choose Movie when watching movies. Press the EXIT...
User Manual (ENGLISH)
Page 26
... "Warm 2" according to select "Color Tone", then press the ENTER button. 4. Resetting the Picture Settings to select "Cool2", "Cool1", "Normal", "Warm1", or "Warm2". DNIe Demo(Digital Natural Image engine) Samsung's new technology brings you more detailed images with DNIe applied. English-24 Press the or buttons ...", then press the ENTER button. You can be reset. Press the or buttons to select "Picture", then press the ENTER button. 2. Press the or buttons to select "Picture", then press the ENTER button. 2. Press the MENU button to your preference. 1. This function...
... "Warm 2" according to select "Color Tone", then press the ENTER button. 4. Resetting the Picture Settings to select "Cool2", "Cool1", "Normal", "Warm1", or "Warm2". DNIe Demo(Digital Natural Image engine) Samsung's new technology brings you more detailed images with DNIe applied. English-24 Press the or buttons ...", then press the ENTER button. You can be reset. Press the or buttons to select "Picture", then press the ENTER button. 2. Press the or buttons to select "Picture", then press the ENTER button. 2. Press the MENU button to your preference. 1. This function...
User Manual (ENGLISH)
Page 27
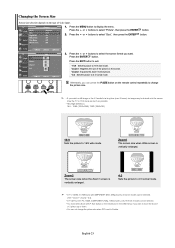
... the screen format you want . Press the or buttons to Double. Zoom1 The screen size when Wide screen is vertically enlarged. 4:3 Sets the picture to 4:3 normal mode. • In TV, VIDEO, S-VIDEO,and all COMPONENT (480i, 480p) modes, all screen modes can be selected. (16:9 • Zoom1 • Zoom2 • 4:3)....wide mode. • Zoom1 : Magnifies the size of video input. 1. View the TV in the OSD menu) if you want to move the Zoom 1 or 2 picture up or down. • You can not change the picture size. • If you can be burned onto the screen. English-25 Press the ...
... the screen format you want . Press the or buttons to Double. Zoom1 The screen size when Wide screen is vertically enlarged. 4:3 Sets the picture to 4:3 normal mode. • In TV, VIDEO, S-VIDEO,and all COMPONENT (480i, 480p) modes, all screen modes can be selected. (16:9 • Zoom1 • Zoom2 • 4:3)....wide mode. • Zoom1 : Magnifies the size of video input. 1. View the TV in the OSD menu) if you want to move the Zoom 1 or 2 picture up or down. • You can not change the picture size. • If you can be burned onto the screen. English-25 Press the ...
User Manual (ENGLISH)
Page 28
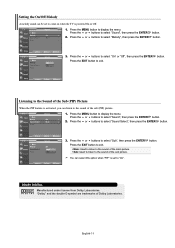
... press the ENTER button. Alternately, you cannot watch two video sources. (See page 31 to cancel. PIP Settings Sub Main Picture Picture TV analog TV analog X AV 1,2 X S-Video 1, 2 X TV digital X HDMI 1, 2 O Component X PC O AV 1,2 X X X O O X O S-Video 1, 2 X X X O O X X TV digital X O O X X O X O: PIP operates / X: PIP doesn't operate HDMI 1, 2 Component PC O X X O X X O X X X O X X O X O X X X X X English-26 You can press the PIP button on again, the...
... press the ENTER button. Alternately, you cannot watch two video sources. (See page 31 to cancel. PIP Settings Sub Main Picture Picture TV analog TV analog X AV 1,2 X S-Video 1, 2 X TV digital X HDMI 1, 2 O Component X PC O AV 1,2 X X X O O X O S-Video 1, 2 X X X O O X X TV digital X O O X X O X O: PIP operates / X: PIP doesn't operate HDMI 1, 2 Component PC O X X O X X O X X X O X X O X O X X X X X English-26 You can press the PIP button on again, the...
User Manual (ENGLISH)
Page 29
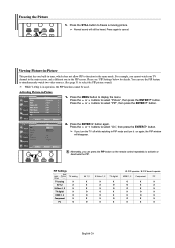
...for PIP. 3. Select the source of the PIP and Main image 4. Changing the Position of the PIP window. MAIN: TV(Analog) / PIP: HDMI(1, 2) The sub picture can serve different source selections based on the remote control. Press the ENTER buttons. English-27 Press the ENTER buttons. ...• MAIN: AV(1, 2), S-Video(1, 2), Component / PIP: TV(Digital) • MAIN: PC, HDMI(1,2) / PIP: TV(Analog) • The channel can adjust picture position only by pressing the or buttons and press the ENTER button. Press the or buttons to view...
...for PIP. 3. Select the source of the PIP and Main image 4. Changing the Position of the PIP window. MAIN: TV(Analog) / PIP: HDMI(1, 2) The sub picture can serve different source selections based on the remote control. Press the ENTER buttons. English-27 Press the ENTER buttons. ...• MAIN: AV(1, 2), S-Video(1, 2), Component / PIP: TV(Digital) • MAIN: PC, HDMI(1,2) / PIP: TV(Analog) • The channel can adjust picture position only by pressing the or buttons and press the ENTER button. Press the or buttons to view...
User Manual (ENGLISH)
Page 33
... to the sound of the sub (PIP) picture. 1. Press the or buttons to exit. Main: Used to listen to "On". Setting the On/Off Melody A melody sound can listen to the Sound of Dolby Laboratories. Press the or buttons to come on when the TV is powered On or Off. 1. Press the... or buttons to display the menu. "Dolby" and the double-D symbol are trademarks of the Sub (PIP) Picture When the PIP feature is set to select "On" or "Off", then press...
... to the sound of the sub (PIP) picture. 1. Press the or buttons to exit. Main: Used to listen to "On". Setting the On/Off Melody A melody sound can listen to the Sound of Dolby Laboratories. Press the or buttons to come on when the TV is powered On or Off. 1. Press the... or buttons to display the menu. "Dolby" and the double-D symbol are trademarks of the Sub (PIP) Picture When the PIP feature is set to select "On" or "Off", then press...

User Manual (ENGLISH)
Page 40
...automatically adjust the video signals the monitor receives. Press the MENU button to the utmost and fine tune again. Vertical stripes may appear or the picture may be blurry. Press the or buttons to adjust the screen quality. Press the or buttons to select "Coarse" or "Fine", then press... then press the ENTER button. Press the or buttons to display the menu. Setting up the TV with your PC How to Auto Adjust Use the Auto Adjust function to remove or reduce picture noise. The function also automatically fine-tunes the settings and adjusts the frequency values and positions. ...
...automatically adjust the video signals the monitor receives. Press the MENU button to the utmost and fine tune again. Vertical stripes may appear or the picture may be blurry. Press the or buttons to adjust the screen quality. Press the or buttons to select "Coarse" or "Fine", then press... then press the ENTER button. Press the or buttons to display the menu. Setting up the TV with your PC How to Auto Adjust Use the Auto Adjust function to remove or reduce picture noise. The function also automatically fine-tunes the settings and adjusts the frequency values and positions. ...
User Manual (ENGLISH)
Page 45
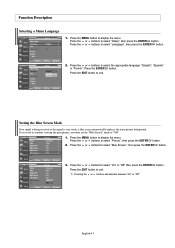
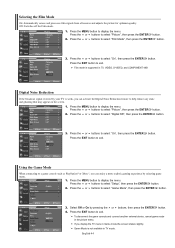
...EXIT button to select "Blue Screen", then press the ENTER button. 3. If you wish to continue viewing the poor picture, you must set the "Blue Screen" mode to select "Picture", then press the ENTER button. 2. Press the or buttons to "Off" 1. Press the or buttons to select...button. Setting the Blue Screen Mode If no signal is being received or the signal is very weak, a blue screen automatically replaces the noisy picture background. Function Description Selecting a Menu Language 1. Pressing the or buttons will alternate between "On" or "Off" button. Press the or buttons...
...EXIT button to select "Blue Screen", then press the ENTER button. 3. If you wish to continue viewing the poor picture, you must set the "Blue Screen" mode to select "Picture", then press the ENTER button. 2. Press the or buttons to "Off" 1. Press the or buttons to select...button. Setting the Blue Screen Mode If no signal is being received or the signal is very weak, a blue screen automatically replaces the noisy picture background. Function Description Selecting a Menu Language 1. Pressing the or buttons will alternate between "On" or "Off" button. Press the or buttons...
User Manual (ENGLISH)
Page 46
...exit. Press the or buttons to exit. Press the EXIT button to select "On", then press the ENTER button. If you display the TV menu in the picture menu. Press the MENU button to select "Setup", then press the ENTER button. 2. Press the or buttons to display the menu. ... not available in TV, VIDEO, S-VIDEO, and COMPONENT 480i Digital Noise Reduction If the broadcast signal received by pressing the or buttons, then press the ENTER button. 4. Selecting the Film Mode On: Automatically senses and processes film signals from all sources and adjusts the picture for optimum quality. ...
...exit. Press the or buttons to exit. Press the EXIT button to select "On", then press the ENTER button. If you display the TV menu in the picture menu. Press the MENU button to select "Setup", then press the ENTER button. 2. Press the or buttons to display the menu. ... not available in TV, VIDEO, S-VIDEO, and COMPONENT 480i Digital Noise Reduction If the broadcast signal received by pressing the or buttons, then press the ENTER button. 4. Selecting the Film Mode On: Automatically senses and processes film signals from all sources and adjusts the picture for optimum quality. ...
User Manual (ENGLISH)
Page 53
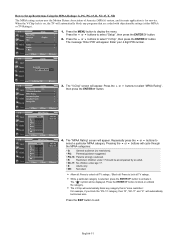
... press the ENTER button. 4. Press the or buttons to lock all TV ratings. English-51 Press the MENU button to Set up Restrictions Using the MPAA Ratings: G, PG, PG-13, R, NC-17, X, NR The MPAA rating system uses the Motion Picture Association of America (MPAA) system, and its main application is "more...
... press the ENTER button. 4. Press the or buttons to lock all TV ratings. English-51 Press the MENU button to Set up Restrictions Using the MPAA Ratings: G, PG, PG-13, R, NC-17, X, NR The MPAA rating system uses the Motion Picture Association of America (MPAA) system, and its main application is "more...
User Manual (ENGLISH)
Page 56
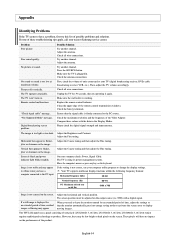
...the output source (i.e. These pixels will have a computer connected to display moving images. No picture or sound. Remote control malfunctions "Check signal cable" message. Adjust the antenna. Check the ...1360 x 768 Image is working. The TFT LCD panel uses a panel consisting of time, residual images or blurring may appear. The TV operates erratically. Digital broadcasting screen problem. Possible ...Adjust the Coarse tuning and then adjust the Fine tuning. The TV is not correct, use your nearest Samsung service center. If the setting is using its power management system....
...the output source (i.e. These pixels will have a computer connected to display moving images. No picture or sound. Remote control malfunctions "Check signal cable" message. Adjust the antenna. Check the ...1360 x 768 Image is working. The TFT LCD panel uses a panel consisting of time, residual images or blurring may appear. The TV operates erratically. Digital broadcasting screen problem. Possible ...Adjust the Coarse tuning and then adjust the Fine tuning. The TV is not correct, use your nearest Samsung service center. If the setting is using its power management system....


