
User Manual (ENGLISH)
Page 3
...Panel 3 Viewing the Connection Panel 4 Viewing the Remote Control 5 Installing Batteries in the Remote Control 6 CONNECTIONS Connecting VHF and UHF Antennas 6 Connecting Cable TV 7 Connecting a VCR 8 Connecting an S-VHS VCR 8 Connecting a DVD Player 9 Connecting a DVD Player/Set-Top Box via DVI 9 Connecting a ... Editing the Input Source Name 22 PC DISPLAY Setting Up Your PC Software (Based on Windows XP 23 Display Modes 23 Setting up the TV with your PC 24 TROUBLESHOOTING Identifying Problems 25 APPENDIX Specifications 25 Symbol Press Important Note One-Touch Button English...
...Panel 3 Viewing the Connection Panel 4 Viewing the Remote Control 5 Installing Batteries in the Remote Control 6 CONNECTIONS Connecting VHF and UHF Antennas 6 Connecting Cable TV 7 Connecting a VCR 8 Connecting an S-VHS VCR 8 Connecting a DVD Player 9 Connecting a DVD Player/Set-Top Box via DVI 9 Connecting a ... Editing the Input Source Name 22 PC DISPLAY Setting Up Your PC Software (Based on Windows XP 23 Display Modes 23 Setting up the TV with your PC 24 TROUBLESHOOTING Identifying Problems 25 APPENDIX Specifications 25 Symbol Press Important Note One-Touch Button English...

User Manual (ENGLISH)
Page 4
... and fasten with your dealer. General Information List of the TV. 3. V-Chip function. Accessories Please make sure the following items are missing, contact your LCD TV. Installing the Stand Owner's Instructions Warranty Card / Registration Card /Safety Guide Manual (Not available in the TV's memory. Samsung Electronics is not responsible for any items are included with...
... and fasten with your dealer. General Information List of the TV. 3. V-Chip function. Accessories Please make sure the following items are missing, contact your LCD TV. Installing the Stand Owner's Instructions Warranty Card / Registration Card /Safety Guide Manual (Not available in the TV's memory. Samsung Electronics is not responsible for any items are included with...

User Manual (ENGLISH)
Page 5
To use the more advanced features, you use the and buttons on the remote control. Press to see an on-screen menu of your TV's basic features, including the on-screen menu. MENU Press to increase or decrease the volume. POWER INDICATOR Blinks and turns off . REMOTE CONTROL ... the power is on and lights up in stand-by mode. SPEAKERS (POWER) Press to change channels. SOURCE Toggles between all the available input sources (TV, AV1, AV2, S-Video, Component1, Component2, PC, HDMI). In the on-screen menu, use the buttons as you use the remote control. In the ...
To use the more advanced features, you use the and buttons on the remote control. Press to see an on-screen menu of your TV's basic features, including the on-screen menu. MENU Press to increase or decrease the volume. POWER INDICATOR Blinks and turns off . REMOTE CONTROL ... the power is on and lights up in stand-by mode. SPEAKERS (POWER) Press to change channels. SOURCE Toggles between all the available input sources (TV, AV1, AV2, S-Video, Component1, Component2, PC, HDMI). In the on-screen menu, use the buttons as you use the remote control. In the ...

User Manual (ENGLISH)
Page 6
You should use a locking device, contact the dealer where you purchased the TV. PC IN Connect to a cable TV system. COMPONENT IN 1, 2 Connect component video/audio. If you want to use the DVI to HDMI cable or DVI-HDMI adapter (DVI to HDMI) for ...
You should use a locking device, contact the dealer where you purchased the TV. PC IN Connect to a cable TV system. COMPONENT IN 1, 2 Connect component video/audio. If you want to use the DVI to HDMI cable or DVI-HDMI adapter (DVI to HDMI) for ...

User Manual (ENGLISH)
Page 7
...PIP window only.) Press to select additional channels (digital and analog) being broadcast by bright light. Press to automatically store selected TV/Cable channels. Press to select channels directly on the TV. Press to select on-screen menu items and change channels. Viewing the Remote Control Turns the...example, to turn off the sound. Displays the main on /off . Adjust the TV sound by selecting one of the preset factory settings. (or selects your personal, customized sound settings) Adjust the TV picture by selecting one of the remote control may be affected by the same station...
...PIP window only.) Press to select additional channels (digital and analog) being broadcast by bright light. Press to automatically store selected TV/Cable channels. Press to select channels directly on the TV. Press to select on-screen menu items and change channels. Viewing the Remote Control Turns the...example, to turn off the sound. Displays the main on /off . Adjust the TV sound by selecting one of the preset factory settings. (or selects your personal, customized sound settings) Adjust the TV picture by selecting one of the remote control may be affected by the same station...

User Manual (ENGLISH)
Page 8
... Place the wires from the TV. (Assuming typical TV usage, the batteries last for a long time. Install two AAA size batteries. Remove the batteries and store them in the Remote Control 1. Make sure to the combiner. If you are using the remote control for about 23 feet from the twin leads under... the screws on a 300-75 Ω adapter (not supplied). Connections Connecting VHF and UHF Antennas If your TV (one VHF and one UHF), you won't be used up to the...
... Place the wires from the TV. (Assuming typical TV usage, the batteries last for a long time. Install two AAA size batteries. Remove the batteries and store them in the Remote Control 1. Make sure to the combiner. If you are using the remote control for about 23 feet from the twin leads under... the screws on a 300-75 Ω adapter (not supplied). Connections Connecting VHF and UHF Antennas If your TV (one VHF and one UHF), you won't be used up to the...

User Manual (ENGLISH)
Page 9
...cable box's output channel, which is cable-ready, you do not need a cable box to "B", you set the A/B switch to a cable TV system, follow the instructions below . Find the cable that Descrambles All Channels ANT IN ANT OUT 1. Connect this cable to tune your cable box...ANT IN terminal on the back of RF cable. (These items are available at most electronics stores.) ANT IN 1. After you have made this TV is usually channel 3 or 4.) English-7 Because this connection, set the A/B switch to view unscrambled cable channels. Incoming cable Splitter Incoming cable ...
...cable box's output channel, which is cable-ready, you do not need a cable box to "B", you set the A/B switch to a cable TV system, follow the instructions below . Find the cable that Descrambles All Channels ANT IN ANT OUT 1. Connect this cable to tune your cable box...ANT IN terminal on the back of RF cable. (These items are available at most electronics stores.) ANT IN 1. After you have made this TV is usually channel 3 or 4.) English-7 Because this connection, set the A/B switch to view unscrambled cable channels. Incoming cable Splitter Incoming cable ...

User Manual (ENGLISH)
Page 10
...Cables between the S-VIDEO OUT jack on the VCR and the AV IN [S-VIDEO] jack on the TV. Each external input source device has a different back panel configuration. Connecting an S-VHS VCR Your Samsung TV can be connected to an S-Video signal from the back of the VCR. 3. Connect Audio Cables ...between the VIDEO OUT jack on the VCR and the AV IN [VIDEO] jack on the TV. 5. When connecting an external device, match the color...
...Cables between the S-VIDEO OUT jack on the VCR and the AV IN [S-VIDEO] jack on the TV. Each external input source device has a different back panel configuration. Connecting an S-VHS VCR Your Samsung TV can be connected to an S-Video signal from the back of the VCR. 3. Connect Audio Cables ...between the VIDEO OUT jack on the VCR and the AV IN [VIDEO] jack on the TV. 5. When connecting an external device, match the color...

User Manual (ENGLISH)
Page 11
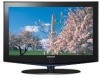
... enhanced video quality. When connecting an external device, match the color of the connection terminal to the cable. 1. DVD Player / Set-Top Box TV Rear Panel 2 Audio Cable (Not supplied) 1 DVI to COMPONENT IN also. Connect a DVI to the cable. 1. For example, if connecting...supplied) Each external input source device has a different back panel configuration. Connect a Component Cable between the HDMI/DVI IN connector on the TV and the DVI connector on the DVD player. 2. Each external input source device has a different back panel configuration. When connecting an ...
... enhanced video quality. When connecting an external device, match the color of the connection terminal to the cable. 1. DVD Player / Set-Top Box TV Rear Panel 2 Audio Cable (Not supplied) 1 DVI to COMPONENT IN also. Connect a DVI to the cable. 1. For example, if connecting...supplied) Each external input source device has a different back panel configuration. Connect a Component Cable between the HDMI/DVI IN connector on the TV and the DVI connector on the DVD player. 2. Each external input source device has a different back panel configuration. When connecting an ...
User Manual (ENGLISH)
Page 12
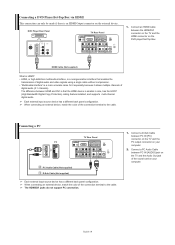
.... • "Multimedia interface" is an HDMI Output connector on your computer. 2. Connect a D-Sub Cable between the HDMI/DVI connector on the TV and the HDMI connector on your computer. English-10 Each external input source device has a different back panel configuration. The HDMI/DVI jacks do not... multi-channel digital audio. When connecting an external device, match the color of the connection terminal to the cable. DVD Player Rear Panel TV Rear Panel 1. Connecting a DVD Player/Set-Top Box via HDMI This connection can only be made if there is a more accurate name...
.... • "Multimedia interface" is an HDMI Output connector on your computer. 2. Connect a D-Sub Cable between the HDMI/DVI connector on the TV and the HDMI connector on your computer. English-10 Each external input source device has a different back panel configuration. The HDMI/DVI jacks do not... multi-channel digital audio. When connecting an external device, match the color of the connection terminal to the cable. DVD Player Rear Panel TV Rear Panel 1. Connecting a DVD Player/Set-Top Box via HDMI This connection can only be made if there is a more accurate name...

User Manual (ENGLISH)
Page 13
...the "Hour", "Minute" or "am /pm". is displayed. • Language: Select your language. • Air/Cable: Select your local cable company TV system. • Auto Program: Selects between terrestrial antenna connection or your watching." If you want to interrupt the memorization process. 6. button. The message "Plug...to select "Start". Press the ENTER button to select "Setup", then press the ENTER 2. The message "Enjoy your local cable company TV system. You can also use the POWER button on the front of the available channels and stores them in memory. Press the MENU ...
...the "Hour", "Minute" or "am /pm". is displayed. • Language: Select your language. • Air/Cable: Select your local cable company TV system. • Auto Program: Selects between terrestrial antenna connection or your watching." If you want to interrupt the memorization process. 6. button. The message "Plug...to select "Start". Press the ENTER button to select "Setup", then press the ENTER 2. The message "Enjoy your local cable company TV system. You can also use the POWER button on the front of the available channels and stores them in memory. Press the MENU ...

User Manual (ENGLISH)
Page 14
When you can temporarily cut off the sound using the MUTE button. 1. Press the PRE-CH button. The TV will not see all the channels that the TV has memorized. (The TV must have memorized at least three channels). Press the button once more or wait approximately 10 seconds and it disappears automatically.... button again, or simply press the VOL or VOL button. Using MUTE button: At any time, you press the CH or CH button, the TV changes channels in the lower-left corner of certain audio-video settings. English-12 To turn mute off . Viewing the Display Press the INFO button...
When you can temporarily cut off the sound using the MUTE button. 1. Press the PRE-CH button. The TV will not see all the channels that the TV has memorized. (The TV must have memorized at least three channels). Press the button once more or wait approximately 10 seconds and it disappears automatically.... button again, or simply press the VOL or VOL button. Using MUTE button: At any time, you press the CH or CH button, the TV changes channels in the lower-left corner of certain audio-video settings. English-12 To turn mute off . Viewing the Display Press the INFO button...

User Manual (ENGLISH)
Page 15
... interrupt the memorization process and return to select "Channel", then press the ENTER button. 2. Use the number buttons to the TV (i.e. Selecting the Video Signal-source Before your television can begin memorizing the available channels, you must specify the type of signal ...Press the MENU button to 3 on the remote control. Press the ENTER button. 3. button on the remote control. Storing Channels Automatically The TV automatically cycles through all the available channels are stored, the "Channel" menu reappears. 5. At this point, the signal source has been selected...
... interrupt the memorization process and return to select "Channel", then press the ENTER button. 2. Use the number buttons to the TV (i.e. Selecting the Video Signal-source Before your television can begin memorizing the available channels, you must specify the type of signal ...Press the MENU button to 3 on the remote control. Press the ENTER button. 3. button on the remote control. Storing Channels Automatically The TV automatically cycles through all the available channels are stored, the "Channel" menu reappears. 5. At this point, the signal source has been selected...

User Manual (ENGLISH)
Page 16
... brightness of the whole screen. • Sharpness: Adjusts the outline of objects to select the desired picture effect. Picture Control Using Automatic Picture Settings Your TV has four automatic picture settings ("Dynamic", "Standard", "Movie", "Custom") that are stored according to select the desired color tone setting. Press the or button to...
... brightness of the whole screen. • Sharpness: Adjusts the outline of objects to select the desired picture effect. Picture Control Using Automatic Picture Settings Your TV has four automatic picture settings ("Dynamic", "Standard", "Movie", "Custom") that are stored according to select the desired color tone setting. Press the or button to...

User Manual (ENGLISH)
Page 17
...", then press the ENTER button. 3. In PC, Component and DVI Mode, only "16:9" and "4:3" mode can select the picture size which best corresponds to your TV is the default setting for a video movie or normal broadcasting. Resetting the Picture Settings to the Factory Defaults You can activate the Digital Noise Reduction...
...", then press the ENTER button. 3. In PC, Component and DVI Mode, only "16:9" and "4:3" mode can select the picture size which best corresponds to your TV is the default setting for a video movie or normal broadcasting. Resetting the Picture Settings to the Factory Defaults You can activate the Digital Noise Reduction...

User Manual (ENGLISH)
Page 18
... voices over other sounds. • Custom: Selects your custom sound settings (See "Customizing the Sound", page 17). For example, you turn the TV off while watching in this case. Press the or buttons to select "Position", then press the ENTER button. 8. PIP Settings (O: PIP operates, ...X: PIP doesn't operate) Main Sub TV PC O AV1 AV2 S-Video Component1 Component2 PC O O O X X X HDMI X When the main picture is in the PIP window. Press the ENTER ...
... voices over other sounds. • Custom: Selects your custom sound settings (See "Customizing the Sound", page 17). For example, you turn the TV off while watching in this case. Press the or buttons to select "Position", then press the ENTER button. 8. PIP Settings (O: PIP operates, ...X: PIP doesn't operate) Main Sub TV PC O AV1 AV2 S-Video Component1 Component2 PC O O O X X X HDMI X When the main picture is in the PIP window. Press the ENTER ...
User Manual (ENGLISH)
Page 20
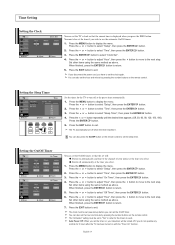
...7. Press the or button to the next step. 5. Setting the Sleep Timer Set the timer for the TV to the channel of your television will : Switch on the remote control. You can also set the hour...", then press the Set other items using the same method as above ) before you can set the TV's clock so that the set the hour and minute by pressing the number buttons on the remote control ... time appears. (Off, 30, 60, 90, 120, 150, 180) Press the ENTER button. 5. The TV automatically turn off automatically at the time you set to use the automatic On/Off timers. 1. Setting the On...
...7. Press the or button to the next step. 5. Setting the Sleep Timer Set the timer for the TV to the channel of your television will : Switch on the remote control. You can also set the hour...", then press the Set other items using the same method as above ) before you can set the TV's clock so that the set the hour and minute by pressing the number buttons on the remote control ... time appears. (Off, 30, 60, 90, 120, 150, 180) Press the ENTER button. 5. The TV automatically turn off automatically at the time you set to use the automatic On/Off timers. 1. Setting the On...

User Manual (ENGLISH)
Page 21
... the ENTER button: Depending on your existing setup, the color of the V-Chip restrictions can be blocked (TV-G, TV-PG, TV-14, and TV-MA). Similarly, if you block "TV-Y" category, then TV-Y7 will automatically block certain categories that is deemed inappropriate for your PIN and enter them. Choose any ...button to select "V-Chip", then press the ENTER button. 3. How to select "V-Chip", then press the ENTER button. 3. The TV-Y7, TV-PG, TV-14, and TV-MA have additional options. The Change PIN screen will appear. Press the or button to display the menu. The default PIN number...
... the ENTER button: Depending on your existing setup, the color of the V-Chip restrictions can be blocked (TV-G, TV-PG, TV-14, and TV-MA). Similarly, if you block "TV-Y" category, then TV-Y7 will automatically block certain categories that is deemed inappropriate for your PIN and enter them. Choose any ...button to select "V-Chip", then press the ENTER button. 3. How to select "V-Chip", then press the ENTER button. 3. The TV-Y7, TV-PG, TV-14, and TV-MA have additional options. The Change PIN screen will appear. Press the or button to display the menu. The default PIN number...

User Manual (ENGLISH)
Page 22
..., and press the ENTER button to clear all screens. Not rated. 6. For example, if you block the "L" sub-rating in TV-PG, then the "L" sub-ratings in TV-14 and TV-MA will automatically be blocked. 8. Press the or button to exit. • E: • C: • C8+: •... each sub-rating. A highlighted letter ("U" or "B") will automatically block certain categories that are coded with objectionable ratings (either MPAA or TV-Ratings). 1. The V-chip will be selected, and no restrictions). Press the or button to set up Restrictions Using the Canadian English...
..., and press the ENTER button to clear all screens. Not rated. 6. For example, if you block the "L" sub-rating in TV-PG, then the "L" sub-ratings in TV-14 and TV-MA will automatically be blocked. 8. Press the or button to exit. • E: • C: • C8+: •... each sub-rating. A highlighted letter ("U" or "B") will automatically block certain categories that are coded with objectionable ratings (either MPAA or TV-Ratings). 1. The V-chip will be selected, and no restrictions). Press the or button to set up Restrictions Using the Canadian English...

User Manual (ENGLISH)
Page 23
...schedule and on the tape's packaging: . 1. The "B" is not suitable for the closed captions as PlayStationTM or XboxTM, you display the TV menu in TV mode. Press the ENTER button. 3. Press the EXIT button to select "Setup", then press the ENTER 2. To disconnect the game console and...13. • 16 ans+: Programming is indicated. 6. Press the or button to select "Caption", then press the ENTER button. 3. Your TV decodes and displays the closed captions. Press the or button to select a appropriate restriction. button. Press the or button to Set up Restrictions Using...
...schedule and on the tape's packaging: . 1. The "B" is not suitable for the closed captions as PlayStationTM or XboxTM, you display the TV menu in TV mode. Press the ENTER button. 3. Press the EXIT button to select "Setup", then press the ENTER 2. To disconnect the game console and...13. • 16 ans+: Programming is indicated. 6. Press the or button to select "Caption", then press the ENTER button. 3. Your TV decodes and displays the closed captions. Press the or button to select a appropriate restriction. button. Press the or button to Set up Restrictions Using...


