Quick Guide (easy Manual) (ver.1.0) (English)
Page 2
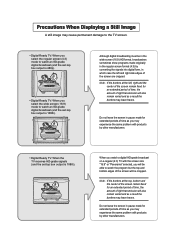
... manufacturers. • Digital Ready TV: When the TV receives HD-grade signals (and the set -top box output is 1080i). Do not leave the screen in pause mode for extended periods of the screen are cropped. Do not leave the screen in which case the left , right and the center of the screen remain fixed for an extended period of time, the amount...
... manufacturers. • Digital Ready TV: When the TV receives HD-grade signals (and the set -top box output is 1080i). Do not leave the screen in pause mode for extended periods of the screen are cropped. Do not leave the screen in which case the left , right and the center of the screen remain fixed for an extended period of time, the amount...
Quick Guide (easy Manual) (ver.1.0) (English)
Page 4
... All Channels . . .8 Connecting to a Cable Box that Descrambles Some Channels . .8 Connecting a PC 9 Connecting a VCR 10 Connecting an S-VHS VCR 11 Connecting a DVD Player 12 Chapter 3: Special Features Turning the TV On and Off 13 Changing Channels 13 Using the Channel Buttons 13 Using the PRE-CH Button to select the Previous Channel . .13 Adjusting the Volume 13 Using Mute 13 Viewing the Display 14 Viewing the Menus 14 Chapter 4: Operation Plug & Play Feature 15 Memorizing the Channels 16 Selecting the Video Signal-source...
... All Channels . . .8 Connecting to a Cable Box that Descrambles Some Channels . .8 Connecting a PC 9 Connecting a VCR 10 Connecting an S-VHS VCR 11 Connecting a DVD Player 12 Chapter 3: Special Features Turning the TV On and Off 13 Changing Channels 13 Using the Channel Buttons 13 Using the PRE-CH Button to select the Previous Channel . .13 Adjusting the Volume 13 Using Mute 13 Viewing the Display 14 Viewing the Menus 14 Chapter 4: Operation Plug & Play Feature 15 Memorizing the Channels 16 Selecting the Video Signal-source...
Quick Guide (easy Manual) (ver.1.0) (English)
Page 5
... Set up Your PC Software (Windows only 45 Adjusting the Screen Quality 46 Changing the Screen Position 47 To Initialize the Screen Position or Color Settings 48 How to Auto Adjust 49 Using Automatic Picture Settings 50 Customizing the Picture 51 Adjusting the Color Tone 52 Customizing the Color 53 Chapter 6: Troubleshooting Identifying Problems 54 Appendix Using the Anti-Theft Kensington Lock 56 Retractable Stand 57 Installing VESA compliant mounting devices 58 Installing the Wall Mount Kit 59 Display Mode 61 Using...
... Set up Your PC Software (Windows only 45 Adjusting the Screen Quality 46 Changing the Screen Position 47 To Initialize the Screen Position or Color Settings 48 How to Auto Adjust 49 Using Automatic Picture Settings 50 Customizing the Picture 51 Adjusting the Color Tone 52 Customizing the Color 53 Chapter 6: Troubleshooting Identifying Problems 54 Appendix Using the Anti-Theft Kensington Lock 56 Retractable Stand 57 Installing VESA compliant mounting devices 58 Installing the Wall Mount Kit 59 Display Mode 61 Using...
Quick Guide (easy Manual) (ver.1.0) (English)
Page 6
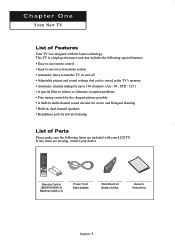
... or eliminate reception problems • Fine tuning control for the sharpest picture possible • A built-in multi-channel sound decoder for stereo and bilingual listening • Built-in, dual channel speakers • Headphone jack for private listening List of Features Your TV was designed with your dealer. Remote Control (BN59-00429A) & Batteries (AAA x 2) Power Cord 3903-000085 Wall Mount kit BN96-01270A Owner's Instructions English-1 Chapter...
... or eliminate reception problems • Fine tuning control for the sharpest picture possible • A built-in multi-channel sound decoder for stereo and bilingual listening • Built-in, dual channel speakers • Headphone jack for private listening List of Features Your TV was designed with your dealer. Remote Control (BN59-00429A) & Batteries (AAA x 2) Power Cord 3903-000085 Wall Mount kit BN96-01270A Owner's Instructions English-1 Chapter...
Quick Guide (easy Manual) (ver.1.0) (English)
Page 7
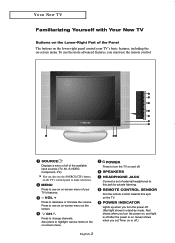
... remote control towards this jack for private listening. POWER INDICATOR Lights up when you turn the TV on and off after the power is on. English-2 POWER Press to make selections. Press to change channels. SPEAKERS HEADPHONE JACK Connect a set Timer on or off . (Red light shows in stand-by mode, Red shows when you set of external headphones to see an on-screen menu on the screen. SOURCE Displays a menu of all of the available input sources...
... remote control towards this jack for private listening. POWER INDICATOR Lights up when you turn the TV on and off after the power is on. English-2 POWER Press to make selections. Press to change channels. SPEAKERS HEADPHONE JACK Connect a set Timer on or off . (Red light shows in stand-by mode, Red shows when you set of external headphones to see an on-screen menu on the screen. SOURCE Displays a menu of all of the available input sources...

Quick Guide (easy Manual) (ver.1.0) (English)
Page 8
.... AV IN Video and audio inputs for external devices, such as a VCR or a DVD player. For more information on connecting equipment, see pages 6~12. COMPONENT IN (480i/480p) Connect a component video/audio. ANT IN Connect to an antenna or to a cable TV system. S-VIDEO IN Connect an S-Video signal from a camcorder or VCR. KENSINGTON LOCK (See page 56) POWER INPUT Connect the supplied power cord. English-3 YOUR NEW TV Rear Panel Jacks Use the rear panel jacks to connect an A/V component that will...
.... AV IN Video and audio inputs for external devices, such as a VCR or a DVD player. For more information on connecting equipment, see pages 6~12. COMPONENT IN (480i/480p) Connect a component video/audio. ANT IN Connect to an antenna or to a cable TV system. S-VIDEO IN Connect an S-Video signal from a camcorder or VCR. KENSINGTON LOCK (See page 56) POWER INPUT Connect the supplied power cord. English-3 YOUR NEW TV Rear Panel Jacks Use the rear panel jacks to connect an A/V component that will...
Quick Guide (easy Manual) (ver.1.0) (English)
Page 9
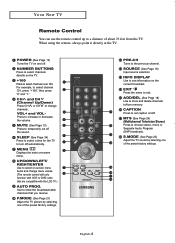
POWER (See Page 13) Turns the TV on the TV. +100 Press to select channels directly on and off. NUMBER BUTTONS Press to select channels over 100. MENU Displays the main on /off. Use to set caption on -screen menu. CAPTION Press to store the broadcast/cable channels that are compatible with VCR or DVD units that you receive. For example, to change menu values. (The remote control will only function with the LCD TV...
POWER (See Page 13) Turns the TV on the TV. +100 Press to select channels directly on and off. NUMBER BUTTONS Press to select channels over 100. MENU Displays the main on /off. Use to set caption on -screen menu. CAPTION Press to store the broadcast/cable channels that are compatible with VCR or DVD units that you receive. For example, to change menu values. (The remote control will only function with the LCD TV...
Quick Guide (easy Manual) (ver.1.0) (English)
Page 14
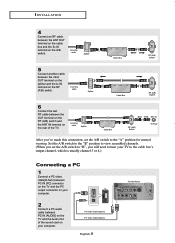
... the rear of the sound card on the TV and the Audio Out of the TV. Set the A/B switch to the "B" position to view scrambled channels. (When you will need to tune your computer. Incoming cable Splitter Cable Box RF (A/B) Switch ANT IN TV Rear After you've made this connection, set the A/B switch to "B", you set the A/B switch to the cable box's output channel, which is usually channel 3 or 4.) Connecting a PC 1 Connect a PC video cable(D-Sub...
... the rear of the sound card on the TV and the Audio Out of the TV. Set the A/B switch to the "B" position to view scrambled channels. (When you will need to tune your computer. Incoming cable Splitter Cable Box RF (A/B) Switch ANT IN TV Rear After you've made this connection, set the A/B switch to "B", you set the A/B switch to the cable box's output channel, which is usually channel 3 or 4.) Connecting a PC 1 Connect a PC video cable(D-Sub...
Quick Guide (easy Manual) (ver.1.0) (English)
Page 15
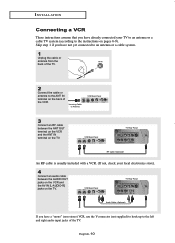
... the TV. English-10 Incoming Cable or Antenna VCR Rear Panel 3 Connect an RF cable between the AUDIO OUT jacks on the VCR and the AV IN [L-AUDIO-R] jacks on pages 6-9). I N S TA L L AT I O N Connecting a VCR These instructions assume that you have a "mono" (non-stereo) VCR, use the Y-connector (not supplied) to hook up to the left and right audio input jacks of the TV. Skip...
... the TV. English-10 Incoming Cable or Antenna VCR Rear Panel 3 Connect an RF cable between the AUDIO OUT jacks on the VCR and the AV IN [L-AUDIO-R] jacks on pages 6-9). I N S TA L L AT I O N Connecting a VCR These instructions assume that you have a "mono" (non-stereo) VCR, use the Y-connector (not supplied) to hook up to the left and right audio input jacks of the TV. Skip...
Quick Guide (easy Manual) (ver.1.0) (English)
Page 17
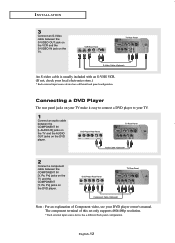
..., PR] jacks on the DVD player. DVD Player Rear Panel TV Rear Panel Component Cable Note : For an explanation of this set only supports 480i/480p resolution. * Each external input source device has a different back panel configuration. The component terminal of Component video, see your local electronics store.) * Each external input source device has a different back panel configuration. English-12 VCR Rear Panel TV Rear Panel S-Video Cable An S-video cable is usually included with an S-VHS VCR. (If not, check your DVD player owner's manual.
..., PR] jacks on the DVD player. DVD Player Rear Panel TV Rear Panel Component Cable Note : For an explanation of this set only supports 480i/480p resolution. * Each external input source device has a different back panel configuration. The component terminal of Component video, see your local electronics store.) * Each external input source device has a different back panel configuration. English-12 VCR Rear Panel TV Rear Panel S-Video Cable An S-video cable is usually included with an S-VHS VCR. (If not, check your DVD player owner's manual.
Quick Guide (easy Manual) (ver.1.0) (English)
Page 19
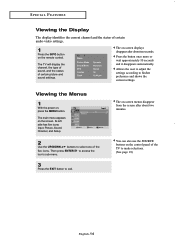
... seconds and it disappears automatically. Viewing the Menus 1 With the power on the control panel of the TV to exit. Its left side has five icons: Input, Picture, Sound, Channel, and Setup. 2 Use the UP/DOWN buttons to his/her preference and shows the current settings. You can also use the SOURCE buttons on , press the MENU button. Allows the user to adjust the settings according to select one of...
... seconds and it disappears automatically. Viewing the Menus 1 With the power on the control panel of the TV to exit. Its left side has five icons: Input, Picture, Sound, Channel, and Setup. 2 Use the UP/DOWN buttons to his/her preference and shows the current settings. You can also use the SOURCE buttons on , press the MENU button. Allows the user to adjust the settings according to select one of...

Quick Guide (easy Manual) (ver.1.0) (English)
Page 29
... the MENU button to select "Mono", "Stereo" or "SAP", then press the ENTER button. English-24 See the previous page.) Depending on the remote control. (When you change the MTS setting.) In other modes except RF, only Mono and Stereo can be adjusted to suit your personal preference. (Alternatively, you are having difficulty receiving a stereo signal. • Choose Stereo for channels that...
... the MENU button to select "Mono", "Stereo" or "SAP", then press the ENTER button. English-24 See the previous page.) Depending on the remote control. (When you change the MTS setting.) In other modes except RF, only Mono and Stereo can be adjusted to suit your personal preference. (Alternatively, you are having difficulty receiving a stereo signal. • Choose Stereo for channels that...
Quick Guide (easy Manual) (ver.1.0) (English)
Page 59
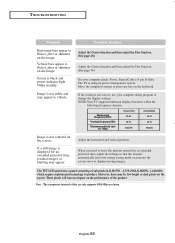
... connections. Press the SOURCE button. The TV operates erratically. Identifying Problems Problem Possible Solution Poor picture Poor sound quality. Try another channel. First, check the volume of these values with the data in . Remote control malfunctions "Check Signal Cable" message. Clean the upper edge of the video Adapter. "Mode Not Supported!" Make sure the wall outlet is firmly connected to the PC sources. Check the maximum resolution and the frequency of the remote control...
... connections. Press the SOURCE button. The TV operates erratically. Identifying Problems Problem Possible Solution Poor picture Poor sound quality. Try another channel. First, check the volume of these values with the data in . Remote control malfunctions "Check Signal Cable" message. Clean the upper edge of the video Adapter. "Mode Not Supported!" Make sure the wall outlet is firmly connected to the PC sources. Check the maximum resolution and the frequency of the remote control...
Quick Guide (easy Manual) (ver.1.0) (English)
Page 60
... LCD panel uses a panel consisting of this set only supports 480i/480p resolution. If the setting is not correct, use your computer check: Power, Signal Cable (15-pin D-Sub) The TV is displayed for an extended period of time, adjust the settings so that the monitor automatically goes into energy saving mode or activates the screen saver to display moving images. If a still image is using its power management system. When you need...
... LCD panel uses a panel consisting of this set only supports 480i/480p resolution. If the setting is not correct, use your computer check: Power, Signal Cable (15-pin D-Sub) The TV is displayed for an extended period of time, adjust the settings so that the monitor automatically goes into energy saving mode or activates the screen saver to display moving images. If a still image is using its power management system. When you need...
Quick Guide (easy Manual) (ver.1.0) (English)
Page 63
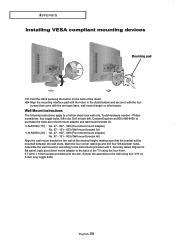
... (Wall mount bracket kit) • LN-R2050 (20") : No. 47 - 007 - 099 (Pivot direct mount adapter) No. 97 - 101 - 003 (Wall mount bracket kit) Align the wall mount bracket on the back of the TV using four 3/16 by 3-inch long toggle bolts. Tools/Hardware needed - Securely attach Ergotron's flat panel, triple pivot direct mount adapter to a hollow sheet-rock wall only. APPENDIX Installing VESA compliant mounting devices Mounting pad Fold the stand pressing the button...
... (Wall mount bracket kit) • LN-R2050 (20") : No. 47 - 007 - 099 (Pivot direct mount adapter) No. 97 - 101 - 003 (Wall mount bracket kit) Align the wall mount bracket on the back of the TV using four 3/16 by 3-inch long toggle bolts. Tools/Hardware needed - Securely attach Ergotron's flat panel, triple pivot direct mount adapter to a hollow sheet-rock wall only. APPENDIX Installing VESA compliant mounting devices Mounting pad Fold the stand pressing the button...
Quick Guide (easy Manual) (ver.1.0) (English)
Page 64
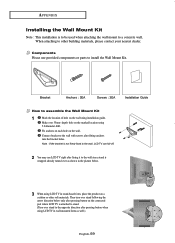
... location using 5.0-diameter drill. hole on the wall. Then turn over stand following the arrow direction below . 3 When using LCD TV in wall-mounted form as well.) English-59 Bracket Anchors : 3EA Screws : 3EA Installation Guide How to the wall with screws after fitting anchors into the bracket holes. depth- Connect bracket to assemble the Wall Mount Kit 1 Mark the location of hole on the wall using installation guide. Components Please use LCD TV right after fixing it to the wall...
... location using 5.0-diameter drill. hole on the wall. Then turn over stand following the arrow direction below . 3 When using LCD TV in wall-mounted form as well.) English-59 Bracket Anchors : 3EA Screws : 3EA Installation Guide How to the wall with screws after fitting anchors into the bracket holes. depth- Connect bracket to assemble the Wall Mount Kit 1 Mark the location of hole on the wall using installation guide. Components Please use LCD TV right after fixing it to the wall...
Quick Guide (easy Manual) (ver.1.0) (English)
Page 65
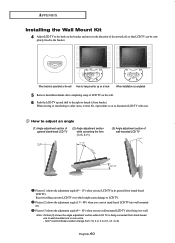
... adjustment section of wall-mounted LCD TV Picture (1) shows the adjustment angle (0°~ 13°) when you use wall-mounted LCD TV after completing setup of LCD TV on the bracket and move in its general form (stand-based LCD TV). Picture (3) shows the adjustment angle (0°~ 10°) when you convert stand-based LCD TV into wall-mounted one or vice versa. - When bracket is assembled on the wall How to hang monitor up on a hook When installation...
... adjustment section of wall-mounted LCD TV Picture (1) shows the adjustment angle (0°~ 13°) when you use wall-mounted LCD TV after completing setup of LCD TV on the bracket and move in its general form (stand-based LCD TV). Picture (3) shows the adjustment angle (0°~ 10°) when you convert stand-based LCD TV into wall-mounted one or vice versa. - When bracket is assembled on the wall How to hang monitor up on a hook When installation...
Quick Guide (easy Manual) (ver.1.0) (English)
Page 67
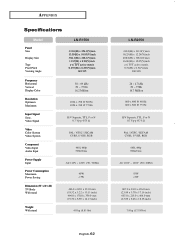
APPENDIX Specifications Model Panel Size Display Size Type Pixel Pitch Viewing Angle LN-R1550 331.6(H) x 254.9(V)mm 13.05(H) x 10.03(V)inch 304.1(H) x 228.1(V)mm 11.97(H) x 8.98(V)inch a-si TFT active matrix 0.297(H) x 0.297(V)mm 140/115 Frequency Horizontal Vertical Display Color Resolution Optimum Maximum Input Signal Sync. Video Signal Video Color System Video System Component Video Input Audio Input Power Supply Input Power Consumption Maximum Power Saving Dimension (W x D x H) TV Body With stand Weight With stand 30 ~ 69 kHz 50 ~ 75 Hz 16.2 Million...
APPENDIX Specifications Model Panel Size Display Size Type Pixel Pitch Viewing Angle LN-R1550 331.6(H) x 254.9(V)mm 13.05(H) x 10.03(V)inch 304.1(H) x 228.1(V)mm 11.97(H) x 8.98(V)inch a-si TFT active matrix 0.297(H) x 0.297(V)mm 140/115 Frequency Horizontal Vertical Display Color Resolution Optimum Maximum Input Signal Sync. Video Signal Video Color System Video System Component Video Input Audio Input Power Supply Input Power Consumption Maximum Power Saving Dimension (W x D x H) TV Body With stand Weight With stand 30 ~ 69 kHz 50 ~ 75 Hz 16.2 Million...

Brochure
Page 1
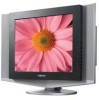
... with 2 Watts x 2 Audio Power • MTS/SAP Stereo Sound CONNECTIONS • Component Video Input (Y,Pb,Pr) 480i/480p • S-Video and Composite Video Input • PC (RGB) Input All features, specifications, and model numbers subject to change. LN-R1550 15" LCD TV with PC/DVD/TV Inputs LCD Want a high performance new flat panel TV that doubles as a wall mount and you've got both performance and value. TV/VIDEO • Premium Samsung LCD Panel • ED...
... with 2 Watts x 2 Audio Power • MTS/SAP Stereo Sound CONNECTIONS • Component Video Input (Y,Pb,Pr) 480i/480p • S-Video and Composite Video Input • PC (RGB) Input All features, specifications, and model numbers subject to change. LN-R1550 15" LCD TV with PC/DVD/TV Inputs LCD Want a high performance new flat panel TV that doubles as a wall mount and you've got both performance and value. TV/VIDEO • Premium Samsung LCD Panel • ED...

Brochure
Page 2
... different programs. Auto Volume Leveler keeps audio volume consistent during channel changing. Design and specifications are subject to fit audio characteristics of moving video. Closed Caption1 (CC) displays dialog that this product meets the Energy Star guidelines for energy efficiency. LCD LN-R1550 15" LCD TV with PC/DVD/TV Inputs Remote Rear Jack Panel F E AT U R E S 1024 Horizontal x 768 Vertical Pixel Resolution: High resolution pixel density with Stand Weight: 13.7 lbs. Samsung's new LCD TV...
... different programs. Auto Volume Leveler keeps audio volume consistent during channel changing. Design and specifications are subject to fit audio characteristics of moving video. Closed Caption1 (CC) displays dialog that this product meets the Energy Star guidelines for energy efficiency. LCD LN-R1550 15" LCD TV with PC/DVD/TV Inputs Remote Rear Jack Panel F E AT U R E S 1024 Horizontal x 768 Vertical Pixel Resolution: High resolution pixel density with Stand Weight: 13.7 lbs. Samsung's new LCD TV...


