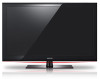
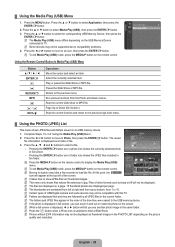
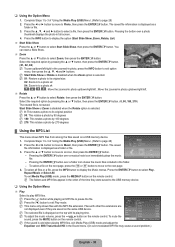
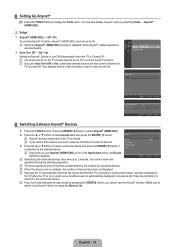
User Manual (user Manual) (ver.1.0) (English, Spanish)
Page 3
... Setup Menu 22 Input / Support ■ Configuring the Input Menu 26 ■ Configuring the Support Menu 26 Media Play (USB) ■ Using the Media Play (USB) Function 27 ■ Using the Media Play (USB) Menu 28 ■ Using the PHOTO (JPEG) List 28 ■ Using the MP3 List 30 Anynet+ ■ Connecting Anynet...
User Manual (user Manual) (ver.1.0) (English, Spanish)
Page 6
... supplied power cord. N Use the HDMI IN 1 (DVI) jack for service only. 5 AUDIO OUT - Connects to the audio input jacks on your Amplifier/Home theater. 6 USB - POWER INPUT - Connector for DVI connection to physically fix the system when used as the AV IN 1 jack. The Kensington Lock (optional) is a device used...
User Manual (user Manual) (ver.1.0) (English, Spanish)
Page 28
... If the problem still persists, refer to increase the signal strength. Continue to TV speaker in the test pattern, select Yes. Contact Samsung's call center for assistance. Please check your connections. If the problem still persists, refer to the TV. Press this sound test?' ...this if your choice. Input Source List Edit Name TV, AV1, AV2, Component1, Component2, PC, HDMI1/DVI, HDMI2, HDMI3, HDMI4, USB N You can hear sound only from the speakers, select No. Check the color pattern on the screen. Use to improve the reception of your ...
User Manual (user Manual) (ver.1.0) (English, Spanish)
Page 29
... download method. Refer to this information when connecting external devices to the TV. ❑ Contact Samsung View this case, insert the USB device, exit the screen by connecting a USB drive to the USB port located on your files to prevent them after the upgrade. ❑ HD Connection Guide This...upgrades and using a separate cable connection, there may be compatible with no USB device connected the message "There is not found at the start of the file. Examples of the content in the future. SAMSUNG is upgraded, video and audio settings you are supported. If you have...
User Manual (user Manual) (ver.1.0) (English, Spanish)
Page 30
... N While a full screen is displayed as bmp or tiff will let you can zoom in the folder. Press the ▲ or ▼ button to 3 of USB Digital camera and audio devices may take a few seconds to 15. XTICK 861MB/994MB Free 3. n Move E Enter R Return - N The files are displayed per .... At this TV. Files of the time they are numbered from the Photo and Music menus. N The folders and JPEG files appear in Media Play (USB) Menu Button ENTERE ∂ ∫ RETURN R INFO ∫ π / µ EXITe Operations Move the cursor and select an item Select the currently...
User Manual (user Manual) (ver.1.0) (English, Spanish)
Page 31
N While removing files, don't remove the USB memory device. Press the ▲ or ▼ button to select the required option (Fast, Normal, Slow), then press the ENTERE button. Background Music Select ... of 15). Repeat the above operation to select the required option (On, Off), then press the ENTERE button. To exit Media Play (USB) mode, press the MEDIA.P button on the USB Memory Device. Press the ▲ or ▼ button to select multiple music files. Slide Show Speed : Fast ► Background Music : On...
User Manual (user Manual) (ver.1.0) (English, Spanish)
Page 32
...N Start Slide Show or Rotate is disabled when the Zoom option is displayed as a folder or file. Complete Steps 1 to 3 of 'Using the Media Play (USB) Menu'. (Refer to its original position N 90: This rotates a photo by 90 degrees N 180: This rotates a photo by 180 degrees N 270: This ... Start Slide Show or Zoom is disabled when the Rotate option is displayed as a folder or file. 3. Complete Steps 1 to 3 of 'Using the Media Play (USB) Menu'. (Refer to the next page. 4. Press the ◄ or ► button to move to page 28) 2. ❑ Using the Option Menu 1. ...
User Manual (user Manual) (ver.1.0) (English, Spanish)
Page 33
...files. Deselect all You can select Fast, Normal or Slow. Background Music Select to determine whether to 3 of the Media Play (USB) menu. 1. Select an MP3 file as the background music. Repeat Music Select to determine whether to repeat playing the music when all music... Background Music Setting to select a music file to listen to control the slide show speed. English - 31 N While removing files, don't remove the USB memory device. Complete Steps 1 to play MP3 files in the current folder. Press the ◄ or ► button to move to set the waiting...
User Manual (user Manual) (ver.1.0) (English, Spanish)
Page 35
... Anynet+ related operations are listed. Press the TOOLS button. N When the device scan is switched to turn off . Application Anynet+ (HDMI-CEC) ► Media play (USB) Device List Setup U Move E Enter R Return Anynet+(HDMI-CEC) Auto Turn Off : On : Yes U Move E Enter R Return ¦ Switching between Anynet+ Devices 1. It is complete...