User Manual (ENGLISH)
Page 3
... Energy Saving Feature 52 Setting the Function Help 53 Digital Noise Reduction 53 Using the V-Chip 54 Upgrading the Software 61 Appendix Troubleshooting 62 Installing the Stand 64 Disconnecting the Stand 64 Wall-Mount Adjustment (LN-T4042H ,LN-T4642H 65 Wall Mount Kit Specifications ( VESA 66 Using the Anti-Theft Kensington Lock 67 Specifications 68...
... Energy Saving Feature 52 Setting the Function Help 53 Digital Noise Reduction 53 Using the V-Chip 54 Upgrading the Software 61 Appendix Troubleshooting 62 Installing the Stand 64 Disconnecting the Stand 64 Wall-Mount Adjustment (LN-T4042H ,LN-T4642H 65 Wall Mount Kit Specifications ( VESA 66 Using the Anti-Theft Kensington Lock 67 Specifications 68...
User Manual (ENGLISH)
Page 6
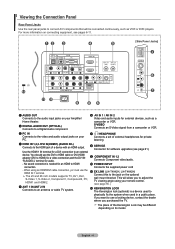
You should use a locking device, contact the dealer where you purchased the TV. EX LINK (LN-T4042H, LN-T4642H) Connect this to HDMI 0 POWER INPUT connection Connects the supplied power cord - If you to connect A/V components that will allow you want to ... signal from a camcorder or VCR. 3 PC IN Connects to the video and audio output jacks on your PC. 7 HEADPHONE Connects a set of external headphones for software upgrades (see pages 6-11. [Side Panel Jacks] 1 AUDIO OUT Connects to the audio input jacks on your Amplifier/ Home theater. 2 DIGITAL AUDIO OUT (OPTICAL) Connects ...
You should use a locking device, contact the dealer where you purchased the TV. EX LINK (LN-T4042H, LN-T4642H) Connect this to HDMI 0 POWER INPUT connection Connects the supplied power cord - If you to connect A/V components that will allow you want to ... signal from a camcorder or VCR. 3 PC IN Connects to the video and audio output jacks on your PC. 7 HEADPHONE Connects a set of external headphones for software upgrades (see pages 6-11. [Side Panel Jacks] 1 AUDIO OUT Connects to the audio input jacks on your Amplifier/ Home theater. 2 DIGITAL AUDIO OUT (OPTICAL) Connects ...

User Manual (ENGLISH)
Page 63
Please check the firmware version after completing the firmware upgrade. Upgrading the Software Samsung may take up to not disconnect the power or remove the USB drive while upgrades are complete. Press the MENU button to select SW Upgrade, then press the ENTER button. 4. Press the ENTER ... on the back of your TV's firmware in the future. Insert a USB drive containing the firmware upgrade into the SERVICE prot on ► SW Upgrade ► Move Enter Software Upgrade Scanning for USB... Press the ▲ or ▼ buttons to display the menu. The TV ...
Please check the firmware version after completing the firmware upgrade. Upgrading the Software Samsung may take up to not disconnect the power or remove the USB drive while upgrades are complete. Press the MENU button to select SW Upgrade, then press the ENTER button. 4. Press the ENTER ... on the back of your TV's firmware in the future. Insert a USB drive containing the firmware upgrade into the SERVICE prot on ► SW Upgrade ► Move Enter Software Upgrade Scanning for USB... Press the ▲ or ▼ buttons to display the menu. The TV ...


