
Open Source Guide (ENGLISH)
Page 1
... or she is intended to apply in other reason (not limited to patent issues), conditions are not responsible for questions regarding open sources, contact Samsung via Email (vdswmanager@samsung. and each author's protection and ours, we want to make sure the software is not the original, so that choice. To send inquiries...
... or she is intended to apply in other reason (not limited to patent issues), conditions are not responsible for questions regarding open sources, contact Samsung via Email (vdswmanager@samsung. and each author's protection and ours, we want to make sure the software is not the original, so that choice. To send inquiries...

Open Source Guide (ENGLISH)
Page 2
How to Apply These Terms to Your New Libraries If you develop a new library, and you want it to be of the greatest possible use to the public, we recommend making it free software that everyone can do so by permitting redistribution under these terms, attach the following notices to most effectively convey the exclusion of the ordinary General Public License). To apply these terms (or, alternatively, under the terms of warranty; 16. You can redistribute and change. IN NO EVENT UNLESS REQUIRED BY APPLICABLE LAW OR AGREED TO IN WRITING WILL ANY COPYRIGHT HOLDER, OR ANY OTHER PARTY ...
How to Apply These Terms to Your New Libraries If you develop a new library, and you want it to be of the greatest possible use to the public, we recommend making it free software that everyone can do so by permitting redistribution under these terms, attach the following notices to most effectively convey the exclusion of the ordinary General Public License). To apply these terms (or, alternatively, under the terms of warranty; 16. You can redistribute and change. IN NO EVENT UNLESS REQUIRED BY APPLICABLE LAW OR AGREED TO IN WRITING WILL ANY COPYRIGHT HOLDER, OR ANY OTHER PARTY ...
User Manual (ENGLISH)
Page 1
... Road Ridgefield Park, NJ 07660-0511 LN-S4095D LN-S4695D TFT-LCD TELEVISION BN68-01047J-01 Owner's Instructions Register your product at www.samsung.com/global/register Comment contacter Samsung dans le monde Si vous avez des suggestions ou des questions concernant les produits Samsung, veuillez contacter le Service Consommateurs Samsung. Contact SAMSUNG WORLD-WIDE If you have any...
... Road Ridgefield Park, NJ 07660-0511 LN-S4095D LN-S4695D TFT-LCD TELEVISION BN68-01047J-01 Owner's Instructions Register your product at www.samsung.com/global/register Comment contacter Samsung dans le monde Si vous avez des suggestions ou des questions concernant les produits Samsung, veuillez contacter le Service Consommateurs Samsung. Contact SAMSUNG WORLD-WIDE If you have any...
User Manual (ENGLISH)
Page 3
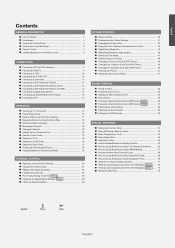
...the Control Panel 4 Viewing the Connection Panel 5 Remote Control 7 Installing Batteries in the Remote Control 8 CONNECTIONS Connecting VHF and UHF Antennas 8 Connecting Cable TV 9 Connecting a VCR 10 Connecting an S-VHS VCR 10 Connecting a Camcorder 11 Connecting a DVD Player/Set-Top Box 11 Connecting a DVD Player/Set-Top...41 Changing the Picture Size 43 Using the Color Weakness Enhancement Feature 44 Digital Noise Reduction 45 DNIe (Digital Natural Image engine 46 Setting the Film Mode 47 Viewing Picture-In-Picture 48 Changing the Size of the Sub (PIP) Picture 49 Changing the ...
...the Control Panel 4 Viewing the Connection Panel 5 Remote Control 7 Installing Batteries in the Remote Control 8 CONNECTIONS Connecting VHF and UHF Antennas 8 Connecting Cable TV 9 Connecting a VCR 10 Connecting an S-VHS VCR 10 Connecting a Camcorder 11 Connecting a DVD Player/Set-Top Box 11 Connecting a DVD Player/Set-Top...41 Changing the Picture Size 43 Using the Color Weakness Enhancement Feature 44 Digital Noise Reduction 45 DNIe (Digital Natural Image engine 46 Setting the Film Mode 47 Viewing Picture-In-Picture 48 Changing the Size of the Sub (PIP) Picture 49 Changing the ...
User Manual (ENGLISH)
Page 4
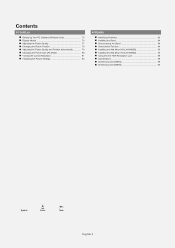
... the Picture Settings 82 APPENDIX Identifying Problems 83 Installing the Stand 84 Disconnecting the Stand 84 Stand Swivel Function 84 Installing the Wall Mount Kit (LN-S4095D 85 Installing the Wall Mount Kit (LN-S4695D 86 Using the Anti-Theft Kensington Lock 88 Specifications 88 Dimensions...
... the Picture Settings 82 APPENDIX Identifying Problems 83 Installing the Stand 84 Disconnecting the Stand 84 Stand Swivel Function 84 Installing the Wall Mount Kit (LN-S4095D 85 Installing the Wall Mount Kit (LN-S4695D 86 Using the Anti-Theft Kensington Lock 88 Specifications 88 Dimensions...
User Manual (ENGLISH)
Page 5
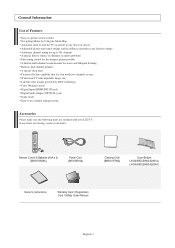
Accessories Please make sure the following items are missing, contact your LCD TV. Remote Control & Batteries (AAA x 2) (BN59-00568A) Power Cord (3903-000144) Cleaning Cloth (BN63-01798A) Cover-Bottom LN-S4095D (BN63-02491A) LN-S4695D (BN63-02624A) Owner's Instructions Warranty Card / Registration Card / Safety Guide Manual ...in, dual channel speakers A special sleep timer Picture-in-Picture capability that lets you watch two channels at once Widescreen TV with your dealer. General Information List of Features Easy-to-operate remote control Navigating Menus by Using the Menu Map ...
Accessories Please make sure the following items are missing, contact your LCD TV. Remote Control & Batteries (AAA x 2) (BN59-00568A) Power Cord (3903-000144) Cleaning Cloth (BN63-01798A) Cover-Bottom LN-S4095D (BN63-02491A) LN-S4695D (BN63-02624A) Owner's Instructions Warranty Card / Registration Card / Safety Guide Manual ...in, dual channel speakers A special sleep timer Picture-in-Picture capability that lets you watch two channels at once Widescreen TV with your dealer. General Information List of Features Easy-to-operate remote control Navigating Menus by Using the Menu Map ...
User Manual (ENGLISH)
Page 6
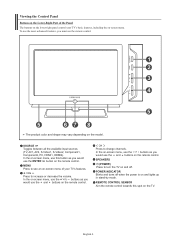
...to change channels. SPEAKERS (POWER) Press to see an on-screen menu of the Panel The buttons on the lower-right panel control your TV's features. In the on-screen menu, use the buttons as you would use the and buttons on the remote control. In the on-... must use the ENTER button on the remote control. English-4 Press to increase or decrease the volume. SOURCE Toggles between all the available input sources (TV, AV1, AV2, S-Video1, S-Video2, Component1, Component2, PC, HDMI1, HDMI2). REMOTE CONTROL SENSOR Aim the remote control towards this button as you ...
...to change channels. SPEAKERS (POWER) Press to see an on-screen menu of the Panel The buttons on the lower-right panel control your TV's features. In the on-screen menu, use the buttons as you would use the and buttons on the remote control. In the on-... must use the ENTER button on the remote control. English-4 Press to increase or decrease the volume. SOURCE Toggles between all the available input sources (TV, AV1, AV2, S-Video1, S-Video2, Component1, Component2, PC, HDMI1, HDMI2). REMOTE CONTROL SENSOR Aim the remote control towards this button as you ...
User Manual (ENGLISH)
Page 7
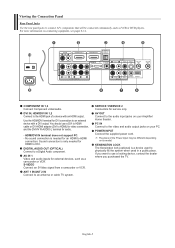
... from a camcorder or VCR. ANT 1 IN/ANT 2 IN Connect to the audio input jacks on your PC. AV OUT Connect to an antenna or cable TV system. For more information on your Amplifier/ Home theater. The place of a device with a DVI output. Sound connection is only needed for an HDMI to... will be different depending on its model. COMPONENT IN 1,2 Connect Component video/audio. You should use a locking device, contact the dealer where you purchased the TV. PC IN Connect to use a DVI to HDMI cable or DVI-HDMI adapter (DVI to DVI. If you want to the video and audio output...
... from a camcorder or VCR. ANT 1 IN/ANT 2 IN Connect to the audio input jacks on your PC. AV OUT Connect to an antenna or cable TV system. For more information on your Amplifier/ Home theater. The place of a device with a DVI output. Sound connection is only needed for an HDMI to... will be different depending on its model. COMPONENT IN 1,2 Connect Component video/audio. You should use a locking device, contact the dealer where you purchased the TV. PC IN Connect to use a DVI to HDMI cable or DVI-HDMI adapter (DVI to DVI. If you want to the video and audio output...

User Manual (ENGLISH)
Page 8
S-VIDEO 2 Video inputs for private listening. HEADPHONE Connect a set of external headphones for external devices with an S-Video output. English-6 Side Panel Jacks Use the left side panel jacks to connect a component that is used only occasionally, such as a camcorder or video game. (See page 11) AV IN 2 Video and audio inputs for external devices.
S-VIDEO 2 Video inputs for private listening. HEADPHONE Connect a set of external headphones for external devices with an S-Video output. English-6 Side Panel Jacks Use the left side panel jacks to connect a component that is used only occasionally, such as a camcorder or video game. (See page 11) AV IN 2 Video and audio inputs for external devices.
User Manual (ENGLISH)
Page 9
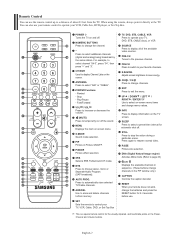
... the volume. (MUTE) Press to the previous channel. Press to stop the action during a particular scene. STILL Press to automatically store selected TV/Cable channels. P.SIZE Picture size selection. CH MGR Used to display all of about 23 feet from memory. PIP Picture-in sequence. (These...INFO Press to exit the menu. DNIe (Digital Natural Image engine) Activates DNIe mode. (Refer to resume normal video. Press again to page 46) CH Displays the available channels in Picture ON/OFF. This is a special remote control for automatic shut off . English-7 When using the remote...
... the volume. (MUTE) Press to the previous channel. Press to stop the action during a particular scene. STILL Press to automatically store selected TV/Cable channels. P.SIZE Picture size selection. CH MGR Used to display all of about 23 feet from memory. PIP Picture-in sequence. (These...INFO Press to exit the menu. DNIe (Digital Natural Image engine) Activates DNIe mode. (Refer to resume normal video. Press again to page 46) CH Displays the available channels in Picture ON/OFF. This is a special remote control for automatic shut off . English-7 When using the remote...
User Manual (ENGLISH)
Page 10
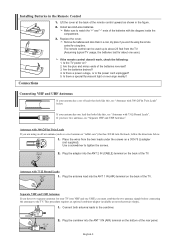
...that has 300 Ω twin flat leads, follow the directions below . ANT 2 IN (CABLE) 2. Make sure to match the "+" and "-" ends of the TV. Is the TV power on a 300-75 Ω adapter (not supplied). UHF VHF ANT 1 IN (AIR) UHF VHF 2. Separate VHF and UHF Antennas If you have two... to about one lead that look like this , see "Antennas with 75 Ω Round Leads ANT 1 IN (AIR) 1. Place the wires from the TV. (Assuming typical TV usage, the batteries last for a long time. Plug the adaptor into the ANT 1 IN (AIR) terminal on the bottom of the batteries reversed? 3....
...that has 300 Ω twin flat leads, follow the directions below . ANT 2 IN (CABLE) 2. Make sure to match the "+" and "-" ends of the TV. Is the TV power on a 300-75 Ω adapter (not supplied). UHF VHF ANT 1 IN (AIR) UHF VHF 2. Separate VHF and UHF Antennas If you have two... to about one lead that look like this , see "Antennas with 75 Ω Round Leads ANT 1 IN (AIR) 1. Place the wires from the TV. (Assuming typical TV usage, the batteries last for a long time. Plug the adaptor into the ANT 1 IN (AIR) terminal on the bottom of the batteries reversed? 3....
User Manual (ENGLISH)
Page 11
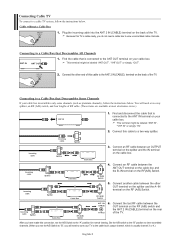
... cable box to the "A" position for normal viewing. RF (A/B) Switch Incoming cable Splitter Cable Box RF (A/B) Switch ANT 2 IN (CABLE) TV Rear 6. Find and disconnect the cable that Descrambles All Channels ANT IN ANT OUT 1. Connect another cable between the ANT OUT terminal on the...Connect this connection, set the A/B Switch to "B", you do not need a two-way splitter, an RF (A/B) switch, and four lengths of the TV. Incoming cable Splitter Cable Box 4. Set the A/B switch to the "B" position to view scrambled channels. (When you set the A/B Switch to view ...
... cable box to the "A" position for normal viewing. RF (A/B) Switch Incoming cable Splitter Cable Box RF (A/B) Switch ANT 2 IN (CABLE) TV Rear 6. Find and disconnect the cable that Descrambles All Channels ANT IN ANT OUT 1. Connect another cable between the ANT OUT terminal on the...Connect this connection, set the A/B Switch to "B", you do not need a two-way splitter, an RF (A/B) switch, and four lengths of the TV. Incoming cable Splitter Cable Box 4. Set the A/B switch to the "B" position to view scrambled channels. (When you set the A/B Switch to view ...
User Manual (ENGLISH)
Page 12
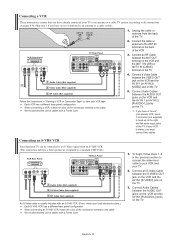
...check your local electronics store.) Each S-VHS VCR has a different back panel configuration. Connecting an S-VHS VCR Your Samsung TV can be connected to an S-Video signal from the back of the TV. We recommend the use of cables with a Ferrite Core. 1. Connect an S-Video Cable between the AUDIO OUT ... must connect two cables. Connect Audio Cables between the S-VIDEO OUT jack on the VCR and the AV IN1 [S-VIDEO] jack on the TV. VCR Rear Panel TV Rear Panel 2. We recommend the use of cables with a Ferrite Core. 4. When connecting a VCR, match the color of the connection...
...check your local electronics store.) Each S-VHS VCR has a different back panel configuration. Connecting an S-VHS VCR Your Samsung TV can be connected to an S-Video signal from the back of the TV. We recommend the use of cables with a Ferrite Core. 1. Connect an S-Video Cable between the AUDIO OUT ... must connect two cables. Connect Audio Cables between the S-VIDEO OUT jack on the VCR and the AV IN1 [S-VIDEO] jack on the TV. VCR Rear Panel TV Rear Panel 2. We recommend the use of cables with a Ferrite Core. 4. When connecting a VCR, match the color of the connection...
User Manual (ENGLISH)
Page 13
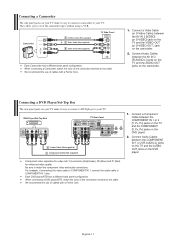
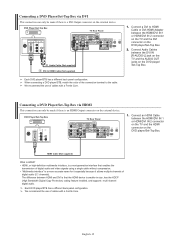
...also. Be sure to the cable. When connecting a Camcorder, match the color of cables with a Ferrite Core. 1. DVD Player/Set-Top Box TV Rear Panel 2 Audio Cable (Not supplied) 1 Component Cable (Not supplied) 1. Connecting a Camcorder The side panel jacks on the camcorder. 2. They allow... you to your TV make it easy to connect a camcorder to view the camcorder tapes without using a VCR. We recommend the use of the connection terminal to...
...also. Be sure to the cable. When connecting a Camcorder, match the color of cables with a Ferrite Core. 1. DVD Player/Set-Top Box TV Rear Panel 2 Audio Cable (Not supplied) 1 Component Cable (Not supplied) 1. Connecting a Camcorder The side panel jacks on the camcorder. 2. They allow... you to your TV make it easy to connect a camcorder to view the camcorder tapes without using a VCR. We recommend the use of the connection terminal to...
User Manual (ENGLISH)
Page 14
... if there is an HDMI Output connector on the external device. The difference between the HDMI/DVI IN 1 or HDMI/DVI IN 2 connector on the TV and the HDMI connector on the DVD player/Set-Top Box. 2. HDMI Cable (Not supplied) What is HDMI? • HDMI, or high-definition multimedia interface... Core. Connect Audio Cables between the HDMI/DVI IN 1 or HDMI/DVI IN 2 connector on the TV and the DVI connector on the DVD player/Set-Top Box. English-12 DVD Player/Set-Top Box TV Rear Panel 2 Audio Cable (Not supplied) 1 DVI to HDMI Cable or DVI-HDMI Adapter between the...
... if there is an HDMI Output connector on the external device. The difference between the HDMI/DVI IN 1 or HDMI/DVI IN 2 connector on the TV and the HDMI connector on the DVD player/Set-Top Box. 2. HDMI Cable (Not supplied) What is HDMI? • HDMI, or high-definition multimedia interface... Core. Connect Audio Cables between the HDMI/DVI IN 1 or HDMI/DVI IN 2 connector on the TV and the DVI connector on the DVD player/Set-Top Box. English-12 DVD Player/Set-Top Box TV Rear Panel 2 Audio Cable (Not supplied) 1 DVI to HDMI Cable or DVI-HDMI Adapter between the...
User Manual (ENGLISH)
Page 15
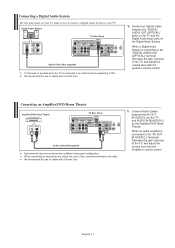
... AUDIO IN [R-AUDIO-L] on the Amplifier/DVD Home Theater. Connecting an Amplifier/DVD Home Theater Amplifier/DVD Home Theater TV Rear Panel Audio Cable (Not supplied) Each external input source device has a different back panel configuration. English-13 When a Digital Audio System... the use of cables with a Ferrite Core. 1. Connect Audio Cables between the "DIGITAL AUDIO OUT (OPTICAL)" jacks on the TV and the Digital Audio Input jacks on your TV. When an audio amplifier is connected to the "AV OUT [R-AUDIO-L]" terminals: Decrease the gain (volume) of the connection terminal...
... AUDIO IN [R-AUDIO-L] on the Amplifier/DVD Home Theater. Connecting an Amplifier/DVD Home Theater Amplifier/DVD Home Theater TV Rear Panel Audio Cable (Not supplied) Each external input source device has a different back panel configuration. English-13 When a Digital Audio System... the use of cables with a Ferrite Core. 1. Connect Audio Cables between the "DIGITAL AUDIO OUT (OPTICAL)" jacks on the TV and the Digital Audio Input jacks on your TV. When an audio amplifier is connected to the "AV OUT [R-AUDIO-L]" terminals: Decrease the gain (volume) of the connection terminal...
User Manual (ENGLISH)
Page 16
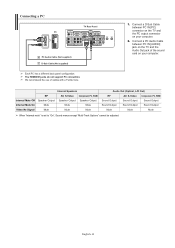
Connect a D-Sub Cable between PC IN [AUDIO] jack on your computer. 2. We recommend the use of the sound card on the TV and the Audio Out jack of cables with a Ferrite Core. 1. The HDMI/DVI jacks do not support PC connection. Connect a PC Audio Cable between PC ...IN [PC] connector on the TV and the PC output connector on your computer. Internal Speakers RF AV, S-Video Component, PC, HDMI Internal Mute Off Speaker Output Speaker Output Speaker Output...
Connect a D-Sub Cable between PC IN [AUDIO] jack on your computer. 2. We recommend the use of the sound card on the TV and the Audio Out jack of cables with a Ferrite Core. 1. The HDMI/DVI jacks do not support PC connection. Connect a PC Audio Cable between PC ...IN [PC] connector on the TV and the PC output connector on your computer. Internal Speakers RF AV, S-Video Component, PC, HDMI Internal Mute Off Speaker Output Speaker Output Speaker Output...
User Manual (ENGLISH)
Page 17
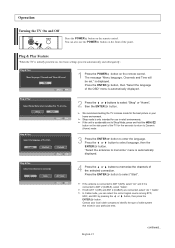
... "Menu language, Channels and Time will be set to Shop Mode, press and hold the MENU button on the remote control. We recommend setting the TV to ANT 2 (CABLE), select "Cable". Shop mode is displayed. "Select the antennas to memorize" menu is automatically displayed. 2 Press the or ... 3 Press the ENTER button to select "Shop" or "Home", then the ENTER button. Operation Turning the TV On and Off Press the POWER button on the front of the panel. Plug & Play Feature When the TV is accidentally set ." If both ANT 1 (AIR) and ANT 2 (CABLE) are connected, select "Air ...
... "Menu language, Channels and Time will be set to Shop Mode, press and hold the MENU button on the remote control. We recommend setting the TV to ANT 2 (CABLE), select "Cable". Shop mode is displayed. "Select the antennas to memorize" menu is automatically displayed. 2 Press the or ... 3 Press the ENTER button to select "Shop" or "Home", then the ENTER button. Operation Turning the TV On and Off Press the POWER button on the front of the panel. Plug & Play Feature When the TV is accidentally set ." If both ANT 1 (AIR) and ANT 2 (CABLE) are connected, select "Air ...
User Manual (ENGLISH)
Page 18
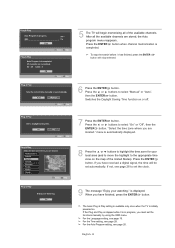
... button. Press the or buttons to select "Manual" or "Auto", then the ENTER button. The basic Plug & Play setting is available only once when the TV is automatically displayed. 8 Press the or buttons to the appropriate time zone on the map of the available channels. If not, see page 28. When... move the highlight to highlight the time zone for your watching." Press the ENTER button when channel memorization is displayed. Press the ENTER button. 5 The TV will be set the functions manually by using the OSD menu.
... button. Press the or buttons to select "Manual" or "Auto", then the ENTER button. The basic Plug & Play setting is available only once when the TV is automatically displayed. 8 Press the or buttons to the appropriate time zone on the map of the available channels. If not, see page 28. When... move the highlight to highlight the time zone for your watching." Press the ENTER button when channel memorization is displayed. Press the ENTER button. 5 The TV will be set the functions manually by using the OSD menu.
User Manual (ENGLISH)
Page 19
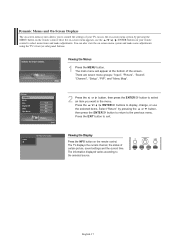
...-screen menu appears, use the selected items. Select "Return" by pressing the MENU button on the remote control. You can also view the on your TV. button to select Press the / / / /ENTER buttons to display, change, or use the / / / /ENTER buttons on -screen menu system and make... allows you want in the menu. Viewing the Menus 1 Press the MENU button. Dynamic Menus and On-Screen Displays The on the remote control. The TV displays the current channel, the status of the screen. There are seven menu groups: "Input", "Picture", "Sound", "Channel", "Setup", "PIP", and "Menu ...
...-screen menu appears, use the selected items. Select "Return" by pressing the MENU button on the remote control. You can also view the on your TV. button to select Press the / / / /ENTER buttons to display, change, or use the / / / /ENTER buttons on -screen menu system and make... allows you want in the menu. Viewing the Menus 1 Press the MENU button. Dynamic Menus and On-Screen Displays The on the remote control. The TV displays the current channel, the status of the screen. There are seven menu groups: "Input", "Picture", "Sound", "Channel", "Setup", "PIP", and "Menu ...