
Open Source Guide (ENGLISH)
Page 2
16. How to Apply These Terms to Your New Libraries If you develop a new library, and you want it free software that everyone can do so by permitting redistribution under these terms, attach the following notices to be of warranty; It is found. and each file should have at least the "copyright" line and a pointer to where the full notice is safest to attach them to the start of each source file to most effectively convey the exclusion of the greatest possible use to the public, we recommend making it to the library. To apply these terms (or, alternatively, under the terms of ...
16. How to Apply These Terms to Your New Libraries If you develop a new library, and you want it free software that everyone can do so by permitting redistribution under these terms, attach the following notices to be of warranty; It is found. and each file should have at least the "copyright" line and a pointer to where the full notice is safest to attach them to the start of each source file to most effectively convey the exclusion of the greatest possible use to the public, we recommend making it to the library. To apply these terms (or, alternatively, under the terms of ...
User Manual (ENGLISH)
Page 3
... Changing the Picture Size 43 Using the Color Weakness Enhancement Feature 44 Digital Noise Reduction 45 DNIe (Digital Natural Image engine 46 Setting the Film Mode 47 Viewing Picture-In-Picture 48 Changing the Size of the Sub (PIP) Picture 49 Changing the Location of the ...to Enable/Disable the Rating Controls 65 How to Set up Restrictions Using "TV Parental Guidelines" ........ 66 How to Set up Restrictions Using "MPAA Rating 67 Important Notes About Parental Locks 68 How to Set up Restrictions Using Canadian English 69 How to Set up Restrictions Using Canadian French 70 Using the ...
... Changing the Picture Size 43 Using the Color Weakness Enhancement Feature 44 Digital Noise Reduction 45 DNIe (Digital Natural Image engine 46 Setting the Film Mode 47 Viewing Picture-In-Picture 48 Changing the Size of the Sub (PIP) Picture 49 Changing the Location of the ...to Enable/Disable the Rating Controls 65 How to Set up Restrictions Using "TV Parental Guidelines" ........ 66 How to Set up Restrictions Using "MPAA Rating 67 Important Notes About Parental Locks 68 How to Set up Restrictions Using Canadian English 69 How to Set up Restrictions Using Canadian French 70 Using the ...
User Manual (ENGLISH)
Page 4
... Mode 80 Viewing the Current Resolution 81 Initializing the Picture Settings 82 APPENDIX Identifying Problems 83 Installing the Stand 84 Disconnecting the Stand 84 Stand Swivel Function 84 Installing the Wall Mount Kit (LN-S4095D 85 Installing the Wall Mount Kit (LN-S4695D 86 Using the Anti-Theft Kensington Lock 88 Specifications 88 Dimensions...
... Mode 80 Viewing the Current Resolution 81 Initializing the Picture Settings 82 APPENDIX Identifying Problems 83 Installing the Stand 84 Disconnecting the Stand 84 Stand Swivel Function 84 Installing the Wall Mount Kit (LN-S4095D 85 Installing the Wall Mount Kit (LN-S4695D 86 Using the Anti-Theft Kensington Lock 88 Specifications 88 Dimensions...
User Manual (ENGLISH)
Page 5
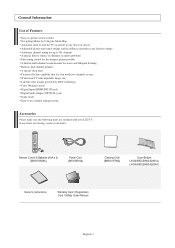
.... Remote Control & Batteries (AAA x 2) (BN59-00568A) Power Cord (3903-000144) Cleaning Cloth (BN63-01798A) Cover-Bottom LN-S4095D (BN63-02491A) LN-S4695D (BN63-02624A) Owner's Instructions Warranty Card / Registration Card / Safety Guide Manual English-3 If any items are included with adjustable ... speakers A special sleep timer Picture-in-Picture capability that lets you choose Adjustable picture and sound settings and the ability to memorize your LCD TV. General Information List of Features Easy-to-operate remote control Navigating Menus by DNle technology Color Weakness...
.... Remote Control & Batteries (AAA x 2) (BN59-00568A) Power Cord (3903-000144) Cleaning Cloth (BN63-01798A) Cover-Bottom LN-S4095D (BN63-02491A) LN-S4695D (BN63-02624A) Owner's Instructions Warranty Card / Registration Card / Safety Guide Manual English-3 If any items are included with adjustable ... speakers A special sleep timer Picture-in-Picture capability that lets you choose Adjustable picture and sound settings and the ability to memorize your LCD TV. General Information List of Features Easy-to-operate remote control Navigating Menus by DNle technology Color Weakness...

User Manual (ENGLISH)
Page 8
Side Panel Jacks Use the left side panel jacks to connect a component that is used only occasionally, such as a camcorder or video game. (See page 11) AV IN 2 Video and audio inputs for private listening. HEADPHONE Connect a set of external headphones for external devices. English-6 S-VIDEO 2 Video inputs for external devices with an S-Video output.
Side Panel Jacks Use the left side panel jacks to connect a component that is used only occasionally, such as a camcorder or video game. (See page 11) AV IN 2 Video and audio inputs for private listening. HEADPHONE Connect a set of external headphones for external devices. English-6 S-VIDEO 2 Video inputs for external devices with an S-Video output.
User Manual (ENGLISH)
Page 9
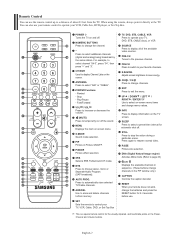
... remote to control your TV, VCR, Cable, DVD, or Set-Top Box TV, DVD, STB, CABLE, VCR Press to operate your favorite channels. E.SAVING Adjusts screen brightness to /from the TV. DNIe (Digital Natural Image engine) Activates DNIe mode. (Refer to page 46) CH Displays the available channels in sequence. (These buttons change channels. Remote...
... remote to control your TV, VCR, Cable, DVD, or Set-Top Box TV, DVD, STB, CABLE, VCR Press to operate your favorite channels. E.SAVING Adjusts screen brightness to /from the TV. DNIe (Digital Natural Image engine) Activates DNIe mode. (Refer to page 46) CH Displays the available channels in sequence. (These buttons change channels. Remote...
User Manual (ENGLISH)
Page 10
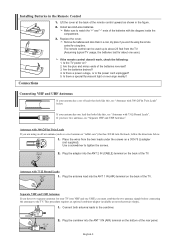
...-75 Ω adapter (not supplied). This procedure requires an optional combiner-adaptor (available at the back of the TV. Connecting VHF and UHF Antennas If your antenna has a set of the batteries with the diagram inside the compartment. 3. English-8 Lift the cover at most electronics shops). 1. ...IN (CABLE) terminal on ? 2. Is there a special fluorescent light or neon sign nearby? Make sure to the TV. Place the wires from the TV. (Assuming typical TV usage, the batteries last for about 23 feet from the twin leads under the screws on the bottom of the ...
...-75 Ω adapter (not supplied). This procedure requires an optional combiner-adaptor (available at the back of the TV. Connecting VHF and UHF Antennas If your antenna has a set of the batteries with the diagram inside the compartment. 3. English-8 Lift the cover at most electronics shops). 1. ...IN (CABLE) terminal on ? 2. Is there a special fluorescent light or neon sign nearby? Make sure to the TV. Place the wires from the TV. (Assuming typical TV usage, the batteries last for about 23 feet from the twin leads under the screws on the bottom of the ...
User Manual (ENGLISH)
Page 11
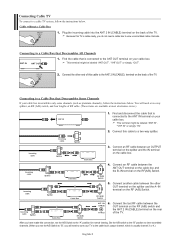
...4.) English-9 Incoming cable Splitter Cable Box 4. After you have made this cable to a two-way splitter. Set the A/B switch to the "B" position to view scrambled channels. (When you set the A/B Switch to view unscrambled cable channels. Cable without a Cable Box ANT 2 IN (CABLE) 1. ...ANT 2 IN (CABLE) 2. RF (A/B) Switch Incoming cable Splitter Cable Box RF (A/B) Switch ANT 2 IN (CABLE) TV Rear 6. Plug the incoming cable ...
...4.) English-9 Incoming cable Splitter Cable Box 4. After you have made this cable to a two-way splitter. Set the A/B switch to the "B" position to view scrambled channels. (When you set the A/B Switch to view unscrambled cable channels. Cable without a Cable Box ANT 2 IN (CABLE) 1. ...ANT 2 IN (CABLE) 2. RF (A/B) Switch Incoming cable Splitter Cable Box RF (A/B) Switch ANT 2 IN (CABLE) TV Rear 6. Plug the incoming cable ...
User Manual (ENGLISH)
Page 13
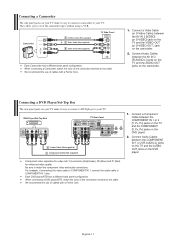
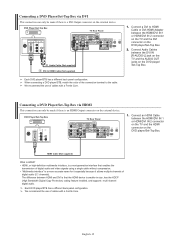
... between the COMPONENT IN 1 or 2 [Y, PB, PR] jacks on the TV and the COMPONENT [Y, PB, PR] jacks on your TV make it easy to connect a DVD player to your TV. Connecting a DVD Player/Set-Top Box The rear panel jacks on the DVD player. 2. We recommend the...-11 Camcorder 1 S-Video Cable (Not supplied) or 1 Video Cable (Not supplied) 2 Audio Cable (Not supplied) TV Side Panel Each Camcorder has a different back panel configuration. DVD Player/Set-Top Box TV Rear Panel 2 Audio Cable (Not supplied) 1 Component Cable (Not supplied) 1. Connect a Video Cable (or S-Video...
... between the COMPONENT IN 1 or 2 [Y, PB, PR] jacks on the TV and the COMPONENT [Y, PB, PR] jacks on your TV make it easy to connect a DVD player to your TV. Connecting a DVD Player/Set-Top Box The rear panel jacks on the DVD player. 2. We recommend the...-11 Camcorder 1 S-Video Cable (Not supplied) or 1 Video Cable (Not supplied) 2 Audio Cable (Not supplied) TV Side Panel Each Camcorder has a different back panel configuration. DVD Player/Set-Top Box TV Rear Panel 2 Audio Cable (Not supplied) 1 Component Cable (Not supplied) 1. Connect a Video Cable (or S-Video...
User Manual (ENGLISH)
Page 14
...Each DVD player/STB has a different back panel configuration. When connecting a DVD player/STB, match the color of cables with a Ferrite Core. DVD Player/Set-Top Box TV Rear Panel 2 Audio Cable (Not supplied) 1 DVI to the cable. Connect Audio Cables between the HDMI/DVI IN 1 or HDMI/DVI IN 2 connector... on the TV and the DVI connector on the DVD player/ Set-Top Box. Connect an HDMI Cable between HDMI and DVI is that enables the transmission of digital audio and video signals...
...Each DVD player/STB has a different back panel configuration. When connecting a DVD player/STB, match the color of cables with a Ferrite Core. DVD Player/Set-Top Box TV Rear Panel 2 Audio Cable (Not supplied) 1 DVI to the cable. Connect Audio Cables between the HDMI/DVI IN 1 or HDMI/DVI IN 2 connector... on the TV and the DVI connector on the DVD player/ Set-Top Box. Connect an HDMI Cable between HDMI and DVI is that enables the transmission of digital audio and video signals...
User Manual (ENGLISH)
Page 16
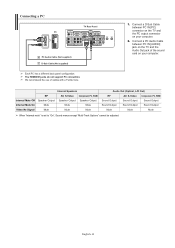
... the Audio Out jack of cables with a Ferrite Core. 1. English-14 Connecting a PC PC TV Rear Panel 2 PC Audio Cable (Not supplied) 1 D-Sub Cable (Not supplied) Each PC has a ... the use of the sound card on your computer. Connect a PC Audio Cable between PC IN [PC] connector on the TV and the PC output connector on your computer. 2. The HDMI/DVI jacks do not support PC connection. Internal Speakers RF AV... Output Sound Output Sound Output Sound Output Sound Output Mute Mute Mute When "Internal mute" is set to "On", Sound menus except "Multi-Track Options" cannot be adjusted.
... the Audio Out jack of cables with a Ferrite Core. 1. English-14 Connecting a PC PC TV Rear Panel 2 PC Audio Cable (Not supplied) 1 D-Sub Cable (Not supplied) Each PC has a ... the use of the sound card on your computer. Connect a PC Audio Cable between PC IN [PC] connector on the TV and the PC output connector on your computer. 2. The HDMI/DVI jacks do not support PC connection. Internal Speakers RF AV... Output Sound Output Sound Output Sound Output Sound Output Mute Mute Mute When "Internal mute" is set to "On", Sound menus except "Multi-Track Options" cannot be adjusted.
User Manual (ENGLISH)
Page 17
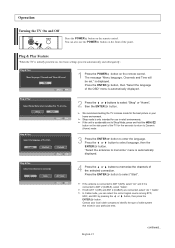
... automatically and subsequently: 1 Press the POWER button on the front of cable system that exists in your particular area. We recommend setting the TV to select "Shop" or "Home", then the ENTER button. "Select the antennas to memorize" menu is automatically displayed. 4 Press the or button ...Cable mode, you can also use in your local cable company to ANT 1(AIR), select "Air" and if it is accidentally set ." Plug & Play Feature When the TV is displayed. If the antenna is connected to identify the type of the panel. The message "Menu language, Channels and Time will...
... automatically and subsequently: 1 Press the POWER button on the front of cable system that exists in your particular area. We recommend setting the TV to select "Shop" or "Home", then the ENTER button. "Select the antennas to memorize" menu is automatically displayed. 4 Press the or button ...Cable mode, you can also use in your local cable company to ANT 1(AIR), select "Air" and if it is accidentally set ." Plug & Play Feature When the TV is displayed. If the antenna is connected to identify the type of the panel. The message "Menu language, Channels and Time will...
User Manual (ENGLISH)
Page 18
... on. For the Language setting, see page 20. For the Auto Program setting, see page 19. The basic Plug & Play setting is available only once when the TV is displayed. For the Time setting, see page 28 to set the clock. 9 The ...the available channels. menu is in progress, you have finished, press the ENTER button. If you must set automatically. English-16 Press the ENTER button when channel memorization is completed. When you are stored, the Auto... to select "Manual" or "Auto", then the ENTER button. 5 The TV will be set the functions manually by using the OSD menu.
... on. For the Language setting, see page 20. For the Auto Program setting, see page 19. The basic Plug & Play setting is available only once when the TV is displayed. For the Time setting, see page 28 to set the clock. 9 The ...the available channels. menu is in progress, you have finished, press the ENTER button. If you must set automatically. English-16 Press the ENTER button when channel memorization is completed. When you are stored, the Auto... to select "Manual" or "Auto", then the ENTER button. 5 The TV will be set the functions manually by using the OSD menu.
User Manual (ENGLISH)
Page 19
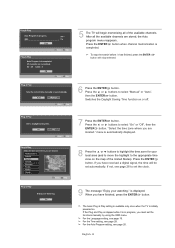
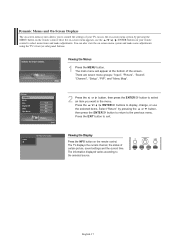
..."PIP", and "Menu Map". 2 Press the or button, then press the ENTER an item you to control the settings of your remote control to select menu items and make some adjustments using the TV's front (or side) panel buttons. Once the on-screen menu appears, use the selected items. Select "Return" by...the Display Press the INFO button on -screen menu system and make adjustments. The main menu will appear at the bottom of certain picture, sound settings and the current time. Access the on-screen menu system by pressing the or button, then press the ENTER button to return to display, ...
..."PIP", and "Menu Map". 2 Press the or button, then press the ENTER an item you to control the settings of your remote control to select menu items and make some adjustments using the TV's front (or side) panel buttons. Once the on-screen menu appears, use the selected items. Select "Return" by...the Display Press the INFO button on -screen menu system and make adjustments. The main menu will appear at the bottom of certain picture, sound settings and the current time. Access the on-screen menu system by pressing the or button, then press the ENTER button to return to display, ...

User Manual (ENGLISH)
Page 23
... always tune to that exists in order to interrupt the memorization process. The TV begins memorizing all available stations. Select "Return" by using the number buttons on the remote control. • When connecting Digital Cable to a Set-Top Box, Channel Memorization is connected to "STD". 4 Press the or ... the auto program. Press the ENTER button at any time to receive digital TV signals. English-21 Even if a particular channel is set to with the SOURCE button on the STB. By default, the cable TV system is deleted from the memory, you want to select another type of ...
... always tune to that exists in order to interrupt the memorization process. The TV begins memorizing all available stations. Select "Return" by using the number buttons on the remote control. • When connecting Digital Cable to a Set-Top Box, Channel Memorization is connected to "STD". 4 Press the or ... the auto program. Press the ENTER button at any time to receive digital TV signals. English-21 Even if a particular channel is set to with the SOURCE button on the STB. By default, the cable TV system is deleted from the memory, you want to select another type of ...

User Manual (ENGLISH)
Page 25
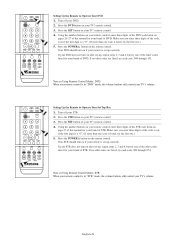
... Box When your remote control is in "VCR" mode, the volume buttons still control your remote control can operate in five different modes: TV, VCR, Cable, DVD, or Set-Top Box. Using the number buttons on your remote control, enter three digits of the VCR code listed on if your cable box...listed, try one .) 5. Make sure you choose. The remote control might not be compatible with all DVD Players, VCRs, Cable boxes, and Set-Top Boxes. Note on your TV's remote control. 4. Turn off your remote is listed, try the first one of the other codes listed for your brand of cable box...
... Box When your remote control is in "VCR" mode, the volume buttons still control your remote control can operate in five different modes: TV, VCR, Cable, DVD, or Set-Top Box. Using the number buttons on your remote control, enter three digits of the VCR code listed on if your cable box...listed, try one .) 5. Make sure you choose. The remote control might not be compatible with all DVD Players, VCRs, Cable boxes, and Set-Top Boxes. Note on your TV's remote control. 4. Turn off your remote is listed, try the first one of the other codes listed for your brand of cable box...
User Manual (ENGLISH)
Page 26
... 26~27 of this manual for your TV's remote control. 3. If no other codes listed for your brand of the DVD code listed on your brand of the other codes are listed, try the first one .) 5. Setting Up the Remote to Operate Your Set Top Box 1. Turn off your remote control..., enter three digits of STB. Using the number buttons on your STB. 2. Your DVD should turn on if your TV's remote control. 4. Setting Up the Remote to Operate Your DVD 1. If your STB does not turn on your remote is listed, try each code, 000 through 141....
... 26~27 of this manual for your TV's remote control. 3. If no other codes listed for your brand of the DVD code listed on your brand of the other codes are listed, try the first one .) 5. Setting Up the Remote to Operate Your Set Top Box 1. Turn off your remote control..., enter three digits of STB. Using the number buttons on your STB. 2. Your DVD should turn on if your TV's remote control. 4. Setting Up the Remote to Operate Your DVD 1. If your STB does not turn on your remote is listed, try each code, 000 through 141....
User Manual (ENGLISH)
Page 29
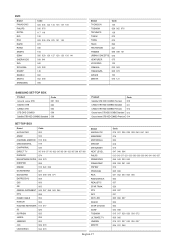
... 096 TECHWOOD 097 TREDEX 098 099 101 URBAN CONCEPTS 076 VENTURER 075 VOCOPRO 102 YAMAHA 032 063 YAMAKAWA 040 073 XWAVE 103 ZENITH 076 121 SAMSUNG SET-TOP BOX Product Ground wave STB Satellite STB CABLE STB STB DVD COMBO Satellite STB HDD COMBO Standard Code 001 002 003 004 008 009... MOTOROLA MACOM MITSUBISHI NEXT LEVEL PHILIPS PRIMESTAR PANASONIC PAYSAT PROSCAN RCA RADIOSHACK REALISTIC STAR TRAK STS SKY SKY LIFE SHACK STAR CHOICE SONY TOSHIBA ULTIMATE TV UNIDEN ZENITH English-27 Code 016 021 036 038 039 040 041 042 016 064 018 015 047 048 064 015 016 017 021 033...
... 096 TECHWOOD 097 TREDEX 098 099 101 URBAN CONCEPTS 076 VENTURER 075 VOCOPRO 102 YAMAHA 032 063 YAMAKAWA 040 073 XWAVE 103 ZENITH 076 121 SAMSUNG SET-TOP BOX Product Ground wave STB Satellite STB CABLE STB STB DVD COMBO Satellite STB HDD COMBO Standard Code 001 002 003 004 008 009... MOTOROLA MACOM MITSUBISHI NEXT LEVEL PHILIPS PRIMESTAR PANASONIC PAYSAT PROSCAN RCA RADIOSHACK REALISTIC STAR TRAK STS SKY SKY LIFE SHACK STAR CHOICE SONY TOSHIBA ULTIMATE TV UNIDEN ZENITH English-27 Code 016 021 036 038 039 040 041 042 016 064 018 015 047 048 064 015 016 017 021 033...
User Manual (ENGLISH)
Page 30
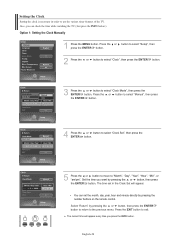
...Month", "Day", "Year", "Hour", "Min", or "am/pm". Press the EXIT button to the previous menu. Also, you can set in order to use the various timer features of the TV. Set the time you want by pressing the or button, then press the ENTER button to return to exit. The time...the remote control. The current time will appear. • You can check the time while watching the TV. (Just press the INFO button.) Option 1: Setting the Clock Manually 1 Press the MENU button. Setting the Clock Setting the clock is necessary in the Clock Set will appear every time you press the INFO button.
...Month", "Day", "Year", "Hour", "Min", or "am/pm". Press the EXIT button to the previous menu. Also, you can set in order to use the various timer features of the TV. Set the time you want by pressing the or button, then press the ENTER button to return to exit. The time...the remote control. The current time will appear. • You can check the time while watching the TV. (Just press the INFO button.) Option 1: Setting the Clock Manually 1 Press the MENU button. Setting the Clock Setting the clock is necessary in the Clock Set will appear every time you press the INFO button.
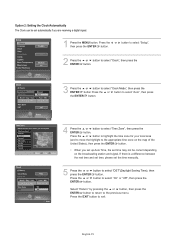
User Manual (ENGLISH)
Page 31
... 4 Press the or button to the previous menu. If there is a difference between the real time and set time, please set automatically if you set up Auto Time, the set time may not be set the time manually. 5 Press the or button to select "DST"(Daylight Saving Time), then press the ENTER ...map of the United States), then press the ENTER button. • When you are receiving a digital signal. 1 Press the MENU button. Option 2: Setting the Clock Automatically The Clock can be correct depending on the broadcasting station and signal. Press the or button to highlight the time zone for...
... 4 Press the or button to the previous menu. If there is a difference between the real time and set time, please set automatically if you set up Auto Time, the set time may not be set the time manually. 5 Press the or button to select "DST"(Daylight Saving Time), then press the ENTER ...map of the United States), then press the ENTER button. • When you are receiving a digital signal. 1 Press the MENU button. Option 2: Setting the Clock Automatically The Clock can be correct depending on the broadcasting station and signal. Press the or button to highlight the time zone for...


