

User Manual (ENGLISH)
Page 4
... 1 List of Parts 1 Familiarizing Yourself with Your New TV 2 Buttons on the Lower-Right Part of the Panel 2 Rear Panel Jacks 3 Remote Control 4 Installing Batteries in the Remote Control 6 If the remote control doesn't work 6 Chapter 2: Connections Connecting VHF and UHF Antennas 7 Antennas with 300-ohm Flat Twin Leads 7 Antennas with 75-ohm...
... 1 List of Parts 1 Familiarizing Yourself with Your New TV 2 Buttons on the Lower-Right Part of the Panel 2 Rear Panel Jacks 3 Remote Control 4 Installing Batteries in the Remote Control 6 If the remote control doesn't work 6 Chapter 2: Connections Connecting VHF and UHF Antennas 7 Antennas with 300-ohm Flat Twin Leads 7 Antennas with 75-ohm...
User Manual (ENGLISH)
Page 6
...Remote Control (BN59-00455A) & Batteries (AAA x 2) Power Cord (3903-000085) Anynet Cable (BN39-00518B) Cover-Bottom (BN63-01674A) Owner's Instructions Anynet AV Owner's Instructions M4 X L16 Stand Screw (6002-001294) x 4 Stand (23", 26" BN96-01727A) (32" BN96-01733A) English-1 Cleaning Cloth (BN63-01798A) LN-R238W, LN-R268W, LN-R2668W, LN-R328W, LN...-R3228W Dynamic Contrast: Automatically detects the input visual signal and adjusts to easily control Samsung audio-video (AV) devices from this ...
...Remote Control (BN59-00455A) & Batteries (AAA x 2) Power Cord (3903-000085) Anynet Cable (BN39-00518B) Cover-Bottom (BN63-01674A) Owner's Instructions Anynet AV Owner's Instructions M4 X L16 Stand Screw (6002-001294) x 4 Stand (23", 26" BN96-01727A) (32" BN96-01733A) English-1 Cleaning Cloth (BN63-01798A) LN-R238W, LN-R268W, LN-R2668W, LN-R328W, LN...-R3228W Dynamic Contrast: Automatically detects the input visual signal and adjusts to easily control Samsung audio-video (AV) devices from this ...
User Manual (ENGLISH)
Page 7
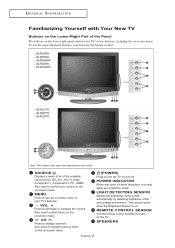
To use the more advanced features, you must use the remote control. - LN-R237W - CH Press to turn the TV on and off when the power is on -screen menu. LIGHT DETECTING SENSOR Adjusts the brightness of the screen automatically by mode. LN-R328W - SOURCE Displays a menu of all of the ...Brightness Sensor is on and lights up in stand-by detecting brightness of your choice on the on -screen menu of the surrounding environment. LN-R268W - Also used to confirm your TV's features. - MENU Press to decrease or increase the volume. VOL + Press to see an on -screen ...
To use the more advanced features, you must use the remote control. - LN-R237W - CH Press to turn the TV on and off when the power is on -screen menu. LIGHT DETECTING SENSOR Adjusts the brightness of the screen automatically by mode. LN-R328W - SOURCE Displays a menu of all of the ...Brightness Sensor is on and lights up in stand-by detecting brightness of your choice on the on -screen menu of the surrounding environment. LN-R268W - Also used to confirm your TV's features. - MENU Press to decrease or increase the volume. VOL + Press to see an on -screen ...

User Manual (ENGLISH)
Page 9
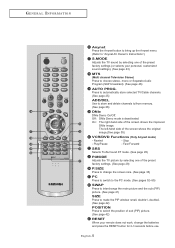
...34) NUMBER BUTTONS Press to change menu values. UP / DOWN / LEFT / RIGHT / ENTER Use to stop the action during a particular scene. When using the remote, always point it directly at the TV. POWER Turns the TV on and off automatically. (See page 57) PRE-CH Tunes to the previous channel... or decrease the volume. (See page 20) SOURCE Press to display all of about 23 feet from the TV. G E N E R A L I N F O R M AT I O N Remote Control You can use the remote control up to a distance of the available video sources. (See page 27) INFO Use to see information on the current broadcast. (See page...
...34) NUMBER BUTTONS Press to change menu values. UP / DOWN / LEFT / RIGHT / ENTER Use to stop the action during a particular scene. When using the remote, always point it directly at the TV. POWER Turns the TV on and off automatically. (See page 57) PRE-CH Tunes to the previous channel... or decrease the volume. (See page 20) SOURCE Press to display all of about 23 feet from the TV. G E N E R A L I N F O R M AT I O N Remote Control You can use the remote control up to a distance of the available video sources. (See page 27) INFO Use to see information on the current broadcast. (See page...
User Manual (ENGLISH)
Page 10
... the Anynet menu. (Refer to "Anynet AV Owner's Instructions".) S.MODE Adjusts the TV sound by selecting one of the preset factory settings (or selects your remote does not work, change the screen size. (See page 33) PC Press to switch to the PC mode. (See pages 52~55) SWAP Press to...
... the Anynet menu. (Refer to "Anynet AV Owner's Instructions".) S.MODE Adjusts the TV sound by selecting one of the preset factory settings (or selects your remote does not work, change the screen size. (See page 33) PC Press to switch to the PC mode. (See pages 52~55) SWAP Press to...

User Manual (ENGLISH)
Page 11
Make sure to about one year.) If the remote control doesn't work Check the following: 1. The remote control can be using the remote control for about 23 feet from the TV. (Assuming typical TV usage, the batteries last for a long time. Are the plus and minus ends of ..., dry place if you won't be used up to match the "+" and "-" ends of the batteries reversed? 3. Remove the batteries and store them in the Remote Control 1 Slide the cover out completely. 2 Install two AAA size batteries. Is there a special fluorescent light or a neon sign nearby?
Make sure to about one year.) If the remote control doesn't work Check the following: 1. The remote control can be using the remote control for about 23 feet from the TV. (Assuming typical TV usage, the batteries last for a long time. Are the plus and minus ends of ..., dry place if you won't be used up to match the "+" and "-" ends of the batteries reversed? 3. Remove the batteries and store them in the Remote Control 1 Slide the cover out completely. 2 Install two AAA size batteries. Is there a special fluorescent light or a neon sign nearby?
User Manual (ENGLISH)
Page 24
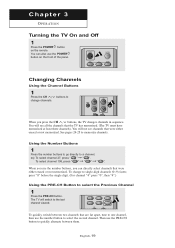
To select channel 108, press When you use the POWER button on the remote. Changing Channels Using the Channel Buttons 1 Press the CH / change to single-digit channels (0~9) faster, press "0" before the single digit. (For channel "4" press "0", then "4".) Using ...
To select channel 108, press When you use the POWER button on the remote. Changing Channels Using the Channel Buttons 1 Press the CH / change to single-digit channels (0~9) faster, press "0" before the single digit. (For channel "4" press "0", then "4".) Using ...
User Manual (ENGLISH)
Page 26
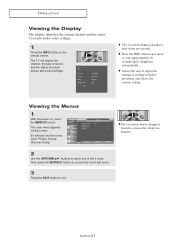
... seconds. The TV will display the channel, the type of sound, and the status of certain audio-video settings. 1 Press the INFO button on the remote control. Viewing the Menus 1 With the power on the screen. Then press the ENTER button to access the icon's sub-menu. 3 Press the EXIT button...
... seconds. The TV will display the channel, the type of sound, and the status of certain audio-video settings. 1 Press the INFO button on the remote control. Viewing the Menus 1 With the power on the screen. Then press the ENTER button to access the icon's sub-menu. 3 Press the EXIT button...

User Manual (ENGLISH)
Page 27
is displayed with "OK" selected. The message "Start Plug & Play" is displayed with "OK" selected. 2 Select the appropriate language by pressing the UP/DOWN buttons. Press the ENTER button. 4 Press the UP/DOWN buttons to confirm your choice. 3 The message "Check antenna input." English-22 Press the ENTER button to select "Air", "STD", "HRC", or "IRC", then press the ENTER button. O P E R AT I O N Plug & Play Feature When the TV is initially powered on, several basic customer settings proceed automatically and subsequently. 1 Press the POWER button on the remote control.
is displayed with "OK" selected. The message "Start Plug & Play" is displayed with "OK" selected. 2 Select the appropriate language by pressing the UP/DOWN buttons. Press the ENTER button. 4 Press the UP/DOWN buttons to confirm your choice. 3 The message "Check antenna input." English-22 Press the ENTER button to select "Air", "STD", "HRC", or "IRC", then press the ENTER button. O P E R AT I O N Plug & Play Feature When the TV is initially powered on, several basic customer settings proceed automatically and subsequently. 1 Press the POWER button on the remote control.

User Manual (ENGLISH)
Page 30
... the correct signal source (Air, STD, HRC, or IRC). See steps 1~2 on the previous page. 2 Press the UP/DOWN buttons to exit. button under the remote's cover. Alternate method: Press the AUTO PROG. O P E R AT I O N Storing Channels in memory. Press the EXIT button to select "Auto Program". This takes about one to...
... the correct signal source (Air, STD, HRC, or IRC). See steps 1~2 on the previous page. 2 Press the UP/DOWN buttons to exit. button under the remote's cover. Alternate method: Press the AUTO PROG. O P E R AT I O N Storing Channels in memory. Press the EXIT button to select "Auto Program". This takes about one to...
User Manual (ENGLISH)
Page 31
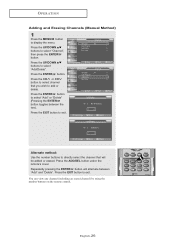
Press the ADD/DEL button under the remote's cover. Press the ENTER button. English-26 Press the CH or CH button to select channel that will alternate between the two). Press the EXIT ... pressing the ENTER button will be added or erased. You can view any channel (including an erased channel) by using the number buttons on the remote control.
Press the ADD/DEL button under the remote's cover. Press the ENTER button. English-26 Press the CH or CH button to select channel that will alternate between the two). Press the EXIT ... pressing the ENTER button will be added or erased. You can view any channel (including an erased channel) by using the number buttons on the remote control.
User Manual (ENGLISH)
Page 32
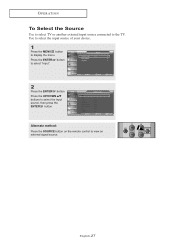
O P E R AT I O N To Select the Source Use to select TV or another external input source connected to display the menu. Use to select the input source of your choice. 1 Press the MENU button to the TV. Press the ENTER button to view an external signal source. Alternate method: Press the SOURCE button on the remote control to select "Input". 2 Press the ENTER button. English-27 Press the UP/DOWN buttons to select the Input source, then press the ENTER button.
O P E R AT I O N To Select the Source Use to select TV or another external input source connected to display the menu. Use to select the input source of your choice. 1 Press the MENU button to the TV. Press the ENTER button to view an external signal source. Alternate method: Press the SOURCE button on the remote control to select "Input". 2 Press the ENTER button. English-27 Press the UP/DOWN buttons to select the Input source, then press the ENTER button.

User Manual (ENGLISH)
Page 34
... picture settings. 1 Press the MENU button to display the menu. English-29 Press the ENTER button. Alternate method: Simply press the P.MODE button on the remote control to select one of the standard picture settings. • Choose Dynamic to increase the clarity and sharpness of the picture. • Choose Standard for...
... picture settings. 1 Press the MENU button to display the menu. English-29 Press the ENTER button. Alternate method: Simply press the P.MODE button on the remote control to select one of the standard picture settings. • Choose Dynamic to increase the clarity and sharpness of the picture. • Choose Standard for...
User Manual (ENGLISH)
Page 38
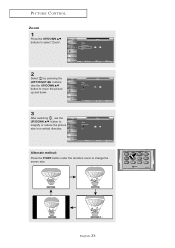
PICTURE CONTROL Zoom 1 Press the UP/DOWN buttons to change the screen size. English-33 Alternate method: Press the P.SIZE button under the remote's cover to select "Zoom". 2 Select by pressing the LEFT/RIGHT buttons. Use the UP/DOWN button to move the picture up and down. 3 After selecting , use the UP/DOWN button to magnify or reduce the picture size in a vertical direction.
PICTURE CONTROL Zoom 1 Press the UP/DOWN buttons to change the screen size. English-33 Alternate method: Press the P.SIZE button under the remote's cover to select "Zoom". 2 Select by pressing the LEFT/RIGHT buttons. Use the UP/DOWN button to move the picture up and down. 3 After selecting , use the UP/DOWN button to magnify or reduce the picture size in a vertical direction.
User Manual (ENGLISH)
Page 40
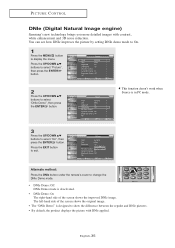
PICTURE CONTROL DNIe (Digital Natural Image engine) Samsung's new technology brings you more detailed images with DNle applied. This function doesn't work when Source is designed to show the difference between the regular ...", then press the ENTER button. The left-hand side of the screen shows the improved DNIe image. Alternate method: Press the DNIe button under the remote's cover to change the DNIe Demo mode. • DNIe Demo: Off DNIe Demo mode is deactivated. • DNIe Demo: On The right-hand side of...
PICTURE CONTROL DNIe (Digital Natural Image engine) Samsung's new technology brings you more detailed images with DNle applied. This function doesn't work when Source is designed to show the difference between the regular ...", then press the ENTER button. The left-hand side of the screen shows the improved DNIe image. Alternate method: Press the DNIe button under the remote's cover to change the DNIe Demo mode. • DNIe Demo: Off DNIe Demo mode is deactivated. • DNIe Demo: On The right-hand side of...

User Manual (ENGLISH)
Page 45
.../DOWN buttons to activate or deactivate the PIP. For example, you turn the TV off while watching in PIP mode and turn it on the remote control repeatedly to select "PIP", then press the ENTER button. 2 Press the ENTER button. Note: While V-Chip is in -Picture 1 Press the MENU button to...
.../DOWN buttons to activate or deactivate the PIP. For example, you turn the TV off while watching in PIP mode and turn it on the remote control repeatedly to select "PIP", then press the ENTER button. 2 Press the ENTER button. Note: While V-Chip is in -Picture 1 Press the MENU button to...
User Manual (ENGLISH)
Page 46
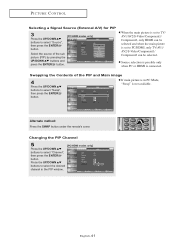
... PIP and Main image 4 Press the UP/DOWN buttons to select "Swap", then press the ENTER button. Alternate method: Press the SWAP button under the remote's cover. English-41 Source selection is possible only when PC or HDMI is in the PIP window. Changing the PIP Channel 5 [PC/HDMI modes only...
... PIP and Main image 4 Press the UP/DOWN buttons to select "Swap", then press the ENTER button. Alternate method: Press the SWAP button under the remote's cover. English-41 Source selection is possible only when PC or HDMI is in the PIP window. Changing the PIP Channel 5 [PC/HDMI modes only...
User Manual (ENGLISH)
Page 47
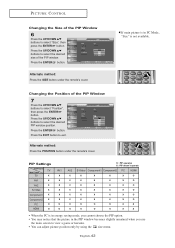
.... Press the ENTER button. Press the UP/DOWN buttons to select "Position", then press the ENTER button. Alternate method: Press the SIZE button under the remote's cover. PIP Settings Sub Picture TV Main Picture TV X AV1 X AV2 X S-Video X Component1 X Component2 X PC O HDMI O AV1 X X X X X X O O AV2 X X X X X X O O O : PIP operates X : ...PIP window position. PICTURE CONTROL Changing the Size of the PIP window. Alternate method: Press the POSITION button under the remote's cover. Press the EXIT button to select "Size", then press the ENTER button. English-42
.... Press the ENTER button. Press the UP/DOWN buttons to select "Position", then press the ENTER button. Alternate method: Press the SIZE button under the remote's cover. PIP Settings Sub Picture TV Main Picture TV X AV1 X AV2 X S-Video X Component1 X Component2 X PC O HDMI O AV1 X X X X X X O O AV2 X X X X X X O O O : PIP operates X : ...PIP window position. PICTURE CONTROL Changing the Size of the PIP window. Alternate method: Press the POSITION button under the remote's cover. Press the EXIT button to select "Size", then press the ENTER button. English-42
User Manual (ENGLISH)
Page 48
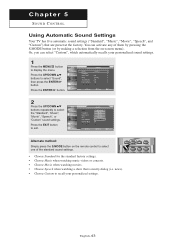
...", then press the ENTER button. Or, you can activate any of them by pressing the S.MODE button (or by making a selection from the on the remote control to select one of the standard sound settings. • Choose Standard for the standard factory settings. • Choose Music when watching music videos or...
...", then press the ENTER button. Or, you can activate any of them by pressing the S.MODE button (or by making a selection from the on the remote control to select one of the standard sound settings. • Choose Standard for the standard factory settings. • Choose Music when watching music videos or...
User Manual (ENGLISH)
Page 50
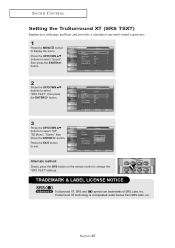
... trademarks of SRS Labs, Inc. TruSurround XT technology is incorporated under license from SRS Labs, Inc. Alternate method: Simply press the SRS button on the remote control to exit. English-45 Press the EXIT button to change the "SRS TSXT" settings. SOUND CONTROL Setting the TruSurround XT (SRS TSXT) Emphasizes midrange...
... trademarks of SRS Labs, Inc. TruSurround XT technology is incorporated under license from SRS Labs, Inc. Alternate method: Simply press the SRS button on the remote control to exit. English-45 Press the EXIT button to change the "SRS TSXT" settings. SOUND CONTROL Setting the TruSurround XT (SRS TSXT) Emphasizes midrange...

