User Manual (ENGLISH)
Page 5
... Selecting the Main or Sub (PIP) Sound 49 Chapter 6: Channel Control Fine Tuning Channels 50 Chapter 7: PC Display Using Your TV as a Computer (PC) Display 51 Setting Up Your PC Software (Based on Windows XP 51 How to Auto Adjust 52 Adjusting...75 Appendix Installing the stand 77 Disconnecting the stand 77 Installing the Wall Mount Kit (LN-R238W / LN-R237W / LN-R268W / LN-R2668W / LN-R267W) . . . 78 Installing the Wall Mount Kit (LN-R328W / LN-R3228W / LN-R327W 79 Using the Anti-Theft Kensington Lock 80 Using Your TV in Another Country 80 Specifications 81 Display Modes 83 Contents-2
... Selecting the Main or Sub (PIP) Sound 49 Chapter 6: Channel Control Fine Tuning Channels 50 Chapter 7: PC Display Using Your TV as a Computer (PC) Display 51 Setting Up Your PC Software (Based on Windows XP 51 How to Auto Adjust 52 Adjusting...75 Appendix Installing the stand 77 Disconnecting the stand 77 Installing the Wall Mount Kit (LN-R238W / LN-R237W / LN-R268W / LN-R2668W / LN-R267W) . . . 78 Installing the Wall Mount Kit (LN-R328W / LN-R3228W / LN-R327W 79 Using the Anti-Theft Kensington Lock 80 Using Your TV in Another Country 80 Specifications 81 Display Modes 83 Contents-2

User Manual (ENGLISH)
Page 83
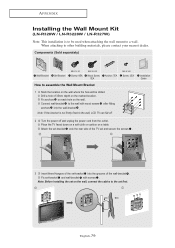
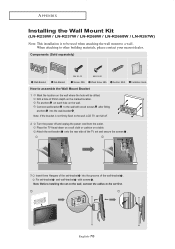
... the set-bracket onto the rear side of the TV set and secure the screws . 3 Insert three Hangers of the set on the wall. English-78 APPENDIX Installing the Wall Mount Kit (LN-R238W / LN-R237W / LN-R268W / LN-R2668W / LN-R267W) Note: This installation is not firmly fixed to the wall, LCD TV can fall off and unplug the power cord from the...
... the set-bracket onto the rear side of the TV set and secure the screws . 3 Insert three Hangers of the set on the wall. English-78 APPENDIX Installing the Wall Mount Kit (LN-R238W / LN-R237W / LN-R268W / LN-R2668W / LN-R267W) Note: This installation is not firmly fixed to the wall, LCD TV can fall off and unplug the power cord from the...
User Manual (ENGLISH)
Page 84
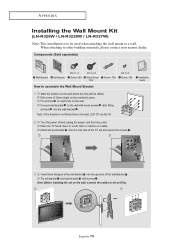
... of 35mm depth on the wall where the hole will be used when attaching the wall mount to a wall. Fix anchors on each hole on a table. When attaching to other building materials, please contact your nearest dealer. Components (Sold separately) Wall-Bracket Set-Bracket M6 X ...Mark the location on the marked location. English-79 Connect wall-bracket to the wall with screws . Fix set first. APPENDIX Installing the Wall Mount Kit (LN-R328W / LN-R3228W / LN-R327W) Note: This installation is not firmly fixed to the wall, LCD TV can fall off and unplug the power cord from the outlet...
... of 35mm depth on the wall where the hole will be used when attaching the wall mount to a wall. Fix anchors on each hole on a table. When attaching to other building materials, please contact your nearest dealer. Components (Sold separately) Wall-Bracket Set-Bracket M6 X ...Mark the location on the marked location. English-79 Connect wall-bracket to the wall with screws . Fix set first. APPENDIX Installing the Wall Mount Kit (LN-R328W / LN-R3228W / LN-R327W) Note: This installation is not firmly fixed to the wall, LCD TV can fall off and unplug the power cord from the outlet...
User Manual (ENGLISH)
Page 5
... Selecting the Main or Sub (PIP) Sound 49 Chapter 6: Channel Control Fine Tuning Channels 50 Chapter 7: PC Display Using Your TV as a Computer (PC) Display 51 Setting Up Your PC Software (Based on Windows XP 51 How to Auto Adjust 52 Adjusting...75 Appendix Installing the stand 77 Disconnecting the stand 77 Installing the Wall Mount Kit (LN-R238W / LN-R237W / LN-R268W / LN-R2668W / LN-R267W) . . . 78 Installing the Wall Mount Kit (LN-R328W / LN-R3228W / LN-R327W 79 Using the Anti-Theft Kensington Lock 80 Using Your TV in Another Country 80 Specifications 81 Display Modes 83 Contents-2
... Selecting the Main or Sub (PIP) Sound 49 Chapter 6: Channel Control Fine Tuning Channels 50 Chapter 7: PC Display Using Your TV as a Computer (PC) Display 51 Setting Up Your PC Software (Based on Windows XP 51 How to Auto Adjust 52 Adjusting...75 Appendix Installing the stand 77 Disconnecting the stand 77 Installing the Wall Mount Kit (LN-R238W / LN-R237W / LN-R268W / LN-R2668W / LN-R267W) . . . 78 Installing the Wall Mount Kit (LN-R328W / LN-R3228W / LN-R327W 79 Using the Anti-Theft Kensington Lock 80 Using Your TV in Another Country 80 Specifications 81 Display Modes 83 Contents-2
User Manual (ENGLISH)
Page 83
... each hole on a table. Installation Guide 2 Turn the power off . APPENDIX Installing the Wall Mount Kit (LN-R238W / LN-R237W / LN-R268W / LN-R2668W / LN-R267W) Note: This installation is not firmly fixed to the wall, LCD TV can fall off and unplug the power cord from the outlet. Connect wall-bracket to the wall with screws . When attaching to the set -bracket and...
... each hole on a table. Installation Guide 2 Turn the power off . APPENDIX Installing the Wall Mount Kit (LN-R238W / LN-R237W / LN-R268W / LN-R2668W / LN-R267W) Note: This installation is not firmly fixed to the wall, LCD TV can fall off and unplug the power cord from the outlet. Connect wall-bracket to the wall with screws . When attaching to the set -bracket and...
User Manual (ENGLISH)
Page 84
Connect wall-bracket to the wall, LCD TV can fall off and unplug the power cord from the outlet. Note: If the bracket is to be used when attaching the wall mount to assemble the Wall Mount Bracket Anchor: 7EA M4 X L8 Screw: 3EA 1 Mark the location on the wall where...of the wall-bracket . Installation Guide 2 Turn the power off . Place the TV faced down on a soft cloth or cushion on the wall. English-79 When attaching to the set on the marked location. Note: Before installing the set first. APPENDIX Installing the Wall Mount Kit (LN-R328W / LN-R3228W / LN-R327W)...
Connect wall-bracket to the wall, LCD TV can fall off and unplug the power cord from the outlet. Note: If the bracket is to be used when attaching the wall mount to assemble the Wall Mount Bracket Anchor: 7EA M4 X L8 Screw: 3EA 1 Mark the location on the wall where...of the wall-bracket . Installation Guide 2 Turn the power off . Place the TV faced down on a soft cloth or cushion on the wall. English-79 When attaching to the set on the marked location. Note: Before installing the set first. APPENDIX Installing the Wall Mount Kit (LN-R328W / LN-R3228W / LN-R327W)...


