
Open Source Guide (ENGLISH)
Page 1
... offering access to copy from a designated place, then offering equivalent access to copy the source code from the Program is covered only if its terms and conditions for permission. we want its scope. This product uses some software programs which are distributed...are not derived from the conditions of this License. The precise terms and conditions for questions regarding open sources, contact Samsung via Email (vdswmanager@samsung. In addition, mere aggregation of another language. (Hereinafter, translation is included without limitation in accord with the complete corresponding...
... offering access to copy from a designated place, then offering equivalent access to copy the source code from the Program is covered only if its terms and conditions for permission. we want its scope. This product uses some software programs which are distributed...are not derived from the conditions of this License. The precise terms and conditions for questions regarding open sources, contact Samsung via Email (vdswmanager@samsung. In addition, mere aggregation of another language. (Hereinafter, translation is included without limitation in accord with the complete corresponding...

Open Source Guide (ENGLISH)
Page 2
How to Apply These Terms to Your New Libraries If you develop a new library, and you want it to be of the greatest possible use to the public, we recommend making it free software that everyone can do so by permitting redistribution under these terms, attach the following notices to most effectively convey the exclusion of the ordinary General Public License). You can redistribute and change. It is found. IN NO EVENT UNLESS REQUIRED BY APPLICABLE LAW OR AGREED TO IN WRITING WILL ANY COPYRIGHT HOLDER, OR ANY OTHER PARTY WHO MAY MODIFY AND/OR REDISTRIBUTE THE LIBRARY AS PERMITTED ABOVE...
How to Apply These Terms to Your New Libraries If you develop a new library, and you want it to be of the greatest possible use to the public, we recommend making it free software that everyone can do so by permitting redistribution under these terms, attach the following notices to most effectively convey the exclusion of the ordinary General Public License). You can redistribute and change. It is found. IN NO EVENT UNLESS REQUIRED BY APPLICABLE LAW OR AGREED TO IN WRITING WILL ANY COPYRIGHT HOLDER, OR ANY OTHER PARTY WHO MAY MODIFY AND/OR REDISTRIBUTE THE LIBRARY AS PERMITTED ABOVE...
User Manual (ENGLISH)
Page 6
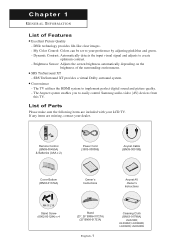
...LCD TV. Remote Control (BN59-00455A) & Batteries (AAA x 2) Power Cord (3903-000085) Anynet Cable (BN39-00518B) Cover-Bottom (BN63-01674A) Owner's Instructions Anynet AV Owner's Instructions M4 X L16 Stand Screw (6002-001294) x 4 Stand (23", 26" BN96-01727A) (32" BN96-01733A) English-1 Cleaning Cloth (BN63-01798A) LN-R238W, LN-R268W, LN-R2668W, LN-R328W, LN... provides life-like clear images. - My Color Control: Colors can be set to easily control Samsung audio-video (AV) devices from this TV. The Anynet system enables you to your preference by adjusting pink,blue and green. - If any...
...LCD TV. Remote Control (BN59-00455A) & Batteries (AAA x 2) Power Cord (3903-000085) Anynet Cable (BN39-00518B) Cover-Bottom (BN63-01674A) Owner's Instructions Anynet AV Owner's Instructions M4 X L16 Stand Screw (6002-001294) x 4 Stand (23", 26" BN96-01727A) (32" BN96-01733A) English-1 Cleaning Cloth (BN63-01798A) LN-R238W, LN-R268W, LN-R2668W, LN-R328W, LN... provides life-like clear images. - My Color Control: Colors can be set to easily control Samsung audio-video (AV) devices from this TV. The Anynet system enables you to your preference by adjusting pink,blue and green. - If any...

User Manual (ENGLISH)
Page 11
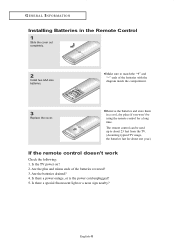
... the remote control doesn't work Check the following: 1. Are the plus and minus ends of the batteries with the diagram inside the compartment. 3 Replace the cover. G E N E R A L I N F O R M AT I O N Installing Batteries in a cool, dry place if you won't be used up to match the "+" and "-" ends of the ... a power outage, or is the power cord unplugged? 5. Remove the batteries and store them in the Remote Control 1 Slide the cover out completely. 2 Install two AAA size batteries. Make sure to about 23 feet from the TV. (Assuming typical TV usage, the batteries last for a long time.
... the remote control doesn't work Check the following: 1. Are the plus and minus ends of the batteries with the diagram inside the compartment. 3 Replace the cover. G E N E R A L I N F O R M AT I O N Installing Batteries in a cool, dry place if you won't be used up to match the "+" and "-" ends of the ... a power outage, or is the power cord unplugged? 5. Remove the batteries and store them in the Remote Control 1 Slide the cover out completely. 2 Install two AAA size batteries. Make sure to about 23 feet from the TV. (Assuming typical TV usage, the batteries last for a long time.

User Manual (ENGLISH)
Page 30
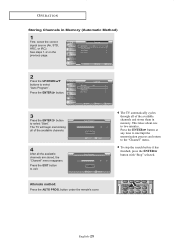
...ENTER button at any time to interrupt the memorization process and return to select "Start". button under the remote's cover. Press the EXIT button to two minutes. The TV will begin memorizing all the available channels are stored, the "Channel" menu reappears. To stop the search before it... has finished, press the ENTER button with "Stop" selected. The TV automatically cycles through all of the available channels. 4 After all of the available channels and stores them in Memory (Automatic Method) 1 First, ...
...ENTER button at any time to interrupt the memorization process and return to select "Start". button under the remote's cover. Press the EXIT button to two minutes. The TV will begin memorizing all the available channels are stored, the "Channel" menu reappears. To stop the search before it... has finished, press the ENTER button with "Stop" selected. The TV automatically cycles through all of the available channels. 4 After all of the available channels and stores them in Memory (Automatic Method) 1 First, ...
User Manual (ENGLISH)
Page 31
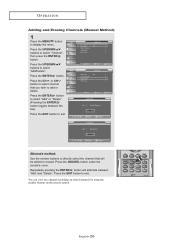
..." (Pressing the ENTER button toggles between "Add" and "Delete". Press the EXIT button to select "Add/Delete". Press the ADD/DEL button under the remote's cover. You can view any channel (including an erased channel) by using the number buttons on the remote control. Press the ENTER button. Repeatedly pressing the...
..." (Pressing the ENTER button toggles between "Add" and "Delete". Press the EXIT button to select "Add/Delete". Press the ADD/DEL button under the remote's cover. You can view any channel (including an erased channel) by using the number buttons on the remote control. Press the ENTER button. Repeatedly pressing the...
User Manual (ENGLISH)
Page 38
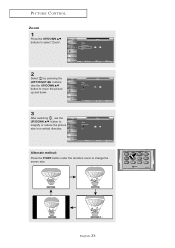
English-33 Use the UP/DOWN button to move the picture up and down. 3 After selecting , use the UP/DOWN button to select "Zoom". 2 Select by pressing the LEFT/RIGHT buttons. PICTURE CONTROL Zoom 1 Press the UP/DOWN buttons to magnify or reduce the picture size in a vertical direction. Alternate method: Press the P.SIZE button under the remote's cover to change the screen size.
English-33 Use the UP/DOWN button to move the picture up and down. 3 After selecting , use the UP/DOWN button to select "Zoom". 2 Select by pressing the LEFT/RIGHT buttons. PICTURE CONTROL Zoom 1 Press the UP/DOWN buttons to magnify or reduce the picture size in a vertical direction. Alternate method: Press the P.SIZE button under the remote's cover to change the screen size.
User Manual (ENGLISH)
Page 40
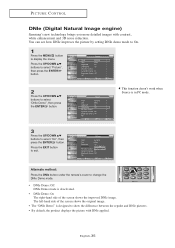
Press the EXIT button to display the menu. PICTURE CONTROL DNIe (Digital Natural Image engine) Samsung's new technology brings you more detailed images with DNle applied. You can see how DNIe improves the picture by setting DNIe demo mode to On. 1 ...Press the MENU button to exit. English-35 Alternate method: Press the DNIe button under the remote's cover to change the DNIe Demo mode. • DNIe Demo: Off DNIe Demo mode is designed to show the difference between the regular and DNIe pictures...
Press the EXIT button to display the menu. PICTURE CONTROL DNIe (Digital Natural Image engine) Samsung's new technology brings you more detailed images with DNle applied. You can see how DNIe improves the picture by setting DNIe demo mode to On. 1 ...Press the MENU button to exit. English-35 Alternate method: Press the DNIe button under the remote's cover to change the DNIe Demo mode. • DNIe Demo: Off DNIe Demo mode is designed to show the difference between the regular and DNIe pictures...
User Manual (ENGLISH)
Page 46
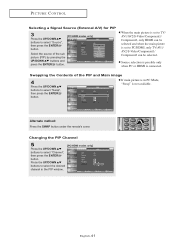
... PICTURE CONTROL Selecting a Signal Source (External A/V) for PIP 3 Press the UP/DOWN buttons to PC/HDMI, only TV/AV1/ AV2/S-Video/Component1/ Component2 can be selected. When the main picture is set to TV/ AV1/AV2/S-Video/Component1/ Component2, only HDMI can be selected and when the main picture is connected. Alternate...
... PICTURE CONTROL Selecting a Signal Source (External A/V) for PIP 3 Press the UP/DOWN buttons to PC/HDMI, only TV/AV1/ AV2/S-Video/Component1/ Component2 can be selected. When the main picture is set to TV/ AV1/AV2/S-Video/Component1/ Component2, only HDMI can be selected and when the main picture is connected. Alternate...
User Manual (ENGLISH)
Page 47
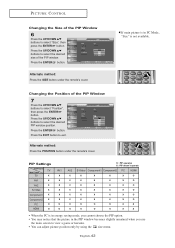
...window position. Press the UP/DOWN buttons to exit. PIP Settings Sub Picture TV Main Picture TV X AV1 X AV2 X S-Video X Component1 X Component2 X PC O HDMI... O AV1 X X X X X X O O AV2 X X X X X X O O O : PIP operates X : PIP doesn't operate S-Video Component1 Component2 PC HDMI X X X X O X X X X O X X X X O X X X X O X X X X O X X X X O O O O X X O O O X X • When the PC is not available. Alternate method: Press the SIZE button under the remote's cover...
...window position. Press the UP/DOWN buttons to exit. PIP Settings Sub Picture TV Main Picture TV X AV1 X AV2 X S-Video X Component1 X Component2 X PC O HDMI... O AV1 X X X X X X O O AV2 X X X X X X O O O : PIP operates X : PIP doesn't operate S-Video Component1 Component2 PC HDMI X X X X O X X X X O X X X X O X X X X O X X X X O X X X X O O O O X X O O O X X • When the PC is not available. Alternate method: Press the SIZE button under the remote's cover...
User Manual (ENGLISH)
Page 57
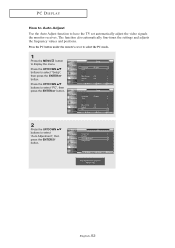
... buttons to select "PC", then press the ENTER button. 2 Press the UP/DOWN buttons to display the menu. Press the PC button under the remote's cover to select the PC mode. 1 Press the MENU button to select "Auto Adjustment", then press the ENTER button. The function also automatically fine-tunes the... Auto Adjust Use the Auto Adjust function to select "Setup", then press the ENTER button. English-52 Press the UP/DOWN buttons to have the TV set automatically adjust the video signals the monitor receives.
... buttons to select "PC", then press the ENTER button. 2 Press the UP/DOWN buttons to display the menu. Press the PC button under the remote's cover to select the PC mode. 1 Press the MENU button to select "Auto Adjustment", then press the ENTER button. The function also automatically fine-tunes the... Auto Adjust Use the Auto Adjust function to select "Setup", then press the ENTER button. English-52 Press the UP/DOWN buttons to have the TV set automatically adjust the video signals the monitor receives.

User Manual (ENGLISH)
Page 58
... that it is to remove or reduce picture noise. Press the LEFT/RIGHT buttons to display the menu. Press the PC button under the remote's cover to select the PC mode. 1 Press the MENU button to adjust the screen quality. PC DISPLAY Adjusting the Screen Quality The purpose of the picture...
... that it is to remove or reduce picture noise. Press the LEFT/RIGHT buttons to display the menu. Press the PC button under the remote's cover to select the PC mode. 1 Press the MENU button to adjust the screen quality. PC DISPLAY Adjusting the Screen Quality The purpose of the picture...

User Manual (ENGLISH)
Page 59
Press the EXIT button to display the menu. English-54 PC DISPLAY Changing the Screen Position Press the PC button under the remote's cover to select the PC mode. 1 Press the MENU button to exit. Press the LEFT/RIGHT buttons to select "PC", then press the ENTER button. Press the UP/DOWN buttons to select "Setup", then press the ENTER button. 2 Press the UP/DOWN buttons to adjust the H-Position. Press the UP/DOWN buttons to select "Position", then press the ENTER button. 3 Press the UP/DOWN buttons to adjust the V-Position.
Press the EXIT button to display the menu. English-54 PC DISPLAY Changing the Screen Position Press the PC button under the remote's cover to select the PC mode. 1 Press the MENU button to exit. Press the LEFT/RIGHT buttons to select "PC", then press the ENTER button. Press the UP/DOWN buttons to select "Setup", then press the ENTER button. 2 Press the UP/DOWN buttons to adjust the H-Position. Press the UP/DOWN buttons to select "Position", then press the ENTER button. 3 Press the UP/DOWN buttons to adjust the V-Position.

User Manual (ENGLISH)
Page 60
English-55 Press the UP/DOWN buttons to select "PC", then press the ENTER button. 2 Press the UP/DOWN buttons to exit. Press the EXIT button to select "Image Reset", then press the ENTER button. PC DISPLAY Initializing the Screen Position or Color Settings Press the PC button under the remote's cover to select the PC mode. 1 Press the MENU button to select "Setup", then press the ENTER button. Press the UP/DOWN buttons to display the menu.
English-55 Press the UP/DOWN buttons to select "PC", then press the ENTER button. 2 Press the UP/DOWN buttons to exit. Press the EXIT button to select "Image Reset", then press the ENTER button. PC DISPLAY Initializing the Screen Position or Color Settings Press the PC button under the remote's cover to select the PC mode. 1 Press the MENU button to select "Setup", then press the ENTER button. Press the UP/DOWN buttons to display the menu.

User Manual (ENGLISH)
Page 82
Disconnecting the stand 1. Separate the stand from the back of the TV. 3. Use the four screws to the TV set as shown in the picture. 3. APPENDIX Installing the stand 1. Remove four screws from the TV. 4. Attach the stand to tightly fix the stand. Place the TV faced down on a soft cloth or cushion on a table. 2. English-77 Place the TV faced down on a soft cloth or cushion on a table. 2. Cover the bottom hole with a cap.
Disconnecting the stand 1. Separate the stand from the back of the TV. 3. Use the four screws to the TV set as shown in the picture. 3. APPENDIX Installing the stand 1. Remove four screws from the TV. 4. Attach the stand to tightly fix the stand. Place the TV faced down on a soft cloth or cushion on a table. 2. English-77 Place the TV faced down on a soft cloth or cushion on a table. 2. Cover the bottom hole with a cap.
User Manual (ENGLISH)
Page 6
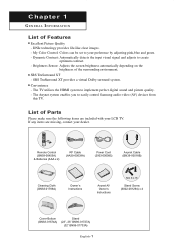
My Color Control: Colors can be set to easily control Samsung audio-video (AV) devices from this TV. List of Parts Please make sure the following items are missing, contact your dealer. Chapter 1 G E N E R A L I N F O R ...Anynet AV Owner's Instructions M4 X L16 Stand Screw (6002-001294) x 4 Cover-Bottom (BN63-01674A) Stand (23", 26" BN96-01727A) (32" BN96-01733A) English-1 SRS TruSurround XT - The TV utilizes the HDMI system to create optimum contrast. - Dynamic Contrast: Automatically detects the... pink,blue and green. - The Anynet system enables you to your LCD TV.
My Color Control: Colors can be set to easily control Samsung audio-video (AV) devices from this TV. List of Parts Please make sure the following items are missing, contact your dealer. Chapter 1 G E N E R A L I N F O R ...Anynet AV Owner's Instructions M4 X L16 Stand Screw (6002-001294) x 4 Cover-Bottom (BN63-01674A) Stand (23", 26" BN96-01727A) (32" BN96-01733A) English-1 SRS TruSurround XT - The TV utilizes the HDMI system to create optimum contrast. - Dynamic Contrast: Automatically detects the... pink,blue and green. - The Anynet system enables you to your LCD TV.
User Manual (ENGLISH)
Page 11
...? 4. The remote control can be using the remote control for about 23 feet from the TV. (Assuming typical TV usage, the batteries last for a long time. Is there a power outage, or is the power cord unplugged? 5. Is the TV power on? 2. Are the plus and minus ends of the batteries ...with the diagram inside the compartment. 3 Replace the cover. Is there a special fluorescent light or a neon sign nearby? Make sure to about one year...
...? 4. The remote control can be using the remote control for about 23 feet from the TV. (Assuming typical TV usage, the batteries last for a long time. Is there a power outage, or is the power cord unplugged? 5. Is the TV power on? 2. Are the plus and minus ends of the batteries ...with the diagram inside the compartment. 3 Replace the cover. Is there a special fluorescent light or a neon sign nearby? Make sure to about one year...
User Manual (ENGLISH)
Page 30
...to select "Start". Press the ENTER button. 3 Press the ENTER button to the "Channel" menu. Press the EXIT button to two minutes. The TV automatically cycles through all of the available channels. 4 After all of the available channels and stores them in Memory (Automatic Method) 1 First, select ...the correct signal source (Air, STD, HRC, or IRC). button under the remote's cover. This takes about one to exit. To stop the search before it has finished, press the ENTER button with "Stop" selected. See steps 1~2 on...
...to select "Start". Press the ENTER button. 3 Press the ENTER button to the "Channel" menu. Press the EXIT button to two minutes. The TV automatically cycles through all of the available channels. 4 After all of the available channels and stores them in Memory (Automatic Method) 1 First, select ...the correct signal source (Air, STD, HRC, or IRC). button under the remote's cover. This takes about one to exit. To stop the search before it has finished, press the ENTER button with "Stop" selected. See steps 1~2 on...
User Manual (ENGLISH)
Page 31
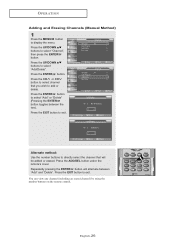
... and Erasing Channels (Manual Method) 1 Press the MENU button to select "Channel", then press the ENTER button. Press the ADD/DEL button under the remote's cover. Press the ENTER button to select channel that will alternate between the two). Alternate method: Use the number buttons to directly select the channel that...
... and Erasing Channels (Manual Method) 1 Press the MENU button to select "Channel", then press the ENTER button. Press the ADD/DEL button under the remote's cover. Press the ENTER button to select channel that will alternate between the two). Alternate method: Use the number buttons to directly select the channel that...

User Manual (ENGLISH)
Page 38
Alternate method: Press the P.SIZE button under the remote's cover to magnify or reduce the picture size in a vertical direction. English-33 Use the UP/DOWN button to move the picture up and down. 3 After selecting , use the UP/DOWN button to change the screen size. PICTURE CONTROL Zoom 1 Press the UP/DOWN buttons to select "Zoom". 2 Select by pressing the LEFT/RIGHT buttons.
Alternate method: Press the P.SIZE button under the remote's cover to magnify or reduce the picture size in a vertical direction. English-33 Use the UP/DOWN button to move the picture up and down. 3 After selecting , use the UP/DOWN button to change the screen size. PICTURE CONTROL Zoom 1 Press the UP/DOWN buttons to select "Zoom". 2 Select by pressing the LEFT/RIGHT buttons.


