

Open Source Guide (ENGLISH)
Page 1
... separate works. These restrictions translate to certain responsibilities for making the program proprietary. The precise terms and conditions for questions regarding open sources, contact Samsung via Email (vdswmanager@samsung. In such case, this License incorporates the limitation as distribution of the GPL and LGPL. If the distribution and/or use the GPL...
... separate works. These restrictions translate to certain responsibilities for making the program proprietary. The precise terms and conditions for questions regarding open sources, contact Samsung via Email (vdswmanager@samsung. In such case, this License incorporates the limitation as distribution of the GPL and LGPL. If the distribution and/or use the GPL...

Open Source Guide (ENGLISH)
Page 2
You can redistribute and change. How to Apply These Terms to Your New Libraries If you develop a new library, and you want it to be of the greatest possible use to the public, we recommend making it free software that everyone can do so by permitting redistribution under these terms, attach the following notices to the library. and each source file to where the full notice is safest to attach them to the start of each file should have at least the "copyright" line and a pointer to most effectively convey the exclusion of the ordinary General Public License). 16. To apply these...
You can redistribute and change. How to Apply These Terms to Your New Libraries If you develop a new library, and you want it to be of the greatest possible use to the public, we recommend making it free software that everyone can do so by permitting redistribution under these terms, attach the following notices to the library. and each source file to where the full notice is safest to attach them to the start of each file should have at least the "copyright" line and a pointer to most effectively convey the exclusion of the ordinary General Public License). 16. To apply these...
Quick Guide (easy Manual) (ver.1.0) (English)
Page 2
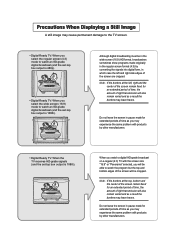
Do not leave the screen in pause mode for extended periods of time as you may experience the same problem with products by other manufacturers. • Digital Ready TV: When the TV receives HD-grade signals (and the set-top box output is 1080i). When you watch a digital HD-grade broadcast on a regular (4:3) TV with the screen size "16:9" or "Panorama" selected, you select the wide screen (16:9) mode to watch an SD-grade digital broadcast (and the set -top box output is 480p). • Digital Ready TV: When you will be able to watch the program but the top and bottom edges of light ...
Do not leave the screen in pause mode for extended periods of time as you may experience the same problem with products by other manufacturers. • Digital Ready TV: When the TV receives HD-grade signals (and the set-top box output is 1080i). When you watch a digital HD-grade broadcast on a regular (4:3) TV with the screen size "16:9" or "Panorama" selected, you select the wide screen (16:9) mode to watch an SD-grade digital broadcast (and the set -top box output is 480p). • Digital Ready TV: When you will be able to watch the program but the top and bottom edges of light ...

Quick Guide (easy Manual) (ver.1.0) (English)
Page 3
Note : If the borders at the left, right and the center of the screen remain fixed for extended periods of time as you may leave traces. Do not leave the screen in pause mode for an extended period of time, the amount of light transmission will also remain varied and as a result the borders may experience the same problem with the 4:3 screen mode selected). • When you watch a DVD, CD or a video in wide screen (21:9) format on a wide-screen (16:9) TV. • When you connect a computer or a game console to the wide-screen TV and watch an analogue (regular) broadcast on a wide...
Note : If the borders at the left, right and the center of the screen remain fixed for extended periods of time as you may leave traces. Do not leave the screen in pause mode for an extended period of time, the amount of light transmission will also remain varied and as a result the borders may experience the same problem with the 4:3 screen mode selected). • When you watch a DVD, CD or a video in wide screen (21:9) format on a wide-screen (16:9) TV. • When you connect a computer or a game console to the wide-screen TV and watch an analogue (regular) broadcast on a wide...
Quick Guide (easy Manual) (ver.1.0) (English)
Page 4
CONTENTS Chapter 1: Your New TV List of Features 1 List of Parts 1 Familiarizing Yourself with Your New TV 2 Buttons on the Lower-Right Part of the Panel 2 Rear Panel Jacks 3 Remote Control 4 Installing Batteries in the Remote Control 5 If remote control doesn't work 5 Chapter 2: Installation Connecting VHF and UHF Antennas 6 Antennas with 300-ohm Flat Twin Leads 6 Antennas with 75-ohm Round Leads 7 Separate VHF and UHF Antennas 7 Connecting Cable TV 7 Cable without a Cable Box 7 Connecting to a Cable Box that Descrambles All Channels . . .8 Connecting to a Cable Box that ...
CONTENTS Chapter 1: Your New TV List of Features 1 List of Parts 1 Familiarizing Yourself with Your New TV 2 Buttons on the Lower-Right Part of the Panel 2 Rear Panel Jacks 3 Remote Control 4 Installing Batteries in the Remote Control 5 If remote control doesn't work 5 Chapter 2: Installation Connecting VHF and UHF Antennas 6 Antennas with 300-ohm Flat Twin Leads 6 Antennas with 75-ohm Round Leads 7 Separate VHF and UHF Antennas 7 Connecting Cable TV 7 Cable without a Cable Box 7 Connecting to a Cable Box that Descrambles All Channels . . .8 Connecting to a Cable Box that ...
Quick Guide (easy Manual) (ver.1.0) (English)
Page 5
CONTENTS Selecting a Menu Language 25 Setting the Blue Screen Mode 26 Adjusting the Color Tone 27 Automatic Volume Control 28 Setting the Clock 29 Option 1: Setting the Clock Manually 29 Option 2: Using the Local PBS Channel to Automatically Set the TV Clock 30 Setting the On/Off Timer 32 Setting the Sleep Timer 34 Sleep timer 34 Viewing Closed Captions 35 Using the V-Chip 36 Setting Up Your Personal ID Number (PIN 36 How to Enable/Disable the V-Chip 38 How to Set up Restrictions Using the 'TV guidelines' . . . . .39 How to Set up Restrictions Using the MPAA Ratings: G, PG, PG-13...
CONTENTS Selecting a Menu Language 25 Setting the Blue Screen Mode 26 Adjusting the Color Tone 27 Automatic Volume Control 28 Setting the Clock 29 Option 1: Setting the Clock Manually 29 Option 2: Using the Local PBS Channel to Automatically Set the TV Clock 30 Setting the On/Off Timer 32 Setting the Sleep Timer 34 Sleep timer 34 Viewing Closed Captions 35 Using the V-Chip 36 Setting Up Your Personal ID Number (PIN 36 How to Enable/Disable the V-Chip 38 How to Set up Restrictions Using the 'TV guidelines' . . . . .39 How to Set up Restrictions Using the MPAA Ratings: G, PG, PG-13...
Quick Guide (easy Manual) (ver.1.0) (English)
Page 6
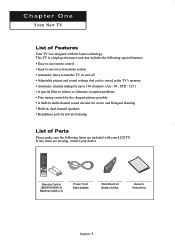
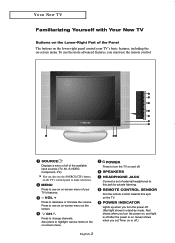
If any items are included with the latest technology. Chapter One YOUR NEW TV List of Parts Please make sure the following special features: • Easy-to-use remote control • Easy-to-use on-screen menu system • Automatic timer to reduce or eliminate reception problems • Fine tuning control for the sharpest picture possible • A built-in multi-channel sound decoder for stereo and bilingual listening • Built-in, dual channel speakers • Headphone jack for private listening List of Features Your TV was designed with your dealer. Remote Control (...
If any items are included with the latest technology. Chapter One YOUR NEW TV List of Parts Please make sure the following special features: • Easy-to-use remote control • Easy-to-use on-screen menu system • Automatic timer to reduce or eliminate reception problems • Fine tuning control for the sharpest picture possible • A built-in multi-channel sound decoder for stereo and bilingual listening • Built-in, dual channel speakers • Headphone jack for private listening List of Features Your TV was designed with your dealer. Remote Control (...
Quick Guide (easy Manual) (ver.1.0) (English)
Page 7
MENU Press to change channels. CH Press to see an on-screen menu on the screen. REMOTE CONTROL SENSOR Aim the remote control towards this jack for private listening. SOURCE Displays a menu of all of your TV's basic features, including the on-screen menu. Press to make selections. English-2 POWER Press to this spot on the TV. POWER INDICATOR Lights up when you turn the power off. (Red light shows in stand-by mode, Red shows when you set of external headphones to turn the power on, and light is off after the power is on. You can also use the remote control. VOL + Press to ...
MENU Press to change channels. CH Press to see an on-screen menu on the screen. REMOTE CONTROL SENSOR Aim the remote control towards this jack for private listening. SOURCE Displays a menu of all of your TV's basic features, including the on-screen menu. Press to make selections. English-2 POWER Press to this spot on the TV. POWER INDICATOR Lights up when you turn the power off. (Red light shows in stand-by mode, Red shows when you set of external headphones to turn the power on, and light is off after the power is on. You can also use the remote control. VOL + Press to ...

Quick Guide (easy Manual) (ver.1.0) (English)
Page 8
ANT IN Connect to an antenna or to the audio output jack on your PC. KENSINGTON LOCK (See page 56) POWER INPUT Connect the supplied power cord. English-3 S-VIDEO IN Connect an S-Video signal from a camcorder or VCR. For more information on connecting equipment, see pages 6~12. AV IN Video and audio inputs for external devices, such as a VCR or a DVD player. PC AUDIO IN Connect to a cable TV system. YOUR NEW TV Rear Panel Jacks Use the rear panel jacks to the video output port on your PC. PC IN Connect to connect an A/V component that will be connected ...
ANT IN Connect to an antenna or to the audio output jack on your PC. KENSINGTON LOCK (See page 56) POWER INPUT Connect the supplied power cord. English-3 S-VIDEO IN Connect an S-Video signal from a camcorder or VCR. For more information on connecting equipment, see pages 6~12. AV IN Video and audio inputs for external devices, such as a VCR or a DVD player. PC AUDIO IN Connect to a cable TV system. YOUR NEW TV Rear Panel Jacks Use the rear panel jacks to the video output port on your PC. PC IN Connect to connect an A/V component that will be connected ...
Quick Guide (easy Manual) (ver.1.0) (English)
Page 9
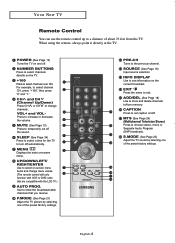
NUMBER BUTTONS Press to select channels directly on and off . CH and CH (Channel Up/Down) Press CH or CH to select channels over 100. MENU Displays the main on the current broadcast. VOL+ and VOLPress to exit. S.MODE (See Page 23) Adjust the TV sound by selecting one of the preset factory settings. POWER (See Page 13) Turns the TV on the TV. +100 Press to change menu values. (The remote control will only function with the LCD TV.) AUTO PROG. Use to store the broadcast/cable channels that are compatible with VCR or DVD units that you receive. P.MODE (See Page 21...
NUMBER BUTTONS Press to select channels directly on and off . CH and CH (Channel Up/Down) Press CH or CH to select channels over 100. MENU Displays the main on the current broadcast. VOL+ and VOLPress to exit. S.MODE (See Page 23) Adjust the TV sound by selecting one of the preset factory settings. POWER (See Page 13) Turns the TV on the TV. +100 Press to change menu values. (The remote control will only function with the LCD TV.) AUTO PROG. Use to store the broadcast/cable channels that are compatible with VCR or DVD units that you receive. P.MODE (See Page 21...
Quick Guide (easy Manual) (ver.1.0) (English)
Page 10
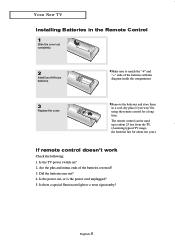
Remove the batteries and store them in the Remote Control 1 Slide the cover out completely. 2 Install two AAA size batteries. Did the batteries run out? 4. Is there a special fluorescent light or a neon sign nearby? Are the plus and minus ends of the batteries with the diagram inside the compartment. 3 Replace the cover. Is the power out, or is the power cord unplugged? 5. Is the TV power switch on? 2. YOUR NEW TV Installing Batteries in a cool, dry place if you won't be used up to match the "+" and "-" ends of the batteries reversed? 3. Make sure to about one year.) If ...
Remove the batteries and store them in the Remote Control 1 Slide the cover out completely. 2 Install two AAA size batteries. Did the batteries run out? 4. Is there a special fluorescent light or a neon sign nearby? Are the plus and minus ends of the batteries with the diagram inside the compartment. 3 Replace the cover. Is the power out, or is the power cord unplugged? 5. Is the TV power switch on? 2. YOUR NEW TV Installing Batteries in a cool, dry place if you won't be used up to match the "+" and "-" ends of the batteries reversed? 3. Make sure to about one year.) If ...
Quick Guide (easy Manual) (ver.1.0) (English)
Page 11
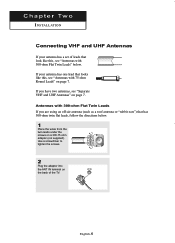
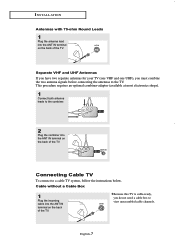
Chapter Two I N S TA L L AT I O N Connecting VHF and UHF Antennas If your antenna has one lead that has 300-ohm twin flat leads, follow the directions below . Use a screwdriver to tighten the screws. 2 Plug the adaptor into the ANT IN terminal on the back of leads that look like this , see "Separate VHF and UHF Antennas" on a 300-75 ohm adaptor (not supplied). Antennas with 300-ohm Flat Twin Leads If you have two antennas, see "Antennas with 75-ohm Round Leads" on page 7. English-6 If your antenna has a set of the TV. If you are using an off-air antenna (such as a roof ...
Chapter Two I N S TA L L AT I O N Connecting VHF and UHF Antennas If your antenna has one lead that has 300-ohm twin flat leads, follow the directions below . Use a screwdriver to tighten the screws. 2 Plug the adaptor into the ANT IN terminal on the back of leads that look like this , see "Separate VHF and UHF Antennas" on a 300-75 ohm adaptor (not supplied). Antennas with 300-ohm Flat Twin Leads If you have two antennas, see "Antennas with 75-ohm Round Leads" on page 7. English-6 If your antenna has a set of the TV. If you are using an off-air antenna (such as a roof ...
Quick Guide (easy Manual) (ver.1.0) (English)
Page 12
UHF VHF 2 Plug the combiner into the ANT IN terminal on the back of the TV. English-7 Separate VHF and UHF Antennas If you have two separate antennas for your TV (one VHF and one UHF), you do not need a cable box to the TV. UHF VHF ANT IN Connecting Cable TV To connect to the combiner. Because this TV is cable-ready, you must combine the two antenna signals before connecting the antennas to view unscrambled cable channels. Cable without a Cable Box 1 Plug the incoming cable into the ANT IN terminal on the back of the TV. I N S TA L L AT I O N Antennas with 75-ohm Round ...
UHF VHF 2 Plug the combiner into the ANT IN terminal on the back of the TV. English-7 Separate VHF and UHF Antennas If you have two separate antennas for your TV (one VHF and one UHF), you do not need a cable box to the TV. UHF VHF ANT IN Connecting Cable TV To connect to the combiner. Because this TV is cable-ready, you must combine the two antenna signals before connecting the antennas to view unscrambled cable channels. Cable without a Cable Box 1 Plug the incoming cable into the ANT IN terminal on the back of the TV. I N S TA L L AT I O N Antennas with 75-ohm Round ...

Quick Guide (easy Manual) (ver.1.0) (English)
Page 13
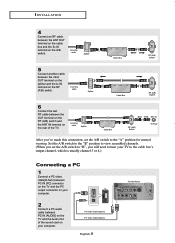
Connecting to a Cable Box that Descrambles Some Channels If your cable box. ANT IN This terminal might be labeled "ANT IN", "VHF IN", or simply, "IN". 2 Connect this cable to the ANT IN terminal on the cable box. Incoming cable Splitter English-8 Cable Box ANT IN ANT OUT This terminal might be labeled "ANT OUT", "VHF OUT", or simply, "OUT". 2 Connect the other end of this cable to a two-way splitter. Incoming cable Splitter 3 Connect a RF cable between an OUTPUT terminal on the splitter and the IN terminal on the back of RF cable. (These items are available at...
Connecting to a Cable Box that Descrambles Some Channels If your cable box. ANT IN This terminal might be labeled "ANT IN", "VHF IN", or simply, "IN". 2 Connect this cable to the ANT IN terminal on the cable box. Incoming cable Splitter English-8 Cable Box ANT IN ANT OUT This terminal might be labeled "ANT OUT", "VHF OUT", or simply, "OUT". 2 Connect the other end of this cable to a two-way splitter. Incoming cable Splitter 3 Connect a RF cable between an OUTPUT terminal on the splitter and the IN terminal on the back of RF cable. (These items are available at...
Quick Guide (easy Manual) (ver.1.0) (English)
Page 14
Incoming cable Splitter Cable Box RF (A/B) Switch ANT IN TV Rear After you will need to tune your computer. Set the A/B switch to the "B" position to view scrambled channels. (When you set the A/B switch to "B", you 've made this connection, set the A/B switch to the cable box's output channel, which is usually channel 3 or 4.) Connecting a PC 1 Connect a PC video cable(D-Sub) between PC IN [PC] connector on the TV and the PC output connector on your computer. 2 Connect a PC audio cable between PC IN [AUDIO] on the TV and the Audio Out of the TV. PC Audio Cable (Option) PC ...
Incoming cable Splitter Cable Box RF (A/B) Switch ANT IN TV Rear After you will need to tune your computer. Set the A/B switch to the "B" position to view scrambled channels. (When you set the A/B switch to "B", you 've made this connection, set the A/B switch to the cable box's output channel, which is usually channel 3 or 4.) Connecting a PC 1 Connect a PC video cable(D-Sub) between PC IN [PC] connector on the TV and the PC output connector on your computer. 2 Connect a PC audio cable between PC IN [AUDIO] on the TV and the Audio Out of the TV. PC Audio Cable (Option) PC ...
Quick Guide (easy Manual) (ver.1.0) (English)
Page 15
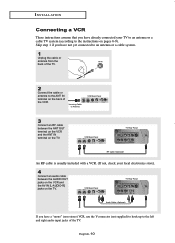
I N S TA L L AT I O N Connecting a VCR These instructions assume that you have already connected your local electronics store). 4 Connect an audio cable between the ANT OUT terminal on the VCR and the ANT IN terminal on the TV. Incoming Cable or Antenna VCR Rear Panel 3 Connect an RF cable between the AUDIO OUT jacks on the VCR and the AV IN [L-AUDIO-R] jacks on the TV. VCR Rear Panel TV Rear Panel Audio Cable If you have a "mono" (non-stereo) VCR, use the Y-connector (not supplied) to hook up to the left and right audio input jacks of the VCR. VCR Rear Panel TV Rear ...
I N S TA L L AT I O N Connecting a VCR These instructions assume that you have already connected your local electronics store). 4 Connect an audio cable between the ANT OUT terminal on the VCR and the ANT IN terminal on the TV. Incoming Cable or Antenna VCR Rear Panel 3 Connect an RF cable between the AUDIO OUT jacks on the VCR and the AV IN [L-AUDIO-R] jacks on the TV. VCR Rear Panel TV Rear Panel Audio Cable If you have a "mono" (non-stereo) VCR, use the Y-connector (not supplied) to hook up to the left and right audio input jacks of the VCR. VCR Rear Panel TV Rear ...
Quick Guide (easy Manual) (ver.1.0) (English)
Page 16
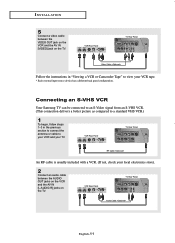
Connecting an S-VHS VCR Your Samsung TV can be connected to an S-Video signal from an S-VHS VCR. (This connection delivers a better picture as compared to a standard VHS VCR.) 1 To begin, ...
Connecting an S-VHS VCR Your Samsung TV can be connected to an S-Video signal from an S-VHS VCR. (This connection delivers a better picture as compared to a standard VHS VCR.) 1 To begin, ...
Quick Guide (easy Manual) (ver.1.0) (English)
Page 17
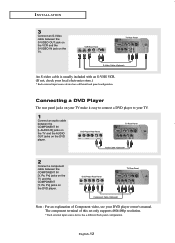
DVD Player Rear Panel TV Rear Panel Audio Cable 2 Connect a component cable between the COMPONENT IN [Y, PB, PR] jacks on the TV and the COMPONENT [Y, PB, PR] jacks on the DVD player. The component terminal of Component video, see your local electronics store.) * Each external input source device has a different back panel configuration. Connecting a DVD Player The rear panel jacks on your TV make it easy to connect a DVD player to your TV. 1 Connect an audio cable between the S-VIDEO OUT jack on the VCR and the S-VIDEO IN jack on the TV. DVD Player Rear Panel TV Rear ...
DVD Player Rear Panel TV Rear Panel Audio Cable 2 Connect a component cable between the COMPONENT IN [Y, PB, PR] jacks on the TV and the COMPONENT [Y, PB, PR] jacks on the DVD player. The component terminal of Component video, see your local electronics store.) * Each external input source device has a different back panel configuration. Connecting a DVD Player The rear panel jacks on your TV make it easy to connect a DVD player to your TV. 1 Connect an audio cable between the S-VIDEO OUT jack on the VCR and the S-VIDEO IN jack on the TV. DVD Player Rear Panel TV Rear ...
Quick Guide (easy Manual) (ver.1.0) (English)
Page 18
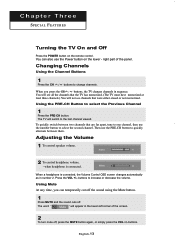
Chapter Three S P E C I A L F E AT U R E S Turning the TV On and Off Press the POWER button on the lower - Using the PRE-CH Button to quickly alternate between two channels that were either erased or not memorized. Adjusting the Volume 1 To control speaker volume. 2 To control headphone volume. - Then use the PRE-CH button to select the Previous Channel 1 Press the PRE-CH button. The word " " will appear in the lower-left corner of the panel. right part of the screen. 2 To turn mute off . You will see all the channels that the TV has memorized. (The TV must have ...
Chapter Three S P E C I A L F E AT U R E S Turning the TV On and Off Press the POWER button on the lower - Using the PRE-CH Button to quickly alternate between two channels that were either erased or not memorized. Adjusting the Volume 1 To control speaker volume. 2 To control headphone volume. - Then use the PRE-CH button to select the Previous Channel 1 Press the PRE-CH button. The word " " will appear in the lower-left corner of the panel. right part of the screen. 2 To turn mute off . You will see all the channels that the TV has memorized. (The TV must have ...
Quick Guide (easy Manual) (ver.1.0) (English)
Page 19
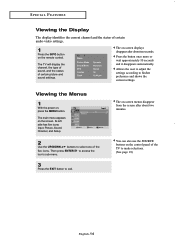
The TV will display the channel, the type of sound, and the status of certain picture and sound settings. Then press ENTER to access the icon's sub-menu. 3 Press the EXIT button to select one of the five icons. Its left side has five icons: Input, Picture, Sound, Channel, and Setup. 2 Use the UP/DOWN buttons to exit. The on -screen displays disappear after about ten seconds. Allows the user to adjust the settings according to make selections. (See page 19) English-14 Press the button once more or wait approximately 10 seconds and it disappears automatically. The on -...
The TV will display the channel, the type of sound, and the status of certain picture and sound settings. Then press ENTER to access the icon's sub-menu. 3 Press the EXIT button to select one of the five icons. Its left side has five icons: Input, Picture, Sound, Channel, and Setup. 2 Use the UP/DOWN buttons to exit. The on -screen displays disappear after about ten seconds. Allows the user to adjust the settings according to make selections. (See page 19) English-14 Press the button once more or wait approximately 10 seconds and it disappears automatically. The on -...