User Manual (ENGLISH)
Page 11
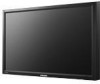
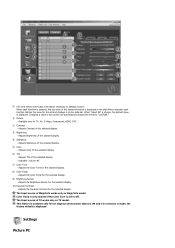
... concerning cable connections, refer to Video mode. Remote Control Sensor Aim the remote control towards this button for external devices that are connected to another vertically or adjusts selected menu values. SOURCE button [SOURCE] Switches from one menu item to the LCD Display at the back may vary slightly depending on -screen D.MENU. For energy conservation, turn your LCD Display OFF when it unattended for further information regarding power saving functions. When OSD is installed in the manual for...
... concerning cable connections, refer to Video mode. Remote Control Sensor Aim the remote control towards this button for external devices that are connected to another vertically or adjusts selected menu values. SOURCE button [SOURCE] Switches from one menu item to the LCD Display at the back may vary slightly depending on -screen D.MENU. For energy conservation, turn your LCD Display OFF when it unattended for further information regarding power saving functions. When OSD is installed in the manual for...
User Manual (ENGLISH)
Page 12
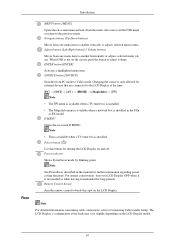
... Video Connection Terminal) Using a DVI Cable (DVI-D to the HDMI terminal of your digital output device using a HDMI cable. POWER IN The power cord plugs into the LCD Display and the wall plug. RS232C OUT/IN (RS232C Serial PORT) MDC(Multiple Display Control) Program Port DVI / PC / HDMI IN [DVI/PC/HDMI AUDIO IN] (PC/DVI/HDMI Audio Connection Terminal (Input)) DVI / PC / HDMI IN [HDMI] Connect the HDMI terminal at the back of your LCD Display to DVI-D) - DVI mode (Digital PC) 11 Introduction POWER S/W ON [ │ ] / OFF [O] Switches the LCD Display...
... Video Connection Terminal) Using a DVI Cable (DVI-D to the HDMI terminal of your digital output device using a HDMI cable. POWER IN The power cord plugs into the LCD Display and the wall plug. RS232C OUT/IN (RS232C Serial PORT) MDC(Multiple Display Control) Program Port DVI / PC / HDMI IN [DVI/PC/HDMI AUDIO IN] (PC/DVI/HDMI Audio Connection Terminal (Input)) DVI / PC / HDMI IN [HDMI] Connect the HDMI terminal at the back of your LCD Display to DVI-D) - DVI mode (Digital PC) 11 Introduction POWER S/W ON [ │ ] / OFF [O] Switches the LCD Display...

User Manual (ENGLISH)
Page 16
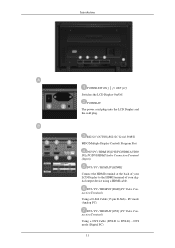
... displayed on both the remote control and the LCD Display except for DTV. button 6. MENU 9. 10. ENTER/PRE-CH 20. RETURN Introduction The "-" button operates only for the Power and LOCK buttons. Adjusts the screen display automatically in high fidelity stereo amplifier. Changing the SOURCE is displayed at the time. TV/DTV 8. Adjusts the audio volume. When pressing this button, the current mode is only allowed for external devices that are connected to select MMS (multi-channel...
... displayed on both the remote control and the LCD Display except for DTV. button 6. MENU 9. 10. ENTER/PRE-CH 20. RETURN Introduction The "-" button operates only for the Power and LOCK buttons. Adjusts the screen display automatically in high fidelity stereo amplifier. Changing the SOURCE is displayed at the time. TV/DTV 8. Adjusts the audio volume. When pressing this button, the current mode is only allowed for external devices that are connected to select MMS (multi-channel...
User Manual (ENGLISH)
Page 25
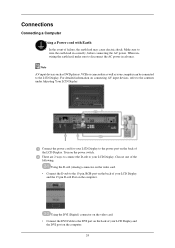
... AV input devices such as DVD players, VCRs or camcorders as well as your computer can be connected to your LCD Display. There are 2 ways to connect the D-sub to the LCD Display. Using the DVI (Digital) connector on the video card. • Connect the DVI Cable to the power port on the back of your LCD Display and the DVI port on the computer. 24 Connect the power cord for your LCD Display...
... AV input devices such as DVD players, VCRs or camcorders as well as your computer can be connected to your LCD Display. There are 2 ways to connect the D-sub to the LCD Display. Using the DVI (Digital) connector on the video card. • Connect the DVI Cable to the power port on the back of your LCD Display and the DVI port on the computer. 24 Connect the power cord for your LCD Display...

User Manual (ENGLISH)
Page 27
... connection using the HDMI cable. • You cannot connect a PC to the HDMI terminal. 26 Note The audio-video cables shown here are connected to a Camcorder Connections 1. Connecting Using a HDMI Cable Note • Input devices such as digital DVD are usually included with a tape inserted. Connect a video cable between the AUDIO OUTPUT jacks on the camcorder and the AV AUDIO IN [L-AUDIO-R] on the camcorder. Locate the AV output jacks on the LCD Display . 2. Connect a set of the LCD Display using the Source button on the remote control...
... connection using the HDMI cable. • You cannot connect a PC to the HDMI terminal. 26 Note The audio-video cables shown here are connected to a Camcorder Connections 1. Connecting Using a HDMI Cable Note • Input devices such as digital DVD are usually included with a tape inserted. Connect a video cable between the AUDIO OUTPUT jacks on the camcorder and the AV AUDIO IN [L-AUDIO-R] on the camcorder. Locate the AV output jacks on the LCD Display . 2. Connect a set of the LCD Display using the Source button on the remote control...

User Manual (ENGLISH)
Page 30
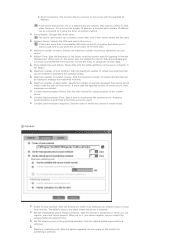
... : http://www.samsung.com/ (Worldwide) Installing the Monitor Driver (Automatic) 1. Click "Windows". 3. Choose your monitor model in the model list, then click the "OK" button. 4. Driver installation is slightly different from one operating system to another. If you have. Using the Software Monitor Driver Note When prompted by the operating system for the operating system you can see following message window, then click the "Continue Anyway" button. Insert CD...
... : http://www.samsung.com/ (Worldwide) Installing the Monitor Driver (Automatic) 1. Click "Windows". 3. Choose your monitor model in the model list, then click the "OK" button. 4. Driver installation is slightly different from one operating system to another. If you have. Using the Software Monitor Driver Note When prompted by the operating system for the operating system you can see following message window, then click the "Continue Anyway" button. Insert CD...

User Manual (ENGLISH)
Page 31
... "Windows needs..." The monitor can be posted on "Appearance and Personalization". 3. is displayed, as is completed. Click (Start) and "Control Panel". Then, double-click on Samsung Monitor homepage. Insert your Manual CD into your system. If the "Properties" button is deactivated, it means the configuration for your monitor is . Click "Personalization" and then "Display Settings". 4. Click "Advanced Settings...". 5. http://www.samsung.com/ Installing the Monitor Driver (Manual) Microsoft...
... "Windows needs..." The monitor can be posted on "Appearance and Personalization". 3. is displayed, as is completed. Click (Start) and "Control Panel". Then, double-click on Samsung Monitor homepage. Insert your Manual CD into your system. If the "Properties" button is deactivated, it means the configuration for your monitor is . Click "Personalization" and then "Display Settings". 4. Click "Advanced Settings...". 5. http://www.samsung.com/ Installing the Monitor Driver (Manual) Microsoft...

User Manual (ENGLISH)
Page 34
Using the Software 1. Click "Start" → "Control Panel" then click the "Appearance and Themes" icon. 3. then click "Next" button. 6. Select "Don't search, I will..." Click the "Properties" button on the "Monitor" tab and select "Driver" tab. 5. then click "Next" and then click "Have disk". 33 Insert CD into the CD-ROM drive. 2. Click "Display" icon and choose the "Settings" tab then click "Advanced...". 4. Click "Update Driver..." and select "Install from a list or..."
Using the Software 1. Click "Start" → "Control Panel" then click the "Appearance and Themes" icon. 3. then click "Next" button. 6. Select "Don't search, I will..." Click the "Properties" button on the "Monitor" tab and select "Driver" tab. 5. then click "Next" and then click "Have disk". 33 Insert CD into the CD-ROM drive. 2. Click "Display" icon and choose the "Settings" tab then click "Advanced...". 4. Click "Update Driver..." and select "Install from a list or..."

User Manual (ENGLISH)
Page 36
... install 1. Click "Start", "Setting", "Control Panel". 2. Select the "Settings" tab and click "Advanced Properties" button. 4. If you can choose a specific driver" then click "Next" and then click "Have disk". 7. Double click the "Display" icon. 3. Choose "OK" button on your monitor model and click the "Next" button then click "Next" button. 10. Click the "Open" button, then click "OK" button. 9. Click the "Finish" button then the "Close" button. Using the Software 10. Monitor driver installation...
... install 1. Click "Start", "Setting", "Control Panel". 2. Select the "Settings" tab and click "Advanced Properties" button. 4. If you can choose a specific driver" then click "Next" and then click "Have disk". 7. Double click the "Display" icon. 3. Choose "OK" button on your monitor model and click the "Next" button then click "Next" button. 10. Click the "Open" button, then click "OK" button. 9. Click the "Finish" button then the "Close" button. Using the Software 10. Monitor driver installation...

User Manual (ENGLISH)
Page 37
... the driver". 7. Click the "Have Disk" button. 9. Click "Start", "Settings", "Control Panel", and then double-click "Display" icon. 2. If the screen is a type of all devices" and choose the monitor that you connected to the Preset Timing Modes in the user guide. Click the "Change" button in a specific location..." logue box. Press "Enter" at All Display Modes, select the level of your computer and click "OK". 11. Enter the model name of resolution...
... the driver". 7. Click the "Have Disk" button. 9. Click "Start", "Settings", "Control Panel", and then double-click "Display" icon. 2. If the screen is a type of all devices" and choose the monitor that you connected to the Preset Timing Modes in the user guide. Click the "Change" button in a specific location..." logue box. Press "Enter" at All Display Modes, select the level of your computer and click "OK". 11. Enter the model name of resolution...
User Manual (ENGLISH)
Page 53
... TV model. Settings Picture PC Changing a value in the slide.When selected, each function is selected, the set and displays it on the slide bar. Adjusts the Dynamic Contrast for TV, AV, S-Video, Component, HDMI, DTV. 2) Contrast - The Input source of TV works only on MagicInfo model. Available only for the selected display. Adjusts Contrast of the selected display. - Adjusts the Brightness Sensor for the selected display. 9) Brightness Sensor - Adjusts the Color Temp...
... TV model. Settings Picture PC Changing a value in the slide.When selected, each function is selected, the set and displays it on the slide bar. Adjusts the Dynamic Contrast for TV, AV, S-Video, Component, HDMI, DTV. 2) Contrast - The Input source of TV works only on MagicInfo model. Available only for the selected display. Adjusts Contrast of the selected display. - Adjusts the Brightness Sensor for the selected display. 9) Brightness Sensor - Adjusts the Color Temp...
User Manual (ENGLISH)
Page 130
..., synchronization is performed at the time set on the monitor for which notify the user of the server receiving monitor data for updating in the tool bar or from the menu to manage the networked monitors. Set the manageable period of virtual local monitors that allows you cannot register, save and import screens. Maximum publishing size: Sets the option regarding the free space on the client...
..., synchronization is performed at the time set on the monitor for which notify the user of the server receiving monitor data for updating in the tool bar or from the menu to manage the networked monitors. Set the manageable period of virtual local monitors that allows you cannot register, save and import screens. Maximum publishing size: Sets the option regarding the free space on the client...

User Manual (ENGLISH)
Page 131
... added to the list of time and then is previewed. z Use the available disk space of each monitor: Sets the size to the maximum free disk space of each monitor: Sets the size to the value entered in a screen. Display options for error messages: Sets the options for multiple monitors. z Display error messages during a fixed time: When an error occurs, an error message is displayed for a newly created screen. z Set: Sets the selected resolution as the default resolution.
... added to the list of time and then is previewed. z Use the available disk space of each monitor: Sets the size to the maximum free disk space of each monitor: Sets the size to the value entered in a screen. Display options for error messages: Sets the options for multiple monitors. z Display error messages during a fixed time: When an error occurs, an error message is displayed for a newly created screen. z Set: Sets the selected resolution as the default resolution.

User Manual (ENGLISH)
Page 142
... Modes • PC / DVI • AV • HDMI • MagicInfo • TV Note • The TV menu is available when a TV tuner box is installed. • The MagicInfo menu is available when a network box is installed in the FX or FXn model. Edit Name MENU → ENTER → Adjusting the LCD Display → → ENTER → → , → ENTER Name the input device connected to the input jacks...
... Modes • PC / DVI • AV • HDMI • MagicInfo • TV Note • The TV menu is available when a TV tuner box is installed. • The MagicInfo menu is available when a network box is installed in the FX or FXn model. Edit Name MENU → ENTER → Adjusting the LCD Display → → ENTER → → , → ENTER Name the input device connected to the input jacks...

User Manual (ENGLISH)
Page 170
... the network (ex: video display). Note • The operating system for this may stop . • To access other languages might be corrupted on the screen. • For MagicInfo, a remote control is the same as Device. • When using MagicInfo with the MagicInfo Pro Server Program: perform Network mode. • When using a separate USB keyboard. • For MagicInfo in the FX or FXn model. Otherwise, the program...
... the network (ex: video display). Note • The operating system for this may stop . • To access other languages might be corrupted on the screen. • For MagicInfo, a remote control is the same as Device. • When using MagicInfo with the MagicInfo Pro Server Program: perform Network mode. • When using a separate USB keyboard. • For MagicInfo in the FX or FXn model. Otherwise, the program...

User Manual (ENGLISH)
Page 183
...; your video controller and computer system; Note Refer to change the screen resolution or stay in the Self-Test mode, the LED power indicator remains green and the figure moves around on both your computer and the LCD Display. 2. Unplug the video cable from the back of 1920 x 1080. Turn off your LCD Display screen remains blank after disconnecting the power cord. 83 The figure shown below ("Check Signal Cable") appears...
...; your video controller and computer system; Note Refer to change the screen resolution or stay in the Self-Test mode, the LED power indicator remains green and the figure moves around on both your computer and the LCD Display. 2. Unplug the video cable from the back of 1920 x 1080. Turn off your LCD Display screen remains blank after disconnecting the power cord. 83 The figure shown below ("Check Signal Cable") appears...
User Manual (ENGLISH)
Page 189
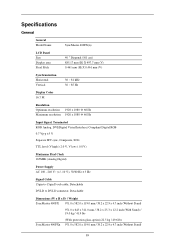
... Clock 165MHz (Analog,Digital) Power Supply AC 100 - 240 V~ (+/- 10 %), 50/60 Hz ± 3 Hz Signal Cable 15pin-to-15pin D-sub cable, Detachable DVI-D to DVI-D connector, Detachable Dimensions (W x H x D) / Weight SyncMaster 400FX 971.0 x 582.0 x 119.0 mm / 38.2 x 22.9 x 4.7 inch (Without Stand) 971.0 x 643 x 311.0 mm / 38.2 x 25.3 x 12.2 inch (With Stand) / 19.0 kg / 41.9 lbs (With protection glass-option) 22.5 kg / 49.6 lbs SyncMaster 400FXn 971...
... Clock 165MHz (Analog,Digital) Power Supply AC 100 - 240 V~ (+/- 10 %), 50/60 Hz ± 3 Hz Signal Cable 15pin-to-15pin D-sub cable, Detachable DVI-D to DVI-D connector, Detachable Dimensions (W x H x D) / Weight SyncMaster 400FX 971.0 x 582.0 x 119.0 mm / 38.2 x 22.9 x 4.7 inch (Without Stand) 971.0 x 643 x 311.0 mm / 38.2 x 25.3 x 12.2 inch (With Stand) / 19.0 kg / 41.9 lbs (With protection glass-option) 22.5 kg / 49.6 lbs SyncMaster 400FXn 971...

User Manual (ENGLISH)
Page 190
... any problems. For example, the number of TFT-LCD sub pixels contained in this product. Note Design and specifications are used for residential use ) This product complies with precision of 1ppm (one millionth) above are subject to change without any Plug & Play compatible system. The interaction of RED, GREEN, BLUE and WHITE color appear to select alternate settings. In most cases, the LCD Display installation will provide the best operating...
... any problems. For example, the number of TFT-LCD sub pixels contained in this product. Note Design and specifications are used for residential use ) This product complies with precision of 1ppm (one millionth) above are subject to change without any Plug & Play compatible system. The interaction of RED, GREEN, BLUE and WHITE color appear to select alternate settings. In most cases, the LCD Display installation will provide the best operating...
User Manual (ENGLISH)
Page 191
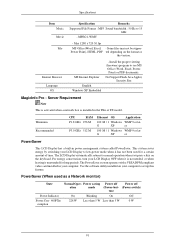
... been used as a Network monitor) State Power Indicator Power Con- 400FXn sumption Normal Oper- For energy conservation, turn your computer. Minimum Recommended CPU RAM P1.8 GHz 256 M P3.0 GHz 512 M Ethernet OS Application 100 M / 1 Windows WMP 9 or lat- Use the software utility installed on the format or the version. The LCD Display automatically returns to low-power mode when it is installed in the FXn or FX model.
... been used as a Network monitor) State Power Indicator Power Con- 400FXn sumption Normal Oper- For energy conservation, turn your computer. Minimum Recommended CPU RAM P1.8 GHz 256 M P3.0 GHz 512 M Ethernet OS Application 100 M / 1 Windows WMP 9 or lat- Use the software utility installed on the format or the version. The LCD Display automatically returns to low-power mode when it is installed in the FXn or FX model.

User Manual (ENGLISH)
Page 197
...; Instruction Guide : OSD Menu -> Set Up -> Safety Screen -> Pixel • Time Interval : 1 ~ 10 hours ( Recommend : 1 ) • Time Period : 10 ~ 50 second ( Recommend : 50 ) • Apply the Screen Bar function - Information Note ( Please check CD's User Guide at "OSD Function", some model's will not available. ) Apply the Screen Erasing function on Product • Apply the Screen Pixel function - Symptom: Dot with Black Color move with Black Color move...
...; Instruction Guide : OSD Menu -> Set Up -> Safety Screen -> Pixel • Time Interval : 1 ~ 10 hours ( Recommend : 1 ) • Time Period : 10 ~ 50 second ( Recommend : 50 ) • Apply the Screen Bar function - Information Note ( Please check CD's User Guide at "OSD Function", some model's will not available. ) Apply the Screen Erasing function on Product • Apply the Screen Pixel function - Symptom: Dot with Black Color move with Black Color move...


