Quick Guide (ENGLISH)
Page 3
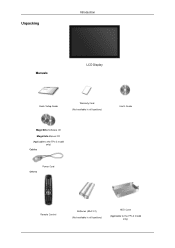
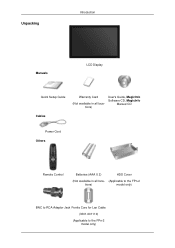
Unpacking Introduction Manuals LCD Display Quick Setup Guide Warranty Card (Not available in all locations) User's Guide MagicInfo Software CD MagicInfo Manual CD (Applicable to the FPn-2 model only) Cables Others Power Cord Remote Control Batteries (AAA X 2) (Not available in all locations) HDD Cover (Applicable to the FPn-2 model only)
Unpacking Introduction Manuals LCD Display Quick Setup Guide Warranty Card (Not available in all locations) User's Guide MagicInfo Software CD MagicInfo Manual CD (Applicable to the FPn-2 model only) Cables Others Power Cord Remote Control Batteries (AAA X 2) (Not available in all locations) HDD Cover (Applicable to the FPn-2 model only)
Quick Guide (ENGLISH)
Page 4
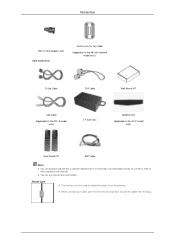
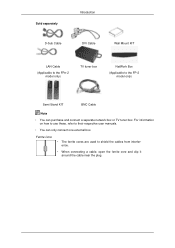
... Sold separately Ferrite Core for Lan Cable (Applicable to the 46-inch network model only.) D-Sub Cable DVI Cable Wall Mount KIT LAN Cable (Applicable to the FPn-2 model only) TV tuner box NetWork Box (Applicable to the FP-2 model only) Semi Stand KIT BNC Cable Note z You can only connect one external...
... Sold separately Ferrite Core for Lan Cable (Applicable to the 46-inch network model only.) D-Sub Cable DVI Cable Wall Mount KIT LAN Cable (Applicable to the FPn-2 model only) TV tuner box NetWork Box (Applicable to the FP-2 model only) Semi Stand KIT BNC Cable Note z You can only connect one external...
Quick Guide (ENGLISH)
Page 5
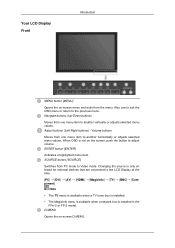
Also use to exit the OSD menu or return to Video mode. When OSD is installed in the FPn-2 or FP-2 model. D.MENU Opens the on-screen D.MENU. Changing the source is only allowed for external devices that are connected to the LCD Display at the time. [...
Also use to exit the OSD menu or return to Video mode. When OSD is installed in the FPn-2 or FP-2 model. D.MENU Opens the on-screen D.MENU. Changing the source is only allowed for external devices that are connected to the LCD Display at the time. [...

Quick Guide (ENGLISH)
Page 6
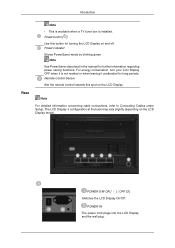
... Display On/Off. Note For detailed information concerning cable connections, refer to Connecting Cables under Setup. Power button [ ] Use this spot on the LCD Display model.
... Display On/Off. Note For detailed information concerning cable connections, refer to Connecting Cables under Setup. Power button [ ] Use this spot on the LCD Display model.

Quick Guide (ENGLISH)
Page 8
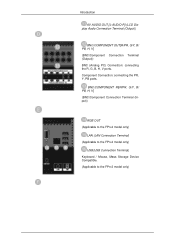
...[R/PR, G/Y, B/ PB, H, V] (BNC/Component Connection Terminal (Input)) RGB OUT (Applicable to the FPn-2 model only) LAN (LAN Connection Terminal) (Applicable to the FPn-2 model only) USB(USB Connection Terminal) Keyboard / Mouse, Mass Storage Device Compatible. (Applicable to the FPn-2 model only) Introduction AV AUDIO OUT [L-AUDIO-R] (LCD Display Audio Connection Terminal (Output)) BNC...
...[R/PR, G/Y, B/ PB, H, V] (BNC/Component Connection Terminal (Input)) RGB OUT (Applicable to the FPn-2 model only) LAN (LAN Connection Terminal) (Applicable to the FPn-2 model only) USB(USB Connection Terminal) Keyboard / Mouse, Mass Storage Device Compatible. (Applicable to the FPn-2 model only) Introduction AV AUDIO OUT [L-AUDIO-R] (LCD Display Audio Connection Terminal (Output)) BNC...

Quick Guide (ENGLISH)
Page 9
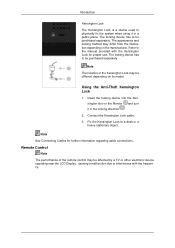
... direction . 2. Note See Connecting Cables for proper use. Remote Control Note The performance of the Kensington Lock may differ from the illustration depending on its model. Refer to interference with the Kensington Lock for further information regarding cable connections. Note The location of the remote control may be affected by a TV...
... direction . 2. Note See Connecting Cables for proper use. Remote Control Note The performance of the Kensington Lock may differ from the illustration depending on its model. Refer to interference with the Kensington Lock for further information regarding cable connections. Note The location of the remote control may be affected by a TV...
Quick Guide (ENGLISH)
Page 14
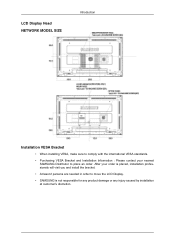
LCD Display Head NETWORK MODEL SIZE Introduction Installation VESA Bracket • When installing VESA, make sure to comply with the international VESA standards. • Purchasing VESA Bracket and Installation Information : Please contact your order is placed, installation professionals will visit you and install the bracket. • At least 2 persons are needed in order to place an order. After your nearest SAMSUNG Distributor to move the LCD Display. • SAMSUNG is not responsible for any product damage or any injury caused by installation at customer's discretion.
LCD Display Head NETWORK MODEL SIZE Introduction Installation VESA Bracket • When installing VESA, make sure to comply with the international VESA standards. • Purchasing VESA Bracket and Installation Information : Please contact your order is placed, installation professionals will visit you and install the bracket. • At least 2 persons are needed in order to place an order. After your nearest SAMSUNG Distributor to move the LCD Display. • SAMSUNG is not responsible for any product damage or any injury caused by installation at customer's discretion.
Quick Guide (ENGLISH)
Page 17
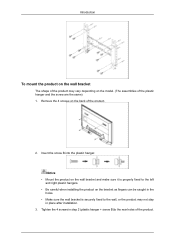
Tighten the 4 screws in step 2 (plastic hanger + screw B)to the wall, or the product may vary depending on the model. (The assemblies of the plastic hanger and the screw are the same) 1. Notice • Mount the product on the wall bracket and make sure it ...
Tighten the 4 screws in step 2 (plastic hanger + screw B)to the wall, or the product may vary depending on the model. (The assemblies of the plastic hanger and the screw are the same) 1. Notice • Mount the product on the wall bracket and make sure it ...
Quick Guide (ENGLISH)
Page 20
After your nearest SAMSUNG Distributor to move the LCD Display. • SAMSUNG is placed, installation professionals will visit you and install the bracket. • At least 2 persons are needed in order to place an order. LCD Display Head NETWORK MODEL SIZE Introduction Installation VESA Bracket • When installing VESA, make sure to comply with the international VESA standards. • Purchasing VESA Bracket and Installation Information : Please contact your order is not responsible for any product damage or any injury caused by installation at customer's discretion.
After your nearest SAMSUNG Distributor to move the LCD Display. • SAMSUNG is placed, installation professionals will visit you and install the bracket. • At least 2 persons are needed in order to place an order. LCD Display Head NETWORK MODEL SIZE Introduction Installation VESA Bracket • When installing VESA, make sure to comply with the international VESA standards. • Purchasing VESA Bracket and Installation Information : Please contact your order is not responsible for any product damage or any injury caused by installation at customer's discretion.
Quick Guide (ENGLISH)
Page 23
... to drill holes deeper than 35 mm. Fix each of the product. 2. Insert the screw B into the plastic hanger. Introduction 3. Remove the 4 screws on the model. (The assemblies of the product may not stay in place after installation. To mount the product on the wall bracket The shape of the plastic...
... to drill holes deeper than 35 mm. Fix each of the product. 2. Insert the screw B into the plastic hanger. Introduction 3. Remove the 4 screws on the model. (The assemblies of the product may not stay in place after installation. To mount the product on the wall bracket The shape of the plastic...
Quick Guide (ENGLISH)
Page 31
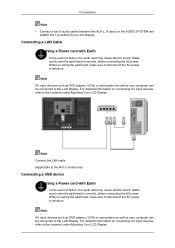
... lead in correctly, before connecting the AC power. Make sure to the LCD Display. When un-wiring the earth lead, make sure to the FPn-2 model only) Connecting a USB device Using a Power cord with Earth • In the event of failure, the earth lead may cause electric shock. Note AV input...
... lead in correctly, before connecting the AC power. Make sure to the LCD Display. When un-wiring the earth lead, make sure to the FPn-2 model only) Connecting a USB device Using a Power cord with Earth • In the event of failure, the earth lead may cause electric shock. Note AV input...
Quick Guide (ENGLISH)
Page 32
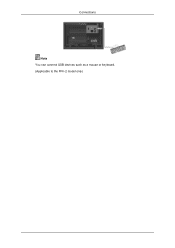
Connections Note You can connect USB devices such as a mouse or keyboard. (Applicable to the FPn-2 model only)
Connections Note You can connect USB devices such as a mouse or keyboard. (Applicable to the FPn-2 model only)
User Manual (ENGLISH)
Page 10
Unpacking Introduction Manuals LCD Display Quick Setup Guide Warranty Card (Not available in all locations) User's Guide, MagicInfo Software CD, MagicInfo Manual CD Cables Power Cord Others Remote Control Batteries (AAA X 2) HDD Cover (Not available in all loca- (Applicable to the FPn-2 tions) model only) BNC to RCA Adaptor Jack Ferrite Core for Lan Cable (3301-001110) (Applicable to the FPn-2 model only)
Unpacking Introduction Manuals LCD Display Quick Setup Guide Warranty Card (Not available in all locations) User's Guide, MagicInfo Software CD, MagicInfo Manual CD Cables Power Cord Others Remote Control Batteries (AAA X 2) HDD Cover (Not available in all loca- (Applicable to the FPn-2 tions) model only) BNC to RCA Adaptor Jack Ferrite Core for Lan Cable (3301-001110) (Applicable to the FPn-2 model only)
User Manual (ENGLISH)
Page 11
... or TV tuner box. Sold separately D-Sub Cable Introduction DVI Cable Wall Mount KIT LAN Cable (Applicable to the FPn-2 model only) TV tuner box NetWork Box (Applicable to the FP-2 model only) Semi Stand KIT BNC Cable Note • You can only connect one external box. For information on how to...
... or TV tuner box. Sold separately D-Sub Cable Introduction DVI Cable Wall Mount KIT LAN Cable (Applicable to the FPn-2 model only) TV tuner box NetWork Box (Applicable to the FP-2 model only) Semi Stand KIT BNC Cable Note • You can only connect one external box. For information on how to...

User Manual (ENGLISH)
Page 12
... menu is available when a TV tuner box is installed. • The MagicInfo menu is available when a network box is installed in the FPn-2 or FP-2 model. Changing the source is not on the screen, push the button to Video mode. Your LCD Display Front Introduction MENU button [MENU] Opens the on...
... menu is available when a TV tuner box is installed. • The MagicInfo menu is available when a network box is installed in the FPn-2 or FP-2 model. Changing the source is not on the screen, push the button to Video mode. Your LCD Display Front Introduction MENU button [MENU] Opens the on...
User Manual (ENGLISH)
Page 13
... saving functions. POWER IN The power cord plugs into the LCD Display and the wall plug. Power button [ ] Use this spot on the LCD Display model. Power indicator Shows PowerSaver mode by blinking green Note See PowerSaver described in the manual for turning the LCD Display on and off. Note For...
... saving functions. POWER IN The power cord plugs into the LCD Display and the wall plug. Power button [ ] Use this spot on the LCD Display model. Power indicator Shows PowerSaver mode by blinking green Note See PowerSaver described in the manual for turning the LCD Display on and off. Note For...
User Manual (ENGLISH)
Page 15
... Terminal (Output)) BNC (Analog PC) Connection: connecting the R, G, B, H, V ports. BNC/COMPONENT IN[R/PR, G/Y, B/ PB, H, V] (BNC/Component Connection Terminal (Input)) RGB OUT (Applicable to the FPn-2 model only) LAN (LAN Connection Terminal) (Applicable to the FPn-2 model only) USB(USB Connection Terminal) Keyboard / Mouse, Mass Storage Device Compatible. (Applicable to the FPn...
... Terminal (Output)) BNC (Analog PC) Connection: connecting the R, G, B, H, V ports. BNC/COMPONENT IN[R/PR, G/Y, B/ PB, H, V] (BNC/Component Connection Terminal (Input)) RGB OUT (Applicable to the FPn-2 model only) LAN (LAN Connection Terminal) (Applicable to the FPn-2 model only) USB(USB Connection Terminal) Keyboard / Mouse, Mass Storage Device Compatible. (Applicable to the FPn...
User Manual (ENGLISH)
Page 16
... due to the manual provided with the frequency. Remote Control Note The performance of the Kensington Lock may differ from the illustration depending on its model. Using the Anti-Theft Kensington Lock 1. Note See Connecting Cables for proper use. The locking device has to a desk or a heavy stationary object. The locking...
... due to the manual provided with the frequency. Remote Control Note The performance of the Kensington Lock may differ from the illustration depending on its model. Using the Anti-Theft Kensington Lock 1. Note See Connecting Cables for proper use. The locking device has to a desk or a heavy stationary object. The locking...

User Manual (ENGLISH)
Page 21
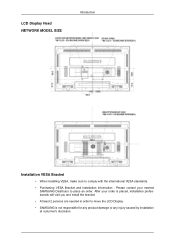
After your nearest SAMSUNG Distributor to move the LCD Display. • SAMSUNG is not responsible for any product damage or any injury caused by installation at customer's discretion. LCD Display Head NETWORK MODEL SIZE Introduction Installation VESA Bracket • When installing VESA, make sure to comply with the international VESA standards. • Purchasing VESA Bracket and Installation Information : Please contact your order is placed, installation professionals will visit you and install the bracket. • At least 2 persons are needed in order to place an order.
After your nearest SAMSUNG Distributor to move the LCD Display. • SAMSUNG is not responsible for any product damage or any injury caused by installation at customer's discretion. LCD Display Head NETWORK MODEL SIZE Introduction Installation VESA Bracket • When installing VESA, make sure to comply with the international VESA standards. • Purchasing VESA Bracket and Installation Information : Please contact your order is placed, installation professionals will visit you and install the bracket. • At least 2 persons are needed in order to place an order.

User Manual (ENGLISH)
Page 24
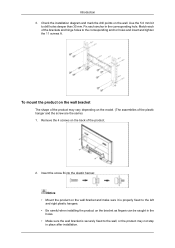
... the screw B into the plastic hanger. Tighten the 4 screws in step 2 (plastic hanger + screw B)to the wall, or the product may vary depending on the model. (The assemblies of the plastic hanger and the screw are the same) 1. Remove the 4 screws on the back of the product. Introduction To mount the...
... the screw B into the plastic hanger. Tighten the 4 screws in step 2 (plastic hanger + screw B)to the wall, or the product may vary depending on the model. (The assemblies of the plastic hanger and the screw are the same) 1. Remove the 4 screws on the back of the product. Introduction To mount the...

