
User Manual
Page 2
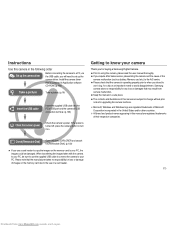
...USB cable Insert the supplied USB cable into the PC's USB port and the camera's USB connection terminal. (p.103) Check the camera's power Check the camera's power. for upgrading the camera functions. Samsung camera takes no responsibility for any loss or damages that may result from www.Manualslib.com... memory card due to avoid disappointment. Check [Removable Disk] Open Windows EXPLORER and search for buying a Samsung Digital Camera. ● Prior to using this camera in the United States and/or other countries. Microsoft, Windows and Windows logo are registered trademarks of their...
...USB cable Insert the supplied USB cable into the PC's USB port and the camera's USB connection terminal. (p.103) Check the camera's power Check the camera's power. for upgrading the camera functions. Samsung camera takes no responsibility for any loss or damages that may result from www.Manualslib.com... memory card due to avoid disappointment. Check [Removable Disk] Open Windows EXPLORER and search for buying a Samsung Digital Camera. ● Prior to using this camera in the United States and/or other countries. Microsoft, Windows and Windows logo are registered trademarks of their...

User Manual
Page 3
... immediately. - This may cause heat to build up and distort the camera body or cause a fire. Should this be carried out by your dealer or Samsung Camera Service centre. ● Please do not use this camera in places subject to extremely high temperatures, such as a sealed vehicle,...wet hands. This could pose a risk of explosion. ● Should any way. Switch off the camera, and then disconnect the power source. You must contact your dealer or Samsung Camera Service centre. Danger DANGER indicates an imminently hazardous situation which , if not avoided, could result in ...
... immediately. - This may cause heat to build up and distort the camera body or cause a fire. Should this be carried out by your dealer or Samsung Camera Service centre. ● Please do not use this camera in places subject to extremely high temperatures, such as a sealed vehicle,...wet hands. This could pose a risk of explosion. ● Should any way. Switch off the camera, and then disconnect the power source. You must contact your dealer or Samsung Camera Service centre. Danger DANGER indicates an imminently hazardous situation which , if not avoided, could result in ...

User Manual
Page 4
... battery could result in fire. - Then make sure that any connector cords or cables to avoid taking an unclear image and possibly causing camera malfunction. ● Avoid obstructing the lens or the flash when you are disconnected before unplugging the cable from www.Manualslib.com manuals search ...Inserting the memory card 016 Instructions on when you capture an image. ● Credit cards may leak corrosive electrolyte and permanently damage the camera's components. ● Do not fire the flash while it is switched on how to use the memory card RECORDING 018 LCD monitor indicator...
... battery could result in fire. - Then make sure that any connector cords or cables to avoid taking an unclear image and possibly causing camera malfunction. ● Avoid obstructing the lens or the flash when you are disconnected before unplugging the cable from www.Manualslib.com manuals search ...Inserting the memory card 016 Instructions on when you capture an image. ● Credit cards may leak corrosive electrolyte and permanently damage the camera's components. ● Do not fire the flash while it is switched on how to use the memory card RECORDING 018 LCD monitor indicator...

User Manual
Page 5
Contents 《4》 024 Using the camera buttons to set the camera 024 POWER button 024 SHUTTER button 024 ZOOM W / T button 026 Face recognition(FR) button 027 Info / Up button 027 Macro / Down button 029 Focus lock ... 047 ISO 048 White balance 049 Exposure compensation 049 Long Time shutter 050 Movie Clip frame stabiliser 050 Using the LCD monitor to adjust the camera settings 051 Sharpness 051 Contrast 051 Auto Focus type 052 Voice Memo 052 Voice Recording 053 Recording the movie clip without voice 053 SCENE mode...
Contents 《4》 024 Using the camera buttons to set the camera 024 POWER button 024 SHUTTER button 024 ZOOM W / T button 026 Face recognition(FR) button 027 Info / Up button 027 Macro / Down button 029 Focus lock ... 047 ISO 048 White balance 049 Exposure compensation 049 Long Time shutter 050 Movie Clip frame stabiliser 050 Using the LCD monitor to adjust the camera settings 051 Sharpness 051 Contrast 051 Auto Focus type 052 Voice Memo 052 Voice Recording 053 Recording the movie clip without voice 053 SCENE mode...

User Manual
Page 6
... a memory 061 Initialisation PLAY 062 Starting play mode 062 Playing back a still image 062 Playing back a movie clip 063 Movie clip capture function 063 On camera movie trimming 064 Playing back a recorded voice 064 Playing back a voice memo 065 LCD monitor Indicator 065 Using the... camera buttons to set the camera 065 Thumbnail / Enlargement button 067 Info / Up button 067 Play & Pause / Down button 068 Left / Right / Menu / OK button 068 Printer button 068 Delete button ...
... a memory 061 Initialisation PLAY 062 Starting play mode 062 Playing back a still image 062 Playing back a movie clip 063 Movie clip capture function 063 On camera movie trimming 064 Playing back a recorded voice 064 Playing back a voice memo 065 LCD monitor Indicator 065 Using the... camera buttons to set the camera 065 Thumbnail / Enlargement button 067 Info / Up button 067 Play & Pause / Down button 068 Left / Right / Menu / OK button 068 Printer button 068 Delete button ...
User Manual
Page 8
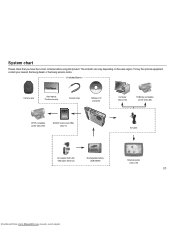
The contents can vary depending on the sales region. To buy the optional equipment, contact your nearest Samsung dealer or Samsung service centre. < Included items > Camera case User manual, Product warranty Camera strap Software CD (see p.99) Computer (see p.103) PictBridge compatible printer (see p.88) DPOF compatible printer (see p.85) SD/SDHC memory card / MMC...
The contents can vary depending on the sales region. To buy the optional equipment, contact your nearest Samsung dealer or Samsung service centre. < Included items > Camera case User manual, Product warranty Camera strap Software CD (see p.99) Computer (see p.103) PictBridge compatible printer (see p.88) DPOF compatible printer (see p.85) SD/SDHC memory card / MMC...

User Manual
Page 10
Identification of features Back LCD monitor Camera status lamp Zoom T button (Digital zoom) Zoom W button (Thumbnail) M (Mode) button Eyelet for camera strap E (Effect) button 5-function button Fn/Delete button Play mode/Print button 《9》 Downloaded from www.Manualslib.com manuals search engine
Identification of features Back LCD monitor Camera status lamp Zoom T button (Digital zoom) Zoom W button (Thumbnail) M (Mode) button Eyelet for camera strap E (Effect) button 5-function button Fn/Delete button Play mode/Print button 《9》 Downloaded from www.Manualslib.com manuals search engine

User Manual
Page 12
... blinks at 0.25-second intervals. After pressing the Shutter button, the image is taken in accordance with the subject's movement. ■ Camera Status Lamp Status Description Power on The lamp turns on the subject) ■ Mode icon : Refer to page 19 for more information about... at 1 second intervals. - MODE Auto Program Movie ASR SHOOTING Night Portrait Children Landscape Close-up (LCD monitor turns off after about the camera mode setting. For the final 3 seconds, the lamp blinks quickly at 0.25second intervals. Identification of features ■ Self-timer lamp Icon...
... blinks at 0.25-second intervals. After pressing the Shutter button, the image is taken in accordance with the subject's movement. ■ Camera Status Lamp Status Description Power on The lamp turns on the subject) ■ Mode icon : Refer to page 19 for more information about... at 1 second intervals. - MODE Auto Program Movie ASR SHOOTING Night Portrait Children Landscape Close-up (LCD monitor turns off after about the camera mode setting. For the final 3 seconds, the lamp blinks quickly at 0.25second intervals. Identification of features ■ Self-timer lamp Icon...
User Manual
Page 13
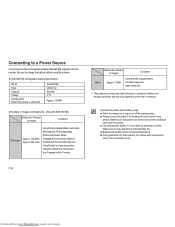
...Changing the zoom position between the Wide and the Tele after every shot. Important information about battery usage. ● When the camera is perfectly normal. 《12》 Downloaded from www.Manualslib.com manuals search engine Be sure to charge the battery before using the...image size 30fps frame rate ※ These figures are prone to leaking if kept inside the camera. ● Low temperatures (below 0°C) can lose power over time and are measured under Samsung's standard conditions and shooting conditions and may become warm. Connecting to a Power Source You ...
...Changing the zoom position between the Wide and the Tele after every shot. Important information about battery usage. ● When the camera is perfectly normal. 《12》 Downloaded from www.Manualslib.com manuals search engine Be sure to charge the battery before using the...image size 30fps frame rate ※ These figures are prone to leaking if kept inside the camera. ● Low temperatures (below 0°C) can lose power over time and are measured under Samsung's standard conditions and shooting conditions and may become warm. Connecting to a Power Source You ...

User Manual
Page 14
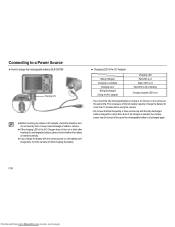
...rechargeable battery SLB-0837(B) by using the SAC-45 KIT which consists of the PC doesn't meet the Power output standard (5V, 500mA), the camera may not be charged. 《13》 Downloaded from www.Manualslib.com manuals search engine Important information about USB cable usage. ● Use...-C2) with the correct specification. ● If the camera is connected to the PC through a USB hub : connect the camera directly to the PC. ● If the camera and other devices are combined, they can download stored images to your camera through the USB cable. Connecting to a Power Source You...
...rechargeable battery SLB-0837(B) by using the SAC-45 KIT which consists of the PC doesn't meet the Power output standard (5V, 500mA), the camera may not be charged. 《13》 Downloaded from www.Manualslib.com manuals search engine Important information about USB cable usage. ● Use...-C2) with the correct specification. ● If the camera is connected to the PC through a USB hub : connect the camera directly to the PC. ● If the camera and other devices are combined, they can download stored images to your camera through the USB cable. Connecting to a Power Source You...
User Manual
Page 15
If you charge the battery with the fully discharged battery charged for more than 10 minutes before using the camera. - This is because of the AC Adapter Being Charged Charging is complete Charging error Being discharged (Using the AC adapter) Charging LED Red LED is ... battery is discharged again. 《14》 Downloaded from www.Manualslib.com manuals search engine Even if the charger is inserted, the camera power may cause breakage of cable or camera. ● If the charging LED of the AC Charger does not turn on or blink after inserting the rechargeable battery, please...
If you charge the battery with the fully discharged battery charged for more than 10 minutes before using the camera. - This is because of the AC Adapter Being Charged Charging is complete Charging error Being discharged (Using the AC adapter) Charging LED Red LED is ... battery is discharged again. 《14》 Downloaded from www.Manualslib.com manuals search engine Even if the charger is inserted, the camera power may cause breakage of cable or camera. ● If the charging LED of the AC Charger does not turn on or blink after inserting the rechargeable battery, please...

User Manual
Page 16
...capacity (Prepare to recharge or use spare battery) Low battery capacity Prepare to a Power Source Insert the battery as shown. - If the camera does not turn on the LCD monitor. Do not insert the memory card the wrong way round. Connecting to recharge or use spare battery. ... battery condition that are displayed on after you have inserted battery, please check whether the battery is opened, do not force it. Turn off the camera's power before inserting the memory card. - When the battery chamber cover is inserted with the correct polarity (+ / -). - Recharge or use spare ...
...capacity (Prepare to recharge or use spare battery) Low battery capacity Prepare to a Power Source Insert the battery as shown. - If the camera does not turn on the LCD monitor. Do not insert the memory card the wrong way round. Connecting to recharge or use spare battery. ... battery condition that are displayed on after you have inserted battery, please check whether the battery is opened, do not force it. Turn off the camera's power before inserting the memory card. - When the battery chamber cover is inserted with the correct polarity (+ / -). - Recharge or use spare ...

User Manual
Page 17
...; Turn off or the memory card is warm. To use the memory card in this camera. ● Do not use a memory card formatted by the Samsung warranty. ● The memory card is being inserted or removed. ● Repeated use of the following, the recorded data may become ...data that the memory card is removed while recording, deleting (formatting) or reading. ● Samsung cannot be the case, you may cause damage to purchase a new memory card. Should this may notice that the camera cannot recognise, or if it contains images captured with a soft cloth. ● Please keep...
...; Turn off or the memory card is warm. To use the memory card in this camera. ● Do not use a memory card formatted by the Samsung warranty. ● The memory card is being inserted or removed. ● Repeated use of the following, the recorded data may become ...data that the memory card is removed while recording, deleting (formatting) or reading. ● Samsung cannot be the case, you may cause damage to purchase a new memory card. Should this may notice that the camera cannot recognise, or if it contains images captured with a soft cloth. ● Please keep...

User Manual
Page 18
... doesn't function during the movie recording. 《17》 Downloaded from being deleted or formatted. By sliding the switch to use the memory card The camera can use SD/ SDHC Memory Cards and MMC (Multi Media Cards). About 21'07" About 27'25" About 37'18" ※ The recording times can...
... doesn't function during the movie recording. 《17》 Downloaded from being deleted or formatted. By sliding the switch to use the memory card The camera can use SD/ SDHC Memory Cards and MMC (Multi Media Cards). About 21'07" About 27'25" About 37'18" ※ The recording times can...

User Manual
Page 19
... Recording mode Color / Saturation Face Recognition Flash Self-timer Macro MF Page p.11 p.35/37 p.26 p.29 p.31 p.27 No. Off 9 Auto Focus Frame 10 Camera shake Warning 11 Date / Time 12 Exposure compensation / LongTime Shutter 13 White Balance 14 ISO 15 Drive mode / Stabiliser 16 Metering 17 Image Quality / Frame...
... Recording mode Color / Saturation Face Recognition Flash Self-timer Macro MF Page p.11 p.35/37 p.26 p.29 p.31 p.27 No. Off 9 Auto Focus Frame 10 Camera shake Warning 11 Date / Time 12 Exposure compensation / LongTime Shutter 13 White Balance 14 ISO 15 Drive mode / Stabiliser 16 Metering 17 Image Quality / Frame...

User Manual
Page 20
...for quick and easy picture taking with minimal user interaction. 1. Left / Right button : moves the cursor between SHOOTING MENU and SCENE MENU mode. Point the camera towards the subject and compose the image by the M (mode) button located on the memory card. 3. Insert the memory card (p.15). Press the shutter... flash when you press the shutter button down half way, it is not essential to use the Auto mode Select this be the case, the camera is inserted, an image will be displayed. 6. You can select the desired working mode by using the LCD monitor. 3. If the memory card...
...for quick and easy picture taking with minimal user interaction. 1. Left / Right button : moves the cursor between SHOOTING MENU and SCENE MENU mode. Point the camera towards the subject and compose the image by the M (mode) button located on the memory card. 3. Insert the memory card (p.15). Press the shutter... flash when you press the shutter button down half way, it is not essential to use the Auto mode Select this be the case, the camera is inserted, an image will be displayed. 6. You can select the desired working mode by using the LCD monitor. 3. If the memory card...
User Manual
Page 21
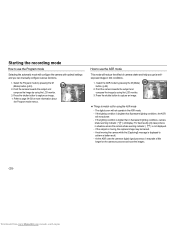
... ■ Things to watch out for more information about the Program mode menus. For best results only take a little longer for the camera to process and save the images. 《20》 Downloaded from www.Manualslib.com manuals search engine If the lighting condition is displayed to... achieve a better result. - Starting the recording mode How to use the ASR mode This mode will reduce the effect of camera shake and help you can manually configure various functions. 1. Select the Program mode by pressing the M (Mode) button. (p.33) 2. Select the...
... ■ Things to watch out for more information about the Program mode menus. For best results only take a little longer for the camera to process and save the images. 《20》 Downloaded from www.Manualslib.com manuals search engine If the lighting condition is displayed to... achieve a better result. - Starting the recording mode How to use the ASR mode This mode will reduce the effect of camera shake and help you can manually configure various functions. 1. Select the Program mode by pressing the M (Mode) button. (p.33) 2. Select the...

User Manual
Page 22
...the same as those for MOVIE CLIP mode. 3. Steps from 1-3 are recorded for MOVIE CLIP mode. 4. Press the OK button. Point the camera towards the subject and compose the image by pressing the Up / Down button. 8. Recording the movie clip without sound You can record a ...menu by using the LCD monitor. Press the Pause button ( ) again to pause recording. 5. Movie clip file type : AVI (MPEG-4) - Point the camera towards the subject and compose the image by pressing the M (Mode) button.(p.33) 2. When the 800X592 or 720X480 image size is selected, the 30FPS can...
...the same as those for MOVIE CLIP mode. 3. Steps from 1-3 are recorded for MOVIE CLIP mode. 4. Press the OK button. Point the camera towards the subject and compose the image by pressing the Up / Down button. 8. Recording the movie clip without sound You can record a ...menu by using the LCD monitor. Press the Pause button ( ) again to pause recording. 5. Movie clip file type : AVI (MPEG-4) - Point the camera towards the subject and compose the image by pressing the M (Mode) button.(p.33) 2. When the 800X592 or 720X480 image size is selected, the 30FPS can...

User Manual
Page 23
.... : For taking pictures of shooting situations. 1. Select the Scene mode by backlight. 《22》 Downloaded from www.Manualslib.com manuals search engine Point the camera towards the subject and compose the image by using the LCD monitor. 3.
.... : For taking pictures of shooting situations. 1. Select the Scene mode by backlight. 《22》 Downloaded from www.Manualslib.com manuals search engine Point the camera towards the subject and compose the image by using the LCD monitor. 3.

User Manual
Page 24
...a stick or flagpole). - If the subject is moving at high speed. - To take pictures against the sun, please use a tripod, support the camera on a solid surface or change to confirm focus and flash battery charge. When photographing a subject that has little contrast. - In this case, use the... [BACKLIGHT] in the scene shooting mode (see page 22), fill-in a low lighting condition, the camera shake warning indicator ( ) may make the picture dark. If the subject is highly reflective or shiny. - When the surroundings are dark. [Lightly press ...
...a stick or flagpole). - If the subject is moving at high speed. - To take pictures against the sun, please use a tripod, support the camera on a solid surface or change to confirm focus and flash battery charge. When photographing a subject that has little contrast. - In this case, use the... [BACKLIGHT] in the scene shooting mode (see page 22), fill-in a low lighting condition, the camera shake warning indicator ( ) may make the picture dark. If the subject is highly reflective or shiny. - When the surroundings are dark. [Lightly press ...


