User Manual
Page 2
...; The contents and illustrations of the camera malfunction (such as battery, Memory card etc.) to the After Sales Centre. ● Please check that the manufacturer accepts no responsibility for buying a Samsung Digital Camera. ● Before using this camera, please read this user manual thoroughly.... ● When you require After Sales service, please bring the camera and the cause of this manual in the United States...
...; The contents and illustrations of the camera malfunction (such as battery, Memory card etc.) to the After Sales Centre. ● Please check that the manufacturer accepts no responsibility for buying a Samsung Digital Camera. ● Before using this camera, please read this user manual thoroughly.... ● When you require After Sales service, please bring the camera and the cause of this manual in the United States...
User Manual
Page 3
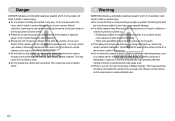
.... Always use it time to cool. ■ Do not leave this be carried out by your dealer or Samsung Camera Service centre. Warning WARNING indicates a potentially hazardous situation which, if not avoided, could cause a fire. ■ When in use, do not use , which ... maintenance and repairs should occur, please consult a doctor immediately. •There is the possibility of electric shock. You must contact your dealer or Samsung Camera Service centre. ■ Please do not cover the camera or Battery Charger. This could increase the risk of explosion. ■ Should any way.
.... Always use it time to cool. ■ Do not leave this be carried out by your dealer or Samsung Camera Service centre. Warning WARNING indicates a potentially hazardous situation which, if not avoided, could cause a fire. ■ When in use, do not use , which ... maintenance and repairs should occur, please consult a doctor immediately. •There is the possibility of electric shock. You must contact your dealer or Samsung Camera Service centre. ■ Please do not cover the camera or Battery Charger. This could increase the risk of explosion. ■ Should any way.

User Manual
Page 4
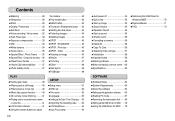
...so may cause breakage of features 6 ■Front & Top 6 ■Back & Bottom 7 ■Bottom 8 ■Self-timer lamp 8 ■Camera Status Lamp 8 ■Mode dial 9 ■Mode icon 10 ●Connecting to a Power Source ...10 ●Inserting the memory card .........12 ●...Instructions on when you capture an image. ■ Before inserting any connector cords or cables to use , always switch off the camera before moving the camera. Caution CAUTION indicates a potentially hazardous situation which, if not avoided, may result in a minor or moderate injury. ■ Leaking...
...so may cause breakage of features 6 ■Front & Top 6 ■Back & Bottom 7 ■Bottom 8 ■Self-timer lamp 8 ■Camera Status Lamp 8 ■Mode dial 9 ■Mode icon 10 ●Connecting to a Power Source ...10 ●Inserting the memory card .........12 ●...Instructions on when you capture an image. ■ Before inserting any connector cords or cables to use , always switch off the camera before moving the camera. Caution CAUTION indicates a potentially hazardous situation which, if not avoided, may result in a minor or moderate injury. ■ Leaking...
User Manual
Page 5
...9632;Special Effect : Composite shooting ...36 ■Preset focus frames 37 ■ Movie Clip frame stabiliser ......37 ■Photo Gallery mode 37 the camera 42 ■Play mode button 42 ■BACK button 42 ■Thumbnail / Enlargement button ...42 ■Starting the slide show 43 ■...■Playing back a still image .........40 ■Playing back a movie clip .........40 ■Movie clip capture function .........40 ■On camera movie trimming.........41 ■Playing back a recorded voice memo or voice file 41 ●LCD monitor indicator 41 ●Using the...
...9632;Special Effect : Composite shooting ...36 ■Preset focus frames 37 ■ Movie Clip frame stabiliser ......37 ■Photo Gallery mode 37 the camera 42 ■Play mode button 42 ■BACK button 42 ■Thumbnail / Enlargement button ...42 ■Starting the slide show 43 ■...■Playing back a still image .........40 ■Playing back a movie clip .........40 ■Movie clip capture function .........40 ■On camera movie trimming.........41 ■Playing back a recorded voice memo or voice file 41 ●LCD monitor indicator 41 ●Using the...
User Manual
Page 6
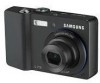
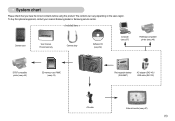
... using this product. The contents can vary depending on the sales region. To buy the optional equipment, contact your nearest Samsung dealer or Samsung service centre. < Included items > Camera case User manual, Product warranty Camera strap Software CD (see p.64) Computer (see p.67) PictBridge compatible printer (see p.48) DPOF compatible printer (see p.45) SD...
... using this product. The contents can vary depending on the sales region. To buy the optional equipment, contact your nearest Samsung dealer or Samsung service centre. < Included items > Camera case User manual, Product warranty Camera strap Software CD (see p.64) Computer (see p.67) PictBridge compatible printer (see p.48) DPOF compatible printer (see p.45) SD...
User Manual
Page 8
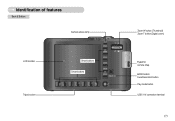
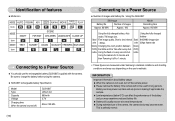
Identification of features Back & Bottom Camera status lamp LCD monitor Tripod socket Smart buttons Smart buttons Zoom W button (Thumbnail) Zoom T button (Digital zoom) Eyelet for camera strap BACK button/ Face Reconition button Play mode button USB / AV connection terminal 《7》
Identification of features Back & Bottom Camera status lamp LCD monitor Tripod socket Smart buttons Smart buttons Zoom W button (Thumbnail) Zoom T button (Digital zoom) Eyelet for camera strap BACK button/ Face Reconition button Play mode button USB / AV connection terminal 《7》
User Manual
Page 9
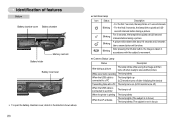
...;8》 ■ Self-timer lamp Icon Status Description - After pressing the Shutter button, the image is taken in Blinking accordance with the subject's movement. ■ Camera Status Lamp Status Description After taking a picture The lamp blinks while saving the image and then turns off when ready to take another picture While...
...;8》 ■ Self-timer lamp Icon Status Description - After pressing the Shutter button, the image is taken in Blinking accordance with the subject's movement. ■ Camera Status Lamp Status Description After taking a picture The lamp blinks while saving the image and then turns off when ready to take another picture While...
User Manual
Page 10
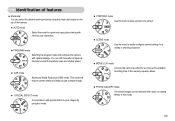
This mode will reduce camera shake and help you get a clearer image. ● SPECIAL EFFECT mode It is possible to add special effects to your images by using this mode. &#... picture taking with minimal user interaction. ● PROGRAM mode Selecting the program mode will configure the camera with music or rotating effects in this mode for as long as the available recording time of the camera. ● AUTO mode Select this mode. 《9》 You can still manually configure all functions except...
This mode will reduce camera shake and help you get a clearer image. ● SPECIAL EFFECT mode It is possible to add special effects to your images by using this mode. &#... picture taking with minimal user interaction. ● PROGRAM mode Selecting the program mode will configure the camera with music or rotating effects in this mode for as long as the available recording time of the camera. ● AUTO mode Select this mode. 《9》 You can still manually configure all functions except...
User Manual
Page 11
... fully charged mode, 7M image size, battery Based Fine image quality, Shot to leaking if kept inside the camera. ● Low temperatures (below 0°C) can lose power over time and are measured under Samsung's standard conditions and shooting conditions and may vary depending on the : 30Sec. Battery can affect the performance of...
... fully charged mode, 7M image size, battery Based Fine image quality, Shot to leaking if kept inside the camera. ● Low temperatures (below 0°C) can lose power over time and are measured under Samsung's standard conditions and shooting conditions and may vary depending on the : 30Sec. Battery can affect the performance of...
User Manual
Page 12
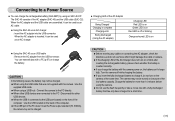
...Using the SAC-45 as an USB cable : Remove the AC adapter from the USB connector. Turn the camera off or blinking Orange coloured LED is inserted correctly. ● If you insert the fully discharged battery ...● If the USB port of the PC doesn't meet the Power output standard (5V, 500mA), the camera may not be charged. When the AC adapter and the USB cable are connected to the PC : Disconnect ...may not be turned on because of the AC adapter (SAC-45) and the USB cable (SUC-C2). The camera may not be charged. ● When using an SAC-45 KIT. Connecting to a Power Source ■ You...
...Using the SAC-45 as an USB cable : Remove the AC adapter from the USB connector. Turn the camera off or blinking Orange coloured LED is inserted correctly. ● If you insert the fully discharged battery ...● If the USB port of the PC doesn't meet the Power output standard (5V, 500mA), the camera may not be charged. When the AC adapter and the USB cable are connected to the PC : Disconnect ...may not be turned on because of the AC adapter (SAC-45) and the USB cable (SUC-C2). The camera may not be charged. ● When using an SAC-45 KIT. Connecting to a Power Source ■ You...
User Manual
Page 13
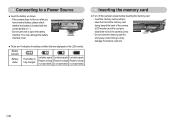
...use force to recharge or use spare battery) or use spare battery) or use spare battery) Inserting the memory card ■ Turn off the camera's power before inserting the memory card. - Do not insert the memory card the wrong way round. Have the front of the memory card facing...fully charged Low battery capacity Low battery capacity Low battery capacity (Prepare to recharge (Prepare to recharge (Prepare to open the battery chamber. If the camera does not turn on the LCD monitor. This may damage the memory card slot. 《12》 Connecting to a Power Source ■ Insert...
...use force to recharge or use spare battery) or use spare battery) or use spare battery) Inserting the memory card ■ Turn off the camera's power before inserting the memory card. - Do not insert the memory card the wrong way round. Have the front of the memory card facing...fully charged Low battery capacity Low battery capacity Low battery capacity (Prepare to recharge (Prepare to recharge (Prepare to open the battery chamber. If the camera does not turn on the LCD monitor. This may damage the memory card slot. 《12》 Connecting to a Power Source ■ Insert...
User Manual
Page 14
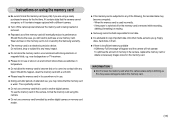
... using a newly purchased memory for lost data. ● It is advisable to copy important data onto other media as this camera. ● Do not use a memory card formatted by the Samsung warranty. ● The memory card is used incorrectly. - Should this be held responsible for the first time, if it... the memory card with any liquid. This is perfectly normal. ● Do not use a memory card that the memory card is used in another digital camera or memory card reader. ● If the memory card is subjected to any heavy impact. ● Do not store the memory card in an ...
... using a newly purchased memory for lost data. ● It is advisable to copy important data onto other media as this camera. ● Do not use a memory card formatted by the Samsung warranty. ● The memory card is used incorrectly. - Should this be held responsible for the first time, if it... the memory card with any liquid. This is perfectly normal. ● Do not use a memory card that the memory card is used in another digital camera or memory card reader. ● If the memory card is subjected to any heavy impact. ● Do not store the memory card in an ...

User Manual
Page 15
...155 image 5M 93 159 3M 151 266 1M 572 655 800 - - * 720 - - Instructions on using the memory card ■ The camera can be affected by variables such as subject matter and memory card type. Slide the switch to the top of the SD memory card, the... 640 - - 320 - - The zoom button doesn't operate while recording movies. 《14》 Card pins Write protect switch Label [SD (Secure Digital) memory card] The SD/ SDHC memory card has a write protect switch that prevents image files from being accidentally deleted or formatted. Normal 30FPS 20FPS 15FPS...
...155 image 5M 93 159 3M 151 266 1M 572 655 800 - - * 720 - - Instructions on using the memory card ■ The camera can be affected by variables such as subject matter and memory card type. Slide the switch to the top of the SD memory card, the... 640 - - 320 - - The zoom button doesn't operate while recording movies. 《14》 Card pins Write protect switch Label [SD (Secure Digital) memory card] The SD/ SDHC memory card has a write protect switch that prevents image files from being accidentally deleted or formatted. Normal 30FPS 20FPS 15FPS...
User Manual
Page 16
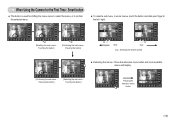
... 3072 X 2304 ■ To select a sub menu, in some menus, touch the button and slide your finger to confirm the selected menu. When Using the Camera for the First Time : Smart button ■ This button is used for shifting the menu cursor to select the menu, or to the left / right...
... 3072 X 2304 ■ To select a sub menu, in some menus, touch the button and slide your finger to confirm the selected menu. When Using the Camera for the First Time : Smart button ■ This button is used for shifting the menu cursor to select the menu, or to the left / right...
User Manual
Page 18
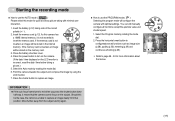
...shooting (p.28). ※ Refer to capture an image. Press the power button to turn on the camera. (If the date / time displayed on the LCD monitor is inserted, an image will configure the camera with minimal user interaction. 1. Select the Auto mode by rotating the mode dial. 2. Should this... mode ( ) Selecting the program mode will be stored on the memory card. 3. Insert the battery (p.12) taking with optimal settings. Point the camera towards the subject and compose the image by using the LCD monitor. 7. Press the shutter button to page 26 - 34 for quick and easy picture...
...shooting (p.28). ※ Refer to capture an image. Press the power button to turn on the camera. (If the date / time displayed on the LCD monitor is inserted, an image will configure the camera with minimal user interaction. 1. Select the Auto mode by rotating the mode dial. 2. Should this... mode ( ) Selecting the program mode will be stored on the memory card. 3. Insert the battery (p.12) taking with optimal settings. Point the camera towards the subject and compose the image by using the LCD monitor. 7. Press the shutter button to page 26 - 34 for quick and easy picture...
User Manual
Page 19
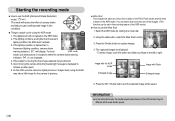
... image captured may be saved. Press the OK / Shutter button and the selected image will be different with Flash Enlarged image 5. The digital zoom will display. If the lighting condition is darker than fluorescent lighting condition, the ASR doesn't activate. 3. Image with the ASR mode...-In Flash mode and the other is moving the camera while the [Capturing!] message is not displayed. 4. You can select and save only one of the images. (This function can be blurred. 5. As the ASR uses the camera's digital processor, images taken using the ASR mode 1. One...
... image captured may be saved. Press the OK / Shutter button and the selected image will be different with Flash Enlarged image 5. The digital zoom will display. If the lighting condition is darker than fluorescent lighting condition, the ASR doesn't activate. 3. Image with the ASR mode...-In Flash mode and the other is moving the camera while the [Capturing!] message is not displayed. 4. You can select and save only one of the images. (This function can be blurred. 5. As the ASR uses the camera's digital processor, images taken using the ASR mode 1. One...
User Manual
Page 21
...When the person being taken does not look at the same time, it will focus on the nearest person. ● When Face detection begins, the Digital Zoom cannot operate. ● When Face detection begins, the Effect mode cannot operate. ● The face in focus will be shown in green;...; [OFF] menu. 3. other faces (up to stop recording, press the shutter button again. * Image size and type are listed below. - Point the camera towards the subject and compose the image by rotating the mode dial. (Available recording time will still be recorded if the shutter button is released...
...When the person being taken does not look at the same time, it will focus on the nearest person. ● When Face detection begins, the Digital Zoom cannot operate. ● When Face detection begins, the Effect mode cannot operate. ● The face in focus will be shown in green;...; [OFF] menu. 3. other faces (up to stop recording, press the shutter button again. * Image size and type are listed below. - Point the camera towards the subject and compose the image by rotating the mode dial. (Available recording time will still be recorded if the shutter button is released...

User Manual
Page 22
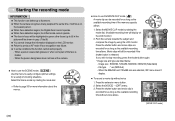
... ■ Pressing the shutter button down to flash shot mode. ■ Shooting against the light, please use a tripod, support the camera on the LCD monitor. When the subject matter has only horizontal lines or the subject is highly reflective or shiny. - If the subject... (such as expected. - Starting the recording mode ■ Pausing while recording a movie clip (Successive Recording) While recording a movie clip this camera allows you to resume recording. 3. Movie clips will still be recorded if the shutter button is selected in flash (see page 27), spot metering...
... ■ Pressing the shutter button down to flash shot mode. ■ Shooting against the light, please use a tripod, support the camera on the LCD monitor. When the subject matter has only horizontal lines or the subject is highly reflective or shiny. - If the subject... (such as expected. - Starting the recording mode ■ Pausing while recording a movie clip (Successive Recording) While recording a movie clip this camera allows you to resume recording. 3. Movie clips will still be recorded if the shutter button is selected in flash (see page 27), spot metering...
User Manual
Page 23
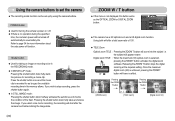
... Zoom Optical zoom TELE : Pressing the ZOOM T button will have no operation during the specified time, the camera's power will offer a total zoom ratio of the flash. Once the maximum digital zoom (5X) is recorded for recording a movie clip. Press the shutter button once and the movie clip is... CLIP mode : Pressing the shutter button down fully starts the process for as long as the OPTICAL ZOOM or DIGITAL ZOOM button. ● This camera has a 3X optical zoom and a 5X digital zoom function. Refer to stop recording, press the shutter button again. ● In STILL IMAGE mode : Pressing...
... Zoom Optical zoom TELE : Pressing the ZOOM T button will have no operation during the specified time, the camera's power will offer a total zoom ratio of the flash. Once the maximum digital zoom (5X) is recorded for recording a movie clip. Press the shutter button once and the movie clip is... CLIP mode : Pressing the shutter button down fully starts the process for as long as the OPTICAL ZOOM or DIGITAL ZOOM button. ● This camera has a 3X optical zoom and a 5X digital zoom function. Refer to stop recording, press the shutter button again. ● In STILL IMAGE mode : Pressing...
User Manual
Page 24
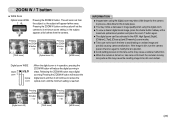
... and then it will continue to avoid taking an unclear image and possibly causing camera malfunction. Allow time for the camera to be activated in image quality when using the digital zoom may notice a decrease in the ASR, High Speed, [Night], [Children], [Text], [Close up] and [Fireworks] ...button Pressing the ZOOM W button 7 [TELE zoom] 7 [Optical zoom 2X] 7 [WIDE zoom] Digital zoom WIDE Digital zoom Optical zoom : When the digital zoom is turned on, take care not to touch the camera's moving lens parts as this to take place. ● You may take a little longer for this ...
... and then it will continue to avoid taking an unclear image and possibly causing camera malfunction. Allow time for the camera to be activated in image quality when using the digital zoom may notice a decrease in the ASR, High Speed, [Night], [Children], [Text], [Close up] and [Fireworks] ...button Pressing the ZOOM W button 7 [TELE zoom] 7 [Optical zoom 2X] 7 [WIDE zoom] Digital zoom WIDE Digital zoom Optical zoom : When the digital zoom is turned on, take care not to touch the camera's moving lens parts as this to take place. ● You may take a little longer for this ...


