
User Manual
Page 6
... 54 Delete button 55 E (Effect) button : Resize 56 E (Effect) button : Rotating an image 56 E (Effect) button : Colour 57 E (Effect) button : Image editing 57 ACB 57 Red eye Removal 57 Brightness control 58 Contrast control 58 Saturation control 58 Setting up the play back function using the LCD monitor 60 Multi slide...
... 54 Delete button 55 E (Effect) button : Resize 56 E (Effect) button : Rotating an image 56 E (Effect) button : Colour 57 E (Effect) button : Image editing 57 ACB 57 Red eye Removal 57 Brightness control 58 Contrast control 58 Saturation control 58 Setting up the play back function using the LCD monitor 60 Multi slide...
User Manual
Page 15
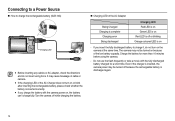
... charging LED of the AC Adapter Being Charged Charging is complete Charging error Being discharged Charging LED Red LED is on Green LED is on because of cable or camera. The camera may be turned on Red LED is off or blinking Orange coloured LED is discharged again. 14 Even if the charger is... inserted, the camera power may not be turned off while charging the battery. „ Charging LED of the AC...
... charging LED of the AC Adapter Being Charged Charging is complete Charging error Being discharged Charging LED Red LED is on Green LED is on because of cable or camera. The camera may be turned on Red LED is off or blinking Orange coloured LED is discharged again. 14 Even if the charger is... inserted, the camera power may not be turned off while charging the battery. „ Charging LED of the AC...

User Manual
Page 21
If the memory card is incorrect, reset the date/ time before taking a picture.) 5. Press the power button to red when you press the shutter button down half way, it means that is displayed on the LCD monitor is inserted, an image will be stored ... still manually configure all functions except the aperture value and shutter speed. 1. Select the AUTO mode by using the LCD monitor. 7. Point the camera towards the subject and compose the image by rotating the mode dial. 6. Press the Fn button to capture an image. Should this mode for quick...
If the memory card is incorrect, reset the date/ time before taking a picture.) 5. Press the power button to red when you press the shutter button down half way, it means that is displayed on the LCD monitor is inserted, an image will be stored ... still manually configure all functions except the aperture value and shutter speed. 1. Select the AUTO mode by using the LCD monitor. 7. Point the camera towards the subject and compose the image by rotating the mode dial. 6. Press the Fn button to capture an image. Should this mode for quick...

User Manual
Page 23
... learn the correct picture taking method and includes solutions for potential problems that can be used when focusing is difficult] 22 Red: Focusing failed Back Practice Guide list Pressing the MENU button Pressing the Up/Down button Pressing the shutter button Practice begins when you... button to shoot. Available functions of the photo help guide x Features to use when the image is out of focus x Features to counter camera shake x Features to use in low light conditions x Features to use when adjusting brightness x Features to use when adjusting colours PHOTO HELP GUIDE...
... learn the correct picture taking method and includes solutions for potential problems that can be used when focusing is difficult] 22 Red: Focusing failed Back Practice Guide list Pressing the MENU button Pressing the Up/Down button Pressing the shutter button Practice begins when you... button to shoot. Available functions of the photo help guide x Features to use when the image is out of focus x Features to counter camera shake x Features to use in low light conditions x Features to use when adjusting brightness x Features to use when adjusting colours PHOTO HELP GUIDE...

User Manual
Page 32
... the subject is weak, the charging time will be longer. If a subject or background is dark, the camera flash will work automatically and will reduce the red-eye effect by the flash light reflecting off atmospheric dust. „ Flash mode indicator Icon... Flash mode Auto flash Auto & Red eye reduction Fill in flash Slow synchro Flash off Red-eye reduction Description If the subject or background is dark, the camera flash will operate automatically. The intensity of the battery. x ...
... the subject is weak, the charging time will be longer. If a subject or background is dark, the camera flash will work automatically and will reduce the red-eye effect by the flash light reflecting off atmospheric dust. „ Flash mode indicator Icon... Flash mode Auto flash Auto & Red eye reduction Fill in flash Slow synchro Flash off Red-eye reduction Description If the subject or background is dark, the camera flash will operate automatically. The intensity of the battery. x ...

User Manual
Page 37
...to the image. Captured images will be preserved. Captured images will be stored in set RGB tone. 2. Setting up the recording function using the camera buttons E (Effect) button It is possible to add special effects to your images „ Press the E button in the Image Adjust menu.... Captured image will be stored in a red tone. E (Effect) button : Colour By using the camera's digital processor, it is added to capture an image. 36 Captured images will be stored in negative mode. In the Auto mode...
...to the image. Captured images will be preserved. Captured images will be stored in set RGB tone. 2. Setting up the recording function using the camera buttons E (Effect) button It is possible to add special effects to your images „ Press the E button in the Image Adjust menu.... Captured image will be stored in a red tone. E (Effect) button : Colour By using the camera's digital processor, it is added to capture an image. 36 Captured images will be stored in negative mode. In the Auto mode...

User Manual
Page 38
...pressing the Shutter button. Move Set 37 Move Set 1. Take a picture pressing the Shutter button. E (Effect) button : Contrast „ You can change the R (Red), G (Green) and B (Blue) values of the image. 1. Press the E button and select [Contrast]() Contrast by pressing the Left/Right button. 3. ...Press the E button and select [Sharpness]() by pressing the Left/Right button. 3. Setting up the recording function using the camera buttons „ Custom colour :You can change the contrast of the image. Change the Contrast value by pressing the Up/Down button...
...pressing the Shutter button. Move Set 37 Move Set 1. Take a picture pressing the Shutter button. E (Effect) button : Contrast „ You can change the R (Red), G (Green) and B (Blue) values of the image. 1. Press the E button and select [Contrast]() Contrast by pressing the Left/Right button. 3. ...Press the E button and select [Sharpness]() by pressing the Left/Right button. 3. Setting up the recording function using the camera buttons „ Custom colour :You can change the contrast of the image. Change the Contrast value by pressing the Up/Down button...

User Manual
Page 46
...subject, the auto focus frame turns to green. In Auto and Portrait mode, the ACB function always operates. When the camera doesn't focus on the subject, the auto focus frame turns to red. [ACB Off] [ACB On] K When using the LCD monitor Focus Area You can select ISO AUTO, 80, ... conditions. K When the ACB function is selected, you only can select your preferred Focus Area according to be focused Back [Multi AF] : This camera selects all of available AF point from the 9 AF points. Setting up the recording function using the AUTO, PROGRAM, PORTRAIT mode, the ACB function ...
...subject, the auto focus frame turns to green. In Auto and Portrait mode, the ACB function always operates. When the camera doesn't focus on the subject, the auto focus frame turns to red. [ACB Off] [ACB On] K When using the LCD monitor Focus Area You can select ISO AUTO, 80, ... conditions. K When the ACB function is selected, you only can select your preferred Focus Area according to be focused Back [Multi AF] : This camera selects all of available AF point from the 9 AF points. Setting up the recording function using the AUTO, PROGRAM, PORTRAIT mode, the ACB function ...

User Manual
Page 57
... the UP / DOWN button. K If you display the rotated image on the LCD monitor, empty spaces may appear to your images by using the camera buttons E (Effect) button : Rotating an image You can rotate the stored images by pressing the Left / Right button . 3. Press the play ...in black and white. Select () menu tab by various degrees. 1. Move Exit Colour Description Captured images will be stored in a red tone. Captured images will be stored in a sepia tone (a gradient of the image. 56 Press the LEFT / RIGHT button and select the [ROTATE] (&#...
... the UP / DOWN button. K If you display the rotated image on the LCD monitor, empty spaces may appear to your images by using the camera buttons E (Effect) button : Rotating an image You can rotate the stored images by pressing the Left / Right button . 3. Press the play ...in black and white. Select () menu tab by various degrees. 1. Move Exit Colour Description Captured images will be stored in a red tone. Captured images will be stored in a sepia tone (a gradient of the image. 56 Press the LEFT / RIGHT button and select the [ROTATE] (&#...

User Manual
Page 58
...le name. 57 OK button : Save the changed value of the image. Up / Down button : Selects R, G, B - Red Eye Fix 1. Press the play back function using the camera buttons „ Custom colour You can change the brightness of the image. 1. Brightness 2. Brightness control You can be removed from ... the values Custom Color Move Set ACB ACB(Auto Contrast Balance) is saved as a new file name. Set Back Red eye Removal Red eye effect can change the R (Red), G (Green) and B (Blue) values of Custom Color - Change the brightness by pressing the Left/Right button. The...
...le name. 57 OK button : Save the changed value of the image. Up / Down button : Selects R, G, B - Red Eye Fix 1. Press the play back function using the camera buttons „ Custom colour You can change the brightness of the image. 1. Brightness 2. Brightness control You can be removed from ... the values Custom Color Move Set ACB ACB(Auto Contrast Balance) is saved as a new file name. Set Back Red eye Removal Red eye effect can change the R (Red), G (Green) and B (Blue) values of Custom Color - Change the brightness by pressing the Left/Right button. The...
User Manual
Page 91
...640x480, 320x240 quality) • Frame rate : 30 fps, 20 fps, 15 fps - Voice Recording (max. 10 hours) - Normal, B&W, Sepia, Red, Blue, Green, Negative, Custom Color White Balance - Still Image • Mode : Auto, Program, Manual, DIS, Photo Help Guide, Scene, Portrait... 2 sec., Double, Motion Timer Storage 3648 X 2736 - Date, Date & Time, Off (user selectable) Shooting - Voice Memo in flash, Slow sync, Flash off, Red-eye Fix - File Format • Still Image : JPEG (DCF), EXIF 2.2, DPOF 1.1, PictBridge 1.0 • Movie : AVI (MPEG-4) • Audio : WAV - Recharging Time...
...640x480, 320x240 quality) • Frame rate : 30 fps, 20 fps, 15 fps - Voice Recording (max. 10 hours) - Normal, B&W, Sepia, Red, Blue, Green, Negative, Custom Color White Balance - Still Image • Mode : Auto, Program, Manual, DIS, Photo Help Guide, Scene, Portrait... 2 sec., Double, Motion Timer Storage 3648 X 2736 - Date, Date & Time, Off (user selectable) Shooting - Voice Memo in flash, Slow sync, Flash off, Red-eye Fix - File Format • Still Image : JPEG (DCF), EXIF 2.2, DPOF 1.1, PictBridge 1.0 • Movie : AVI (MPEG-4) • Audio : WAV - Recharging Time...

User Manual
Page 92
... - Editing : Resize, Rotate, Color, Image Adjust (ACB, Red Eye Fix, Brightness, Contrast, Saturation) Image Play - Video output : NTSC, PAL (user selectable) Power Source - Samsung Master, Adobe Reader K Specifications are measured under Samsung standard conditions and may vary depending on shooting conditions and camera settings. Digital output connector : USB 2.0 High Speed - K All trademarks are...
... - Editing : Resize, Rotate, Color, Image Adjust (ACB, Red Eye Fix, Brightness, Contrast, Saturation) Image Play - Video output : NTSC, PAL (user selectable) Power Source - Samsung Master, Adobe Reader K Specifications are measured under Samsung standard conditions and may vary depending on shooting conditions and camera settings. Digital output connector : USB 2.0 High Speed - K All trademarks are...

