Quick Guide (easy Manual) (ver.1.0) (English)
Page 2
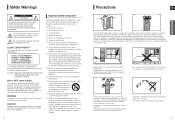
...main plug from the AC supply if the player malfunctions. If transporting the player during lightning storms or when unused for your player or subwoofer. Do not dispose of the unit. REFER SERVICING TO QUALIFIED SERVICE PERSONNEL. A polarized plug has two blades with the identification sticker located... one wider than those specified herein may result in any way, such as close to rain or moisture. Do not place the player or subwoofer on a suitable base (furniture), with the cart, stand, tripod, bracket, or table specifi ed by mode does not disconnect the electrical ...
...main plug from the AC supply if the player malfunctions. If transporting the player during lightning storms or when unused for your player or subwoofer. Do not dispose of the unit. REFER SERVICING TO QUALIFIED SERVICE PERSONNEL. A polarized plug has two blades with the identification sticker located... one wider than those specified herein may result in any way, such as close to rain or moisture. Do not place the player or subwoofer on a suitable base (furniture), with the cart, stand, tripod, bracket, or table specifi ed by mode does not disconnect the electrical ...

Quick Guide (easy Manual) (ver.1.0) (English)
Page 5
... Connector 1 Use this to connect external equipment capable of digital output. 14 HDMI OUT Jack 15 HDMI IN Jack 16 USB Port 17 Headphone Jack 8 Subwoofer ENG PREPARATION 1 Standby indicator 2 Power on indicator 3 Auto Sound Calibration Input Connector 4 5.1 Channel Speaker Output Connectors 3 4 1 5 6 2 7 8 9 10 11 5 Cooling Fan 6 FM 75Ω COAXIAL Jack...
... Connector 1 Use this to connect external equipment capable of digital output. 14 HDMI OUT Jack 15 HDMI IN Jack 16 USB Port 17 Headphone Jack 8 Subwoofer ENG PREPARATION 1 Standby indicator 2 Power on indicator 3 Auto Sound Calibration Input Connector 4 5.1 Channel Speaker Output Connectors 3 4 1 5 6 2 7 8 9 10 11 5 Cooling Fan 6 FM 75Ω COAXIAL Jack...
Quick Guide (easy Manual) (ver.1.0) (English)
Page 7
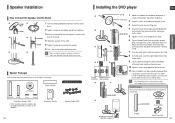
.... 6 Open a Toroidal Ferrite Core by pulling it upward. BACK COVER STAND BASE Screw (6EA) System connection cable Main Unit to the DVD Player. Center Speaker Subwoofer Speaker Speaker Accessories Speaker Cable (5EA) 12 Installing the DVD player ENG CONNECTIONS 1 2 3 4 67 5 STAND 8 Toroidal System connection Ferrite Core cable - Speaker Packages Please confirm... back of the system connection cable so it on the stand. Wrap it around of the system connection cable so it will be next to Subwoofer STAND Cable Holder (3EA) 13
.... 6 Open a Toroidal Ferrite Core by pulling it upward. BACK COVER STAND BASE Screw (6EA) System connection cable Main Unit to the DVD Player. Center Speaker Subwoofer Speaker Speaker Accessories Speaker Cable (5EA) 12 Installing the DVD player ENG CONNECTIONS 1 2 3 4 67 5 STAND 8 Toroidal System connection Ferrite Core cable - Speaker Packages Please confirm... back of the system connection cable so it on the stand. Wrap it around of the system connection cable so it will be next to Subwoofer STAND Cable Holder (3EA) 13

Quick Guide (easy Manual) (ver.1.0) (English)
Page 8
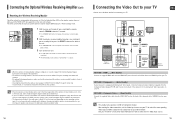
...) Rear Speakers SL SR • Place these speakers so they face each other. • Place them about 2.5 to the back of the Subwoofer. Place it directly over or under the TV stand. Make sure the colors of the speaker terminals match the colors of the connecting plugs. &#... effects and sound will be at the same height as the front speakers. • You can also install it anywhere you like. 14 Rear of Subwoofer Front Speaker (R) ENG Rear of Main unit Center Speaker Front Speaker (L) CONNECTIONS Rear Speaker (R) Rear Speaker (L) Connecting the Speakers 1 2 Black Red 1...
...) Rear Speakers SL SR • Place these speakers so they face each other. • Place them about 2.5 to the back of the Subwoofer. Place it directly over or under the TV stand. Make sure the colors of the speaker terminals match the colors of the connecting plugs. &#... effects and sound will be at the same height as the front speakers. • You can also install it anywhere you like. 14 Rear of Subwoofer Front Speaker (R) ENG Rear of Main unit Center Speaker Front Speaker (L) CONNECTIONS Rear Speaker (R) Rear Speaker (L) Connecting the Speakers 1 2 Black Red 1...

Quick Guide (easy Manual) (ver.1.0) (English)
Page 9
... card may not be removed easily. • Do not insert the TX card upside down or in , dedicated 185W amplifier, the Subwoofer generates rich bass sounds. When you have purchased the wireless receiving module (SWA-3000) additionally Front Speaker (R) Front Speaker (L) Center Speaker CONNECTIONS...side faces left and right rear speakers to purchase the wireless receiving module and TX card from your Samsung retailer. Connecting the Speakers (Con't) Connecting the Main Unit and Subwoofer Rear of Subwoofer Rear of Main unit Connect the System Connector cable from the main unit to pages 15~16....
... card may not be removed easily. • Do not insert the TX card upside down or in , dedicated 185W amplifier, the Subwoofer generates rich bass sounds. When you have purchased the wireless receiving module (SWA-3000) additionally Front Speaker (R) Front Speaker (L) Center Speaker CONNECTIONS...side faces left and right rear speakers to purchase the wireless receiving module and TX card from your Samsung retailer. Connecting the Speakers (Con't) Connecting the Main Unit and Subwoofer Rear of Subwoofer Rear of Main unit Connect the System Connector cable from the main unit to pages 15~16....
Quick Guide (easy Manual) (ver.1.0) (English)
Page 10
... REMAIN button for more information on the main unit's display. Keep the unit away from the VIDEO OUT jack on the back of the subwoofer to the Component Video Input jacks on your TV ENG Choose one of the listening position. METHOD 3 : Composite Video ....... (Good Quality)...microwave oven, wireless LAN Card, Bluetooth equipment, or any obstructions. • Sound will be heard due to interference. • The transmission distance of the subwoofer. • The wireless receiving antenna is about 33 feet, but may be heard due to interference. • If you use a ball point pen ...
... REMAIN button for more information on the main unit's display. Keep the unit away from the VIDEO OUT jack on the back of the subwoofer to the Component Video Input jacks on your TV ENG Choose one of the listening position. METHOD 3 : Composite Video ....... (Good Quality)...microwave oven, wireless LAN Card, Bluetooth equipment, or any obstructions. • Sound will be heard due to interference. • The transmission distance of the subwoofer. • The wireless receiving antenna is about 33 feet, but may be heard due to interference. • If you use a ball point pen ...
Quick Guide (easy Manual) (ver.1.0) (English)
Page 12
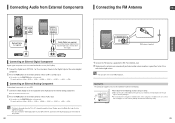
The mode switches as a VCR. 1 Connect the AUX (Audio) In on the subwoofer to the Audio Out of the external digital component. 2 Press the AUX button on the main unit. The mode switches as a Cable Box/Satellite receiver (... External Analog Component Analog signal components such as follows : ➝ ➝ ➝ ➝ ➝ ➝ . Cooling Fan The cooling fan supplies cool air to the subwoofer to select input. s You can also use the FUNCTION button on the remote control to the FM 75Ω COAXIAL Jack. 2 Slowly move the antenna...
The mode switches as a VCR. 1 Connect the AUX (Audio) In on the subwoofer to the Audio Out of the external digital component. 2 Press the AUX button on the main unit. The mode switches as a Cable Box/Satellite receiver (... External Analog Component Analog signal components such as follows : ➝ ➝ ➝ ➝ ➝ ➝ . Cooling Fan The cooling fan supplies cool air to the subwoofer to select input. s You can also use the FUNCTION button on the remote control to the FM 75Ω COAXIAL Jack. 2 Slowly move the antenna...

Quick Guide (easy Manual) (ver.1.0) (English)
Page 13
...the FUNCTION button on the main unit or DVD button on the remote to select VIDEO mode on your Samsung TV with this manual, the instructions marked with DVD or DVD-R/DVD-RW discs that have been recorded and...button to set the remote to TV mode. 3 Press the POWER button to turn on your Samsung TV and the Home Theater with the HT-TXQ120's Remote Control The DVD Home Theater's remote can be playable. Before Using Your Home Theater ...it will be cancelled. Before Reading the User's Manual Make sure to control Samsung TVs. 1 Plug the subwoofer's power cord into the AC power supply.
...the FUNCTION button on the main unit or DVD button on the remote to select VIDEO mode on your Samsung TV with this manual, the instructions marked with DVD or DVD-R/DVD-RW discs that have been recorded and...button to set the remote to TV mode. 3 Press the POWER button to turn on your Samsung TV and the Home Theater with the HT-TXQ120's Remote Control The DVD Home Theater's remote can be playable. Before Using Your Home Theater ...it will be cancelled. Before Reading the User's Manual Make sure to control Samsung TVs. 1 Plug the subwoofer's power cord into the AC power supply.
Quick Guide (easy Manual) (ver.1.0) (English)
Page 27
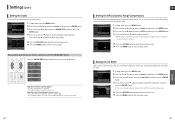
... then press the ENTER button. 4 Press the Cursor , button to select the AV-SYNC Delay Time and then press the ENTER button. Adjusting Center/Rear/Subwoofer Speaker Level • The volume level can select between the loudest and quietest sounds. MOVE ENTER RETURN EXIT 1 In Stop mode, press the MENU button...
... then press the ENTER button. 4 Press the Cursor , button to select the AV-SYNC Delay Time and then press the ENTER button. Adjusting Center/Rear/Subwoofer Speaker Level • The volume level can select between the loudest and quietest sounds. MOVE ENTER RETURN EXIT 1 In Stop mode, press the MENU button...

Quick Guide (easy Manual) (ver.1.0) (English)
Page 28
Each time the button is pressed, the mode changes as if using five speakers, while using just the front left and right speakers and the subwoofer only. • When selecting Pro Logic II mode, connect your external device to the AUDIO INPUT jacks (L and R) on the player. If you connect to ...
Each time the button is pressed, the mode changes as if using five speakers, while using just the front left and right speakers and the subwoofer only. • When selecting Pro Logic II mode, connect your external device to the AUDIO INPUT jacks (L and R) on the player. If you connect to ...
Quick Guide (easy Manual) (ver.1.0) (English)
Page 29
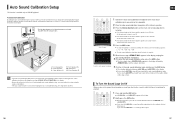
... listener and the speaker is less than 118 inch : Set the main unit's volume to the auto sound calibration input connector on the subwoofer. 2 Place the auto sound calibration microphone at the listener's position. 3 Press the Volume Control buttons on . If you will be ... will be cancelled. 56 ENG A tone is cancelled. L: Front Speaker (L) C: Center Speaker SL: Rear Speaker (L) R: Front Speaker (R) SW: Subwoofer SR: Rear Speaker (R) • If you have the unit automatically recognize the distance between speakers, levels between the listener and the speaker is fixed during...
... listener and the speaker is less than 118 inch : Set the main unit's volume to the auto sound calibration input connector on the subwoofer. 2 Place the auto sound calibration microphone at the listener's position. 3 Press the Volume Control buttons on . If you will be ... will be cancelled. 56 ENG A tone is cancelled. L: Front Speaker (L) C: Center Speaker SL: Rear Speaker (L) R: Front Speaker (R) SW: Subwoofer SR: Rear Speaker (R) • If you have the unit automatically recognize the distance between speakers, levels between the listener and the speaker is fixed during...


