User Manual (ENGLISH)
Page 4
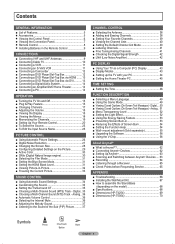
Digital....50 ■ Viewing Closed Captions (On-Screen Text Messages) - mount adjustment (Sold separately 55 ■ Upgrading...■ Troubleshooting 66 ■ Installing the Wall Mount Kit 67 ■ How to the Sound of Screen Burn 54 ■ Setting the Function Help 54 ■ Wall- Analog.. 51 ■ Menu Transparency Level... ■ Installing Batteries in the Remote Control 9 CONNECTIONS ■ Connecting VHF and UHF Antennas 9 ■ Connecting Cable TV 10 ■ Connecting a VCR 11 ■ Connecting a Camcorder 12 ■ Connecting a DVD Player/Set-Top Box...
Digital....50 ■ Viewing Closed Captions (On-Screen Text Messages) - mount adjustment (Sold separately 55 ■ Upgrading...■ Troubleshooting 66 ■ Installing the Wall Mount Kit 67 ■ How to the Sound of Screen Burn 54 ■ Setting the Function Help 54 ■ Wall- Analog.. 51 ■ Menu Transparency Level... ■ Installing Batteries in the Remote Control 9 CONNECTIONS ■ Connecting VHF and UHF Antennas 9 ■ Connecting Cable TV 10 ■ Connecting a VCR 11 ■ Connecting a Camcorder 12 ■ Connecting a DVD Player/Set-Top Box...
User Manual (ENGLISH)
Page 7
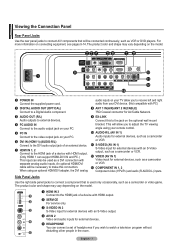
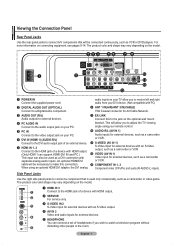
... as VCR or DVD players. Side Panel Jacks Use the right side panel jacks to adjust the TV viewing angle using an optional HDMI/DVI adapter, the DVI analog audio inputs on the optional wall mount bracket. An optional HDMI/DVI cable will be used only occasionally, such as a camcorder or video ...your PC. 6 DVI IN (HDMI 1) (AUDIO-R/L) Connect to the DVI audio output jack of an external device. 7 HDMI IN 1, 2 Connect to the jack on your TV allow you wish to make this to the HDMI jack of headphones if you to connect a component that will be necessary to watch a television program...
... as VCR or DVD players. Side Panel Jacks Use the right side panel jacks to adjust the TV viewing angle using an optional HDMI/DVI adapter, the DVI analog audio inputs on the optional wall mount bracket. An optional HDMI/DVI cable will be used only occasionally, such as a camcorder or video ...your PC. 6 DVI IN (HDMI 1) (AUDIO-R/L) Connect to the DVI audio output jack of an external device. 7 HDMI IN 1, 2 Connect to the jack on your TV allow you wish to make this to the HDMI jack of headphones if you to connect a component that will be necessary to watch a television program...

User Manual (ENGLISH)
Page 31
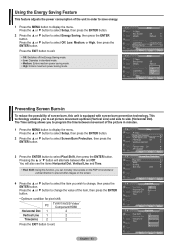
... Upgrade ► Move Enter Return T V Setup ▲ More Screen Burn Protection HDMI Black Level : Normal Film Mode : OOff f Wall-Mount Adjustment On PIP Function Help : On SW Upgrade Move Enter Return Setting the Blue Screen Mode If no signal from all sources and adjusts ...▲ More Blue Screen : Off ► Melody : Medium ► PC ► Home Theater PC : Off ► Light Effect Energy Saving : In Watching TV ► : Off ► ▼ More Move Enter Return T V Setup ▲ More Blue Screen Melody : OOfff : MOendium PC Home Theater PC : Off...
... Upgrade ► Move Enter Return T V Setup ▲ More Screen Burn Protection HDMI Black Level : Normal Film Mode : OOff f Wall-Mount Adjustment On PIP Function Help : On SW Upgrade Move Enter Return Setting the Blue Screen Mode If no signal from all sources and adjusts ...▲ More Blue Screen : Off ► Melody : Medium ► PC ► Home Theater PC : Off ► Light Effect Energy Saving : In Watching TV ► : Off ► ▼ More Move Enter Return T V Setup ▲ More Blue Screen Melody : OOfff : MOendium PC Home Theater PC : Off...

User Manual (ENGLISH)
Page 32
... or ▼ button to select Setup, then press the ENTER button. T V Setup ▲ More Screen Burn Protection HDMI Black Level : Normal Film Mode : Off Wall-Mount Adjustment PIP Function Help : On SW Upgrade Move Enter Return T V PIP Size Position Channel PIP : OOfff : On : : DTV Air 3 - 0 Press the... PIP button on the remote control to activate or deactivate the PIP. ➢ Analog TV signals can use the main picture to select Size, then press the ENTER button. English - 32 You can be used. (Refer to page 56) Activating...
... or ▼ button to select Setup, then press the ENTER button. T V Setup ▲ More Screen Burn Protection HDMI Black Level : Normal Film Mode : Off Wall-Mount Adjustment PIP Function Help : On SW Upgrade Move Enter Return T V PIP Size Position Channel PIP : OOfff : On : : DTV Air 3 - 0 Press the... PIP button on the remote control to activate or deactivate the PIP. ➢ Analog TV signals can use the main picture to select Size, then press the ENTER button. English - 32 You can be used. (Refer to page 56) Activating...
User Manual (ENGLISH)
Page 53
... ▲ More Blue Screen Melody : Off ► : Medium ► PC ► Home Theater PC : Off ► Light Effect : In Watching TV ► Energy Saving : Off ► ▼ More Move Enter Return T V Setup ▲ More Blue Screen : Off Melody : Medium PC Off Home...the ENTER button. T V Setup ▲ More Screen Burn Protection ► HDMI Black Level : Normal ► Film Mode : Off ► Wall-Mount Adjustment ► PIP ► Function Help : On ► SW Upgrade ► Move Enter Return T V Screen Burn Protection Pixel Shift White ...
... ▲ More Blue Screen Melody : Off ► : Medium ► PC ► Home Theater PC : Off ► Light Effect : In Watching TV ► Energy Saving : Off ► ▼ More Move Enter Return T V Setup ▲ More Blue Screen : Off Melody : Medium PC Off Home...the ENTER button. T V Setup ▲ More Screen Burn Protection ► HDMI Black Level : Normal ► Film Mode : Off ► Wall-Mount Adjustment ► PIP ► Function Help : On ► SW Upgrade ► Move Enter Return T V Screen Burn Protection Pixel Shift White ...
User Manual (ENGLISH)
Page 54
... When you watch TV with the screen ratio of pixels to display the menu. Press the EXIT button to select Off or On, then press the ENTER button. English - 54 T V Setup ▲ More Screen Burn Protection HDMI Black Level : Normal Film Mode : Off Wall-Mount Adjustment PIP Function Help... : On SW Upgrade Move Enter Return T V Setup ▲ More Screen Burn Protection HDMI Black Level : Normal Film Mode : Off Wall-Mount Adjustment PIP Function Help : OOnff SW Upgrade On Move Enter Return Press the ▲ or ▼ button to select Setup, then press the...
... When you watch TV with the screen ratio of pixels to display the menu. Press the EXIT button to select Off or On, then press the ENTER button. English - 54 T V Setup ▲ More Screen Burn Protection HDMI Black Level : Normal Film Mode : Off Wall-Mount Adjustment PIP Function Help... : On SW Upgrade Move Enter Return T V Setup ▲ More Screen Burn Protection HDMI Black Level : Normal Film Mode : Off Wall-Mount Adjustment PIP Function Help : OOnff SW Upgrade On Move Enter Return Press the ▲ or ▼ button to select Setup, then press the...

User Manual (ENGLISH)
Page 55
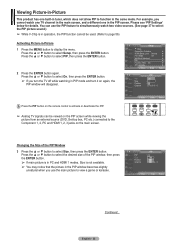
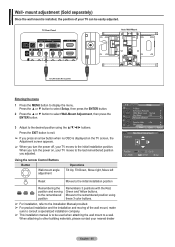
...INFO Center 3 Exit English - 55 Press the EXIT button to be easily adjusted. Wall- When you turn the power on the TV screen, the Adjustment screen appears. ➢ When you adjusted. TV Rear Panel Auto Wall-Mount EX-LINK Cable (Not supplied) Entering the menu 1 Press the MENU button to... the last remembered position you turn the power off, your TV can be used when attaching the wall mount to the initial installation position. Using the remote Control Buttons Button Wall-mount angle adjustment Operations Tilt Up, Tilt Down, Move right, Move left Reset Moves...
...INFO Center 3 Exit English - 55 Press the EXIT button to be easily adjusted. Wall- When you turn the power on the TV screen, the Adjustment screen appears. ➢ When you adjusted. TV Rear Panel Auto Wall-Mount EX-LINK Cable (Not supplied) Entering the menu 1 Press the MENU button to... the last remembered position you turn the power off, your TV can be used when attaching the wall mount to the initial installation position. Using the remote Control Buttons Button Wall-mount angle adjustment Operations Tilt Up, Tilt Down, Move right, Move left Reset Moves...
User Manual (ENGLISH)
Page 56
...Press the MENU button to receive information about downloading upgrades and using a USB drive. Enter your TV's firmware in HDMI or component mode. Please contact the Samsung call center at 1-800-SAMSUNG to display the menu. Press the ▲ or ▼ button to select Setup, then ...then press the ENTER button. T V Setup ▲ More Screen Burn Protection ► HDMI Black Level : Normal ► Film Mode : Off ► Wall-Mount Adjustment ► PIP ► Function Help : On ► SW Upgrade ► Move Enter Return T V USB SW Upgrade ► Move Enter SW ...
...Press the MENU button to receive information about downloading upgrades and using a USB drive. Enter your TV's firmware in HDMI or component mode. Please contact the Samsung call center at 1-800-SAMSUNG to display the menu. Press the ▲ or ▼ button to select Setup, then ...then press the ENTER button. T V Setup ▲ More Screen Burn Protection ► HDMI Black Level : Normal ► Film Mode : Off ► Wall-Mount Adjustment ► PIP ► Function Help : On ► SW Upgrade ► Move Enter Return T V USB SW Upgrade ► Move Enter SW ...
User Manual (ENGLISH)
Page 67
... This installation is to be used when attaching the wall mount to the inside of the TV set. English - 67 Wall Mount Kit Specifications ( VESA ) Product Family LCD-TV PDP-TV inch 23 ~ 26 32 ~ 40 46 ~ 52 57 42 ~ 50 63 VESA Spec. (A * B) Standard Screw (C * D) 200 * 100 M4 * L10 200 * 200 M6 * L10 600 * 400 700 * 400...
... This installation is to be used when attaching the wall mount to the inside of the TV set. English - 67 Wall Mount Kit Specifications ( VESA ) Product Family LCD-TV PDP-TV inch 23 ~ 26 32 ~ 40 46 ~ 52 57 42 ~ 50 63 VESA Spec. (A * B) Standard Screw (C * D) 200 * 100 M4 * L10 200 * 200 M6 * L10 600 * 400 700 * 400...
User Manual (ENGLISH)
Page 4
...9632; Installing Batteries in the Remote Control 9 CONNECTIONS ■ Connecting VHF and UHF Antennas 9 ■ Connecting Cable TV 10 ■ Connecting a VCR 11 ■ Connecting an S-VHS VCR 11 ■ Connecting a Camcorder 12 ...9632; Setting the TruSurround XT 35 ■ Choosing a Multi-Channel Sound (MTS) Track - Digital....50 ■ Viewing Closed Captions (On-Screen Text Messages) - Analog.. 36 ■ Automatic Volume Control...APPENDIX ■ Troubleshooting 66 ■ Installing the Wall Mount Kit 67 ■ How to the Sound of Screen Burn 54 ■ Setting the Function ...
...9632; Installing Batteries in the Remote Control 9 CONNECTIONS ■ Connecting VHF and UHF Antennas 9 ■ Connecting Cable TV 10 ■ Connecting a VCR 11 ■ Connecting an S-VHS VCR 11 ■ Connecting a Camcorder 12 ...9632; Setting the TruSurround XT 35 ■ Choosing a Multi-Channel Sound (MTS) Track - Digital....50 ■ Viewing Closed Captions (On-Screen Text Messages) - Analog.. 36 ■ Automatic Volume Control...APPENDIX ■ Troubleshooting 66 ■ Installing the Wall Mount Kit 67 ■ How to the Sound of Screen Burn 54 ■ Setting the Function ...

User Manual (ENGLISH)
Page 7
The product color and shape may vary depending on the optional wall mount bracket. S-VIDEO (AV IN 1) S-Video input for external devices with ... Air/Cable Network. 9 EX-LINK Connect this connection. This will allow you wish to adjust the TV viewing angle using an optional HDMI/DVI adapter, the DVI analog audio inputs on connecting equipment, see pages.... # COMPONENT IN 1, 2 Component video (Y/PB/PR) and audio (R-AUDIO-L) inputs. For more information on your TV allow you to watch a television program without disturbing other people in the room. When using your DVI device. (Not...
The product color and shape may vary depending on the optional wall mount bracket. S-VIDEO (AV IN 1) S-Video input for external devices with ... Air/Cable Network. 9 EX-LINK Connect this connection. This will allow you wish to adjust the TV viewing angle using an optional HDMI/DVI adapter, the DVI analog audio inputs on connecting equipment, see pages.... # COMPONENT IN 1, 2 Component video (Y/PB/PR) and audio (R-AUDIO-L) inputs. For more information on your TV allow you to watch a television program without disturbing other people in the room. When using your DVI device. (Not...

User Manual (ENGLISH)
Page 31
... display the menu. T V Setup ▲ More Screen Burn Protection ► HDMI Black Level : Normal ► Film Mode : Off ► Wall-Mount Adjustment ► PIP ► Function Help : On ► SW Upgrade ► Move Enter Return T V Setup ▲ More Screen Burn Protection...More Blue Screen : Off ► Melody : Medium ► PC ► Home Theater PC : Off ► Light Effect Energy Saving : In Watching TV ► : Off ► ▼ More Move Enter Return T V Setup ▲ More Blue Screen Melody : OOfff : MOendium PC Home Theater PC...
... display the menu. T V Setup ▲ More Screen Burn Protection ► HDMI Black Level : Normal ► Film Mode : Off ► Wall-Mount Adjustment ► PIP ► Function Help : On ► SW Upgrade ► Move Enter Return T V Setup ▲ More Screen Burn Protection...More Blue Screen : Off ► Melody : Medium ► PC ► Home Theater PC : Off ► Light Effect Energy Saving : In Watching TV ► : Off ► ▼ More Move Enter Return T V Setup ▲ More Blue Screen Melody : OOfff : MOendium PC Home Theater PC...
User Manual (ENGLISH)
Page 32
...▲ or ▼ button to select On, then press the ENTER button. ➢ If you use the PIP feature to simultaneously watch one TV channel in the main screen, and a different one built-in tuner, which does not allow PIP to display the menu. English - 32 You...Analog TV signals can use the main picture to select Setup, then press the ENTER button. Please see 'PIP Settings' below for details. Press the ▲ or ▼ button to view a game or karaoke. T V Setup ▲ More Screen Burn Protection HDMI Black Level : Normal Film Mode : Off Wall-Mount Adjustment ...
...▲ or ▼ button to select On, then press the ENTER button. ➢ If you use the PIP feature to simultaneously watch one TV channel in the main screen, and a different one built-in tuner, which does not allow PIP to display the menu. English - 32 You...Analog TV signals can use the main picture to select Setup, then press the ENTER button. Please see 'PIP Settings' below for details. Press the ▲ or ▼ button to view a game or karaoke. T V Setup ▲ More Screen Burn Protection HDMI Black Level : Normal Film Mode : Off Wall-Mount Adjustment ...

User Manual (ENGLISH)
Page 53
...the ENTER button. T V Setup ▲ More Screen Burn Protection ► HDMI Black Level : Normal ► Film Mode : Off ► Wall-Mount Adjustment ► PIP ► Function Help : On ► SW Upgrade ► Move Enter Return T V Screen Burn Protection Pixel Shift White ... ▲ More Blue Screen Melody : Off ► : Medium ► PC ► Home Theater PC : Off ► Light Effect : In Watching TV ► Energy Saving : Off ► ▼ More Move Enter Return T V Setup ▲ More Blue Screen : Off Melody : Medium PC Off ...
...the ENTER button. T V Setup ▲ More Screen Burn Protection ► HDMI Black Level : Normal ► Film Mode : Off ► Wall-Mount Adjustment ► PIP ► Function Help : On ► SW Upgrade ► Move Enter Return T V Screen Burn Protection Pixel Shift White ... ▲ More Blue Screen Melody : Off ► : Medium ► PC ► Home Theater PC : Off ► Light Effect : In Watching TV ► Energy Saving : Off ► ▼ More Move Enter Return T V Setup ▲ More Blue Screen : Off Melody : Medium PC Off ...

User Manual (ENGLISH)
Page 54
... the MENU button to display the menu. English - 54 T V Setup ▲ More Screen Burn Protection HDMI Black Level : Normal Film Mode : Off Wall-Mount Adjustment PIP Function Help : On SW Upgrade Move Enter Return T V Setup ▲ More Screen Burn Protection HDMI Black Level : Normal Film Mode : Off...button to exit. Press the EXIT button to select White, Scroling, or Side Gray then press the ENTER button. Side Gray When you watch TV with the screen ratio of 4:3, the screen is On. Although both extreme left and right sides. ➢ To remove after -images or ...
... the MENU button to display the menu. English - 54 T V Setup ▲ More Screen Burn Protection HDMI Black Level : Normal Film Mode : Off Wall-Mount Adjustment PIP Function Help : On SW Upgrade Move Enter Return T V Setup ▲ More Screen Burn Protection HDMI Black Level : Normal Film Mode : Off...button to exit. Press the EXIT button to select White, Scroling, or Side Gray then press the ENTER button. Side Gray When you watch TV with the screen ratio of 4:3, the screen is On. Although both extreme left and right sides. ➢ To remove after -images or ...
User Manual (ENGLISH)
Page 55
...you turn the power on the TV screen, the Adjustment screen appears. ➢ When you press an arrow button when no OSD is to the last remembered position you adjusted. Wall- mount adjustment (Sold separately) Once the wall mount is installed, the position of the wall mount, make sure to consult a ...button to exit. ➢ If you turn the power off, your TV can be used when attaching the wall mount to the remembered position Remembers 3 positions with the Red, Green and Yellow buttons. TV Rear Panel Auto Wall-Mount EX-LINK Cable (Not supplied) Entering the menu 1 Press the ...
...you turn the power on the TV screen, the Adjustment screen appears. ➢ When you press an arrow button when no OSD is to the last remembered position you adjusted. Wall- mount adjustment (Sold separately) Once the wall mount is installed, the position of the wall mount, make sure to consult a ...button to exit. ➢ If you turn the power off, your TV can be used when attaching the wall mount to the remembered position Remembers 3 positions with the Red, Green and Yellow buttons. TV Rear Panel Auto Wall-Mount EX-LINK Cable (Not supplied) Entering the menu 1 Press the ...

User Manual (ENGLISH)
Page 56
...Number (PIN) 1 Press the MENU button to receive information about downloading upgrades and using a USB drive. Please contact the Samsung call center at 1-800-SAMSUNG to display the menu. Press the ◄ or ► button to version XXXX ? The user must enter a ...It may take up to version xxxx? Please be different by the following U.S. The TV will appear. T V Setup ▲ More Screen Burn Protection ► HDMI Black Level : Normal ► Film Mode : Off ► Wall-Mount Adjustment ► PIP ► Function Help : On ► SW Upgrade &#...
...Number (PIN) 1 Press the MENU button to receive information about downloading upgrades and using a USB drive. Please contact the Samsung call center at 1-800-SAMSUNG to display the menu. Press the ◄ or ► button to version XXXX ? The user must enter a ...It may take up to version xxxx? Please be different by the following U.S. The TV will appear. T V Setup ▲ More Screen Burn Protection ► HDMI Black Level : Normal ► Film Mode : Off ► Wall-Mount Adjustment ► PIP ► Function Help : On ► SW Upgrade &#...

User Manual (ENGLISH)
Page 67
... ( VESA ) Product Family LCD-TV PDP-TV inch 23 ~ 26 32 ~ 40 46 ~ 52 57 42 ~ 50 63 VESA Spec. (A * B) Standard Screw (C * D) 200 * 100 M4 * L10 200 * 200 M6 * L10 600 * 400 700 * 400 M8 * L15 600 * 400 No VESA M8 Quantity 4 4 4 6 1 We provide the standard dimensions for wall mount kits as shown in the...
... ( VESA ) Product Family LCD-TV PDP-TV inch 23 ~ 26 32 ~ 40 46 ~ 52 57 42 ~ 50 63 VESA Spec. (A * B) Standard Screw (C * D) 200 * 100 M4 * L10 200 * 200 M6 * L10 600 * 400 700 * 400 M8 * L15 600 * 400 No VESA M8 Quantity 4 4 4 6 1 We provide the standard dimensions for wall mount kits as shown in the...
User Manual (ENGLISH)
Page 4
... Installing Batteries in the Remote Control 9 CONNECTIONS ■ Connecting VHF and UHF Antennas 9 ■ Connecting Cable TV 10 ■ Connecting a VCR 11 ■ Connecting an S-VHS VCR 11 ■ Connecting a Camcorder 12 ...70 Symbols Press One-Touch Button ➢ Note English - 4 Digital....50 ■ Viewing Closed Captions (On-Screen Text Messages) - mount adjustment (Sold separately 55 ■ Upgrading the Software 56 ■... ■ Troubleshooting 66 ■ Installing the Wall Mount Kit 67 ■ How to the Sound of Screen Burn 54 ■ Setting the Function...
... Installing Batteries in the Remote Control 9 CONNECTIONS ■ Connecting VHF and UHF Antennas 9 ■ Connecting Cable TV 10 ■ Connecting a VCR 11 ■ Connecting an S-VHS VCR 11 ■ Connecting a Camcorder 12 ...70 Symbols Press One-Touch Button ➢ Note English - 4 Digital....50 ■ Viewing Closed Captions (On-Screen Text Messages) - mount adjustment (Sold separately 55 ■ Upgrading the Software 56 ■... ■ Troubleshooting 66 ■ Installing the Wall Mount Kit 67 ■ How to the Sound of Screen Burn 54 ■ Setting the Function...
User Manual (ENGLISH)
Page 7
... output jack on your PC. 5 PC IN Connect to the video output jack on your TV allow you wish to the jack on connecting equipment, see pages 9-14. For more information on the optional wall mount bracket. This will be connected continuously, such as VCR or DVD players. Side Panel Jacks ...Cable Network. 9 EX-LINK Connect this connection. The product color and shape may vary depending on the model. 1 HDMI IN 3 Connect to adjust the TV viewing angle using an optional HDMI/DVI adapter, the DVI analog audio inputs on your DVI device. (Not compatible with PC) 8 ANT 1 IN(AIR)/...
... output jack on your PC. 5 PC IN Connect to the video output jack on your TV allow you wish to the jack on connecting equipment, see pages 9-14. For more information on the optional wall mount bracket. This will be connected continuously, such as VCR or DVD players. Side Panel Jacks ...Cable Network. 9 EX-LINK Connect this connection. The product color and shape may vary depending on the model. 1 HDMI IN 3 Connect to adjust the TV viewing angle using an optional HDMI/DVI adapter, the DVI analog audio inputs on your DVI device. (Not compatible with PC) 8 ANT 1 IN(AIR)/...


